1988 OPEL CALIBRA maintenance
[x] Cancel search: maintenancePage 157 of 525

31This engine is also fitted with an EGR
(exhaust gas recirculation) valve and
secondary air injection (AIR - Air Injection
Reactor), to conform to the latest European
exhaust emission limits (as from 1996). The
EGR returns a specific amount of exhaust gas
into the combustion process. This in turn
reduces the formation of nitrogen oxides
(No
x). The secondary air injection system has
an electrically driven air pump that injects air
into the exhaust manifold, reducing the
amount of CO and HC emissions.
2Fuel injection system -
precautions
The fuel injection system is pressurised,
therefore extra care must be taken when
disconnecting fuel lines. When disconnecting
a fuel line union, loosen the union slowly, to
avoid a sudden release of pressure that may
cause fuel to spray out.
Fuel pressure checking must be entrusted
to a Vauxhall dealer, or other specialist, who
has the necessary special equipment.
3System testing - general
3
General
1Apart from basic electrical tests, there is
nothing that can be done by the owner to test
individual fuel system components.2If a fault arises, check first that it is not due
to poor maintenance. Check that the air
cleaner filter element is clean, the spark plugs
are in good condition and correctly gapped.
Check also that the engine breather hoses are
clear and undamaged and that the throttle
cable is correctly adjusted. If the engine is
running very roughly, check the compression
pressures (Chapter 1) and remember the
possibility that one of the hydraulic tappets
might be faulty, producing an incorrect valve
clearance.
3If the fault is thought to be due to a dirty
injector, it is worth trying one of the
established injector-cleaning treatments
before renewing, perhaps unnecessarily, the
injector.
4If the fault persists, check the ignition
system components (as far as possible).
5If the fault is still not eliminated, work
methodically through the system, checking all
fuses, wiring connectors and wiring, looking
for any signs of poor connections, dampness,
corrosion, dirt or other faults.
6Once the system components have been
checked for signs of obvious faults, take the
vehicle to a Vauxhall dealer for the full system
to be tested on special equipment.
7Do not attempt to “test” any component,
but particularly the ECU, with anything other
than the correct test equipment, available at a
Vauxhall dealer. If any of the wires to be
checked lead to a component such as the
ECU, always first unplug the relevant
connector from the system components so
that there is no risk of the component being
damaged by the application of incorrect
voltages from test equipment.
4Air cleaner - removal and
refitting
2
Note:If ‘round type’ air filter is fitted, follow
procedure in Chapter 4A.
Removal
1Unclip the coolant expansion tank hose
from the air cleaner cover, and move it to one
side out of the way.2Loosen the clamp screw and disconnect
the air trunking from the airflow meter (see
illustration).
3Disconnect the battery negative lead, then
disconnect the wiring plug from the airflow
meter.
4Release the two securing clips from the left-
hand side of the air cleaner cover, and
unscrew the two captive securing screws
from the right-hand side, then lift off the
cover.
5Lift out the filter element.
6Loosen the preheat hoses, fastening nuts.
7Undo the nuts securing the 2 rubber block
studs which are secured through the lower
half of the air cleaner housing.
8Some models are fitted with an inlet air
resonance box, to reduce induction noise.
This box is located under the wheel arch, and
connects to a pipe on the air inlet tube.
9The resonance box must be removed
before the air inlet tube can be removed. To
do this, first apply the handbrake, then jack up
the front of the vehicle, and support securely
on axle stands placed under the body side
members.
10Remove the securing screws, and
withdraw the lower splash shield from the
wing to expose the resonance box.
11Unscrew the single securing screw, and
pull the resonance box from the connector
tube (see illustrations).
12If desired, the air inlet tube can be
removed after pulling off the connector tube
from under the wing (see illustration).
4B•4Fuel and exhaust systems - fuel injection models
4.12 Removing the resonance box
connector tube4.11B . . . and withdraw the resonance box4.11A Remove the securing screw . . .
4.2 Loosening the air trunking clamp
screw at the airflow meter
Warning: Many of the
procedures in this sub-Section
require the removal of fuel lines
and connections that may result
in some fuel spillage. Before carrying out
any operation on the fuel system refer to
the precautions given in Safety first! at
the beginning of this Manual and follow
them implicitly. Petrol is a highly
dangerous and volatile liquid, and the
precautions necessary when handling it
cannot be overstressed.
Page 172 of 525
1
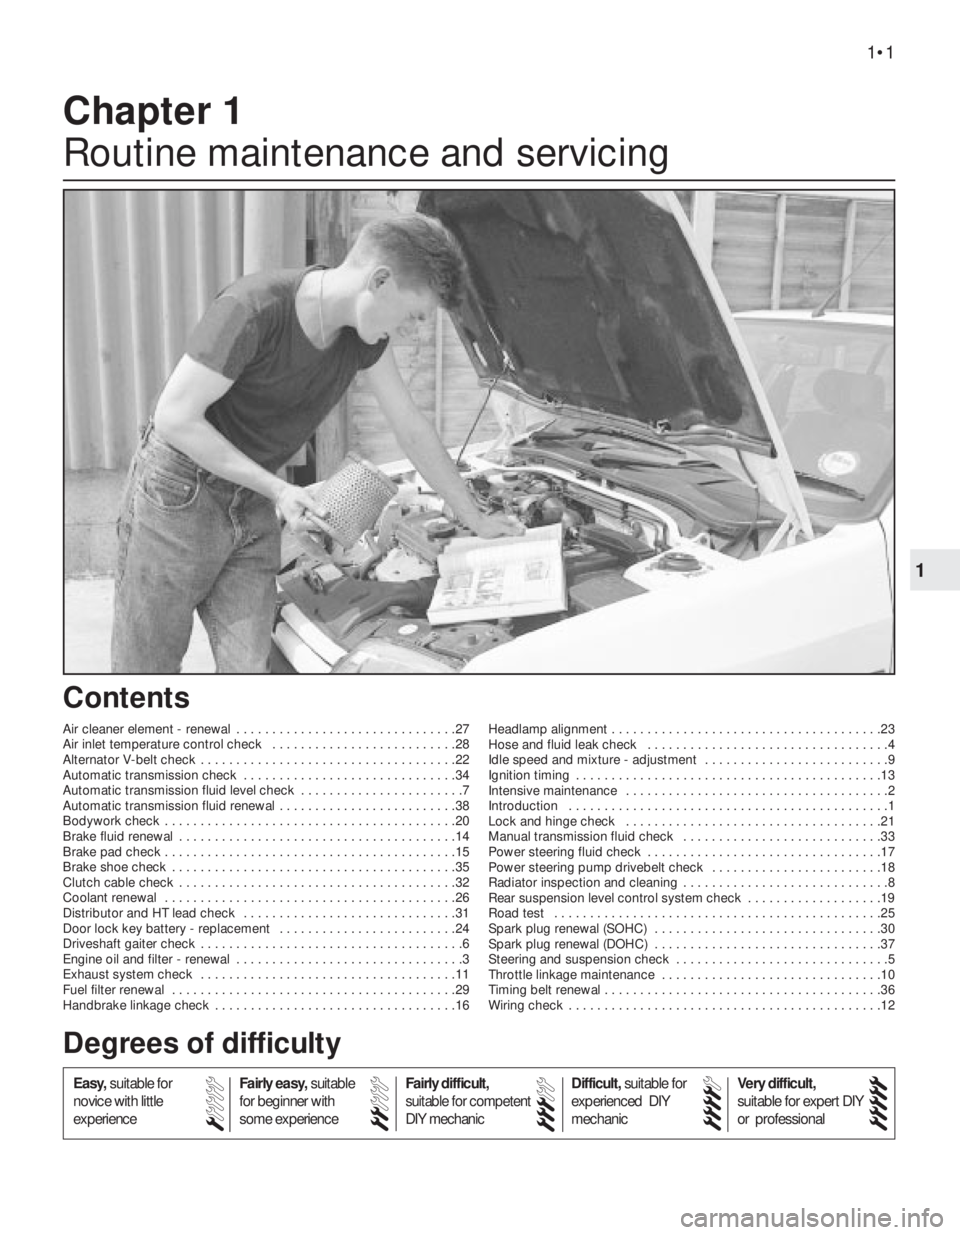
Chapter 1
Routine maintenance and servicing
Air cleaner element - renewal . . . . . . . . . . . . . . . . . . . . . . . . . . . . . . .27
Air inlet temperature control check . . . . . . . . . . . . . . . . . . . . . . . . . .28
Alternator V-belt check . . . . . . . . . . . . . . . . . . . . . . . . . . . . . . . . . . . .22
Automatic transmission check . . . . . . . . . . . . . . . . . . . . . . . . . . . . . .34
Automatic transmission fluid level check . . . . . . . . . . . . . . . . . . . . . . .7
Automatic transmission fluid renewal . . . . . . . . . . . . . . . . . . . . . . . . .38
Bodywork check . . . . . . . . . . . . . . . . . . . . . . . . . . . . . . . . . . . . . . . . .20
Brake fluid renewal . . . . . . . . . . . . . . . . . . . . . . . . . . . . . . . . . . . . . . .14
Brake pad check . . . . . . . . . . . . . . . . . . . . . . . . . . . . . . . . . . . . . . . . .15
Brake shoe check . . . . . . . . . . . . . . . . . . . . . . . . . . . . . . . . . . . . . . . .35
Clutch cable check . . . . . . . . . . . . . . . . . . . . . . . . . . . . . . . . . . . . . . .32
Coolant renewal . . . . . . . . . . . . . . . . . . . . . . . . . . . . . . . . . . . . . . . . .26
Distributor and HT lead check . . . . . . . . . . . . . . . . . . . . . . . . . . . . . .31
Door lock key battery - replacement . . . . . . . . . . . . . . . . . . . . . . . . .24
Driveshaft gaiter check . . . . . . . . . . . . . . . . . . . . . . . . . . . . . . . . . . . . .6
Engine oil and filter - renewal . . . . . . . . . . . . . . . . . . . . . . . . . . . . . . . .3
Exhaust system check . . . . . . . . . . . . . . . . . . . . . . . . . . . . . . . . . . . .11
Fuel filter renewal . . . . . . . . . . . . . . . . . . . . . . . . . . . . . . . . . . . . . . . .29
Handbrake linkage check . . . . . . . . . . . . . . . . . . . . . . . . . . . . . . . . . .16Headlamp alignment . . . . . . . . . . . . . . . . . . . . . . . . . . . . . . . . . . . . . .23
Hose and fluid leak check . . . . . . . . . . . . . . . . . . . . . . . . . . . . . . . . . .4
Idle speed and mixture - adjustment . . . . . . . . . . . . . . . . . . . . . . . . . .9
Ignition timing . . . . . . . . . . . . . . . . . . . . . . . . . . . . . . . . . . . . . . . . . . .13
Intensive maintenance . . . . . . . . . . . . . . . . . . . . . . . . . . . . . . . . . . . . .2
Introduction . . . . . . . . . . . . . . . . . . . . . . . . . . . . . . . . . . . . . . . . . . . . .1
Lock and hinge check . . . . . . . . . . . . . . . . . . . . . . . . . . . . . . . . . . . .21
Manual transmission fluid check . . . . . . . . . . . . . . . . . . . . . . . . . . . .33
Power steering fluid check . . . . . . . . . . . . . . . . . . . . . . . . . . . . . . . . .17
Power steering pump drivebelt check . . . . . . . . . . . . . . . . . . . . . . . .18
Radiator inspection and cleaning . . . . . . . . . . . . . . . . . . . . . . . . . . . . .8
Rear suspension level control system check . . . . . . . . . . . . . . . . . . .19
Road test . . . . . . . . . . . . . . . . . . . . . . . . . . . . . . . . . . . . . . . . . . . . . .25
Spark plug renewal (SOHC) . . . . . . . . . . . . . . . . . . . . . . . . . . . . . . . .30
Spark plug renewal (DOHC) . . . . . . . . . . . . . . . . . . . . . . . . . . . . . . . .37
Steering and suspension check . . . . . . . . . . . . . . . . . . . . . . . . . . . . . .5
Throttle linkage maintenance . . . . . . . . . . . . . . . . . . . . . . . . . . . . . . .10
Timing belt renewal . . . . . . . . . . . . . . . . . . . . . . . . . . . . . . . . . . . . . . .36
Wiring check . . . . . . . . . . . . . . . . . . . . . . . . . . . . . . . . . . . . . . . . . . . .12
1•1
Contents
Easy,suitable for
novice with little
experienceFairly easy,suitable
for beginner with
some experienceFairly difficult,
suitable for competent
DIY mechanic
Difficult,suitable for
experienced DIY
mechanicVery difficult,
suitable for expert DIY
or professional
Degrees of difficulty
54321
Page 174 of 525
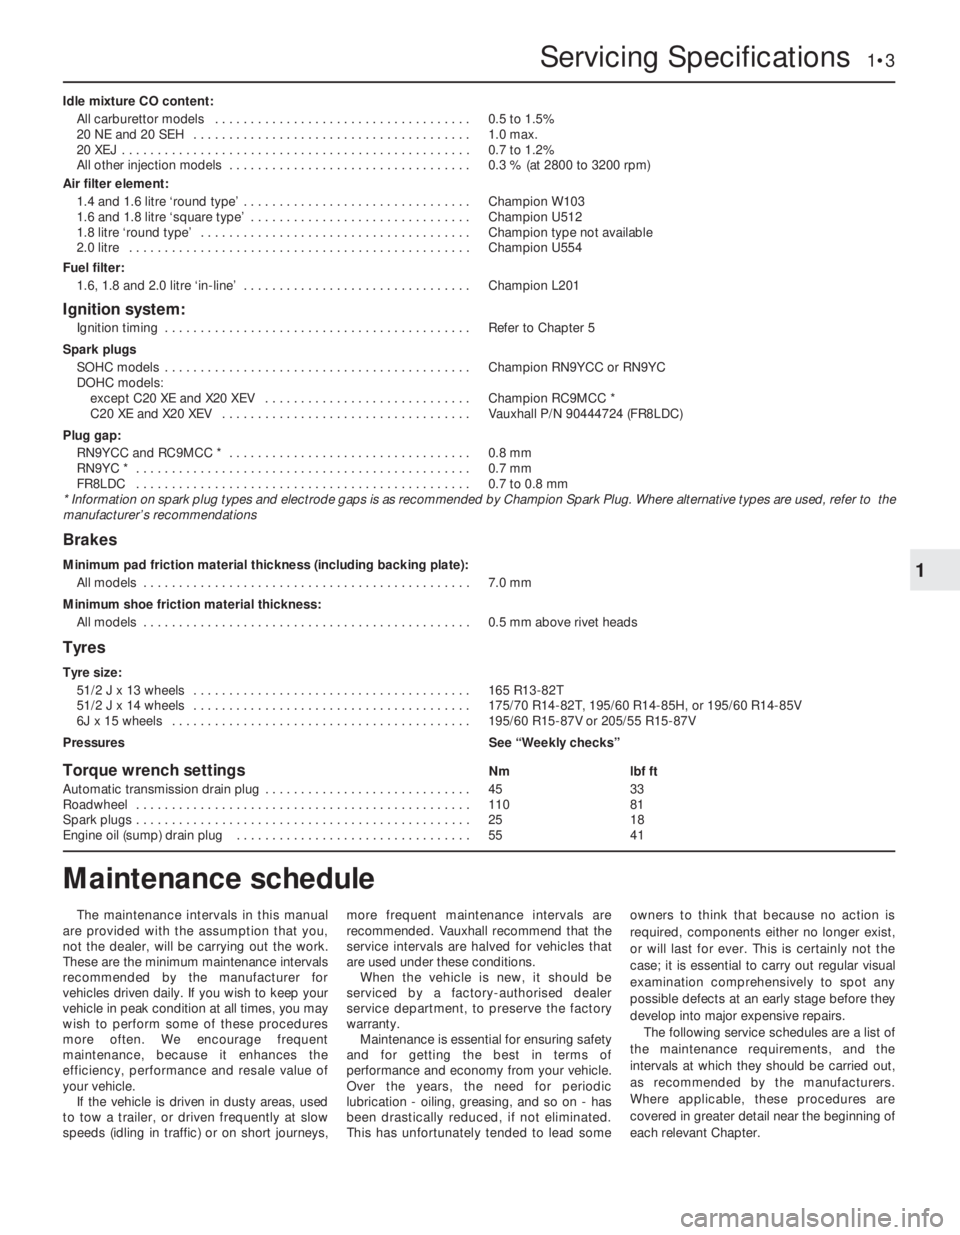
Idle mixture CO content:
All carburettor models . . . . . . . . . . . . . . . . . . . . . . . . . . . . . . . . . . . .0.5 to 1.5%
20 NE and 20 SEH . . . . . . . . . . . . . . . . . . . . . . . . . . . . . . . . . . . . . . .1.0 max.
20 XEJ . . . . . . . . . . . . . . . . . . . . . . . . . . . . . . . . . . . . . . . . . . . . . . . . .0.7 to 1.2%
All other injection models . . . . . . . . . . . . . . . . . . . . . . . . . . . . . . . . . .0.3 % (at 2800 to 3200 rpm)
Air filter element:
1.4 and 1.6 litre ‘round type’ . . . . . . . . . . . . . . . . . . . . . . . . . . . . . . . .Champion W103
1.6 and 1.8 litre ‘square type’ . . . . . . . . . . . . . . . . . . . . . . . . . . . . . . .Champion U512
1.8 litre ‘round type’ . . . . . . . . . . . . . . . . . . . . . . . . . . . . . . . . . . . . . .Champion type not available
2.0 litre . . . . . . . . . . . . . . . . . . . . . . . . . . . . . . . . . . . . . . . . . . . . . . . .Champion U554
Fuel filter:
1.6, 1.8 and 2.0 litre ‘in-line’ . . . . . . . . . . . . . . . . . . . . . . . . . . . . . . . .Champion L201
Ignition system:
Ignition timing . . . . . . . . . . . . . . . . . . . . . . . . . . . . . . . . . . . . . . . . . . .Refer to Chapter 5
Spark plugs
SOHC models . . . . . . . . . . . . . . . . . . . . . . . . . . . . . . . . . . . . . . . . . . .Champion RN9YCC or RN9YC
DOHC models:
except C20 XE and X20 XEV . . . . . . . . . . . . . . . . . . . . . . . . . . . . .Champion RC9MCC *
C20 XE and X20 XEV . . . . . . . . . . . . . . . . . . . . . . . . . . . . . . . . . . .Vauxhall P/N 90444724 (FR8LDC)
Plug gap:
RN9YCC and RC9MCC * . . . . . . . . . . . . . . . . . . . . . . . . . . . . . . . . . .0.8 mm
RN9YC * . . . . . . . . . . . . . . . . . . . . . . . . . . . . . . . . . . . . . . . . . . . . . . .0.7 mm
FR8LDC . . . . . . . . . . . . . . . . . . . . . . . . . . . . . . . . . . . . . . . . . . . . . . .0.7 to 0.8 mm
* Information on spark plug types and electrode gaps is as recommended by Champion Spark Plug. Where alternative types are used, refer to the
manufacturer’s recommendations
Brakes
Minimum pad friction material thickness (including backing plate):
All models . . . . . . . . . . . . . . . . . . . . . . . . . . . . . . . . . . . . . . . . . . . . . .7.0 mm
Minimum shoe friction material thickness:
All models . . . . . . . . . . . . . . . . . . . . . . . . . . . . . . . . . . . . . . . . . . . . . .0.5 mm above rivet heads
Tyres
Tyre size:
51/2 J x 13 wheels . . . . . . . . . . . . . . . . . . . . . . . . . . . . . . . . . . . . . . .165 R13-82T
51/2 J x 14 wheels . . . . . . . . . . . . . . . . . . . . . . . . . . . . . . . . . . . . . . .175/70 R14-82T, 195/60 R14-85H, or 195/60 R14-85V
6J x 15 wheels . . . . . . . . . . . . . . . . . . . . . . . . . . . . . . . . . . . . . . . . . .195/60 R15-87V or 205/55 R15-87V
PressuresSee “Weekly checks”
Torque wrench settingsNmlbf ft
Automatic transmission drain plug . . . . . . . . . . . . . . . . . . . . . . . . . . . . .4533
Roadwheel . . . . . . . . . . . . . . . . . . . . . . . . . . . . . . . . . . . . . . . . . . . . . . .11081
Spark plugs . . . . . . . . . . . . . . . . . . . . . . . . . . . . . . . . . . . . . . . . . . . . . . .2518
Engine oil (sump) drain plug . . . . . . . . . . . . . . . . . . . . . . . . . . . . . . . . .5541
Servicing Specifications 1•3
1
The maintenance intervals in this manual
are provided with the assumption that you,
not the dealer, will be carrying out the work.
These are the minimum maintenance intervals
recommended by the manufacturer for
vehicles driven daily. If you wish to keep your
vehicle in peak condition at all times, you may
wish to perform some of these procedures
more often. We encourage frequent
maintenance, because it enhances the
efficiency, performance and resale value of
your vehicle.
If the vehicle is driven in dusty areas, used
to tow a trailer, or driven frequently at slow
speeds (idling in traffic) or on short journeys,more frequent maintenance intervals are
recommended. Vauxhall recommend that the
service intervals are halved for vehicles that
are used under these conditions.
When the vehicle is new, it should be
serviced by a factory-authorised dealer
service department, to preserve the factory
warranty.
Maintenance is essential for ensuring safety
and for getting the best in terms of
performance and economy from your vehicle.
Over the years, the need for periodic
lubrication -oiling, greasing, and so on -has
been drastically reduced, if not eliminated.
This has unfortunately tended to lead someowners to think that because no action is
required, components either no longer exist,
or will last for ever. This is certainly not the
case; it is essential to carry out regular visual
examination comprehensively to spot any
possible defects at an early stage before they
develop into major expensive repairs.
The following service schedules are a list of
the maintenance requirements, and the
intervals at which they should be carried out,
as recommended by the manufacturers.
Where applicable, these procedures are
covered in greater detail near the beginning of
each relevant Chapter.
Maintenance schedule
Page 175 of 525
1•4Maintenance schedule
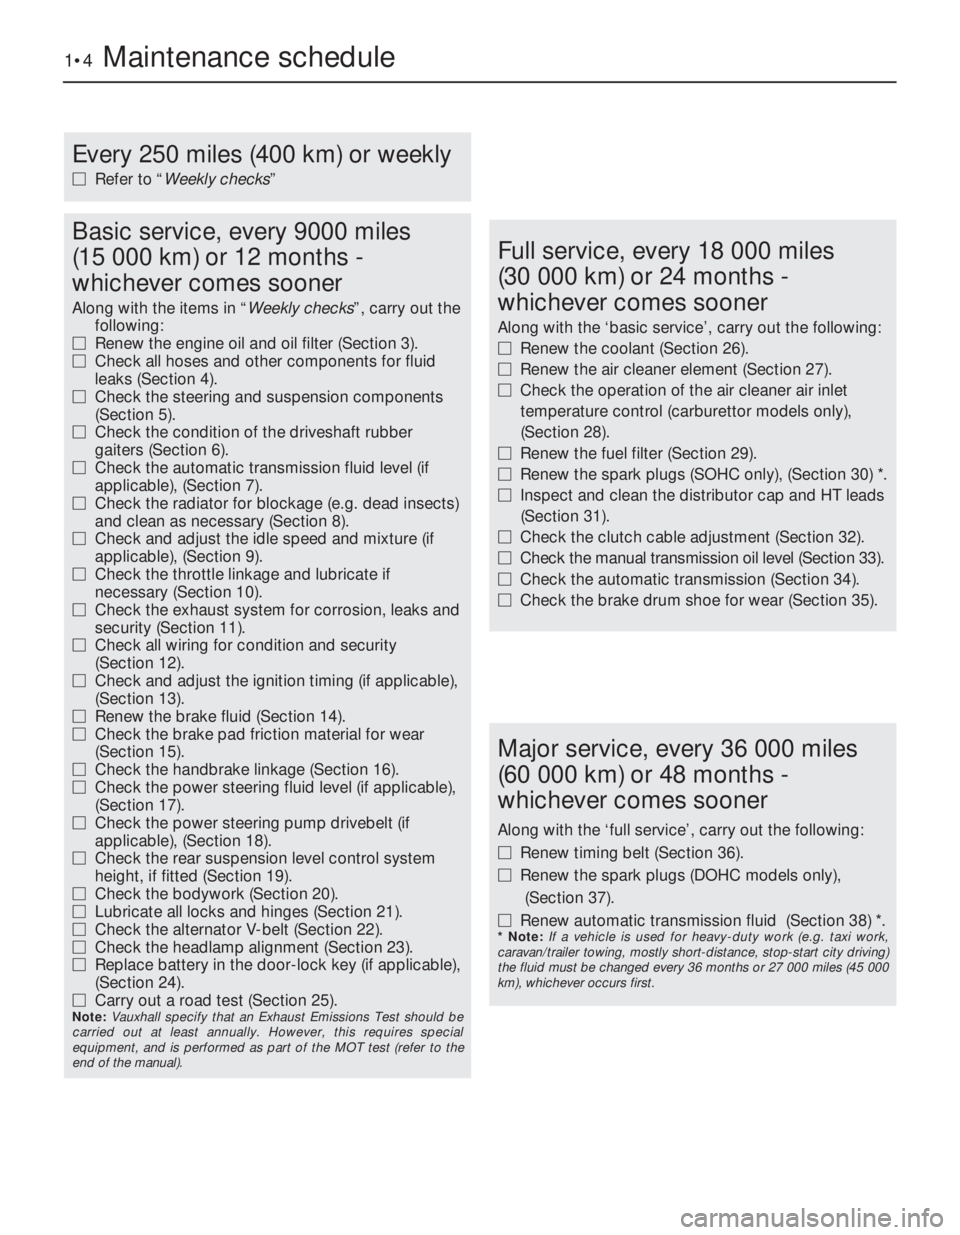
Every 250 miles (400 km) or weekly
MRefer to “Weekly checks”
Basic service, every 9000 miles
(15 000 km) or 12 months -
whichever comes sooner
Along with the items in “Weekly checks”, carry out the
following:
MRenew the engine oil and oil filter (Section 3).
MCheck all hoses and other components for fluid
leaks (Section 4).
MCheck the steering and suspension components
(Section 5).
MCheck the condition of the driveshaft rubber
gaiters (Section 6).
MCheck the automatic transmission fluid level (if
applicable), (Section 7).
MCheck the radiator for blockage (e.g. dead insects)
and clean as necessary (Section 8).
MCheck and adjust the idle speed and mixture (if
applicable), (Section 9).
MCheck the throttle linkage and lubricate if
necessary (Section 10).
MCheck the exhaust system for corrosion, leaks and
security (Section 11).
MCheck all wiring for condition and security
(Section 12).
MCheck and adjust the ignition timing (if applicable),
(Section 13).
MRenew the brake fluid (Section 14).
MCheck the brake pad friction material for wear
(Section 15).
MCheck the handbrake linkage (Section 16).
MCheck the power steering fluid level (if applicable),
(Section 17).
MCheck the power steering pump drivebelt (if
applicable), (Section 18).
MCheck the rear suspension level control system
height, if fitted (Section 19).
MCheck the bodywork (Section 20).
MLubricate all locks and hinges (Section 21).
MCheck the alternator V-belt (Section 22).
MCheck the headlamp alignment (Section 23).
MReplace battery in the door-lock key (if applicable),
(Section 24).
MCarry out a road test (Section 25).
Note: Vauxhall specify that an Exhaust Emissions Test should be
carried out at least annually. However, this requires special
equipment, and is performed as part of the MOT test (refer to the
end of the manual).
Full service, every 18 000 miles
(30 000 km) or 24 months -
whichever comes sooner
Along with the ‘basic service’, carry out the following:
MRenew the coolant (Section 26).
MRenew the air cleaner element (Section 27).
MCheck the operation of the air cleaner air inlet
temperature control (carburettor models only),
(Section 28).
MRenew the fuel filter (Section 29).
MRenew the spark plugs (SOHC only), (Section 30) *.
MInspect and clean the distributor cap and HT leads
(Section 31).
MCheck the clutch cable adjustment (Section 32).
MCheck the manual transmission oil level (Section 33).
MCheck the automatic transmission (Section 34).
MCheck the brake drum shoe for wear (Section 35).
Major service, every 36 000 miles
(60 000 km) or 48 months -
whichever comes sooner
Along with the ‘full service’, carry out the following:
MRenew timing belt (Section 36).
MRenew the spark plugs (DOHC models only),
(Section 37).
MRenew automatic transmission fluid (Section 38) *.
* Note: If a vehicle is used for heavy-duty work (e.g. taxi work,
caravan/trailer towing, mostly short-distance, stop-start city driving)
the fluid must be changed every 36 months or 27 000 miles (45 000
km), whichever occurs first.
Page 176 of 525
Maintenance - component location 1•5
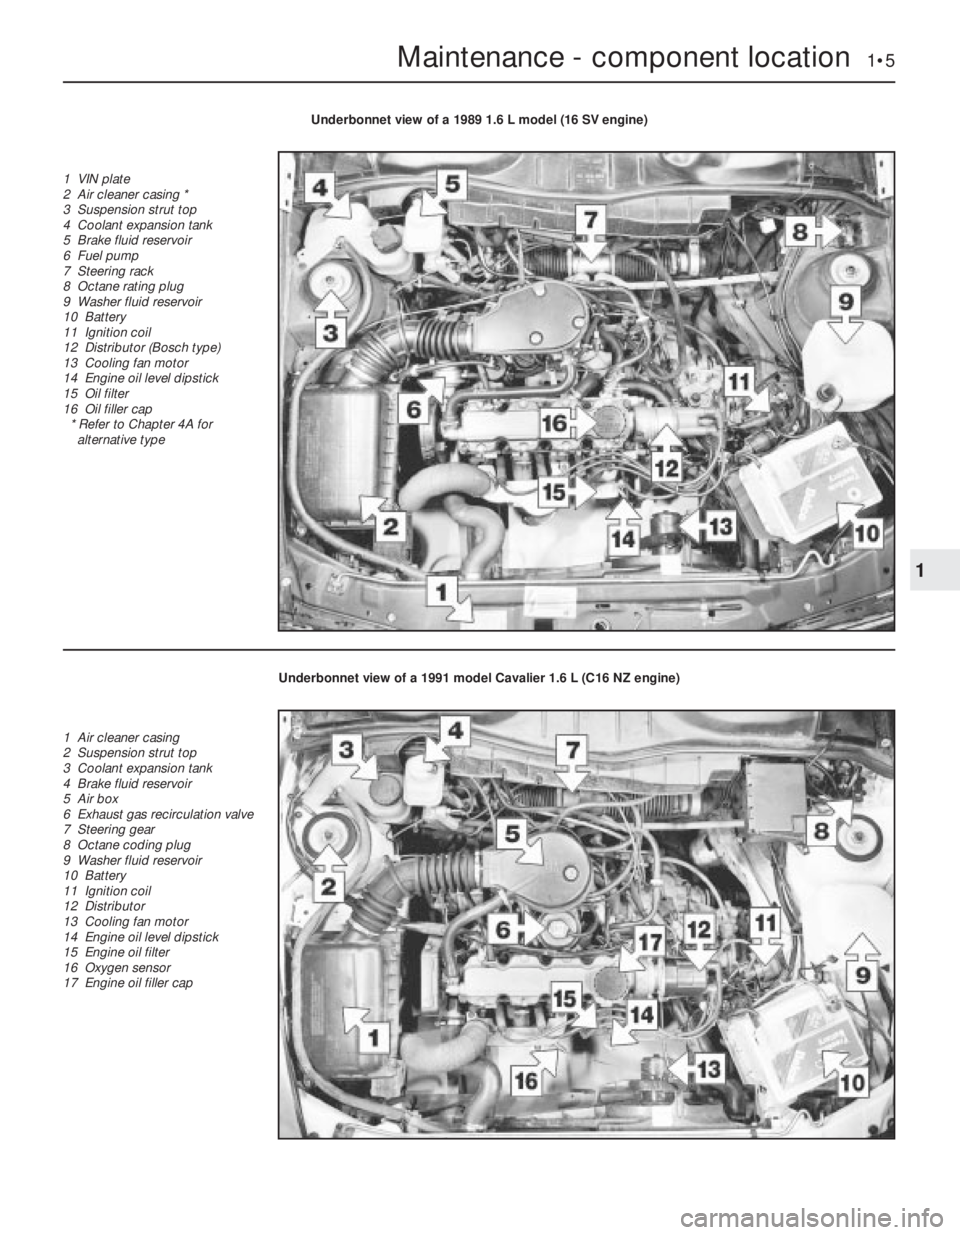
1
Underbonnet view of a 1989 1.6 L model (16 SV engine)
1 VIN plate
2 Air cleaner casing *
3 Suspension strut top
4 Coolant expansion tank
5 Brake fluid reservoir
6 Fuel pump
7 Steering rack
8 Octane rating plug
9 Washer fluid reservoir
10 Battery
11 Ignition coil
12 Distributor (Bosch type)
13 Cooling fan motor
14 Engine oil level dipstick
15 Oil filter
16 Oil filler cap
* Refer to Chapter 4A for
alternative type
Underbonnet view of a 1991 model Cavalier 1.6 L (C16 NZ engine)
1 Air cleaner casing
2 Suspension strut top
3 Coolant expansion tank
4 Brake fluid reservoir
5 Air box
6 Exhaust gas recirculation valve
7 Steering gear
8 Octane coding plug
9 Washer fluid reservoir
10 Battery
11 Ignition coil
12 Distributor
13 Cooling fan motor
14 Engine oil level dipstick
15 Engine oil filter
16 Oxygen sensor
17 Engine oil filler cap
Page 177 of 525
1•6Maintenance - component location
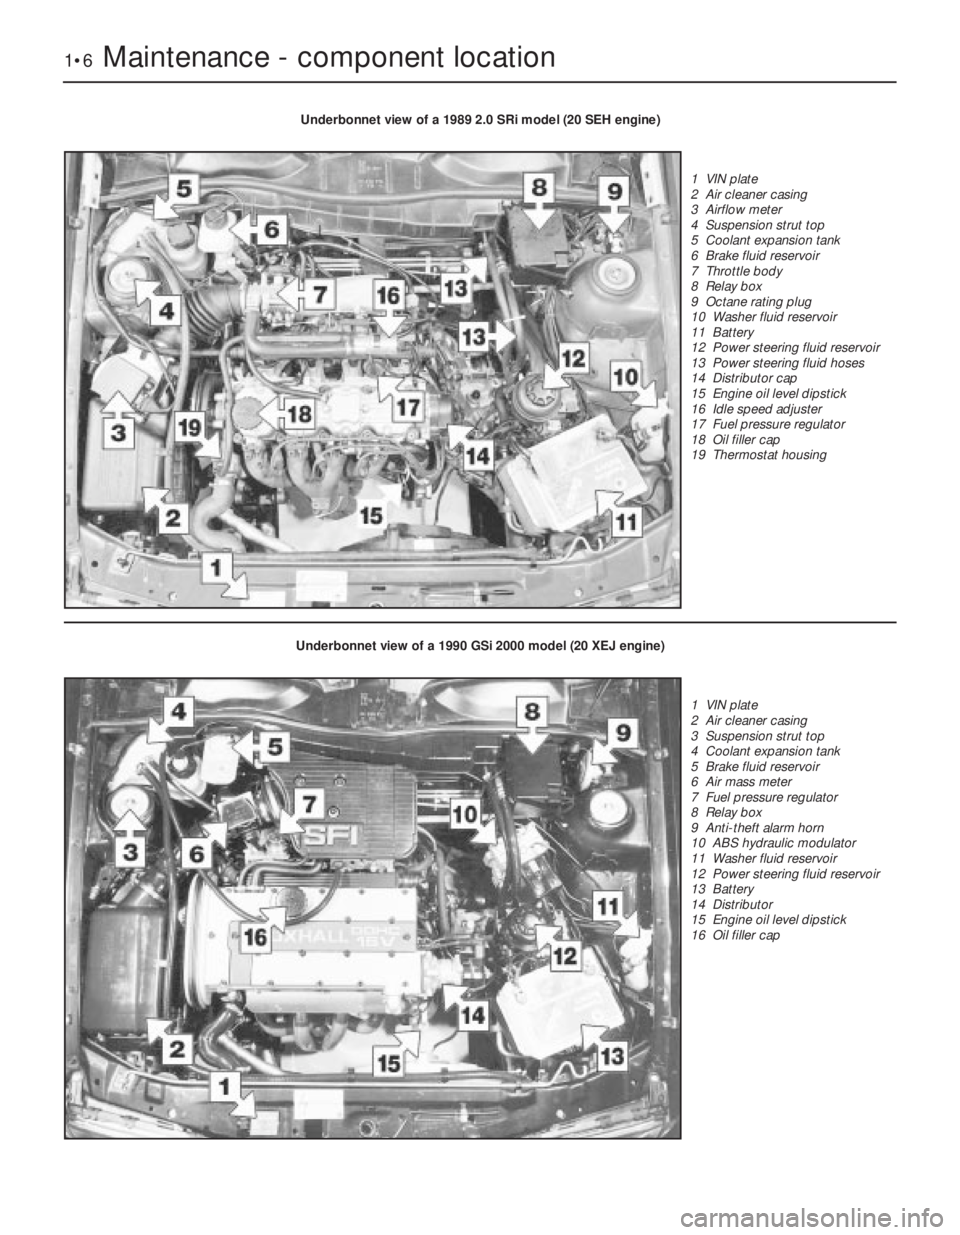
Underbonnet view of a 1989 2.0 SRi model (20 SEH engine)
1 VIN plate
2 Air cleaner casing
3 Airflow meter
4 Suspension strut top
5 Coolant expansion tank
6 Brake fluid reservoir
7 Throttle body
8 Relay box
9 Octane rating plug
10 Washer fluid reservoir
11 Battery
12 Power steering fluid reservoir
13 Power steering fluid hoses
14 Distributor cap
15 Engine oil level dipstick
16 Idle speed adjuster
17 Fuel pressure regulator
18 Oil filler cap
19 Thermostat housing
Underbonnet view of a 1990 GSi 2000 model (20 XEJ engine)
1 VIN plate
2 Air cleaner casing
3 Suspension strut top
4 Coolant expansion tank
5 Brake fluid reservoir
6 Air mass meter
7 Fuel pressure regulator
8 Relay box
9 Anti-theft alarm horn
10 ABS hydraulic modulator
11 Washer fluid reservoir
12 Power steering fluid reservoir
13 Battery
14 Distributor
15 Engine oil level dipstick
16 Oil filler cap
Page 178 of 525
Maintenance - component location 1•7
1
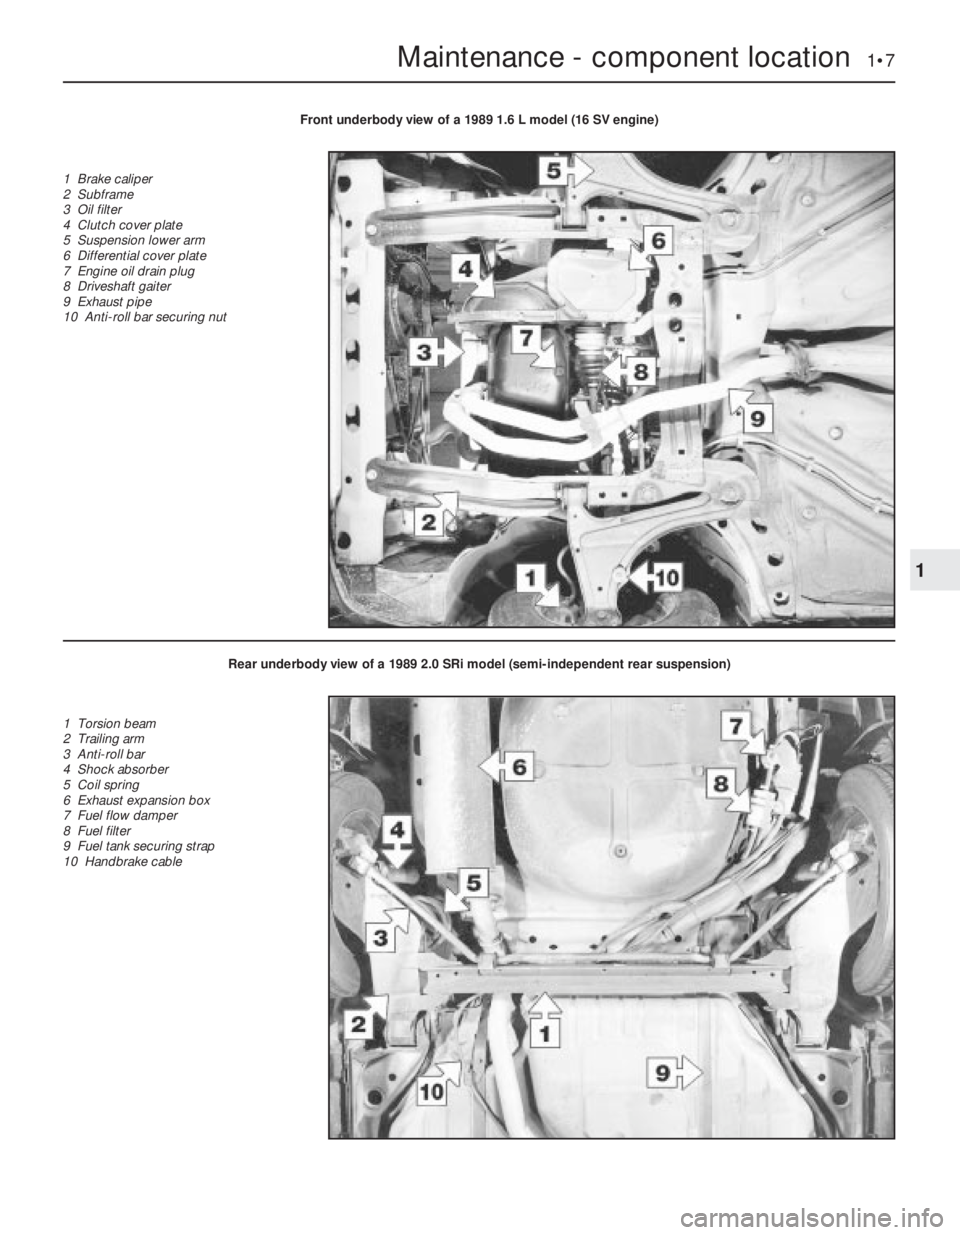
Front underbody view of a 1989 1.6 L model (16 SV engine)
1 Brake caliper
2 Subframe
3 Oil filter
4 Clutch cover plate
5 Suspension lower arm
6 Differential cover plate
7 Engine oil drain plug
8 Driveshaft gaiter
9 Exhaust pipe
10 Anti-roll bar securing nut
Rear underbody view of a 1989 2.0 SRi model (semi-independent rear suspension)
1 Torsion beam
2 Trailing arm
3 Anti-roll bar
4 Shock absorber
5 Coil spring
6 Exhaust expansion box
7 Fuel flow damper
8 Fuel filter
9 Fuel tank securing strap
10 Handbrake cable
Page 179 of 525

1Introduction
This Chapter is designed to help the home
mechanic maintain his/her vehicle for safety,
economy, long life and peak performance.
The Chapter contains a master maintenance
schedule, followed by Sections dealing specifically
with each task in the schedule. Visual checks,
adjustments, component renewal and other helpful
items are included. Refer to the accompanying
illustrations of the engine compartment and the
underside of the vehicle for the locations of the
various components.
Servicing your vehicle according to the
mileage/time maintenance schedule and the
following Sections will provide a planned
maintenance programme, which should result in a
long and reliable service life. This is a comprehensiveplan, so maintaining some items but not others at
the specified service intervals, will not produce the
same results.
As you service your vehicle, you will
discover that many of the procedures can -
and should - be grouped together, because of
the particular procedure being performed, or
because of the proximity of two otherwise-
unrelated components to one another. For
example, if the vehicle is raised for any
reason, the exhaust can be inspected at the
same time as the suspension and steering
components.
The first step in this maintenance
programme is to prepare yourself before the
actual work begins. Read through all the
Sections relevant to the work to be carried
out, then make a list and gather all the parts
and tools required. If a problem is found, seek
advice from a parts specialist, or a dealer
service department.
2Intensive maintenance
If, from the time the vehicle is new, routine
maintenance schedule is followed closely,
frequent checks made of fluid levels and high-
wear items, as recommended, the engine will
be kept in relatively good running condition.
The need for additional work will be minimised
It is possible that there will be times when
the engine is running poorly due to the lack of
regular maintenance. This is even more likely
if a used vehicle, which has not received
regular and frequent maintenance checks, is
purchased. In such cases, additional work
may need to be carried out, outside of the
regular maintenance intervals.
If engine wear is suspected, a compression
1•8Maintenance - component location
Rear underbody view of a 1990 GSi 2000 model (fully independent rear suspension)
1 Fuel tank securing strap
2 Shock absorber
3 ABS wheel sensor
4 Semi-trailing arm
5 Suspension crossmember
mounting bracing bracket
6 Handbrake cable
7 Suspension crossmember
8 Exhaust expansion box
9 Fuel pump
Maintenance procedures