1987 PORSCHE 944 change time
[x] Cancel search: change timePage 1 of 66
From http://www.9ss1.dk/porsche944
Driver's Manual
IMPORTANT For your own protection and longer
service life of your car, please heed all
operating instructions and special
warnings. Ignoring them could result in
serious mechanical failure or even
physical injury.
WKD 944021 8 M 6/86 Edition 87
© Dr. Ing. h. c. F. Porsche Aktiengesellschaft
All rights reserved.
Printed in Germany
Your car may have all or some of the
components described in this manual. Should
you find explanations of a feature or equipment
not installed in your car, your Porsche dealer will
be glad to assist you. Also check with your
dealer on other available options or accessories.
Text, illustrations and specifications in this
manual are based on the information available
at the time of printing.
It has always been Porsche's policy to
continuously improve its products. Porsche,
therefore, reserves the right to make changes in
design and specifications, and to make additions
or improvements in its product, without incurring
any obligation to install them on products
previously manufactured.
NOTE TO OWNERS
In Canada, this manual is also
available in French. To obtain a
copy contact your dealer or write to: NOTE AUX PROPRIETAIRES Au Canada on peut se procurer un
exemplaire de ce Manuel en fran-
gais aupres du concessionaire ou
du:
Volkswagen Canada Inc.
Porsche Customer Assistance /
Assistance a la Clientele Porsche1940 Eglinton Ave. East
Scarborough
Ontario M1L 2M2
1
Page 2 of 66
Judging by the car you have chosen, you are a
motorist of a special breed, and you are
probably no novice when it comes to
automobiles. Remember however that, as with
any vehicle, you should take time to familiarize
yourself with your Porsche and its performance characteristics. Always drive within your own
unique capabilities as a driver and your level of
experience with your Porsche. Ensure that
anyone else driving your Porsche does the
same. To prevent or minimize injury, always
use your safety belts. Never drink alcohol
before or while driving.
This Owner's Manual contains a host of useful
information. Please read this manual before
you drive your new Porsche. Acquaint yourself
with your car's features and know how to operate your Porsche more safely. The better
you know your Porsche, the more pleasure you will experience driving your new car. A separate Warranty and Maintenance booklet explains how you can keep your Porsche in top driving condition by having it serviced regularly.
It also contains detailed information about the warranties covering your Porsche. These warranties are:
"Warranty for new Porsche vehicles",
"Warranty against corrosion for new Porsche
vehicles", "Warranty for new Porsche vehicle
emission control system", "Emissions
performance warranty" (USA only), and
"California emission control system warranty"
(California USA only). In order to keep your
warranty in effect, you must have the vehicle maintained and serviced as prescribed in the
Warranty and Maintenance booklet provided to
you at the time of sale.
Always carry your Warranty & Maintenance
booklet with you when you take your Porsche
to an authorized dealer for service. It provides
your Service Adviser with the information he
needs and enables him to record each service.
If you sell your Porsche the Owner's Manual
and the Warranty & Maintenance booklet
should be left in the vehicle to make all
operating safety and maintenance information available to the next
owner.
If you change your address or if you bought this Porsche used be sure to send in a "Notice of Address Change"/ "Notice of Used Car Purchase" post card. This card can be found in
the Warranty & Maintenance booklet or
obtained from your Porsche dealer.
It is in your own interest that we can contact
you, should the need arise. In case any
adjustments or modifications need to be made
to your Porsche to maintain its safety.
For your own protection and longer service life
of your car, please heed all operating
instructions and special warnings. Ignoring
them could result in serious mechanical failure
or even physical injury.
We wish you many miles of safe and
pleasurable driving in your
2
3
Page 11 of 66
Air Bag System
The "Air Bag" in combination with the safety
belt makes up a passive safety system which
offers the driver and front seat passenger the
greatest known protection from injuries in
case of accident.
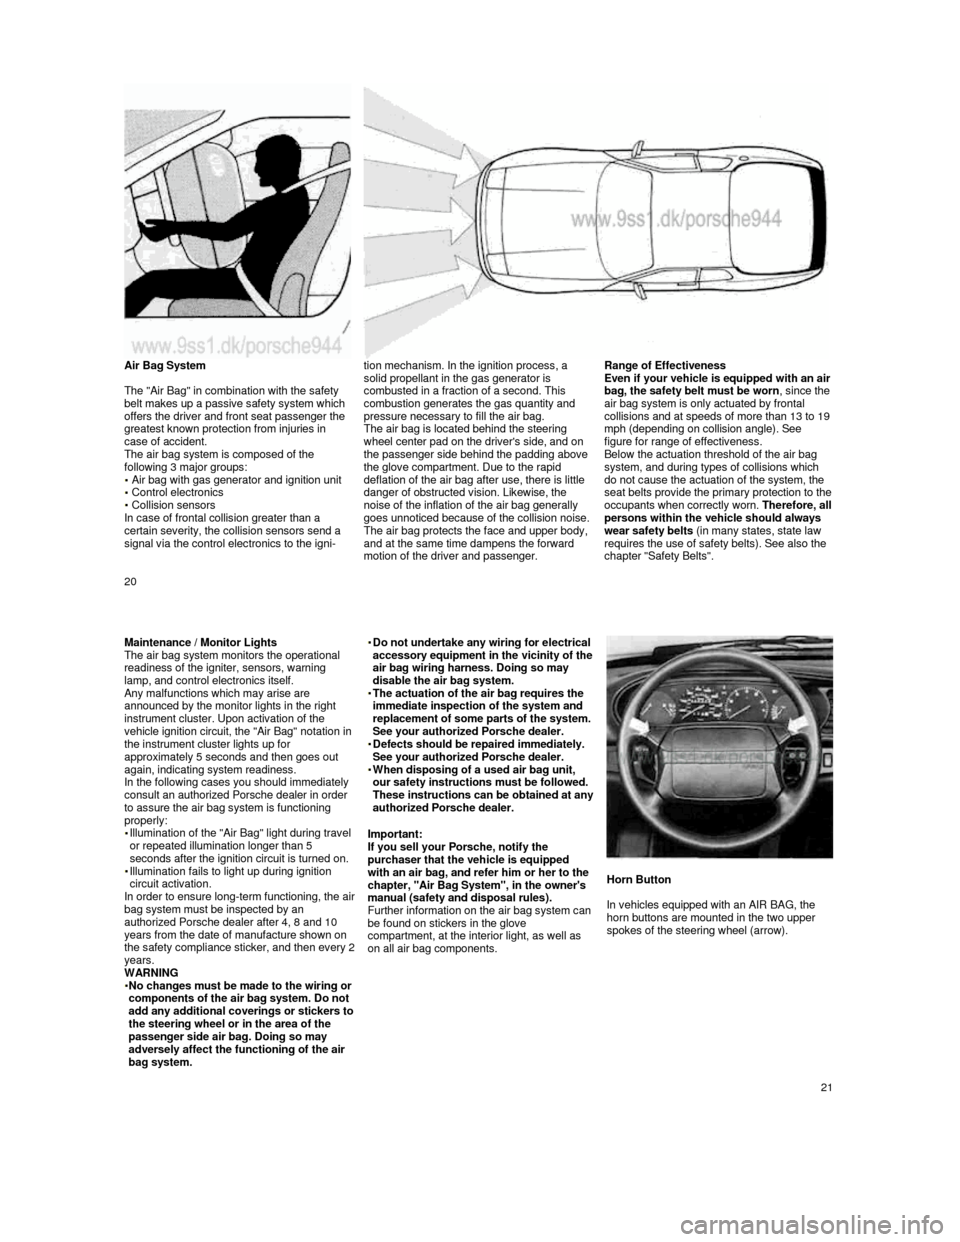
The air bag system is composed of the
following 3 major groups:
Air bag with gas generator and ignition unit Control electronics Collision sensors
In case of frontal collision greater than a
certain severity, the collision sensors send a
signal via the control electronics to the igni- tion mechanism. In the ignition process, a
solid propellant in the gas generator is
combusted in a fraction of a second. This
combustion generates the gas quantity and
pressure necessary to fill the air bag.
The air bag is located behind the steering
wheel center pad on the driver's side, and on the passenger side behind the padding above
the glove compartment. Due to the rapid
deflation of the air bag after use, there is little
danger of obstructed vision. Likewise, the
noise of the inflation of the air bag generally
goes unnoticed because of the collision noise. The air bag protects the face and upper body,
and at the same time dampens the forward
motion of the driver and passenger.
Range of Effectiveness Even if your vehicle is equipped with an air bag, the safety belt must be worn, since the air bag system is only actuated by frontal collisions and at speeds of more than 13 to 19 mph (depending on collision angle). See
figure for range of effectiveness.
Below the actuation threshold of the air bag
system, and during types of collisions which
do not cause the actuation of the system, the
seat belts provide the primary protection to the occupants when correctly worn. Therefore, all persons within the vehicle should always
wear safety belts (in many states, state law
requires the use of safety belts). See also the
chapter "Safety Belts".
20
Maintenance / Monitor Lights
The air bag system monitors the operational
readiness of the igniter, sensors, warning
lamp, and control electronics itself.
Any malfunctions which may arise are announced by the monitor lights in the right
instrument cluster. Upon activation of the
vehicle ignition circuit, the "Air Bag" notation in
the instrument cluster lights up for
approximately 5 seconds and then goes out
again, indicating system readiness.
In the following cases you should immediately
consult an authorized Porsche dealer in order
to assure the air bag system is functioning
properly:
Illumination of the "Air Bag" light during travel
or repeated illumination longer than 5
seconds after the ignition circuit is turned on.
Illumination fails to light up during ignition
circuit activation.
In order to ensure long-
term functioning, the air bag system must be inspected by an
authorized Porsche dealer after 4, 8 and 10
years from the date of manufacture shown on
the safety compliance sticker, and then every 2 years.
WARNING
No changes must be made to the wiring or components of the air bag system. Do not
add any additional coverings or stickers to the steering wheel or in the area of the
passenger side air bag. Doing so may
adversely affect the functioning of the air
bag system.
Do not undertake any wiring for electrical accessory equipment in the vicinity of the air bag wiring harness. Doing so may
disable the air bag system.
The actuation of the air bag requires the immediate inspection of the system and
replacement of some parts of the system.
See your authorized Porsche dealer.
Defects should be repaired immediately. See your authorized Porsche dealer. When disposing of a used air bag unit, our safety instructions must be followed. These instructions can be obtained at any authorized Porsche dealer.
Important:
If you sell your Porsche, notify the
purchaser that the vehicle is equipped
with an air bag, and refer him or her to the
chapter, "Air Bag System", in the owner's
manual (safety and disposal rules).
Further information on the air bag system can
be found on stickers in the glove
compartment, at the interior light, as well as
on all air bag components.
Horn Button
In vehicles equipped with an AIR BAG, the
horn buttons are mounted in the two upper
spokes of the steering wheel (arrow).
21
Page 16 of 66
Lane changer
To indicate your intention when changing
lanes on the highway, slightly push the turn
signal switch lever up or down to the point of
resistance. The lever will return to the OFF
position when released.
Headlight dimmer
With the light switch at stage 2, high beam is
switched on by pressing the lever towards the
instrument panel, and low beam is switched
on by pulling the lever towards the steering
wheel. When high beams are on, the blue indicator light between the tachometer and the right instrument cluster will light up.
You can flash signal other motorists by
repeatedly pulling and releasing the lever just
up to the point of resistance.
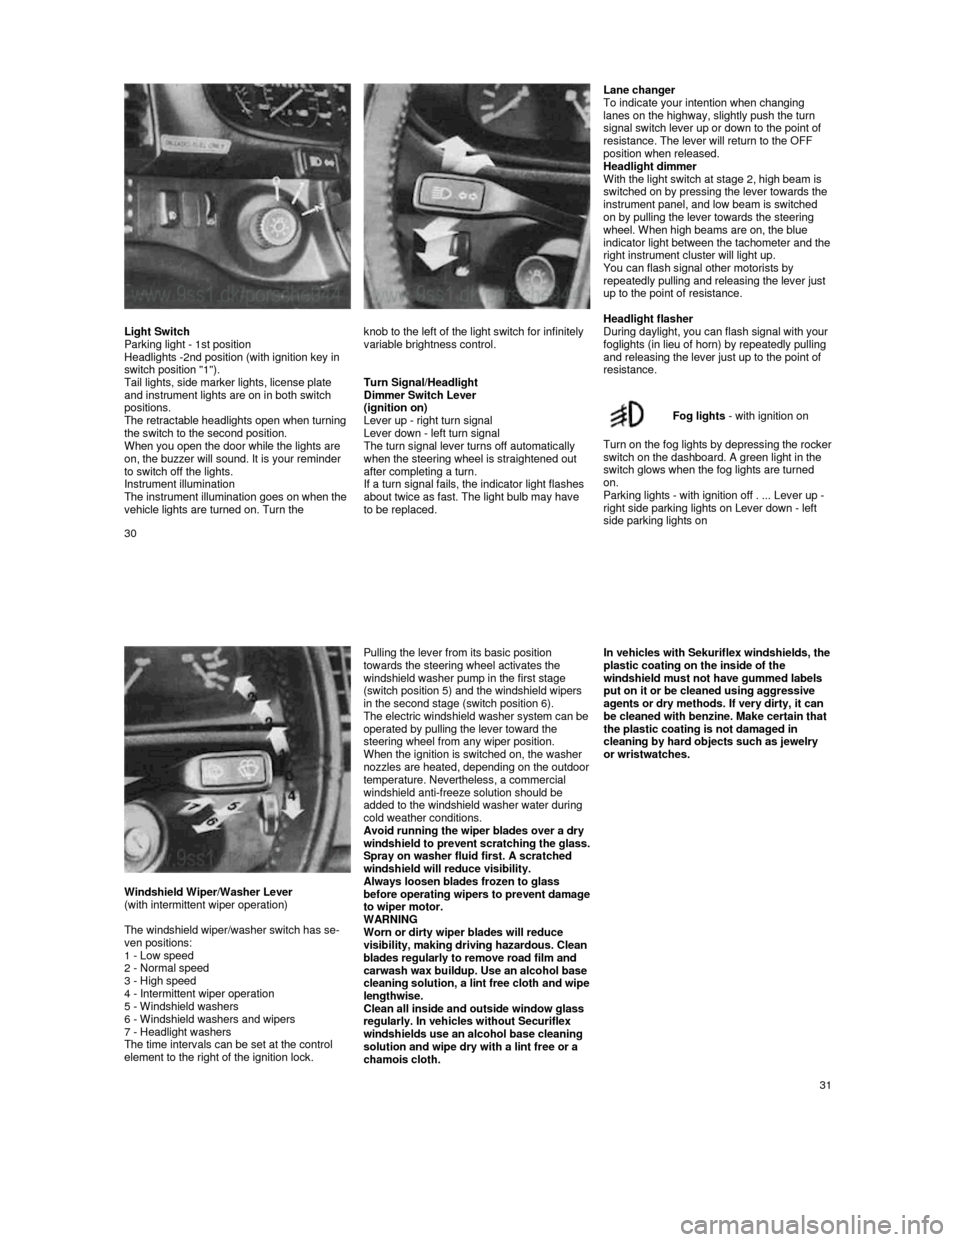
Light Switch
Parking light - 1st position
Headlights -2nd position (with ignition key in
switch position "1").
Tail lights, side marker lights, license plate
and instrument lights are on in both switch
positions.
The retractable headlights open when turning
the switch to the second position.
When you open the door while the lights are
on, the buzzer will sound. It is your reminder
to switch off the lights.
Instrument illumination
The instrument illumination goes on when the
vehicle lights are turned on. Turn the
knob to the left of the light switch for infinitely
variable brightness control.
Turn Signal/Headlight
Dimmer Switch Lever
(ignition on)
Lever up - right turn signal
Lever down - left turn signal
The turn signal lever turns off automatically
when the steering wheel is straightened out after completing a turn.
If a turn signal fails, the indicator light flashes
about twice as fast. The light bulb may have
to be replaced.
Headlight flasher
During daylight, you can flash signal with your
foglights (in lieu of horn) by repeatedly pulling
and releasing the lever just up to the point of
resistance.
Fog lights
- with ignition on
Turn on the fog lights by depressing the rocker switch on the dashboard. A green light in the
switch glows when the fog lights are turned
on.
Parking lights - with ignition off . ... Lever up -
right side parking lights on Lever down - left
side parking lights on
30
Windshield Wiper/Washer Lever
(with intermittent wiper operation)
The windshield wiper/washer switch has se-
ven positions:
1 - Low speed
2 - Normal speed
3 - High speed
4 - Intermittent wiper operation
5 - Windshield washers
6 - Windshield washers and wipers
7 - Headlight washers
The time intervals can be set at the control
element to the right of the ignition lock.
Pulling the lever from its basic position
towards the steering wheel activates the
windshield washer pump in the first stage
(switch position 5) and the windshield wipers
in the second stage (switch position 6).
The electric windshield washer system can be operated by pulling the lever toward the
steering wheel from any wiper position.
When the ignition is switched on, the washer
nozzles are heated, depending on the outdoor temperature. Nevertheless, a commercial windshield anti-freeze solution should be
added to the windshield washer water during
cold weather conditions.
Avoid running the wiper blades over a dry
windshield to p
revent scratching the glass. Spray on washer fluid first. A scratched
windshield will reduce visibility.
Always loosen blades frozen to glass
before operating wipers to prevent damage to wiper motor.
WARNING
Worn or dirty wiper blades will reduce
visibility, making driving hazardous. Clean
blades regularly to remove road film and
carwash wax buildup. Use an alcohol base
cleaning solution, a lint free cloth and wipe lengthwise.
Clean all inside and outside window glass
regularly. In vehicles without Securiflex
windshields use an alcohol base cleaning
solution and wipe dry with a lint free or a
chamois cloth.
In vehicles with Sekuriflex windshields, the plastic coating on the inside of the
windshield must not have gummed labels
put on it or be cleaned using aggressive
agents or dry methods. If very dirty, it can
be cleaned with benzine. Make certain that
the plastic coating is not damaged in
cleaning by hard objects such as jewelry
or wristwatches.
31
Page 21 of 66
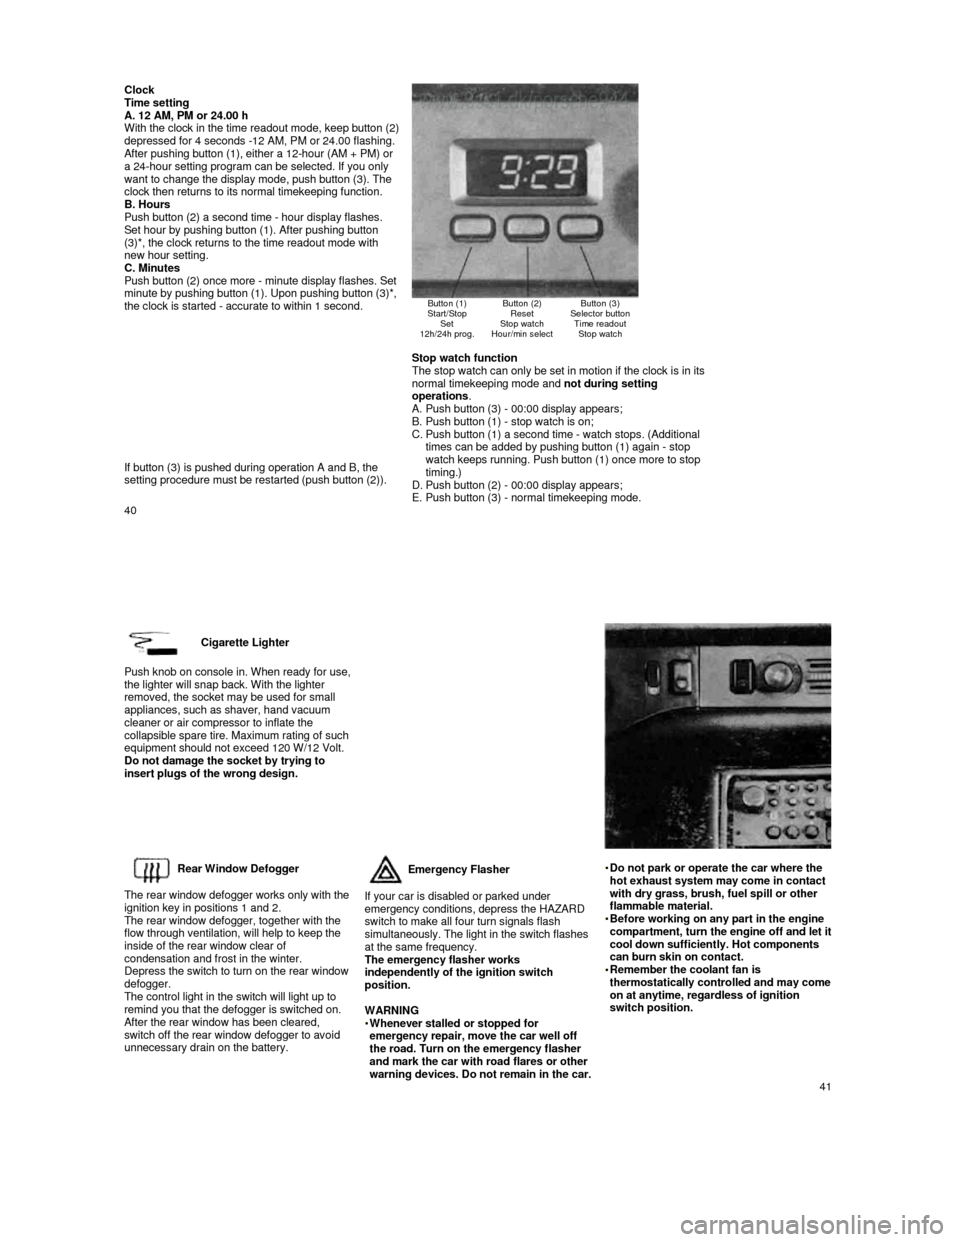
Clock Time setting
A. 12 AM, PM or 24.00 h
With the clock in the time readout mode, keep butto n (2) depressed for 4 seconds -12 AM, PM or 24.00 flashin g. After pushing button (1), either a 12-hour (AM + PM) or
a 24-hour setting program can be selected. If you o nly
want to change the display mode, push button (3). The
clock then returns to its normal timekeeping functi on.
B. Hours
Push button (2) a second time - hour display flashe s.
Set hour by pushing button (1). After pushing butto n
(3)*, the clock returns to the time readout mode wi th
new hour setting.
C. Minutes
Push button (2) once more -
minute display flashes. Set minute by pushing button (1). Upon pushing button ( 3)*, the clock is started - accurate to within 1 second.
Button (1)
Start/Stop Set
12h/24h prog.
Button (2) Reset
Stop watch
Hour/min select
Button (3)
Selector button Time readout Stop watch
If button (3) is pushed during operation A and B, t he
setting procedure must be restarted (push button (2 )).
Stop watch function
The stop watch can only be set in motion if the clo ck is in its
normal timekeeping mode and not during setting
operations .
A. Push button (3) - 00:00 display appears;
B. Push button (1) - stop watch is on;
C. Push button (1) a second time - watch stops. (Addit ional
times can be added by pushing button (1) again - st op
watch keeps running. Push button (1) once more to s top timing.)
D. Push button (2) - 00:00 display appears;
E. Push button (3) - normal timekeeping mode.
40
Cigarette Lighter
Push knob on console in. When ready for use, the lighter will snap back. With the lighter
removed, the socket may be used for small
appliances, such as shaver, hand vacuum
cleaner or air compressor to inflate the
collapsible spare tire. Maximum rating of such
equipment should not exceed 120 W/12 Volt.
Do not damage the socket by trying to
insert plugs of the wrong design.
Rear Window Defogger
The rear window defogger works only with the
ignition key in positions 1 and 2.
The rear window defogger, together with the
flow through ventilation, will help to keep the
inside of the rear window clear of
condensation and frost in the winter.
Depress the switch to turn on the rear window
defogger.
The control light in the switch will light up to
remind you that the defogger is switched on.
After the rear window has been cleared, switch off the rear window defogger to avoid
unnecessary drain on the battery.
Emergency Flasher
If your car is disabled or parked under
emergency conditions, depress the HAZARD
switch to make all four turn signals flash
simultaneously. The light in the switch flashes
at the same frequency.
The emergency flasher works
independently of the ignition switch
position.
WARNING
Whenever stalled or stopped for emergency repair, move the car well off
the road. Turn on the emergency flasher
and mark the car with road flares or other
warning devices. Do not remain in the car.
Do not park or operate the car where the hot exhaust system may come in contact
with dry grass, brush, fuel spill or other
flammable material.
Before working on any part in the engine compartment, turn the engine off and let it cool down sufficiently. Hot components
can burn skin on contact.
Remember the coolant fan is thermostatically controlled and may come on at anytime, regardless of ignition
switch position.
41
Page 25 of 66

Break-in Hints for the first 1.000 miles /
1.600 kilometers
There are no specific break-in rules for your
Porsche. However, by observing a few
precautions you can help extend the service
life and performance of your engine.
During the first 1.000 miles / 1.600 km, all
working components of the engine adjust to
each other to a certain degree. Therefore:
Avoid full throttle starts and abrupt stops. Change speeds frequently. Vary the throttle
load.
Do not exceed maximum engine speed of
5.000 rpm (revolutions per minute).
Do not run a cold engine at high rpm or in
Neutral.
Do not let the engine labor, especially when
driving uphill. Shift to the next proper gear in
time (use the most favorable rpm range).
There may be a slight stiffness in the steering, gearshifting or other controls during the break-
in period, which will gradually disappear.
Never lug the engine in high gear at low
speeds. This rule applies all the time, not
just during the break-in period.
Breaking in brake pads
Brake pads do not possess maximum braking
efficiency when the car is new. Therefore
more pedal force is necessary during the first
100 to 150 miles (150 to 250 km). This also
applies to replacement brake pads.
New tires
New tires do not possess maximum traction.
They tend to
be slippery. Break in new tires by driving at moderate speeds during the first 60
to 120 miles (100 to 200 km), and longer
braking distances must be anticipated.
Engine Oil Consumption
During the break-in period oil consumption
may be higher than normal.
As always, the rate of oil consumption depends on the quality and viscosity of oil, the speed at which the engine is operated, the climate, road conditions as well as the amount of dilution and oxidation of the lubricant.
Check engine oil level, add if necessary. Make it a habit to have engine oil checked with
every fuel filling.
47
Engine Exhaust WARNING
Engine exhaust is dangerous if inhaled.
Never start or let the engine run in a closed garage. Never sit in your car for
prolonged periods with the engine on and
the car not moving.
Although exhaust fumes from the engine have many components which you can smell, they also contain carbon monoxide, which is a colorless and odorless gas.
Carbon monoxide can be fatal if inhaled.
If you smell gas fumes in the vehicle, drive with the windows open but keep the
hatchback closed. Have the cause
immediately located and corrected.
Because of inherent hazards, we do not recommend transporting objects larger
than those fitting safely into the luggage
compartment. Keep the hatchback closed
while driving to prevent poisonous
exhaust gas from being drawn into the
vehicle.
Never carry additional fuel containers in your vehicle. Such containers, full or
partially empty, may leak, cause an
explosion, or result in fire in case of a
collision.
Operating Your Porsche in other Countries Government regulations in the United States
and Canada require that automobiles meet
specific emission regulations and safety
standards.
Therefore cars built for the U.S. and Canada
differ from vehicles sold in other countries.
If you plan to take your Porsche outside the
continental limits of the United States or
Canada, there is the possibility that
unleaded fuel may not be available;
unleaded fuel may have a considerably lower octane rating. Excessive engine knock and
serious damage to both engine and catalytic
converter could result;
service may be inadequate due to lack of
proper service facilities, tools or diagnostic
equipment;
replacement parts may not be available or
very difficult to get.
Porsche cannot be responsible for the
mechanical damage that could result
because of inadequate fuel, service or
parts availability.
If you bought your car abroad and want to
bring it back home, be sure to find out about
shipping and forwarding requirements, as well as current import and customs regulations.
48
Page 28 of 66
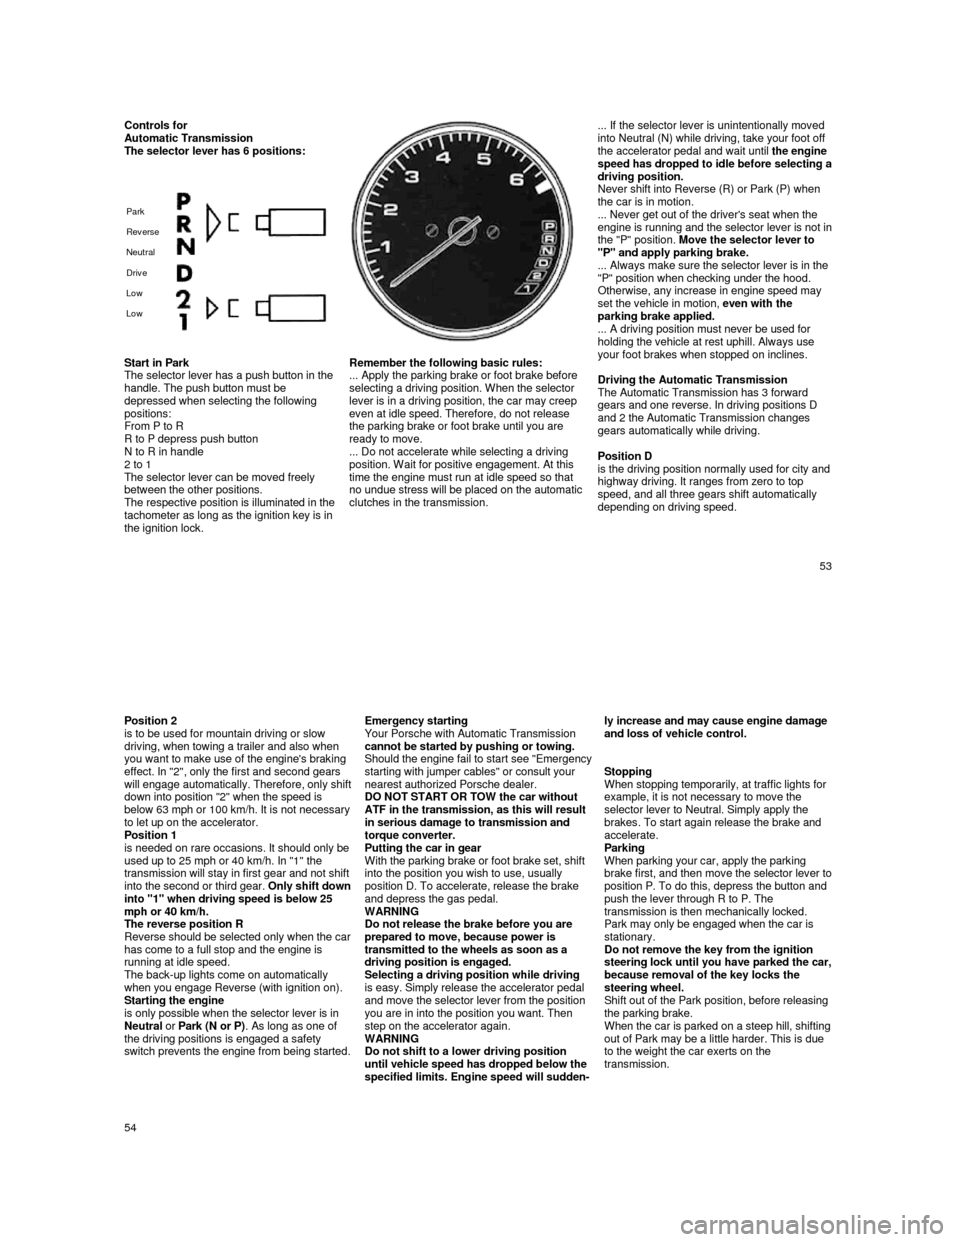
Controls for Automatic Transmission
The selector lever has 6 positions:
Park
Rev erse
Neutral
Driv e
Low
Low
... If the selector lever is unintentionally mo ved
into Neutral (N) while driving, take your foot off
the accelerator pedal and wait until the engine
speed has dropped to idle before selecting a driving position.
Never shift into Reverse (R) or Park (P) when
the car is in motion.
... Never get out of the driver's seat when the
engine is running and the selector lever is not in the "P" position. Move the selector lever to
"P" and apply parking brake.
... Always make sure the selector lever is in the
"P" position when checking under the hood.
Otherwise, any increase in engine speed may
set the vehicle in motion, even with the
parking brake applied.
... A driving position must never be used for
holding the vehicle at rest uphill. Always use
your foot brakes when stopped on inclines.
Driving the Automatic Transmission
The Automatic Transmission has 3 forward
gears and one reverse. In driving positions D
and 2 the Automatic Transmission changes
gears automatically while driving.
Position D
is the driving position normally used for city and highway driving. It ranges from zero to top
speed, and all three gears shift automatically
depending on driving speed.
Start in Park
The selector lever has a push button in the
handle. The push button must be
depressed when selecting the following
positions:
From P to R
R to P depress push button
N to R in handle
2 to 1
The selector lever can be moved freely
between the other positions.
The respective position is illuminated in the tachometer as long as the ignition key is in
the ignition lock.
Remember the following basic rules:
... Apply the parking brake or foot brake before
selecting a driving position. When the selector
lever is in a driving position, the car may creep
even at idle speed. Therefore, do not release
the parking brake or foot brake until you are
ready to move.
... Do not accelerate while selecting a driving
position. Wait for positive engagement. At this
time the engine must run at idle speed so that
no undue stress will be placed on the automatic
clutches in the transmission.
53
Position 2
is to be used for mountain driving or slow
driving, when towing a trailer and also when
you want to make use of the engine's braking
effect. In "2", only the first and second gears
will engage automatically. Therefore, only shift down into position "2" when the speed is below 63 mph or 100 km/h. It is not necessary to let up on the accelerator.
Position 1
is needed on rare occasions. It should only be
used up to 25 mph or 40 km/h. In "1" the
transmission will stay in first gear and not shift
into the second or third gear.
Only shift down into "1" when driving speed is below 25
mph or 40 km/h.
The reverse position R
Reverse should be selected only when the car has come to a full stop and the engine is
running at idle speed.
The back-up lights come on automatically
when you engage Reverse (with ignition on). Starting the engine
is only possible when the selector lever is in
Neutral or Park (N or P) . As long as one of
the driving positions is engaged a safety
switch prevents the engine from being started.
Emergency starting
Your Porsche with Automatic Transmission
cannot be started by pushing or towing.
Should the engine fail to start see "Emergency starting with jumper cables" or consult your
nearest authorized Porsche dealer.
DO NOT START OR TOW the car without
ATF in the transmission, as this will result
in serious damage to transmission and
torque converter.
Putting the car in gear
With the parking brake or foot brake set, shift
into the position you wish to use, usually
position D. To accelerate, release the brake
and depress the gas pedal.
WARNING
Do not release the brake before you are
prepared to move, because power is
transmitted to the wheels as soon as a
driving position is engaged.
Selecting a driving position while driving
is easy. Simply release the accelerator pedal
and move the selector lever from the position
you are in into the position you want. Then
step on the accelerator again.
WARNING
Do not shift to a lower driving position
until vehicle speed has dropped below the
specified limits. Engine speed will sudden-
ly increase and may cause engine damage and loss of vehicle control.
Stopping
When stopping temporarily, at traffic lights for
example, it is not necessary to move the
selector lever to Neutral. Simply apply the
brakes. To start again release the brake and
accelerate.
Parking
When parking your car, apply the parking
brake first, and then move the selector lever to position P. To do this, depress the button and
push the lever through R to P. The
transmission is then mechanically locked.
Park may only be engaged when the car is
stationary.
Do not remove the key from the ignition
steering lock until you have parked the car, because removal of the key locks the
steering wheel.
Shift out of the Park position, before releasing
the parking brake.
When the car is parked on a steep hill, shifting
out of Park may be a little harder. This is due
to the weight the car exerts on the
transmission.
54
Page 43 of 66
may not always be due to improper wheel
alignment. It can be the result of individual
driving habits such as cornering at high
speeds. If the tire pressure is not checked and adjusted regularly, abnormal tire wear can
also occur.
Tire care
WARNING
Avoid damaging tires and wheel rims. If you must drive over a curb or other obstacle,
drive slowly and at an obtuse angle.
Frequently check tires for uneven wear and
damage.
Remove imbedded material. Replace worn or damaged tires immediately. Replace missing valve dust caps. Keep oil, fuel, brake fluid, etc. away from
tires.
Keep tires inflated correctly.
Tire replacement
In the interest of maximum safety and best
all-around car handling, always buy
replacement tires that have the same
specifications with regard to tire size,
design, load carrying capacity, tread
pattern, tread depth etc. This also applies
to Porsche recommended alternate
replacement tires. If you do not use a
Porsche recommended replacement tire,
make sure that you purchase your new
tires from a reputable
tire specially dealer and that the dealer complies with all manufacturers warnings
for those tires.
In case of tire damage where it is uncertain
whether there is a break in the ply with all its consequences or, tire damage caused by
thermal or mechanical overloading due to a
loss of pressure or any other prior damage,
we recommend that the tire be replaced for safety reasons.
If one faulty tire on an axle is replaced it
should be noted that the difference in tread
depth on one axle must not be more than
30%.
Tire specifications are imprinted on the
sidewall of the tires. If in doubt, check with
your Porsche dealer.
When replacing tubeless tires, always install
new valve stems. When replacing tires
requiring an inner tube, always install new
tubes.
New tires do not possess maximum
traction. They tend to be slippery. Break
new tires in by driving at moderate speed
for the first 60-120 miles or 100-200
kilometers.
Wheel balancing
A wheel should always be balanced after a tire repair. Even with regular use a wheel can
get out of balance, and should therefore be
balanced from time to time. Unbalanced
wheels may affect car handling and tire life.
When balancing light alloy wheels, use only
adhesive balancing weights supplied through
the Porsche parts service.
Wheels
If you intend to use other than original
equipment wheels, be sure that they conform
to Porsche specifications for your model.
Check with your Porsche dealer regarding the
correct wheel specifications for type and
model year.
Removing and storing tires
The driving direction should be clearly marked on all tires before removing them for storage,
to make sure they are mounted and run in the
same direction as before. Store tires in a cool
and dry place. Tires without rims upright!
Avoid contact with oil, grease or gasoline. When remounting, put tires with the most
tread depth at the front.
Snow tires
For a better grip on snow and ice use radial M + S tires or snow tires with studs. Check with
your local Motor Vehicle Bureau for possible
restrictions.
Radial ply M+S tires should be inflated with
the same cold tire inflation pressures required
for the regular radial ply tires. However, do not exceed the maximum tire inflation pressure
listed on the tire sidewall.
Snow tires should have the same load
capacity as original equipment tires and
should be mounted on all four wheels. Snow
tires with studs should be run at moderate
speeds when new in order to give the studs
time to settle.
83
WARNING
Tires with badly worn treads and studs are
very dangerous. Make sure they are replaced
immediately.
Do not drive a vehicle equipped with snow
tires at prolonged high speed. Snow tires do
not have the same degree of traction on dry,
wet or snow free roads as a normal tire. Furthermore, snow tires wear rapidly under
these conditions.
Snow tires do not fulfill their purpose if the
tread depth is less than 5/32 in. / 4 mm.
Comply with all state and local laws
governing snow tire and tread depth
requirements.
Snow chains Should snow chains be necessary, they
must be mounted on the drive wheels
only.
Check with local authorities for possible
restrictions.
Use only Porsche-approved snow chains with
fine pitch links, so that enough
space remains between the chains and the inside of the wheel arches.
Drive wheels must rotate freely with chains
mounted to prevent damage to body, axle or
brake components. Follow instructions issued
by the supplier of the chains. Remove chains
as soon as roads are free of ice and snow.
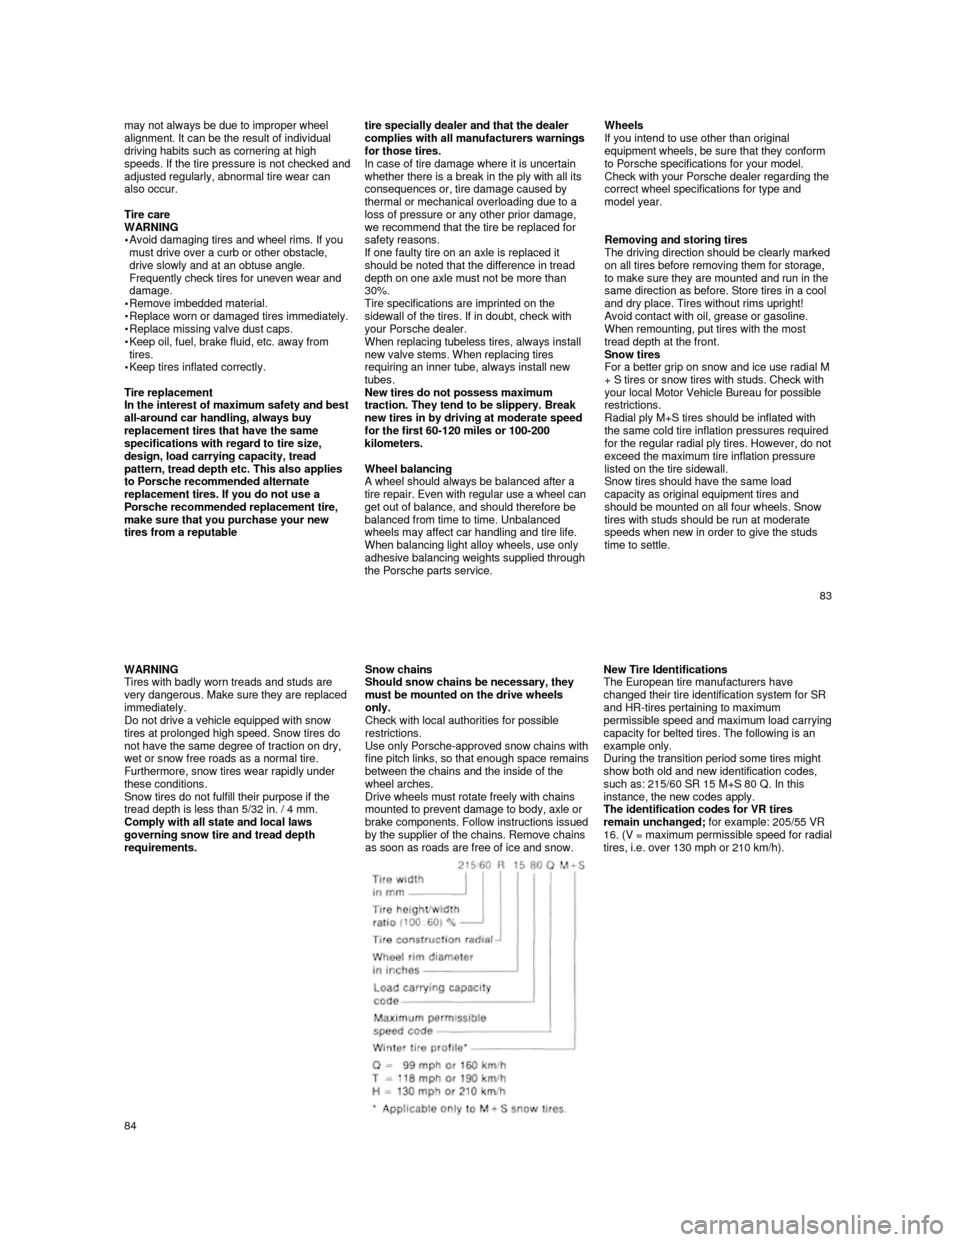
New Tire Identifications
The European tire manufacturers have
changed their tire identification system for SR
and HR-tires pertaining to maximum
permissible speed and maximum load carrying capacity for belted tires. The following is an
example only.
During the transition period some tires might
show both old and new identification codes,
such as: 215/60 SR 15 M+S 80 Q. In this
instance, the new codes apply.
The identification codes for VR tires
remain unchanged; for example: 205/55 VR
16. (V = maximum permissible speed for radial tires, i.e. over 130 mph or 210 km/h).
84