Page 1238 of 1865
7C INSTALLATION
31.
Connect the distributor lead.
Connect the main fuse block.
Tightening torque:
8—11 N-m (80—110 cm-kg, 69—95 in-lb)
Install the fresh air duct.
Install the battery carrier and battery.
Tghtening torque:
Bolts
9—13 N-m (90—130 cm-kg, 78—113 in-lb)
Nut
5—7 N-m (50—70 cm-kg, 43—61 in-lb)
Pour in ATF and check the following:
(1) With the engine idling, check that the fluid lev-
el is between the F and L marks on the dip-
stick. (Refer to page 7C—25.)
(2) Check the manual linkage, and adjust if neces-
sary. (Refer to page 7C—26.)
(3) Check the inhibitor switch operation. (Refer to
page 7C—23.)
(4) Conduct a road test. (Refer to page 7C—18.)
(5) Check that there is no fluid leakage from the
transaxle. (Refer to page 7C—25.)
76G07C-337
7C-124
Page 1299 of 1865

ON-VEHICLE MAINTENANCE 1 0
"{krf
'"""^JlW^M 1
V
^A-X
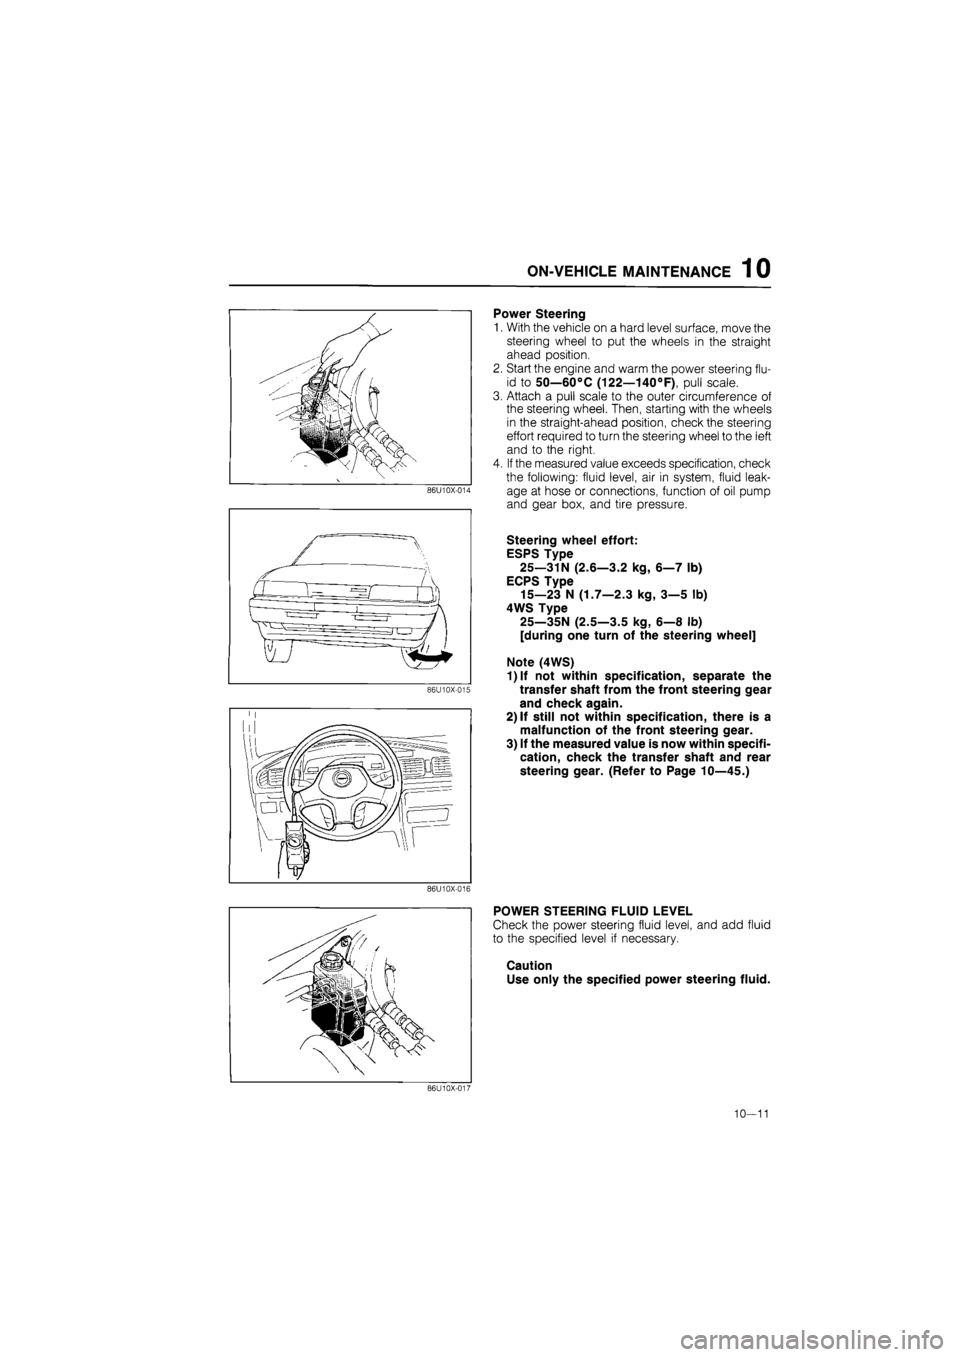
Power Steering
1.
86U10X-014
86U10X-015
With the vehicle on a hard level surface, move the
steering wheel to put the wheels in the straight
ahead position.
Start the engine and warm the power steering flu-
id to 50—60°C (122—140°F), pull scale.
Attach a pull scale to the outer circumference of
the steering wheel. Then, starting with the wheels
in the straight-ahead position, check the steering
effort required to turn the steering wheel to the left
and to the right.
If the measured value exceeds specification, check
the following: fluid level, air in system, fluid leak-
age at hose or connections, function of oil pump
and gear box, and tire pressure.
Steering wheel effort:
ESPS Type
25—31N (2.6—3.2 kg, 6—7 lb)
ECPS Type
15—23 N (1.7—2.3 kg, 3—5 lb)
4WS Type
25—35N (2.5—3.5 kg, 6—8 lb)
[during one turn of the steering wheel]
Note (4WS)
1)lf not within specification, separate the
transfer shaft from the front steering gear
and check again.
2) If still not within specification, there is a
malfunction of the front steering gear.
3) If the measured value is now within specifi-
cation, check the transfer shaft and rear
steering gear. (Refer to Page 10—45.)
86U10X-016
POWER STEERING FLUID LEVEL
Check the power steering fluid level, and add fluid
to the specified level if necessary.
Caution
Use only the specified power steering fluid.
86U10X-017
10—11
Page 1300 of 1865

1 0 ON-VEHICLE MAINTENANCE
Gasoline engine Adjust bolt
Idler pulley fM ,.. Lock nut
1 / I
Drive pulley Power steering oil
pump pulley
76G10X-004
Diesel engine
Vacuum pump
Rear
camshaft
pulley
Power steering oil
pump pulley
76G10X-005
86U10X-019
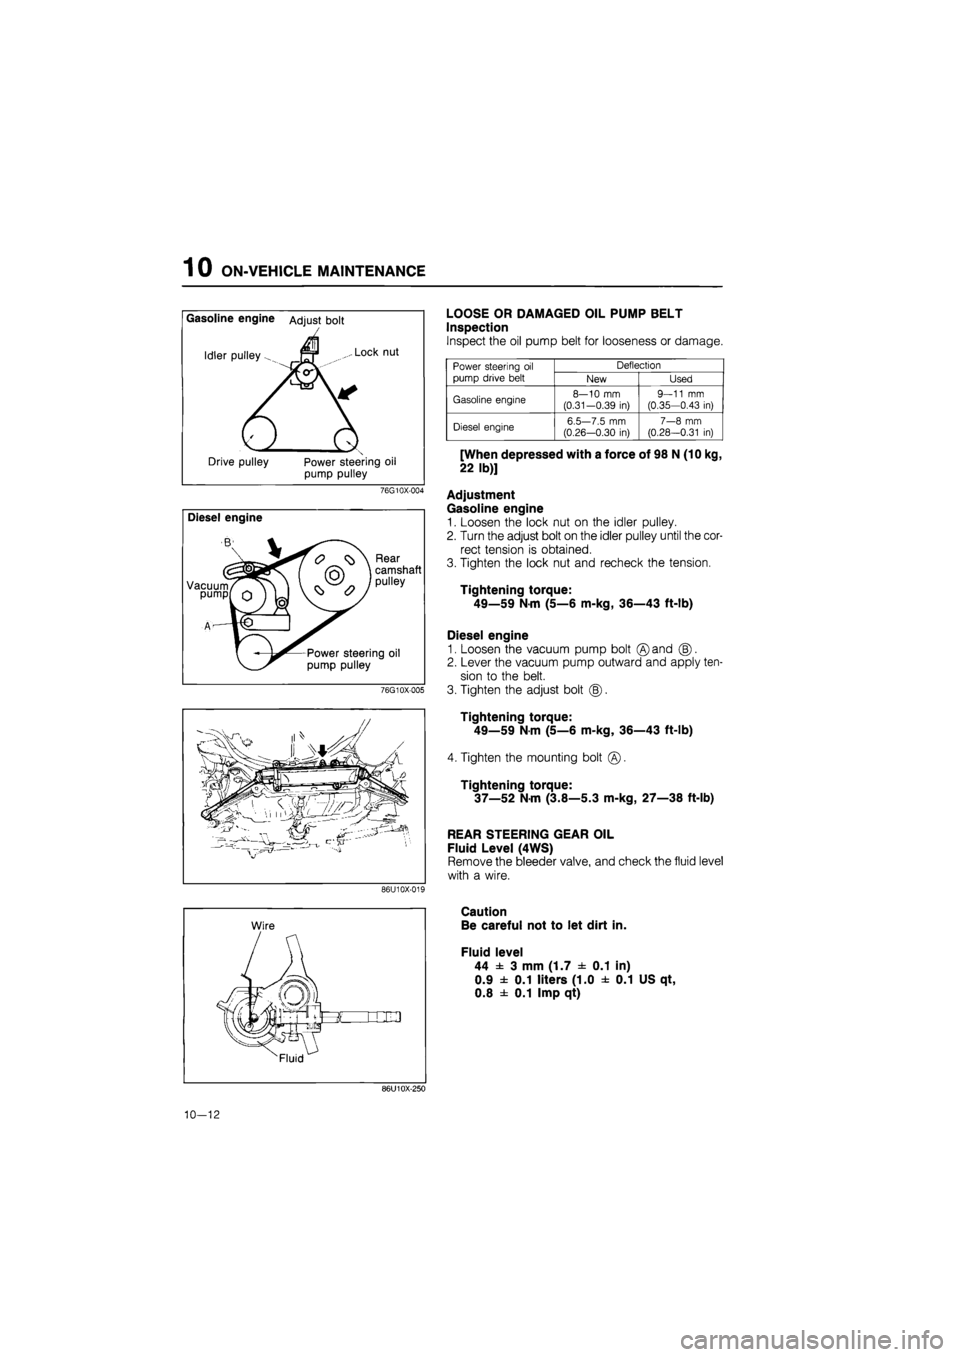
LOOSE OR DAMAGED OIL PUMP BELT
Inspection
Inspect the oil pump belt for looseness or damage.
Power steering
oil
pump drive belt
Deflection Power steering
oil
pump drive belt New Used
Gasoline engine 8—10
mm
(0.31-0.39
in)
9—11
mm
(0.35—0.43
in)
Diesel engine 6.5—7.5
mm
(0.26—0.30
in)
7—8
mm
(0.28—0.31
in)
[When depressed with a force of 98 N (10 kg,
22 lb)]
Adjustment
Gasoline engine
1. Loosen the lock nut on the idler pulley.
2. Turn the adjust bolt on the idler pulley until the cor-
rect tension is obtained.
3. Tighten the lock nut and recheck the tension.
Tightening torque:
49—59 Nm (5—6 m-kg, 36—43 ft-lb)
Diesel engine
1. Loosen the vacuum pump bolt ©and (B).
2. Lever the vacuum pump outward and apply ten-
sion to the belt.
3. Tighten the adjust bolt (|).
Tightening torque:
49—59
N
m (5—6 m-kg, 36—43 ft-lb)
4. Tighten the mounting bolt
Tightening torque:
37—52 N-m (3.8—5.3 m-kg, 27—38 ft-lb)
REAR STEERING GEAR OIL
Fluid Level (4WS)
Remove the bleeder valve, and check the fluid level
with a wire.
Caution
Be careful not to let dirt in.
Fluid level
44 ± 3 mm (1.7 ± 0.1 in)
0.9 ± 0.1 liters (1.0 ± 0.1 US qt,
0.8 ± 0.1 Imp qt)
86U10X-250
10-12
Page 1301 of 1865
ON-VEHICLE MAINTENANCE 1 0
LEAKAGE OF POWER STEERING FLUID
Check the following points for fluid leakage:
1. Gear
2. Oil pump
3. All fluid pipes and connections
4. Solenoid valve (ECPS Type, 4WS Type)
Note
a) Start the engine, and check for fluid leakage after turning the steering wheel completely
to the left and right to apply fluid pressure. Do not, however, keep the steering wheel
in the fully turned position for more than 15 seconds.
b)The points where fluid leakage may occur are indicated by the arrows in the figure.
Power Steering (2WS)
86U10X-020
10-13
Page 1303 of 1865
INSPECTION AND ADJUSTMENT 1 0
INSPECTION AND ADJUSTMENT
BLEEDING OF POWER STEERING SYSTEM
1. Check the fluid level, and add fluid if necessary.
2. Turn the steering wheel fully in both directions 5
times (engine not running).
3. Recheck the fluid level. If the level has lowered,
add fluid, and repeat from step 1.
86U10X-021
4. Start the engine, and run it at idle.
5. Turn the steering wheel fully in both directions 5
times to bleed air from the system.
6. Check that the fluid is not foamy and the fluid lev-
el has not lowered.
If a problem is found, add fluid as necessary and
repeat from step 5.
Note
If bleeding is not done completely, the follow-
ing problems may appear:
• Foamy fluid on level gauge.
• Noise from power steering oil pump.
86U10X-022
10—15
Page 1320 of 1865
1 0 4-WHEEL STEERING GEAR AND LINKAGE
86U10X-301
86U10X-302
86U10X-303
4WS PERFORMANCE INSPECTION
1. Steering Angle Transfer Shaft Alignement
(Simple inspection)
(1) Put masking tape on the steering wheel and
column cover.
(2) Drive the vehicle on a straight, flat road for at
least 30 m (18.6 ft) and note the steering wheel
position. Stop and mark the straight-ahead po-
sition on the steering wheel and column cover
tape. Drive the vehicle again and check the
marks.
(3) With the marks between the steering wheel and
column cover aligned, check that the rear
wheels do not turn off center when the engine
is started.
(4) If the rear wheels move, adjust the steering an-
gle transfer shaft.
(Inspection by dial indicator)
(1) Mark between the steering wheel and column
cover as shown above.
(2) Attach a scale on the column cover as shown
in the illustration.
86U10X-304
10-32
Page 1322 of 1865
1 0 4-WHEEL STEERING GEAR AND LINKAGE
(Example) ^"in)
-I
8 mm (0.31 in)
1 1111111
- ^Center
10 mm (0.39 in)
86U10X-309
(8) The center position can be determined from
the left/right measurements in (5) and (7) above.
Example:
Right rotation.... 10 mm (0.39 in)
Left rotation....8 mm (0.31 in)
Center = Right 1 mm (0.04 in)
(9) Check that the center is within specification.
Specification
= R 5 mm (0.4 in ) to L 5 mm (0.4 in)
(10) If not correct, adjust the steering angle trans-
fer shaft.
2. Steering Inspection
With the vehicle stopped and the engine running,
check that the rear wheels turn in the opposite
direction when the steering wheel is turned and that
there is no abnormal noise.
86U10X-310
3.4WS Electric System Inspection
Drive the vehicle and check that the 4WS warning
light does not come on at over 40 km/h (25mph).
86U10X-311
10—34
Page 1350 of 1865
1 0 ENGINE SPEED SENSING POWER STEERING
Oil seal and needle bearing
1. Insert the SST so that it contacts the needle
bearing.
2. Drive the oil seal and needle bearing out with the
SST bar.
86U10X-134
^aFm / y^s.
INSPECTION
Check the following and replace any faulty parts.
Pinion shaft assembly
1. Pinion shaft teeth wear or damage
2. Control valve damage, clogging, and wear
86U10X-135
Rack bushing
Wear or damage
86U10X-136
Bearing
Wear, damage, and operation
86U10X-137
10—62