Page 1296 of 1865

1 0 TROUBLESHOOTING GUIDE
POWER STEERING
Problem Possible cause Remedy Page
Hard steering
Loose
or
damaged belt Low fluid level,
or air in
fluid Leakage
of
fluid
Malfunctioning electrical system* Insufficient oil pump pressure Improperly adjusted wheel alignment Malfunctioning steering gear Linkage ball joint not operating smoothly
Adjust
or
replace Add fluid
or
bleed
air
Repair
or
replace Repair
or
replace Repair
or
replace Refer
to
Section
13
Repair
or
replace Replace
10—12 10-11 10-13 10-87 10-16
10—28,
37
10-18
Poor return
Insufficient tire pressure
Improperly adjusted wheel alignment
Ball-joint not operating smoothly
Steering shaft contacting something
Refer
to
Section
12
Refer
to
Section
13
Replace
Repair
10-20 10-21
Excessive play
Loose gear box housing mounting bolts Worn linkage
or
tie-rod ball joint Worn lower ball joint Worn
or
damaged steering joint Worn rack and pinion gear
Tighten Replace
Refer
to
Section
13
Replace
Replace
10—30
10—18
10—21
10-58,
75
Steering wheel
vibrates
Insufficient tire pressure Damaged
or
unbalanced wheel Improperly adjusted wheel alignment Loose gear box housing mounting bolts Incorrect pinion preload adjustment Worn ball joints
Loose shock absorber mounting Malfunctioning shock absorber
Refer
to
Section
12
Refer
to
Section
13
Refer
to
Section
13
Tighten Adjust
Replace Refer
to
Section
13
Refer
to
Section
13
10-30 10-72,
81
10—18
Steering wheel
pulls
Unevenly worn tires
Incorrect tire pressure
Dragging brake
Improperly adjusted wheel alignment
Refer
to
Section
12
Refer
to
Section
12
Refer
to
Section
11
Refer
to
Section
13 —
Excessively light
steering at high
speed*
Malfunctioning electrical system Repair
or
replace 10-87
*... Only
for
electronically
-
controlled type
76G10X-002
10—8
Page 1299 of 1865

ON-VEHICLE MAINTENANCE 1 0
"{krf
'"""^JlW^M 1
V
^A-X
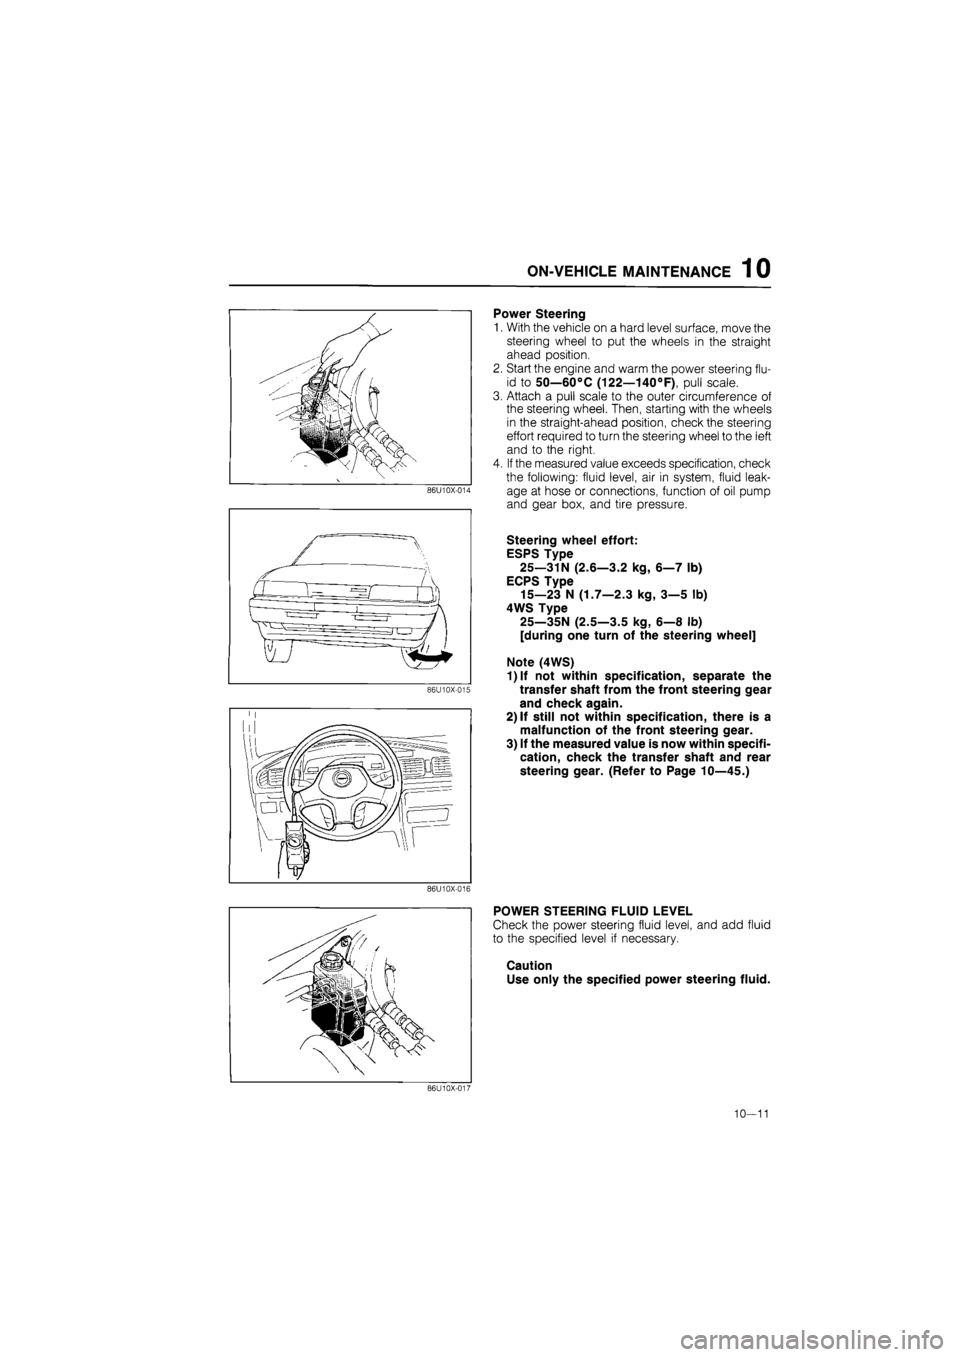
Power Steering
1.
86U10X-014
86U10X-015
With the vehicle on a hard level surface, move the
steering wheel to put the wheels in the straight
ahead position.
Start the engine and warm the power steering flu-
id to 50—60°C (122—140°F), pull scale.
Attach a pull scale to the outer circumference of
the steering wheel. Then, starting with the wheels
in the straight-ahead position, check the steering
effort required to turn the steering wheel to the left
and to the right.
If the measured value exceeds specification, check
the following: fluid level, air in system, fluid leak-
age at hose or connections, function of oil pump
and gear box, and tire pressure.
Steering wheel effort:
ESPS Type
25—31N (2.6—3.2 kg, 6—7 lb)
ECPS Type
15—23 N (1.7—2.3 kg, 3—5 lb)
4WS Type
25—35N (2.5—3.5 kg, 6—8 lb)
[during one turn of the steering wheel]
Note (4WS)
1)lf not within specification, separate the
transfer shaft from the front steering gear
and check again.
2) If still not within specification, there is a
malfunction of the front steering gear.
3) If the measured value is now within specifi-
cation, check the transfer shaft and rear
steering gear. (Refer to Page 10—45.)
86U10X-016
POWER STEERING FLUID LEVEL
Check the power steering fluid level, and add fluid
to the specified level if necessary.
Caution
Use only the specified power steering fluid.
86U10X-017
10—11
Page 1301 of 1865
ON-VEHICLE MAINTENANCE 1 0
LEAKAGE OF POWER STEERING FLUID
Check the following points for fluid leakage:
1. Gear
2. Oil pump
3. All fluid pipes and connections
4. Solenoid valve (ECPS Type, 4WS Type)
Note
a) Start the engine, and check for fluid leakage after turning the steering wheel completely
to the left and right to apply fluid pressure. Do not, however, keep the steering wheel
in the fully turned position for more than 15 seconds.
b)The points where fluid leakage may occur are indicated by the arrows in the figure.
Power Steering (2WS)
86U10X-020
10-13
Page 1304 of 1865
![MAZDA 626 1987 Workshop Manual
1 0 INSPECTION AND ADJUSTMENT
86U10X023
2WS
To oil pump
Si£r To gear housing
86U10X-024
86U10X-025
Thermometer [50—60°C (122—140°C)]
ii ^
Gauge
Close valve
completely
POWER STEERIN MAZDA 626 1987 Workshop Manual
1 0 INSPECTION AND ADJUSTMENT
86U10X023
2WS
To oil pump
Si£r To gear housing
86U10X-024
86U10X-025
Thermometer [50—60°C (122—140°C)]
ii ^
Gauge
Close valve
completely
POWER STEERIN](/manual-img/28/57059/w960_57059-1303.png)
1 0 INSPECTION AND ADJUSTMENT
86U10X023
2WS
To oil pump
Si£r To gear housing
86U10X-024
86U10X-025
Thermometer [50—60°C (122—140°C)]
ii ^
Gauge
Close valve
completely
POWER STEERING PRESSURE
1. Disconnect the high-pressure hose of the gear
housing side, and attach the SST.
Tightening torque:
39—49 N-m (4.0—5.0 m-kg, 29—36 ft-lb)
2. Bleed air from the system.
3. Open the gauge valve fully, then start the engine
and turn the steering wheel fully left and right to
raise the fluid temperature to 50—60°C
(122—140°F)
4. To measure the fluid pressure generated by the
oil pump, close the gauge valve completely and
increase the engine speed to 1,000—1,500 rpm.
If the fluid pressure is low, replace the oil pump
assembly.
Warning
If the valve is left closed for more than 15 sec-
onds, the fluid temperature will increase ex-
cessively and adversely affect the oil pump.
Oil pump fluid pressure
2WS
7,355—7,846 kPa
(75—80 kg/cm2, 1,066—1,138 psi)
4WS
Front 8,093—8,829 kPa
(82.5—90.0 kg/cm2, 1,173—1,280 psi)
Rear 7,112—7,848 kPa
(72.5—80.0 kg/cm2, 1,031—1,138 psi)
To measure the fluid pressure generated at the
gear housing, first open the gauge valve complete-
ly, increase the engine speed to 1,000—1,500
rpm, and then turn the steering wheel fully to the
left and right.
Warning
If the steering wheel is kept in the fully turned
position for more than 15 seconds, the fluid
temperature will rise excessively.
80U10X-026
10—16
Page 1332 of 1865
1 0 4-WHEEL STEERING GEAR AND LINKAGE
INSPECTION
Front Steering Gear and Linkage
1. Check the following and replace the front steering
gear assembly if necessary.
(a) Damaged or cracked case
(b) Bent linkage
86U10X-079
2. Check the following and replace any faulty parts.
(a) Clogged, bent, or pinched pipes
(b) Faulty oil pressure switch
(c) Damaged mounting bracket and mounting
rubber
(d) Cracked, damaged, or deteriorated boots
86U10X-080
Available spare parts
86U10X-081
1. Tie-rod end 7. Oil pressure switch
2. Tie-rod end boot 8. O-ring
3. Nut 9. Mounting bracket
4. Boot 10. Mounting rubber
5. Boot band (large) 11. Oil pipe
6. Boot band (small) 12. Steering gear assembly
10—44
Page 1346 of 1865

1 0 ENGINE SPEED SENSING POWER STEERING
ENGINE SPEED SENSING POWER STEERING
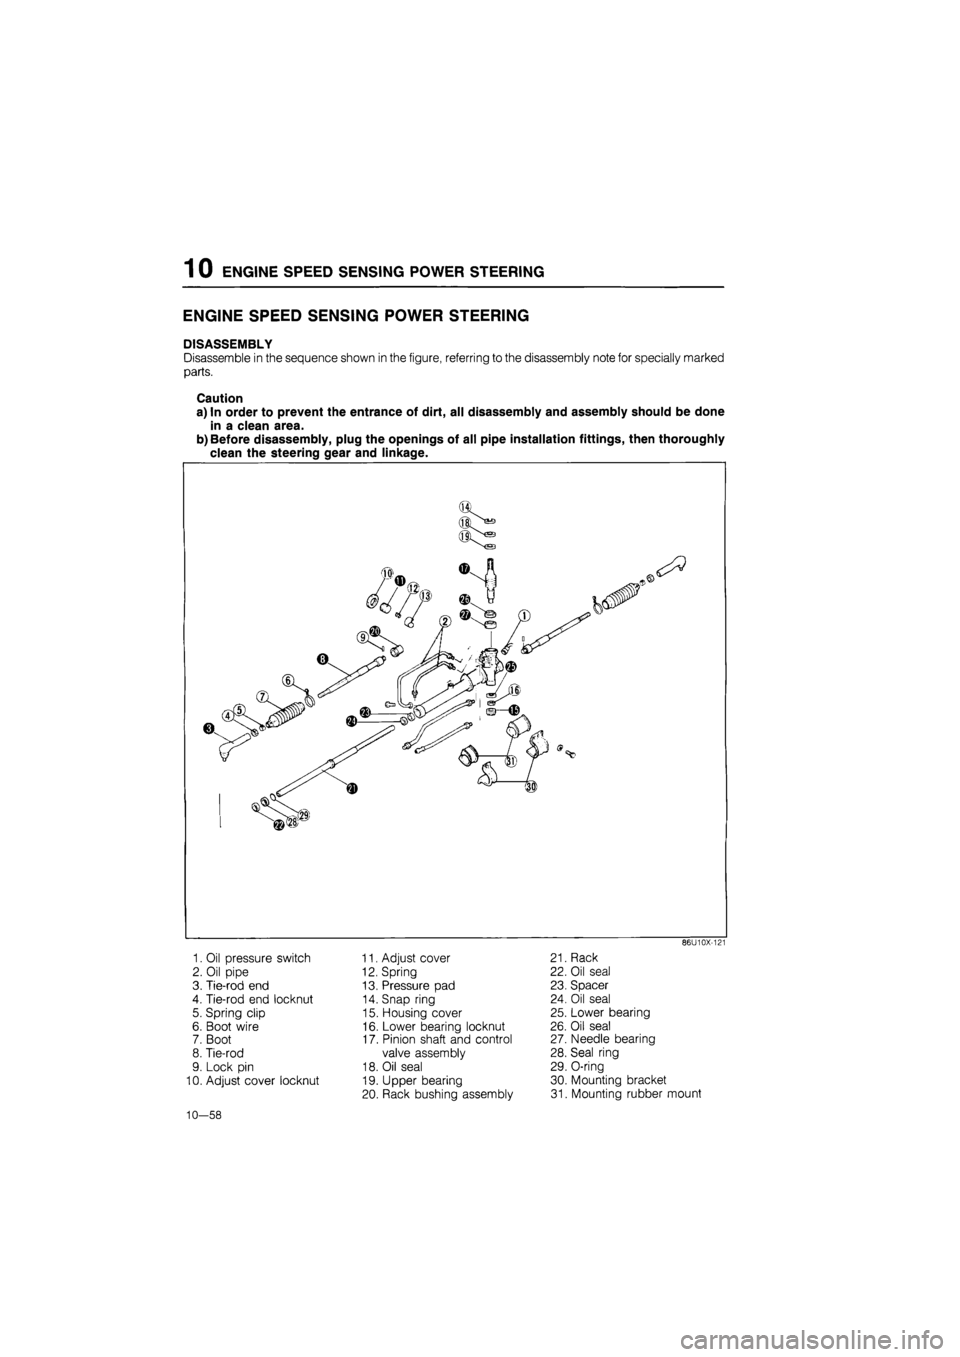
DISASSEMBLY
Disassemble in the sequence shown in the figure, referring to the disassembly note for specially marked
parts.
Caution
a) In order to prevent the entrance of dirt, all disassembly and assembly should be done
in a clean area.
b) Before disassembly, plug the openings of all pipe installation fittings, then thoroughly
clean the steering gear and linkage.
86U10X-121
1. Oil pressure switch
2. Oil pipe
3. Tie-rod end
4. Tie-rod end locknut
5. Spring clip
6. Boot wire
7. Boot
8. Tie-rod
9. Lock pin
10. Adjust cover locknut
11. Adjust cover
12. Spring
13. Pressure pad
14. Snap ring
15. Housing cover
16. Lower bearing locknut
17. Pinion shaft and control
valve assembly
18. Oil seal
19. Upper bearing
20. Rack bushing assembly
21. Rack
22. Oil seal
23. Spacer
24. Oil seal
25. Lower bearing
26. Oil seal
27. Needle bearing
28. Seal ring
29. O-ring
30. Mounting bracket
31. Mounting rubber mount
10—58
Page 1366 of 1865
1 0 ELECTRONICALLY-CONTROLLED POWER STEERING
Oil seal
Remove the oil seal with a screwdriver.
86U10X-188
INSPECTION
Check the following and replace any faulty parts.
1. Cracked, damaged, or deteriorated boots
2. Worn pressure pad friction surface
3. Loose or sticking tie-rod ball joint
4. Bent or damaged tie-rod or tie-rod end
86U10X-189
5. Worn outer box bushing
86U10X-190
6. Cracked or damaged gear housing
7. Steering gear oil leakage
86! I10X-191
10-78
Page 1397 of 1865

TROUBLESHOOTING GUIDE 1 1
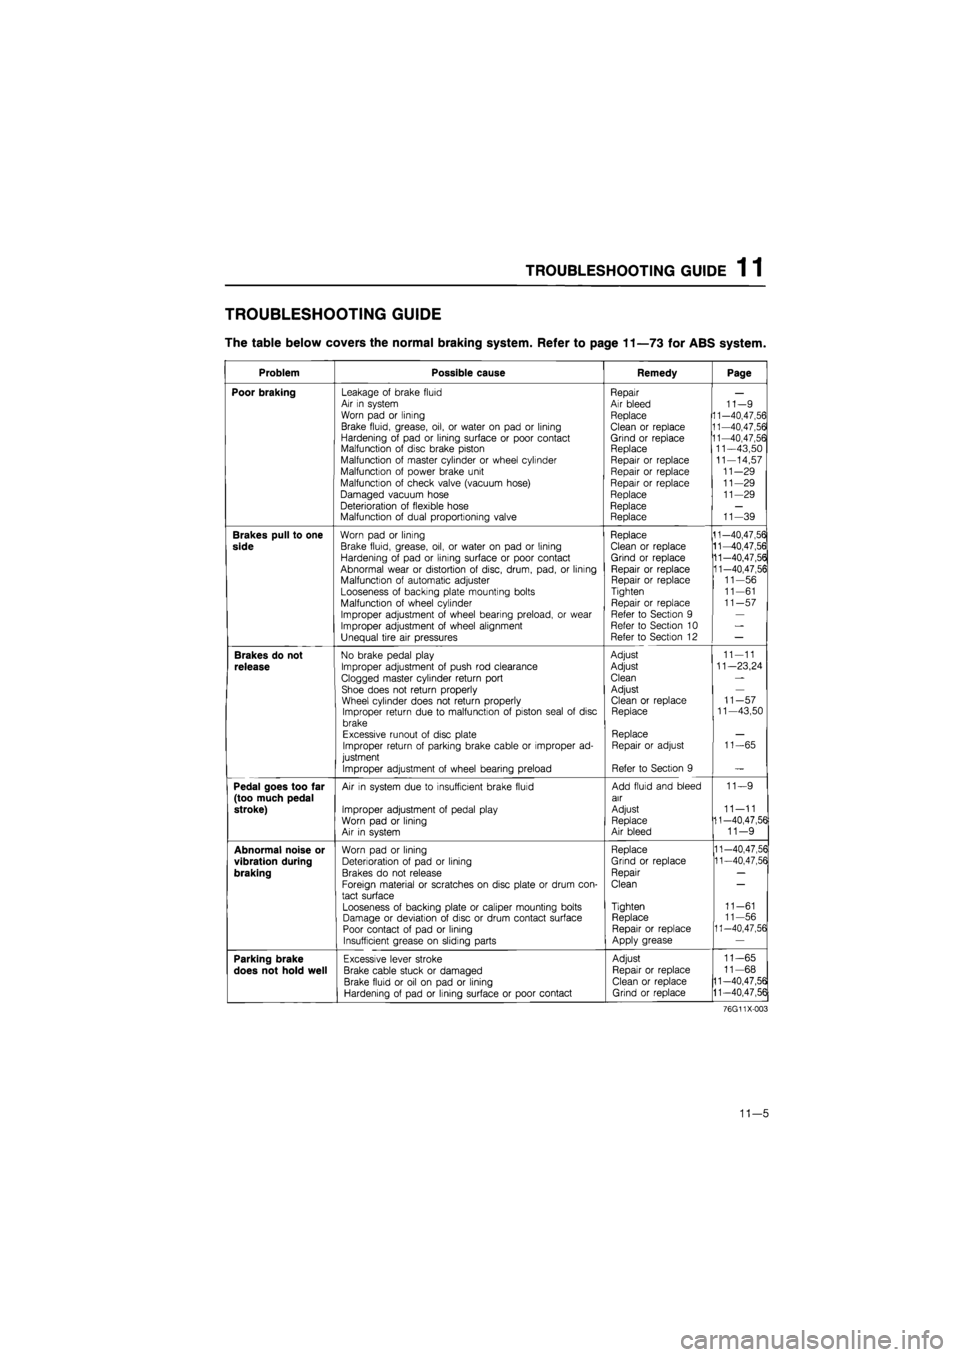
TROUBLESHOOTING GUIDE
The table below covers the normal braking system. Refer to page 11—73 for ABS system.
Problem Possible cause Remedy Page
Poor braking Leakage of brake fluid Air in system Worn pad or lining
Brake fluid, grease, oil, or water on pad or lining Hardening of pad or lining surface or poor contact Malfunction of disc brake piston Malfunction of master cylinder or wheel cylinder Malfunction of power brake unit
Malfunction of check valve (vacuum hose)
Damaged vacuum hose Deterioration of flexible hose Malfunction of dual proportioning valve
Repair Air bleed Replace
Clean or replace Grind or replace Replace Repair or replace Repair or replace Repair or replace Replace Replace Replace
11-9 11-40,47,56 11-40,47,56 11-40,47,56 11—43,50 11-14,57 11-29 11-29 11-29
11-39
Brakes pull to one
side
Worn pad or lining
Brake fluid, grease, oil, or water on pad or lining Hardening of pad or lining surface or poor contact Abnormal wear or distortion of disc, drum, pad, or lining Malfunction of automatic adjuster Looseness of backing plate mounting bolts Malfunction of wheel cylinder
Improper adjustment of wheel bearing preload, or wear Improper adjustment of wheel alignment Unequal tire air pressures
Replace Clean or replace Grind or replace Repair or replace Repair or replace Tighten
Repair or replace Refer to Section 9 Refer to Section 10 Refer to Section 12
11-40,47,56 11-40,47,56 11-40,47,56 11-40,47,56 11-56 11-61 11-57
Brakes do not
release
No brake pedal play
Improper adjustment of push rod clearance
Clogged master cylinder return port Shoe does not return properly Wheel cylinder does not return properly Improper return due to malfunction of piston seal of disc brake Excessive runout of disc plate Improper return of parking brake cable or improper ad-justment
Improper adjustment of wheel bearing preload
Adjust
Adjust
Clean
Adjust Clean or replace Replace
Replace Repair or adjust
Refer to Section 9
11-11
11—23,24
11-57 11—43,50
11-65
Pedal goes too far (too much pedal stroke)
Air in system due to insufficient brake fluid
Improper adjustment of pedal play Worn pad or lining Air in system
Add fluid and bleed air
Adjust Replace Air bleed
11—9
11—11 11-40,47,56 11-9
Abnormal noise or
vibration during
braking
Worn pad or lining Deterioration of pad or lining Brakes do not release
Foreign material or scratches on disc plate or drum con-tact surface
Looseness of backing plate or caliper mounting bolts Damage or deviation of disc or drum contact surface Poor contact of pad or lining Insufficient grease on sliding parts
Replace
Grind or replace
Repair
Clean
Tighten Replace Repair or replace Apply grease
11-40,47,56 11-40,47,56
11-61 11-56 11-40,47,56
Parking brake
does not hold well
Excessive lever stroke
Brake cable stuck or damaged
Brake fluid or oil on pad or lining Hardening of pad or lining surface or poor contact
Adjust
Repair or replace Clean or replace Grind or replace
11-65
11-68
11-40,47,56
11-40,47,56
76G11X-003
11—5