Page 454 of 878
w6 injectors connectors
HINT: The No.1, No.3 and No.5 injector connectors are dark
gray, and the No.2, No.4 and No.6 injector connectors are
gray.
w2 camshaft position sensor connectors
w3 engine wire clamps to injector holders
16. INSTALL AIR INTAKE CHAMBER ASSEMBLY
(See injector installation in SFI System)
17. CONNECT FUEL RETURN HOSE
18. INSTALL PS PUMP
Torque: 58 NVm (590 kgfVcm, 43 ftVlbf)
19. INSTALL WATER OUTLET AND NO.1 WATER BYPASS
PIPE
(a) Install 2 new O±rings to the No.1 water bypass pipe.
(b) Apply soapy water to the O±rings.
(c) Install the No.1 water bypass pipe to the water pump.
(d) Install a new gasket and the water outlet with the 2 bolts.
Torque: 21 NVm (210 kgfVcm, 15 ftVlbf)
(e) Connect the ECT sensor and sender gauge connectors.
(f) Connect the upper radiator hose to the water outlet.
20. INSTALL DRIVE BELT
Install the drive belt by turning the drive belt tensioner clock-
wise.
21. M/T:
INSTALL DRIVE BELT TENSIONER DAMPER
(See step 19 in timing belt installation)
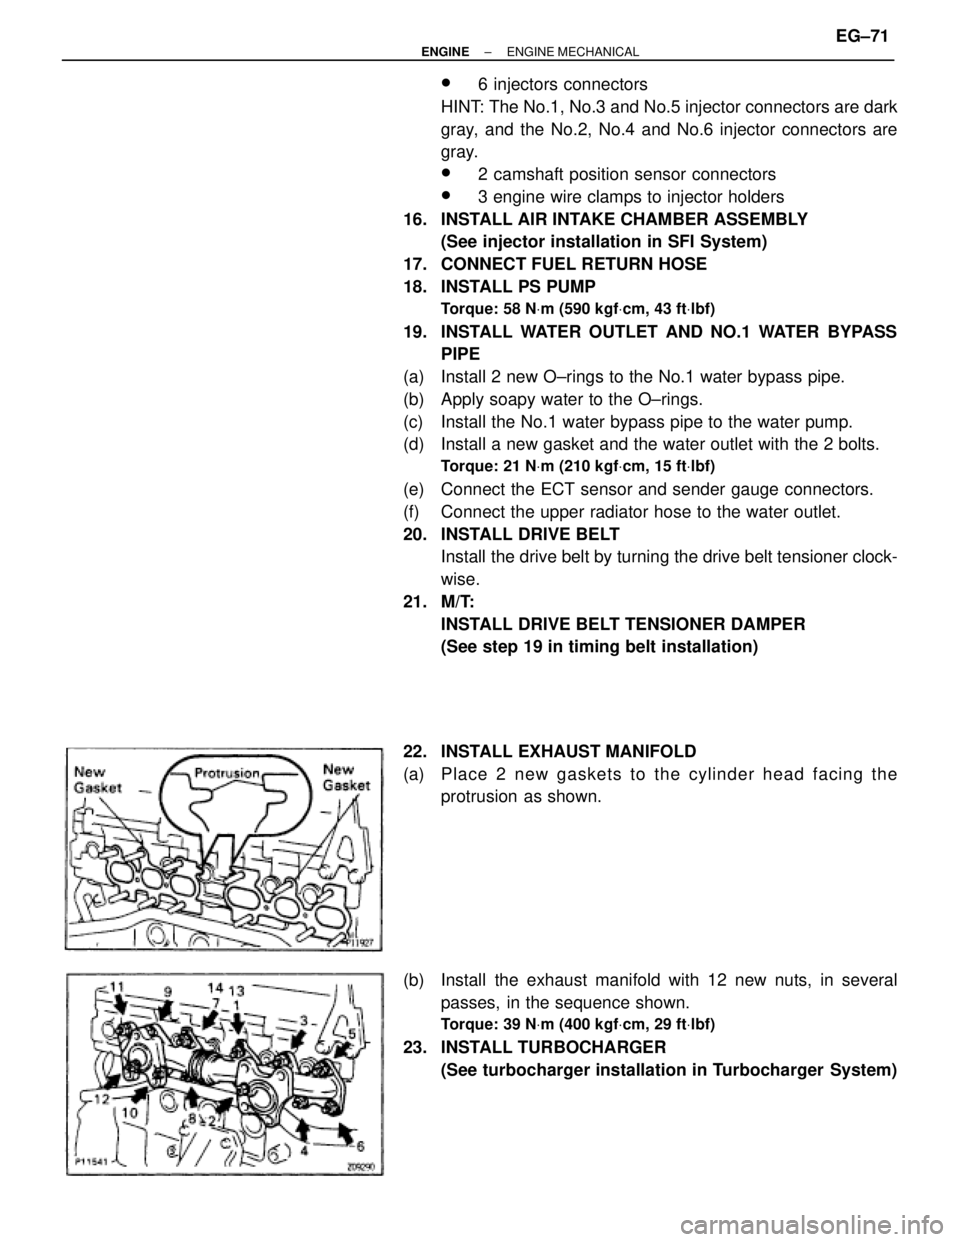
22. INSTALL EXHAUST MANIFOLD
(a) P la ce 2 ne w ga ske ts to th e cylinder head facing the
protrusion as shown.
(b) Install the exhaust manifold with 12 new nuts, in several
passes, in the sequence shown.
Torque: 39 NVm (400 kgfVcm, 29 ftVlbf)
23. INSTALL TURBOCHARGER
(See turbocharger installation in Turbocharger System)
± ENGINEENGINE MECHANICALEG±71
Page 461 of 878
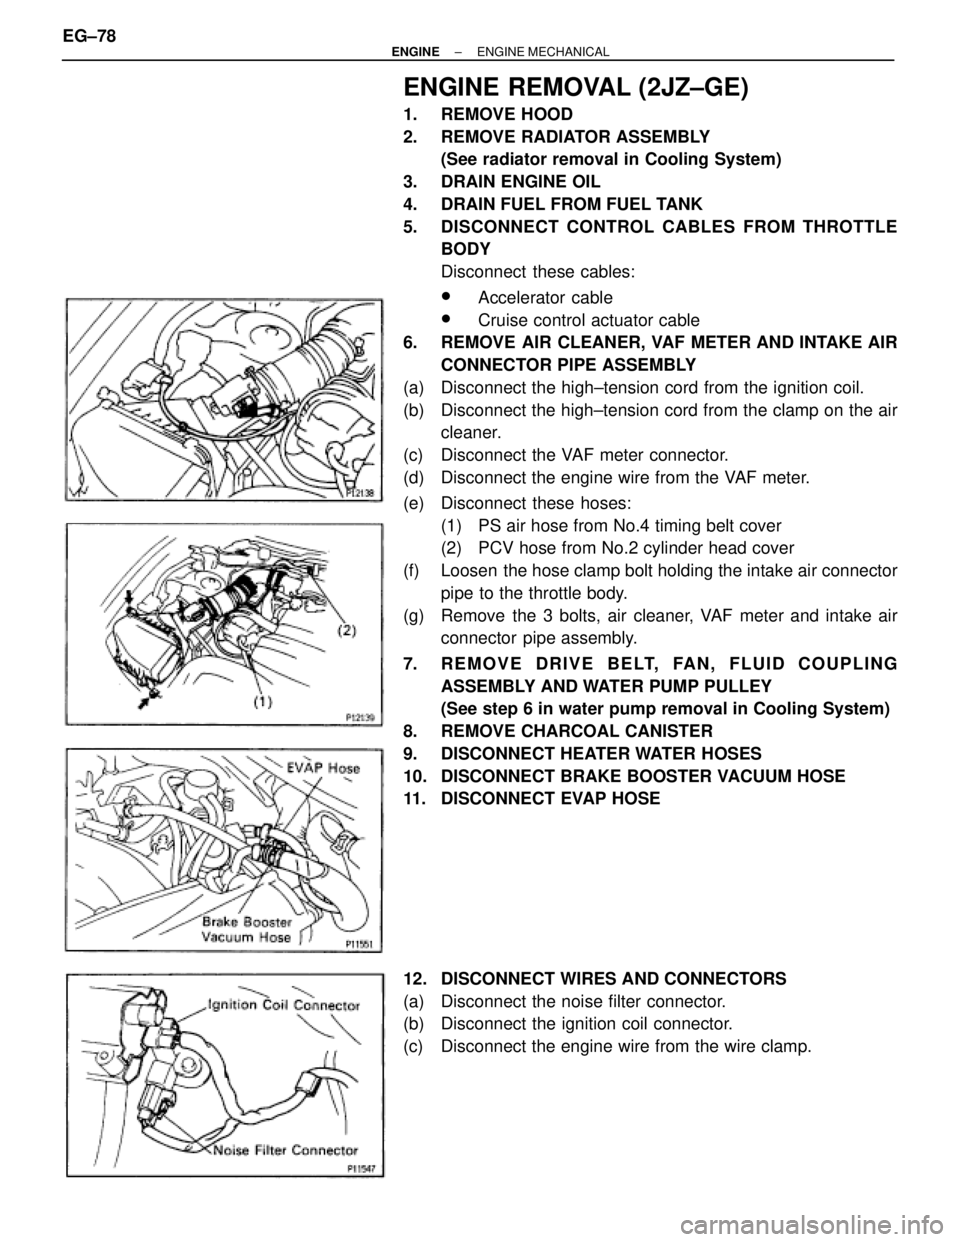
ENGINE REMOVAL (2JZ±GE)
1. REMOVE HOOD
2. REMOVE RADIATOR ASSEMBLY
(See radiator removal in Cooling System)
3. DRAIN ENGINE OIL
4. DRAIN FUEL FROM FUEL TANK
5. DISCONNECT CONTROL CABLES FROM THROTTLE
BODY
Disconnect these cables:
wAccelerator cable
wCruise control actuator cable
6. REMOVE AIR CLEANER, VAF METER AND INTAKE AIR
CONNECTOR PIPE ASSEMBLY
(a) Disconnect the high±tension cord from the ignition coil.
(b) Disconnect the high±tension cord from the clamp on the air
cleaner.
(c) Disconnect the VAF meter connector.
(d) Disconnect the engine wire from the VAF meter.
(e) Disconnect these hoses:
(1) PS air hose from No.4 timing belt cover
(2) PCV hose from No.2 cylinder head cover
(f) Loosen the hose clamp bolt holding the intake air connector
pipe to the throttle body.
(g) Remove the 3 bolts, air cleaner, VAF meter and intake air
connector pipe assembly.
7. REMOVE DRIVE BELT, FAN, FLUID COUPLING
ASSEMBLY AND WATER PUMP PULLEY
(See step 6 in water pump removal in Cooling System)
8. REMOVE CHARCOAL CANISTER
9. DISCONNECT HEATER WATER HOSES
10. DISCONNECT BRAKE BOOSTER VACUUM HOSE
11. DISCONNECT EVAP HOSE
12. DISCONNECT WIRES AND CONNECTORS
(a) Disconnect the noise filter connector.
(b) Disconnect the ignition coil connector.
(c) Disconnect the engine wire from the wire clamp. EG±78
± ENGINEENGINE MECHANICAL
Page 463 of 878
13. DISCONNECT FUEL HOSES
(a) Remove the union bolt and 2 gaskets, disconnect the fuel
inlet hose.
HINT:
wPut a suitable container or shop rag under the fuel pipe
support.
wSlowly loosen the union bolt.
(b) Suspend the hose union end upward.
(c) Disconnect the fuel return hose from the oil dipstick guide.
(d) Disconnect the fuel return hose from the fuel return hose.
Plug the hose end.
14. REMOVE ENGINE WIRE BRACKET
Remove the bolt and bracket, and disconnect the engine wire
from the intake manifold stay.
15. DISCONNECT PS PUMP WITHOUT DISCONNECTING
HOSES
(a) Remove the 3 bolts, plate washer and pump front bracket.
(b) Disconnect these hoses:
(1) Air hose from No.4 timing belt cover
(2) Air hose from air intake chamber
(c) Disconnect the pump housing from the pump bracket.
HINT: Put aside the pump housing, and suspend it.
(d) Remove the 2 bolts and pump rear stay.
(e) Remove the 2 bolts and pump bracket. EG±80
± ENGINEENGINE MECHANICAL
Page 468 of 878
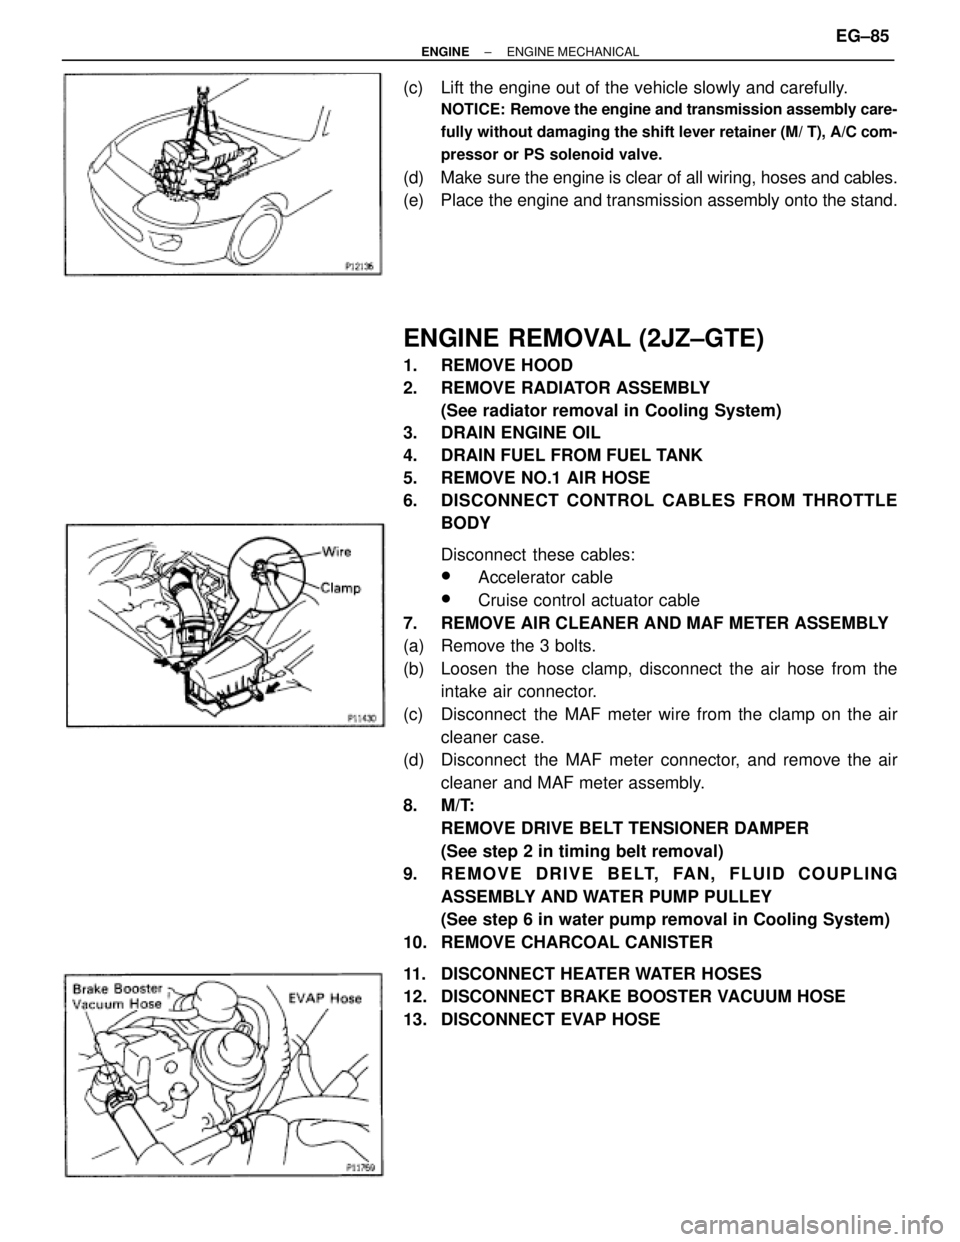
(c) Lift the engine out of the vehicle slowly and carefully.
NOTICE: Remove the engine and transmission assembly care-
fully without damaging the shift lever retainer (M/ T), A/C com-
pressor or PS solenoid valve.
(d) Make sure the engine is clear of all wiring, hoses and cables.
(e) Place the engine and transmission assembly onto the stand.
ENGINE REMOVAL (2JZ±GTE)
1. REMOVE HOOD
2. REMOVE RADIATOR ASSEMBLY
(See radiator removal in Cooling System)
3. DRAIN ENGINE OIL
4. DRAIN FUEL FROM FUEL TANK
5. REMOVE NO.1 AIR HOSE
6. DISCONNECT CONTROL CABLES FROM THROTTLE
BODY
Disconnect these cables:
wAccelerator cable
wCruise control actuator cable
7. REMOVE AIR CLEANER AND MAF METER ASSEMBLY
(a) Remove the 3 bolts.
(b) Loosen the hose clamp, disconnect the air hose from the
intake air connector.
(c) Disconnect the MAF meter wire from the clamp on the air
cleaner case.
(d) Disconnect the MAF meter connector, and remove the air
cleaner and MAF meter assembly.
8. M/T:
REMOVE DRIVE BELT TENSIONER DAMPER
(See step 2 in timing belt removal)
9. REMOVE DRIVE BELT, FAN, FLUID COUPLING
ASSEMBLY AND WATER PUMP PULLEY
(See step 6 in water pump removal in Cooling System)
10. REMOVE CHARCOAL CANISTER
11. DISCONNECT HEATER WATER HOSES
12. DISCONNECT BRAKE BOOSTER VACUUM HOSE
13. DISCONNECT EVAP HOSE
± ENGINEENGINE MECHANICALEG±85
Page 481 of 878
PREPARATION FOR DISASSEMBLY
1. M/T:
REMOVE FLYWHEEL
2. A/T:
REMOVE DRIVE PLATE
3. INSTALL ENGINE TO ENGINE STAND FOR
DISASSEMBLY
4. REMOVE GENERATOR
5. REMOVE TIMING BELT AND PULLEYS
(See timing belt removal)
6. REMOVE CYLINDER HEAD
(See cylinder head removal)
7. REMOVE OIL FILTER
(See oil and filter replacement in Lubrication System)
8. 2JZ±GTE:
REMOVE OIL COOLER
(See oil cooler removal in Lubrication System)
9. REMOVE NO.2 WATER BYPASS PIPE
(a) 2JZ±GE:
Remove the bolt, 2 nuts, water bypass pipe and gasket.
(b) 2JZ±GTE:
Remove the 2 bolts, 2 nuts, water bypass pipe and gasket.
10. REMOVE OIL FILTER BRACKET
Remove the union bolt, gasket, oil filter bracket and O ±ring.
11. REMOVE LH ENGINE MOUNTING BRACKET AND
INSULATOR ASSEMBLY
12. REMOVE FUEL PIPE SUPPORT EG±98
± ENGINEENGINE MECHANICAL
Page 505 of 878
8. INSTALL FUEL PIPE SUPPORT
Torque: 14 NVm (145 kgfVcm, 10 ftVlbf)
9. INSTALL LH ENGINE MOUNTING BRACKET AND
INSULATOR ASSEMBLY
HINT: LH mounting bracket is marked ºA u INº.
Torque: 58 NVm (590 kgfVcm, 43 ftVlbf)
10. INSTALL OIL FILTER BRACKET
(a) Check and clean the oil filter bracket installation.
(b) Place a new O±ring in position on the oil filter bracket.
(c) Apply clean engine oil to the O±ring.
(d) Install a new gasket to the union bolt.
(e) Install the oil filter braket with the union bolt.
Torque: 88 NVm (900 kgfVcm, 65 ftVlbf)
11. INSTALL NO.2 WATER BYPASS PIPE
(a) Install a new gasket to the water pump.
(b) 2JZ±GE:
Install the water bypass pipe with the bolt and 2 nuts.
Torque: 21 NVm (210 kgfVcm, 15 ftVlbf)
(c) 2JZ±GTE:
Install the water bypass pipe with the 2 bolts and 2 nuts.
Torque: 21 NVm (210 kgfVcm, 15 ftVlbf)
12. 2JZ±GTE:
INSTALL OIL COOLER
(See oil cooler installation in Lubrication System)
13. INSTALL OIL FILTER
(See oil and filter replacement in Lubrication System)
14. INSTALL CYLINDER HEAD
(See cylinder head installation)
15. INSTALL TIMING PULLEYS AND BELT
(See timing belt installation)
16. INSTALL GENERATOR
(See generator installation in Charging System)
17. REMOVE ENGINE STAND FROM ENGINE
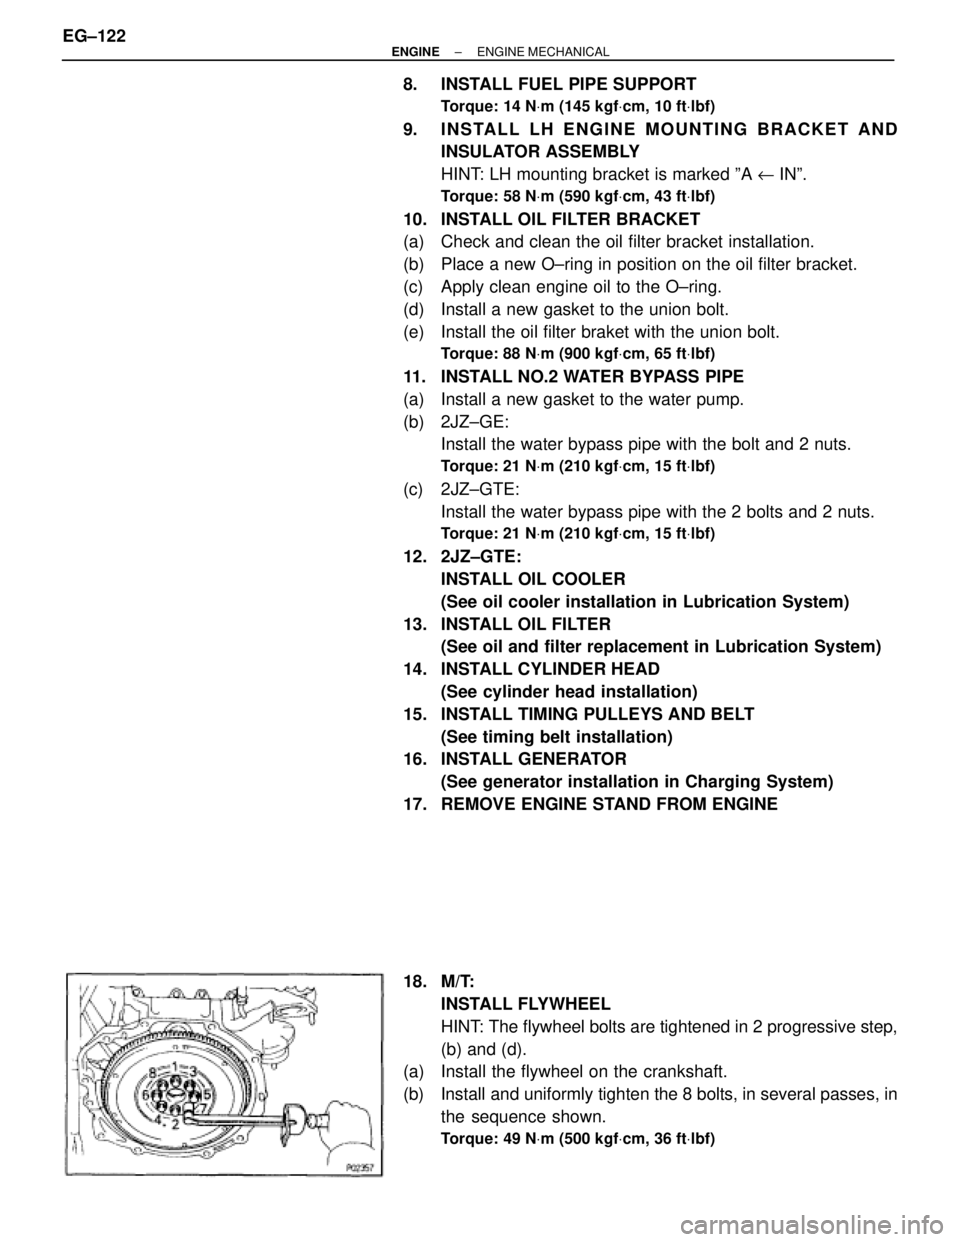
18. M/T:
INSTALL FLYWHEEL
HINT: The flywheel bolts are tightened in 2 progressive step,
(b) and (d).
(a) Install the flywheel on the crankshaft.
(b) Install and uniformly tighten the 8 bolts, in several passes, in
the sequence shown.
Torque: 49 NVm (500 kgfVcm, 36 ftVlbf)
EG±122± ENGINEENGINE MECHANICAL
Page 511 of 878
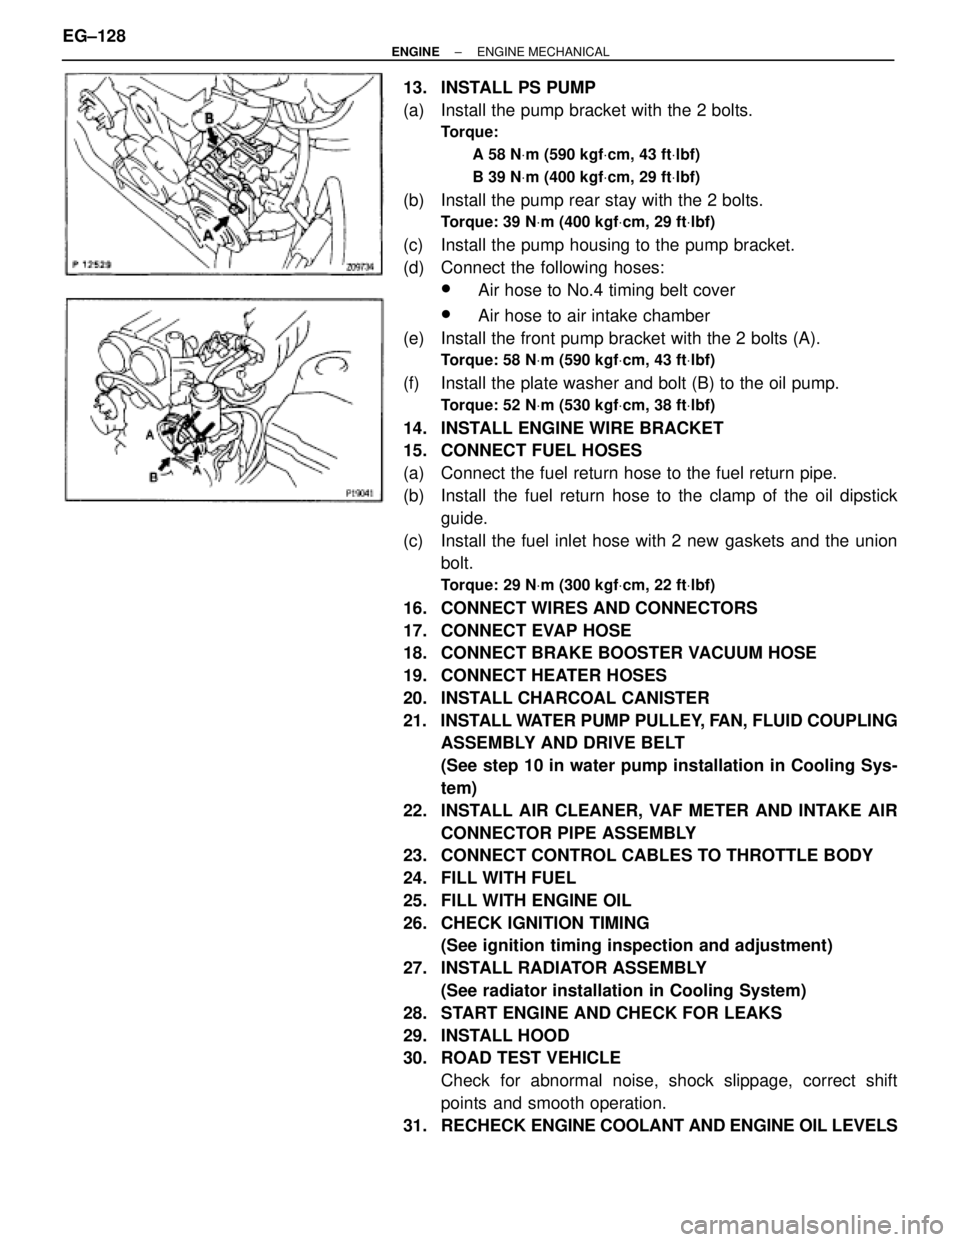
13. INSTALL PS PUMP
(a) Install the pump bracket with the 2 bolts.
Torque:
A 58 NVm (590 kgfVcm, 43 ftVlbf)
B 39 NVm (400 kgfVcm, 29 ftVlbf)
(b) Install the pump rear stay with the 2 bolts.
Torque: 39 NVm (400 kgfVcm, 29 ftVlbf)
(c) Install the pump housing to the pump bracket.
(d) Connect the following hoses:
wAir hose to No.4 timing belt cover
wAir hose to air intake chamber
(e) Install the front pump bracket with the 2 bolts (A).
Torque: 58 NVm (590 kgfVcm, 43 ftVlbf)
(f) Install the plate washer and bolt (B) to the oil pump.
Torque: 52 NVm (530 kgfVcm, 38 ftVlbf)
14. INSTALL ENGINE WIRE BRACKET
15. CONNECT FUEL HOSES
(a) Connect the fuel return hose to the fuel return pipe.
(b) Install the fuel return hose to the clamp of the oil dipstick
guide.
(c) Install the fuel inlet hose with 2 new gaskets and the union
bolt.
Torque: 29 NVm (300 kgfVcm, 22 ftVlbf)
16. CONNECT WIRES AND CONNECTORS
17. CONNECT EVAP HOSE
18. CONNECT BRAKE BOOSTER VACUUM HOSE
19. CONNECT HEATER HOSES
20. INSTALL CHARCOAL CANISTER
21. INSTALL WATER PUMP PULLEY, FAN, FLUID COUPLING
ASSEMBLY AND DRIVE BELT
(See step 10 in water pump installation in Cooling Sys-
tem)
22. INSTALL AIR CLEANER, VAF METER AND INTAKE AIR
CONNECTOR PIPE ASSEMBLY
23. CONNECT CONTROL CABLES TO THROTTLE BODY
24. FILL WITH FUEL
25. FILL WITH ENGINE OIL
26. CHECK IGNITION TIMING
(See ignition timing inspection and adjustment)
27. INSTALL RADIATOR ASSEMBLY
(See radiator installation in Cooling System)
28. START ENGINE AND CHECK FOR LEAKS
29. INSTALL HOOD
30. ROAD TEST VEHICLE
Check for abnormal noise, shock slippage, correct shift
points and smooth operation.
31. RECHECK ENGINE COOLANT AND ENGINE OIL LEVELS EG±128
± ENGINEENGINE MECHANICAL
Page 514 of 878
13. CONNECT ENGINE WIRE TO COWL PANEL
14. INSTALL A/C COMPRESSOR
(a) Using a torx socket (E10), install the stud bolt and and
compressor.
Torque: 26 NVm (265 kgfVcm, 19 ftVlbf)
(b) Connect the compressor connector.
(c) Temporarily install the compressor with nut and 3 bolts.
(d) Alternately tighten the bolt and nut.
Torque: 52 NVm (530 kgfVcm, 38 ftVlbf)
15. INSTALL PS PRESSURE TUBE
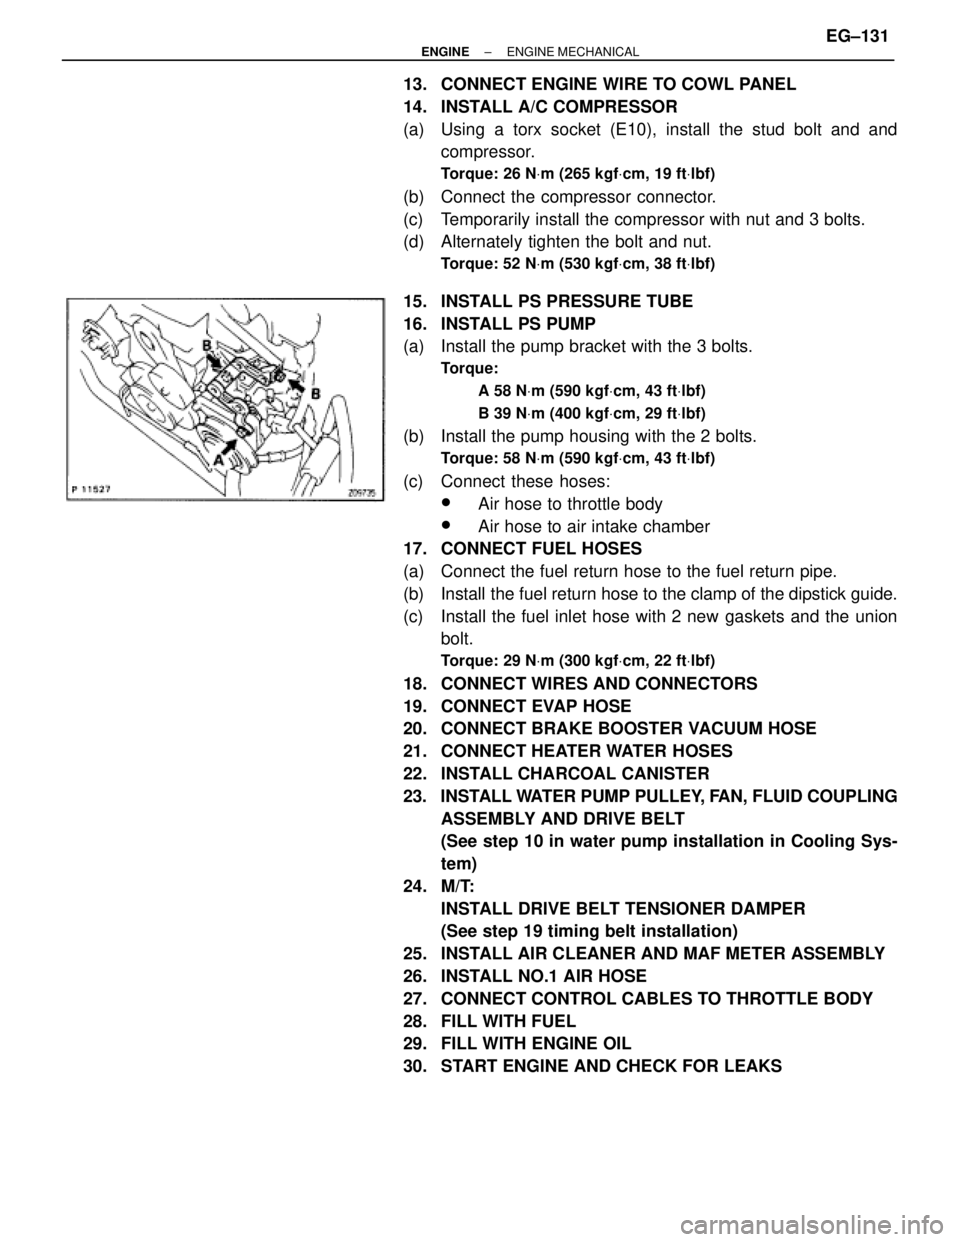
16. INSTALL PS PUMP
(a) Install the pump bracket with the 3 bolts.
Torque:
A 58 NVm (590 kgfVcm, 43 ftVlbf)
B 39 NVm (400 kgfVcm, 29 ftVlbf)
(b) Install the pump housing with the 2 bolts.
Torque: 58 NVm (590 kgfVcm, 43 ftVlbf)
(c) Connect these hoses:
wAir hose to throttle body
wAir hose to air intake chamber
17. CONNECT FUEL HOSES
(a) Connect the fuel return hose to the fuel return pipe.
(b) Install the fuel return hose to the clamp of the dipstick guide.
(c) Install the fuel inlet hose with 2 new gaskets and the union
bolt.
Torque: 29 NVm (300 kgfVcm, 22 ftVlbf)
18. CONNECT WIRES AND CONNECTORS
19. CONNECT EVAP HOSE
20. CONNECT BRAKE BOOSTER VACUUM HOSE
21. CONNECT HEATER WATER HOSES
22. INSTALL CHARCOAL CANISTER
23. INSTALL WATER PUMP PULLEY, FAN, FLUID COUPLING
ASSEMBLY AND DRIVE BELT
(See step 10 in water pump installation in Cooling Sys-
tem)
24. M/T:
INSTALL DRIVE BELT TENSIONER DAMPER
(See step 19 timing belt installation)
25. INSTALL AIR CLEANER AND MAF METER ASSEMBLY
26. INSTALL NO.1 AIR HOSE
27. CONNECT CONTROL CABLES TO THROTTLE BODY
28. FILL WITH FUEL
29. FILL WITH ENGINE OIL
30. START ENGINE AND CHECK FOR LEAKS
± ENGINEENGINE MECHANICALEG±131