Page 486 of 878
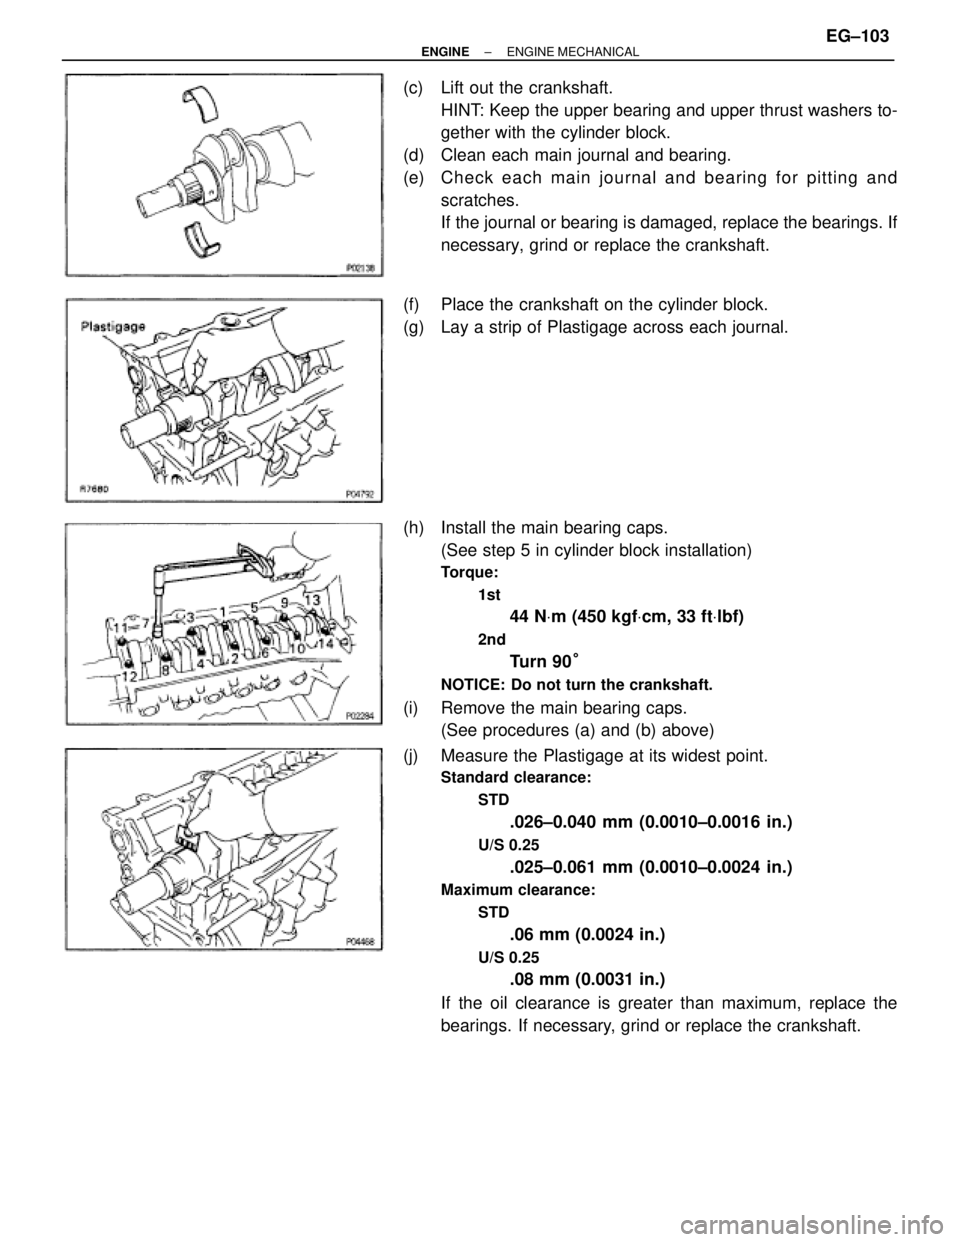
(c) Lift out the crankshaft.
HINT: Keep the upper bearing and upper thrust washers to-
gether with the cylinder block.
(d) Clean each main journal and bearing.
(e) Ch e ck ea ch ma in jo u rn a l an d be a rin g fo r pittin g an d
scratches.
If the journal or bearing is damaged, replace the bearings. If
necessary, grind or replace the crankshaft.
(f) Place the crankshaft on the cylinder block.
(g) Lay a strip of Plastigage across each journal.
(h) Install the main bearing caps.
(See step 5 in cylinder block installation)
Torque:
1st
44 NVm (450 kgfVcm, 33 ftVlbf)
2nd
Turn 90°
NOTICE: Do not turn the crankshaft.
(i) Remove the main bearing caps.
(See procedures (a) and (b) above)
(j) Measure the Plastigage at its widest point.
Standard clearance:
STD
.026±0.040 mm (0.0010±0.0016 in.)
U/S 0.25
.025±0.061 mm (0.0010±0.0024 in.)
Maximum clearance:
STD
.06 mm (0.0024 in.)
U/S 0.25
.08 mm (0.0031 in.)
If the oil clearance is greater than maximum, replace the
bearings. If necessary, grind or replace the crankshaft.
± ENGINEENGINE MECHANICALEG±103
Page 488 of 878
Mark º6º
61.986±61.988 mm (2.44039±2.44047 in.)
Mark º7º
61.984±61.986 mm (2.44031±2.44039 in.)
Bearing center wall thickness:
Mark º1º
1.994±1.997 mm (0.0785±0.0786 in.)
Mark º2º
1.997±2.000 mm (0.0786±0.0787 in.)
Mark º3º
2.000±2.003 mm (0.0787±0.0789 in.)
Mark º4º
2.003±2.006 mm (0.0789±0.0790 in.)
Mark º5º
2.006±2.009 mm (0.0790±0.0791 in.)
Standard sized Bearing Selection chart
������ ������Crankshaft������������ ������������Cylinder block number mark
������ ������number mark�� ��0��� ���1�� ��2�� ��3��� ���4�� ��5�� ��6��� ���7
������011122233������ ������011122233
������ ������111222333
������
111222333
������ ������212223334������212223334������ ������322233344������322233344������ ������422333444������ ������422333444
������523334455������ ������523334455
������633344555������ ������633344555
������733445555������ ������733445555
EXAMPLE: Cylinder block º3º Crankshaft º4º
= Use bearing º3º
(k) Completely remove the Plastigage.
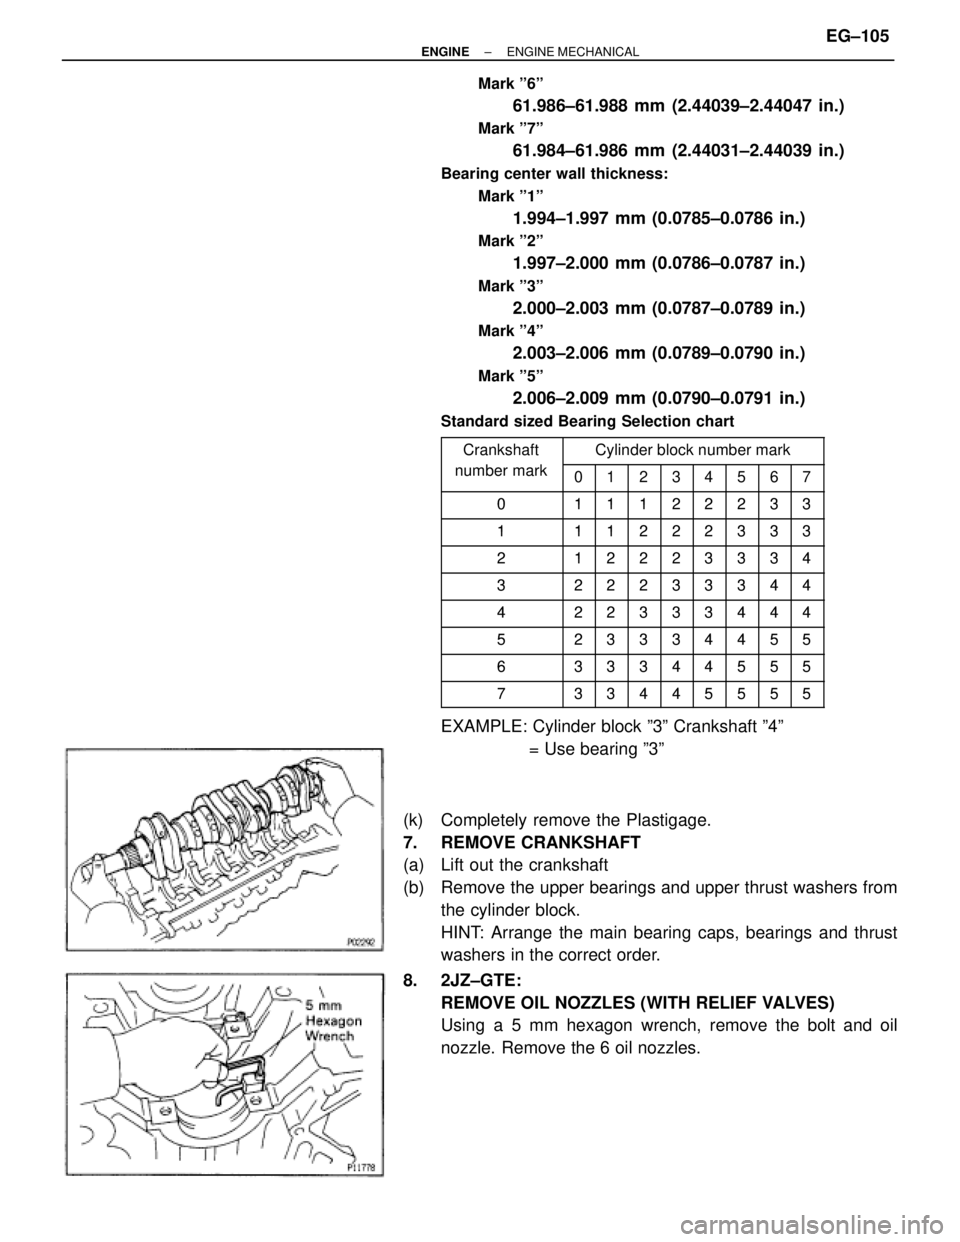
7. REMOVE CRANKSHAFT
(a) Lift out the crankshaft
(b) Remove the upper bearings and upper thrust washers from
the cylinder block.
HINT: Arrange the main bearing caps, bearings and thrust
washers in the correct order.
8. 2JZ±GTE:
REMOVE OIL NOZZLES (WITH RELIEF VALVES)
Using a 5 mm hexagon wrench, remove the bolt and oil
nozzle. Remove the 6 oil nozzles.
± ENGINEENGINE MECHANICALEG±105
Page 490 of 878
5. REMOVE CYLINDER RIDGE
If the wear is less than 0.2 mm (0.008 in.), using a ridge ream-
er, grind the top of the cylinder.
6. INSPECT MAIN BEARING CAP BOLTS
Using vernier calipers, measure the minimum diameter of the
compressed thread at the measuring point.
Standard diameter:
9.96±9.97 mm (0.3921±0.3925 in.)
Minimum diameter:
9.7 mm (0.382 in.)
If the diameter is less than minimum, replace the bolt.
PISTON AND CONNECTING ROD
DISASSEMBLY
1. CHECK FIT BETWEEN PISTON AND PISTON PIN
Try to move the piston back and forth on the piston pin.
If any movement is felt, replace the piston and pin as a set.
2. REMOVE PISTON RINGS
(a) Using a piston ring expander, remove the 2 compression
rings.
(b) Remove the 2 side rails and oil ring expander by hand.
HINT: Arrange the piston rings in correct order only.
3. DISCONNECT CONNECTING ROD FROM PISTON
(a) Using a small screwdriver, remove the 2 snap rings.
± ENGINEENGINE MECHANICALEG±107
Page 492 of 878
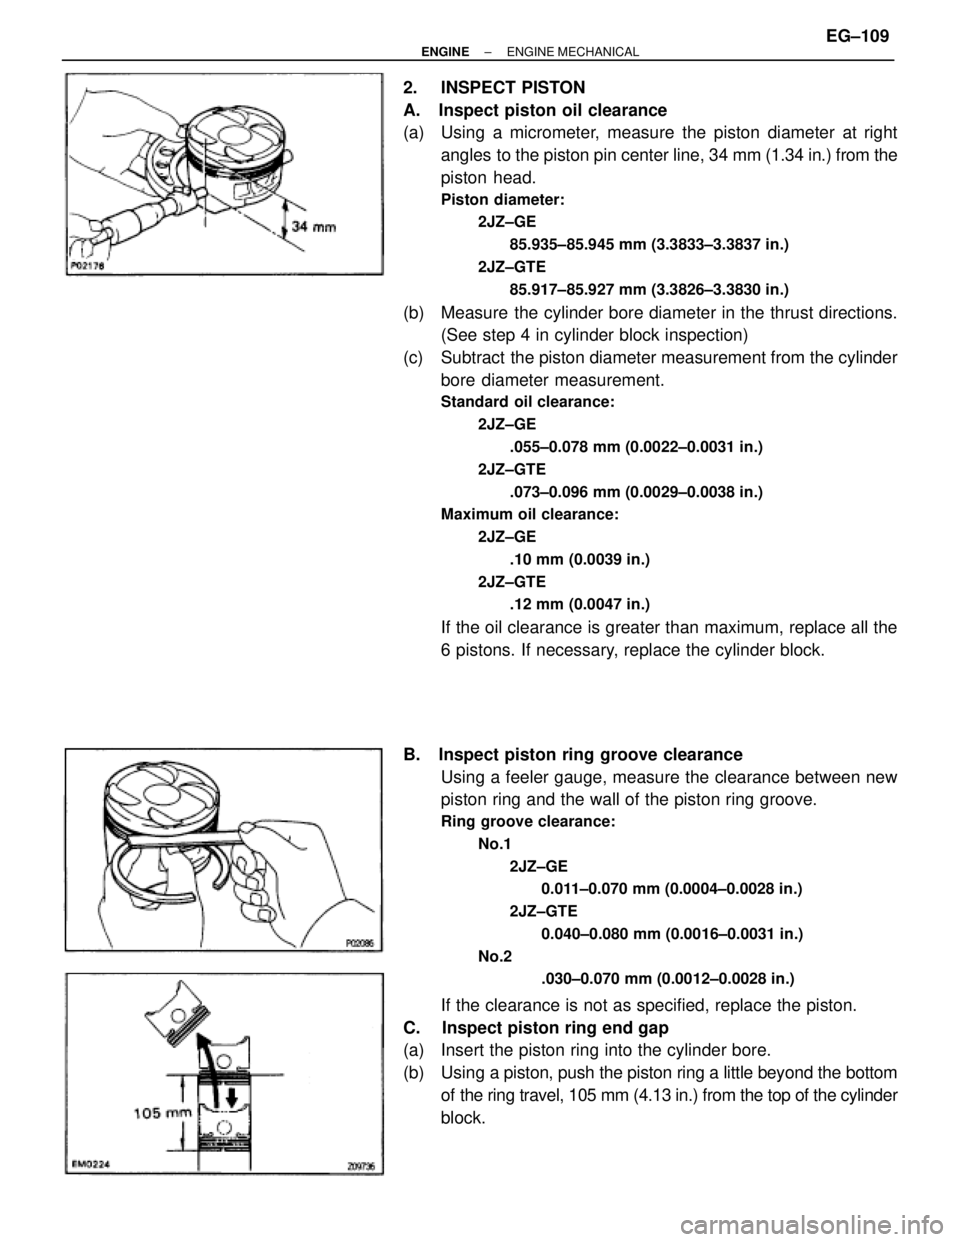
2. INSPECT PISTON
A. Inspect piston oil clearance
(a) Using a micrometer, measure the piston diameter at right
angles to the piston pin center line, 34 mm (1.34 in.) from the
piston head.
Piston diameter:
2JZ±GE
85.935±85.945 mm (3.3833±3.3837 in.)
2JZ±GTE
85.917±85.927 mm (3.3826±3.3830 in.)
(b) Measure the cylinder bore diameter in the thrust directions.
(See step 4 in cylinder block inspection)
(c) Subtract the piston diameter measurement from the cylinder
bore diameter measurement.
Standard oil clearance:
2JZ±GE
.055±0.078 mm (0.0022±0.0031 in.)
2JZ±GTE
.073±0.096 mm (0.0029±0.0038 in.)
Maximum oil clearance:
2JZ±GE
.10 mm (0.0039 in.)
2JZ±GTE
.12 mm (0.0047 in.)
If the oil clearance is greater than maximum, replace all the
6 pistons. If necessary, replace the cylinder block.
B. Inspect piston ring groove clearance
Using a feeler gauge, measure the clearance between new
piston ring and the wall of the piston ring groove.
Ring groove clearance:
No.1
2JZ±GE
0.011±0.070 mm (0.0004±0.0028 in.)
2JZ±GTE
0.040±0.080 mm (0.0016±0.0031 in.)
No.2
.030±0.070 mm (0.0012±0.0028 in.)
If the clearance is not as specified, replace the piston.
C. Inspect piston ring end gap
(a) Insert the piston ring into the cylinder bore.
(b) Using a piston, push the piston ring a little beyond the bottom
of the ring travel, 105 mm (4.13 in.) from the top of the cylinder
block.
± ENGINEENGINE MECHANICALEG±109
Page 493 of 878
(c) Using a feeler gauge, measure the ring end gap.
Standard ring end gap:
No.1
2JZ±GE
0.300±0.470 mm (0.0118±0.0185 in.)
2JZ±GTE
0.300±0.400 mm (0.0118±0.0157 in.)
No.2
2JZ±GE
0.350±0.520 mm (0.0138±0.0205 in.)
2JZ±GTE
0.350±0.450 mm (0.0138±0.0178 in.)
Oil (Side rail)
2JZ±GE
0.130±0.450 mm (0.0051±0.0177 in.)
2JZ±GTE
0.130±0.380 mm (0.0051±0.0150 in.)
Maximum ring end gap:
No.1
2JZ±GE
1.07 mm (0.0421 in.)
2JZ±GTE
1.00 mm (0.0394 in.)
No.2
2JZ±GE
1.12 mm (0.0441 in.)
2JZ±GTE
1.05 mm (0.0413 in.)
Oil (Side rail)
2JZ±GE
1.05 mm (0.0413 in.)
2JZ±GTE
0.98 mm (0.0386 in.)
If the end gap is greater than maximum, replace the piston
ring. If the end gap is greater than maximum, even with a new
piston ring, replace the cylinder block.
D. Inspect piston pin fit
At 80°C (176°F), you should be able to push the piston pin
into the piston pin hole with your thumb. EG±110
± ENGINEENGINE MECHANICAL
Page 494 of 878
1041 W. 18th Street, Suite A210
Costa Mesa, California 92627
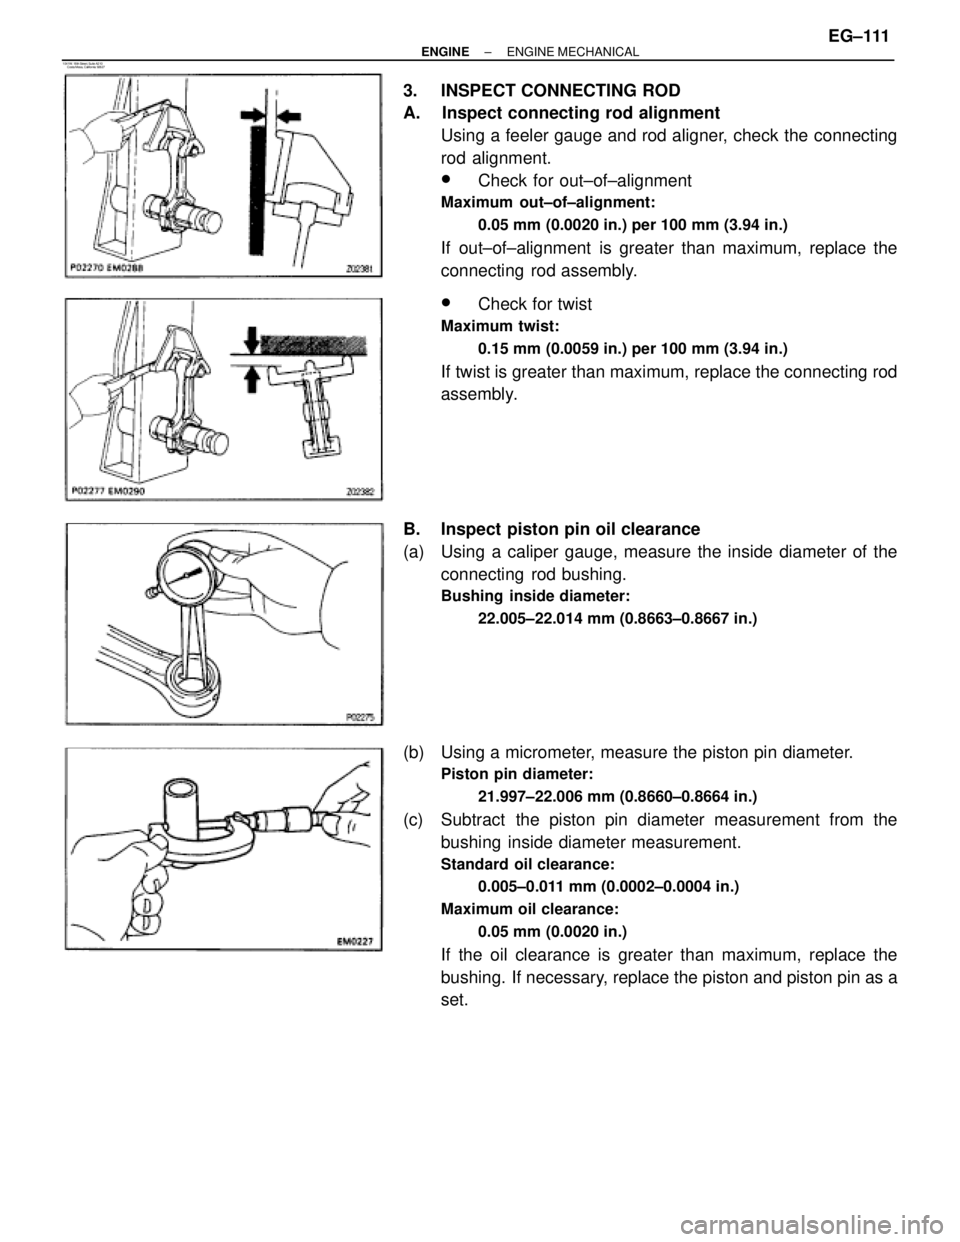
3. INSPECT CONNECTING ROD
A. Inspect connecting rod alignment
Using a feeler gauge and rod aligner, check the connecting
rod alignment.
wCheck for out±of±alignment
Maximum out±of±alignment:
0.05 mm (0.0020 in.) per 100 mm (3.94 in.)
If out±of±alignment is greater than maximum, replace the
connecting rod assembly.
wCheck for twist
Maximum twist:
0.15 mm (0.0059 in.) per 100 mm (3.94 in.)
If twist is greater than maximum, replace the connecting rod
assembly.
B. Inspect piston pin oil clearance
(a) Using a caliper gauge, measure the inside diameter of the
connecting rod bushing.
Bushing inside diameter:
22.005±22.014 mm (0.8663±0.8667 in.)
(b) Using a micrometer, measure the piston pin diameter.
Piston pin diameter:
21.997±22.006 mm (0.8660±0.8664 in.)
(c) Subtract the piston pin diameter measurement from the
bushing inside diameter measurement.
Standard oil clearance:
0.005±0.011 mm (0.0002±0.0004 in.)
Maximum oil clearance:
0.05 mm (0.0020 in.)
If the oil clearance is greater than maximum, replace the
bushing. If necessary, replace the piston and piston pin as a
set.
± ENGINEENGINE MECHANICALEG±111
Page 495 of 878
C. If necessary, replace connecting rod bushing
(a) Using SST and a press, press out the bushing.
SST 09222±30010
(b) Align the oil holes of a new bushing and the connecting rod.
(c) Using SST and a press, press in the bushing.
SST 09222±30010
(d) Using a pin hole grinder, bore the bushing to obtain the
standard specified clearance (see step B) between the
bushing and piston pin.
(e) Check the piston pin fit at room temperature.
Coat the piston pin with engine oil and push it into the con-
necting rod with your thumb.
D. Inspect connecting rod bolts
Using vernier calipers, measure the minimum diameter of the
compressed bolt at the measuring point.
Standard diameter:
8.1±8.3 mm (0.319±0.327 in.)
Minimum diameter:
8.0 mm (0.315 in.)
If the diameter is less than minimum, replace the connecting
rod bolt. EG±112
± ENGINEENGINE MECHANICAL
Page 496 of 878
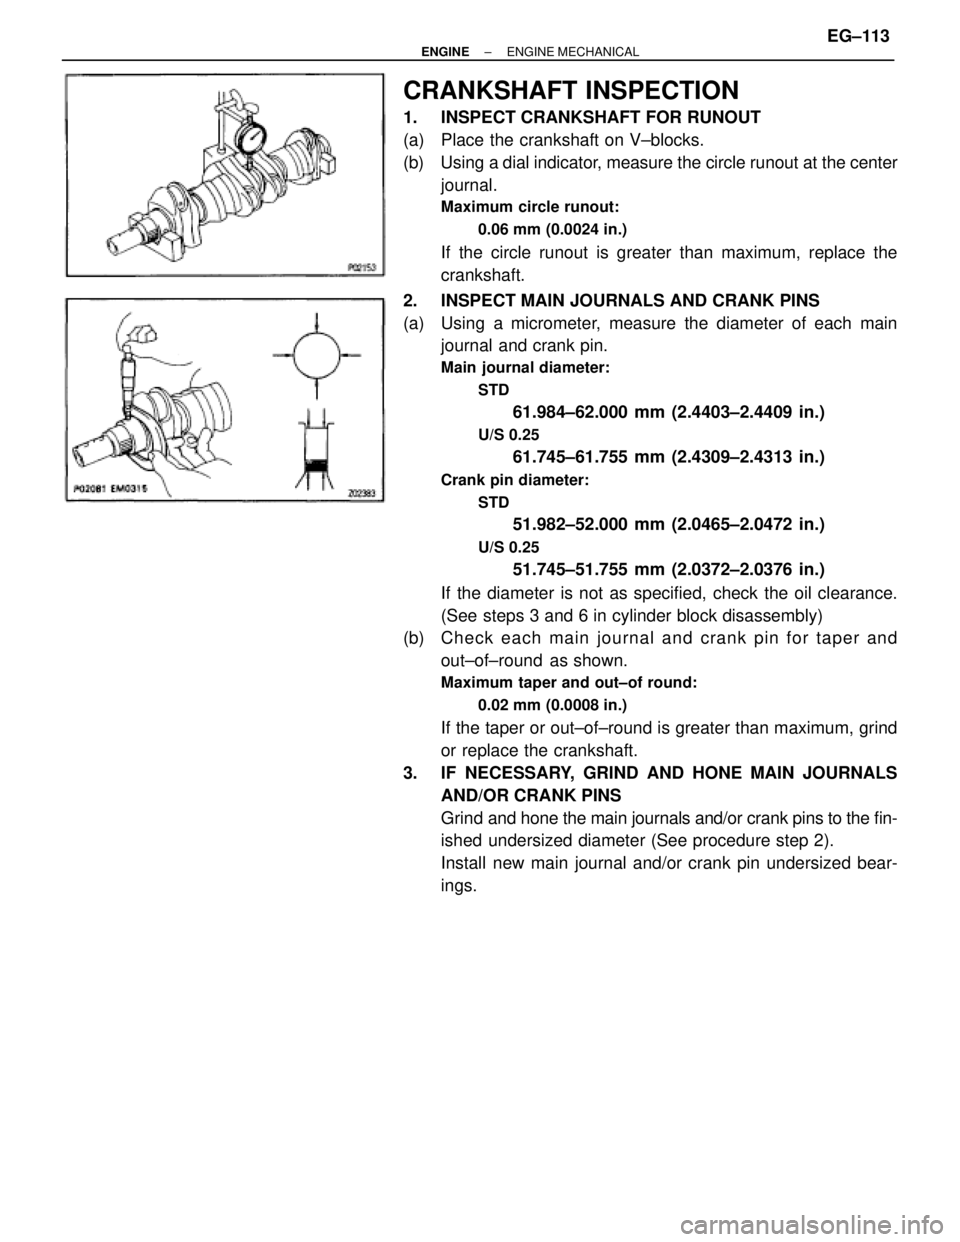
CRANKSHAFT INSPECTION
1. INSPECT CRANKSHAFT FOR RUNOUT
(a) Place the crankshaft on V±blocks.
(b) Using a dial indicator, measure the circle runout at the center
journal.
Maximum circle runout:
0.06 mm (0.0024 in.)
If the circle runout is greater than maximum, replace the
crankshaft.
2. INSPECT MAIN JOURNALS AND CRANK PINS
(a) Using a micrometer, measure the diameter of each main
journal and crank pin.
Main journal diameter:
STD
61.984±62.000 mm (2.4403±2.4409 in.)
U/S 0.25
61.745±61.755 mm (2.4309±2.4313 in.)
Crank pin diameter:
STD
51.982±52.000 mm (2.0465±2.0472 in.)
U/S 0.25
51.745±51.755 mm (2.0372±2.0376 in.)
If the diameter is not as specified, check the oil clearance.
(See steps 3 and 6 in cylinder block disassembly)
(b) Ch e ck ea ch ma in jo u rn a l an d cra n k pin fo r taper and
out±of±round as shown.
Maximum taper and out±of round:
0.02 mm (0.0008 in.)
If the taper or out±of±round is greater than maximum, grind
or replace the crankshaft.
3. IF NECESSARY, GRIND AND HONE MAIN JOURNALS
AND/OR CRANK PINS
Grind and hone the main journals and/or crank pins to the fin-
ished undersized diameter (See procedure step 2).
Install new main journal and/or crank pin undersized bear-
ings.
± ENGINEENGINE MECHANICALEG±113