Page 1284 of 3115
A19627A19432
A19637
E2PTNK
Vacuum Disconnect(+)
(-) E5
E9
- DIAGNOSTICSENGINE
DI-235
428 Author�: Date�:
20 Check voltage between terminals PTNK and E2 of ECM connectors.
PREPARATION:
Turn the ignition switch ON.
CHECK:
Measure the voltage between terminals PTNK and E2 of the
ECM connectors at following condition (1) and (2).
(1) Disconnect the vacuum hose from the vapor pres-
sure sensor.
(2) Using the MITYVAC (Hand-Held Vacuum Pump),
apply a vacuum of 4.0 kPa (30 mmHg, 1.18 in.Hg)
to the vapor pressure sensor.
NOTICE:
The vacuum applied to the vapor pressure sensor must be
less than 66.7 kPa (500 mmHg, 19.7 in.Hg).
OK:
Condition (1) Voltage: 2.9 to 3.7 V
Condition (2) Voltage: 0.5 V or less
OK Go to step 22.
NG
21 Check for open and short in harness and connector between vapor pressure
sensor and ECM (See page IN-36).
NG Repair or replace harness or connector.
OK
Replace ECM (See page SF-60).
22 Check fuel tank inlet valve.
NG Replace fuel tank inlet valve.
OK
Page 1289 of 3115

(-) E5
ECM Connector
A19627A19432
A19637
E2PTNK
Vacuum Disconnect(+)
(-) E5
E9
DI-240
- DIAGNOSTICSENGINE
433 Author�: Date�:
11 Check voltage between terminals VC and E2 of ECM")
A19522A19630
VC
E2(+)
(-) E5
ECM Connector
A19627A19432
A19637
E2PTNK
Vacuum Disconnect(+)
(-) E5
E9
DI-240
- DIAGNOSTICSENGINE
433 Author�: Date�:
11 Check voltage between terminals VC and E2 of ECM connector.
CHECK:
Turn the ignition switch ON.
CHECK:
Measure the voltage between terminals the E5 ECM connector.
OK:
Tester ConnectionSpecified Condition
VC (E5-18) - E2 (E5-28)4.5 to 5.5 V
NG Replace ECM (See page SF-60).
OK
12 Check voltage between terminals PTNK and E2 of ECM connectors.
PREPARATION:
Turn the ignition switch ON.
CHECK:
Measure the voltage between terminals PTNK and E2 of the
ECM connectors at following condition (1) and (2).
(1) Disconnect the vacuum hose from the vapor pres-
sure sensor.
(2) Using the MITYVAC (Hand-Held Vacuum Pump),
apply a vacuum of 4.0 kPa (30 mmHg, 1.18 in.Hg)
to the vapor pressure sensor.
NOTICE:
The vacuum applied to the vapor pressure sensor must be
less than 66.7 kPa (500 mmHg, 19.7 in.Hg).
OK:
Condition (1) Voltage: 2.9 to 3.7 V
Condition (2) Voltage: 0.5 V or less
OK Go to step 14.
NG
Page 1290 of 3115
A19638
PRG
Air Air
FF EE
VSV is ON VSV is OFF
E5
- DIAGNOSTICSENGINE
DI-241
434 Author�: Date�:
13 Check for open and short in harness and connector between vapor pressure sen-
sor
and ECM (See page IN-36).
NG Repair or replace harness or connector.
OK
Replace ECM (See page SF-60).
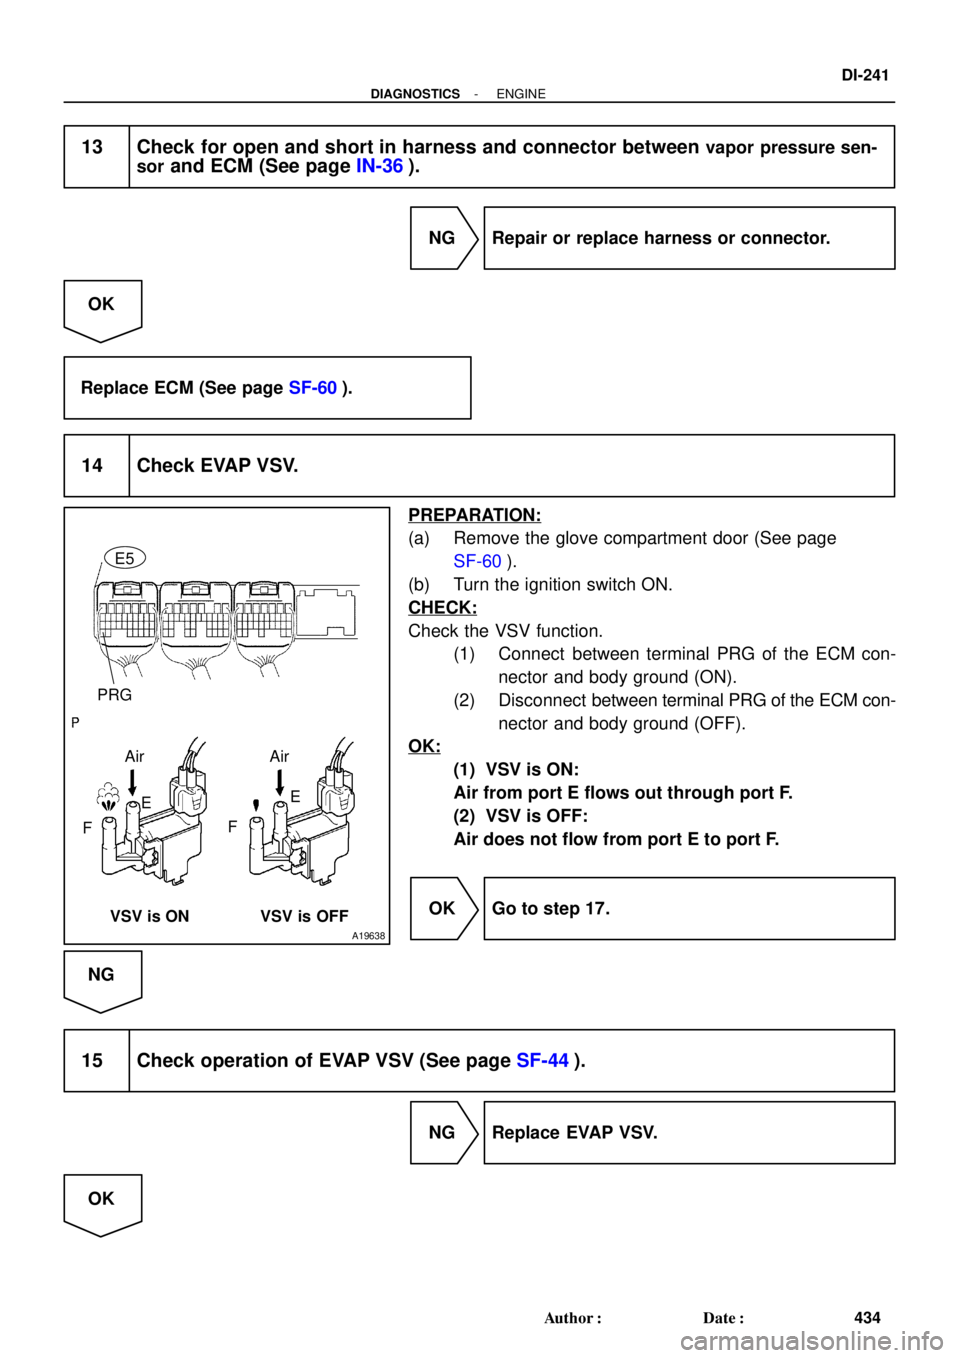
14 Check EVAP VSV.
PREPARATION:
(a) Remove the glove compartment door (See page
SF-60).
(b) Turn the ignition switch ON.
CHECK:
Check the VSV function.
(1) Connect between terminal PRG of the ECM con-
nector and body ground (ON).
(2) Disconnect between terminal PRG of the ECM con-
nector and body ground (OFF).
OK:
(1) VSV is ON:
Air from port E flows out through port F.
(2) VSV is OFF:
Air does not flow from port E to port F.
OK Go to step 17.
NG
15 Check operation of EVAP VSV (See page SF-44).
NG Replace EVAP VSV.
OK
Page 1291 of 3115
A19639VSV is OFF VSV is ON CCV
Air
E Air
E
FF
E5
DI-242
- DIAGNOSTICSENGINE
435 Author�: Date�:
16 Check for open and short in harness and connector between EFI or ECD relay
and EVAP VSV, and EVAP VSV and ECM (See page IN-36).
NG Repair or replace harness or connector.
OK
Replace ECM (See page SF-60).
17 Check CCV.
PREPARATION:
Turn the ignition switch ON.
CHECK:
Check the VSV function.
(1) Connect the terminal CCV of the ECM connector
and body ground (ON).
(2) Disconnect the terminal CCV of the ECM connector
and body ground (OFF).
OK:
(1) VSV is ON:
Air does not flow from port E to port F.
(2) VSV is OFF:
Air from port E flows out through port F.
OK Go to step 20.
NG
18 Check operation of CCV (See page SF-48).
NG Replace CCV.
OK
Page 1292 of 3115
A19641VSV is ON VSV is OFFTBP
Air
E Air
E
FF
E9
- DIAGNOSTICSENGINE
DI-243
436 Author�: Date�:
19 Check for open and short in harness and connector between EFI or ECD relay
and CCV, and CCV and ECM (See page IN-36).
NG Repair or replace harness or connector.
OK
Replace ECM (See page SF-60).
20 Check pressure switching valve.
PREPARATION:
Turn the ignition switch ON.
CHECK:
Check the VSV function.
(1) Connect the terminal TBP of the ECM connector
and body ground (ON).
(2) Disconnect the terminal TBP of the ECM connector
and body ground (OFF).
OK:
(1) VSV is ON:
Air does not flow from port E to port F.
(2) VSV is OFF:
Air from port E flows out through port F.
OK Go to step 23.
NG
21 Check operation of pressure switching valve (See page SF-46).
NG Replace pressure switching valve.
OK
Page 1302 of 3115
A10150A10149BE6653
A10281VSV is OFFVSV is ON ON
Air
FAir
E
F E
- DIAGNOSTICSENGINE
DI-253
446 Author�: Date�:
9 Check CCV.
PREPARATION:
(a) Disconnect the vacuum hose for the CCV from the char-
coal canister.
(b) Turn the ignition switch ON and push the hand-held tes-
ter main switch ON.
(c) Select the ºENHANCED OBD II / ACTIVE TESTº mode on
the hand-held tester.
(d) Select the item ºCAN CTRL VSV / ALLº in the ACTIVE
TEST and operate CAN CTRL VSV (Press the right or left
button).
CHECK:
Check the VSV operation when it is operated by the hand-held
tester.
OK:
VSV is ON:
Air does not flow from port E to port F.
VSV is OFF:
Air from port E flows out through port F.
OK Go to step 13.
NG
10 Check vacuum hose between CCV and charcoal canister.
CHECK:
(a) Check that the vacuum hose is connected correctly.
(b) Check the vacuum hose for looseness and disconnection.
(c) Check the vacuum hose for cracks, hole damage, and blockage.
NG Repair or replace vacuum hose.
OK
Page 1303 of 3115
BE6653A10143A10144A10801VSV is ONVSV is OFF ON
Air
Air
E
FE
F
DI-254
- DIAGNOSTICSENGINE
447 Author�: Date�:
11 Check operation of CCV (See page SF-48).
NG Replace CCV.
OK
12 Check for open and short in harness and connector between EFI or ECD relay
and CCV, and CCV and ECM (See page IN-36).
NG Repair or replace harness or connector.
OK
Replace ECM (See page SF-60).
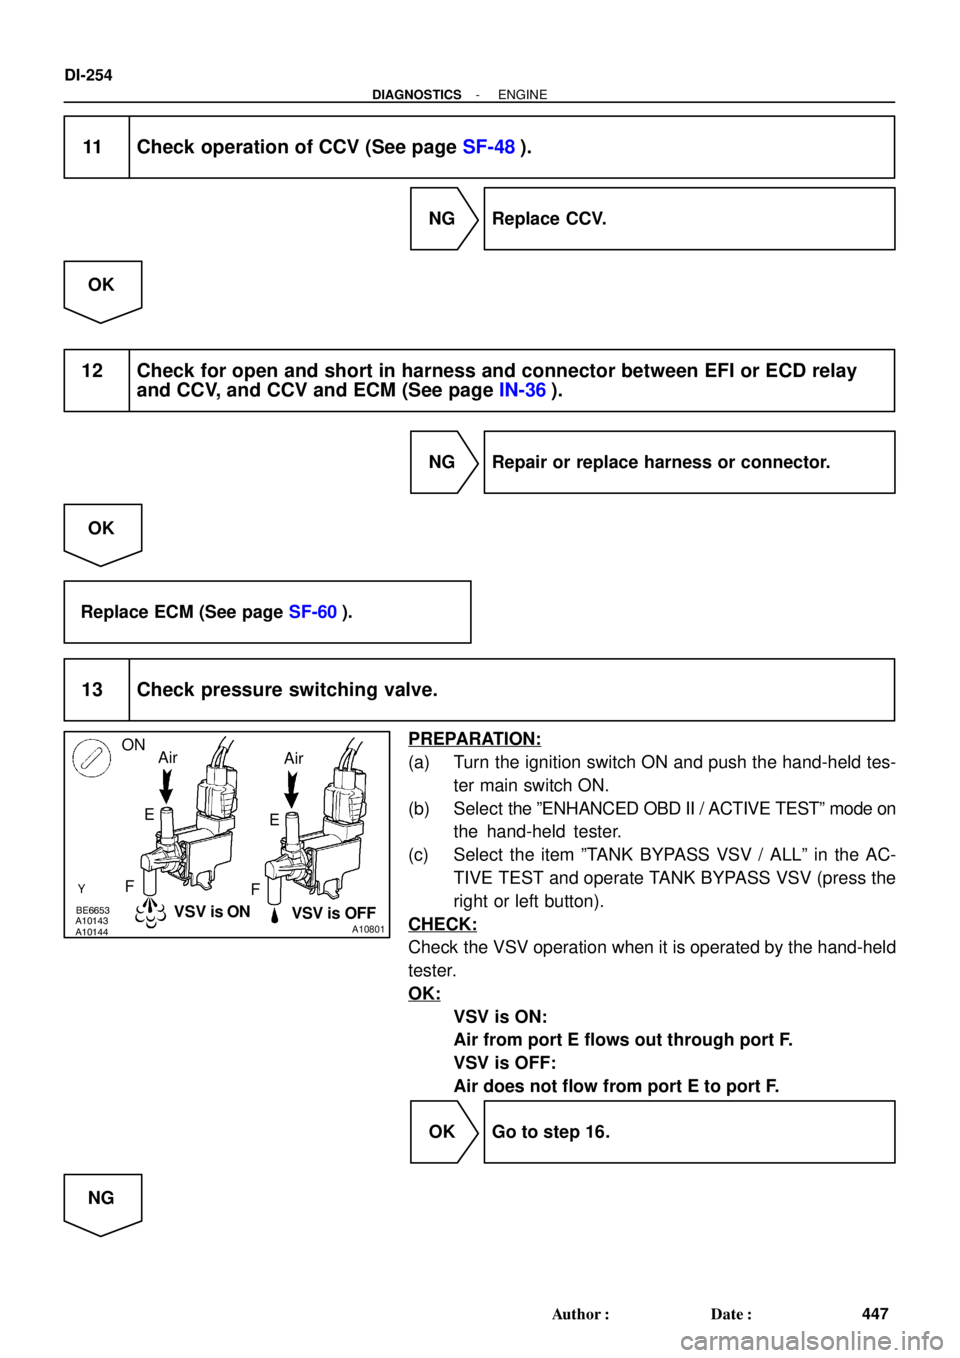
13 Check pressure switching valve.
PREPARATION:
(a) Turn the ignition switch ON and push the hand-held tes-
ter main switch ON.
(b) Select the ºENHANCED OBD II / ACTIVE TESTº mode on
the hand-held tester.
(c) Select the item ºTANK BYPASS VSV / ALLº in the AC-
TIVE TEST and operate TANK BYPASS VSV (press the
right or left button).
CHECK:
Check the VSV operation when it is operated by the hand-held
tester.
OK:
VSV is ON:
Air from port E flows out through port F.
VSV is OFF:
Air does not flow from port E to port F.
OK Go to step 16.
NG
Page 1305 of 3115

(-) E5
ECM Connector
DI-256
- DIAGNOSTICSENGINE
449 Author�: Date�:
17 Check vacuum hoses between vapor pressure sensor and fuel tank, and char-
coal canister and pressure switch")
A19522A19630
VC
E2(+)
(-) E5
ECM Connector
DI-256
- DIAGNOSTICSENGINE
449 Author�: Date�:
17 Check vacuum hoses between vapor pressure sensor and fuel tank, and char-
coal canister and pressure switching valve.
CHECK:
(a) Check that the vacuum hose is connected correctly.
(b) Check the vacuum hose for looseness and disconnection.
(c) Check the vacuum hose for cracks, hole and damage.
NG Repair or replace vacuum hose and tube.
OK
18 Check hose and tube between fuel tank and charcoal canister.
CHECK:
(a) Check for proper connection of the fuel tank and fuel evap pipe (See page EC-2), fuel evap pipe and
fuel tube under the floor, fuel tube under the floor and charcoal canister.
(b) Check the hose and tube for cracks, hole and damage.
NG Repair or replace hose and tube.
OK
19 Check voltage between terminals VC and E2 of ECM connector.
CHECK:
Turn the ignition switch ON.
CHECK:
Measure the voltage between terminals of the E5 ECM connec-
tor.
OK:
Tester ConnectionSpecified Condition
VC (E5-18) - E2 (E5-28)4.5 to 5.5 V
NG Replace ECM (See page SF-60).
OK