1986 CHEVROLET CORVAIR height
[x] Cancel search: heightPage 27 of 56

Downloaded from www.Manualslib.com manuals search engine The bucket seats are adjusted in exactly the same
manner. The seat control lever
for each seat is located
beneath the outer edge of the seat (toward the door).
Underneath the seat trim are strong steel seat struc
tures,
anchored firmly to the body. The seats and
anchorages are strong enough to prevent deformation
during low-speed impacts, but are designed in such a way that they absorb some energy by yielding to a de
gree during certain more severe higher-speed impacts.
Seat Back Lock
Folding seat backs are equipped with seH-latching
mechanisms
and release controls designed for the con
venience of entering and exiting passengers.
The release
knob is located at the lower rear of
each backrest nearest the door. lift the knob upward,
then push the seatback forward. The lock will latch
when the
seatback returns to its upright position.
OCCUPANT RESTRAINT BELTS
Suitable occupant restraints are available on all 1968
Corvairs. Worn properly, lap and shoulder belts reduce
the chances
of death or serious injury in the event of cert.ain types of accidents. Get into the habit of using
these restraints,
and using them properly, every single
time you
enter your car. Insist that your passengers use
them,
too. * By using them correctly, you give the belts
a chance
to help prevent injuries and perhaps even
save a
life.
·Shoulder belts should not be worn by persons less thon approximately 55 inches in height.
24
Lap Belts
Lap belts provide added security and comfort for
you and your passengers . Lap belts are standard equip
ment for all seating positions on all models. Proper use
and care of these belts will assure continuance of this
security.
After the front seat has been adjusted to the satis
faction of the driver, grasp the buckle end and the flat
metal "eye" end of your individual belt assembly and
position the belt across the pelvic area as LOW ON THE
PELVIS AS POSSIBLE. Insert the metal eye into the open
end of the buckle until an audible snap is heard. Make
sure the connection is secure and adjust the belt to a
SNUG FIT by pulling on the end of the belt protruding
from the buckle . The snug and low positions are essential
in
order that the force exerted by the lap belt in a colli
sion may be spread over the strong pelvic bone and not
across the soft abdominal area. For retractor equipped
belts, pull retractor half of the belts to a solid stop to
make sure that the belt webbing is completely unwound
from the retractor drum, then connect the belt and make
the necessary adjustments
at the buckle for proper fit. To
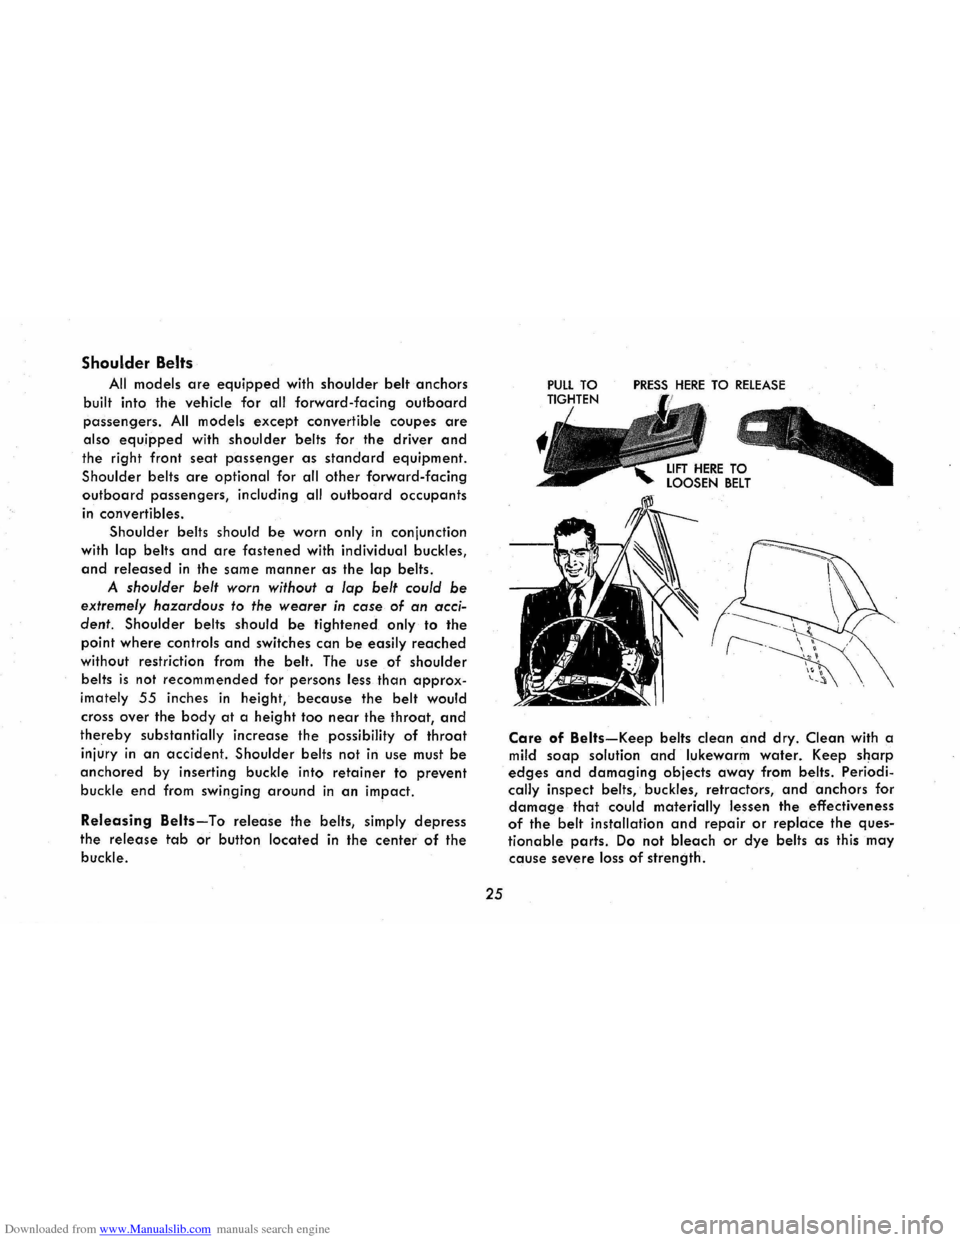
release the belts, simply depress the release
tab or button
located on the center of the buckle.
CAUTION: Never use the same belt for more than one
person at a time. Be sure to avoid: (aJ wearing a lap belt
loosely or with slack
in the system; and (bJ wearing the
belt with the
webbing wound around the retractor drum.
Page 28 of 56

Downloaded from www.Manualslib.com manuals search engine Shoulder Belts
All models are equipped with shoulder belt anchors
built into the vehicle for all forward-facing outboard
passengers. All models except convertible coupes are
also equipped with shoulder belts for the driver and
the right front seat passenger as standard equipment.
Shoulder belts are optional for all other forward-facing
outboard passengers, including all outboard occupants
in convertibles.
Shoulder belts should
be worn only in conjunction
with
lap belts and are fastened with individual buckles,
and released in the same manner as the lap belts.
A shoulder belt worn without a lap belt could be
extremely hazardous to the wearer in case of an acci
dent.
Shoulder belts should be tightened only to the
point where controls and switches can be easily reached
without restriction from the belt. The use of shoulder
belts
is not recommended for persons less than approx
imately 55 inches in height, because the belt would
cross over the body at a height too near the throat, and
thereby substantially increase the possibility of throat
injury in an accident. Shoulder belts not in use must be
anchored by inserting buckle into retainer to prevent
buckle end from swinging around in an impact.
Releasing Belts-To release the belts, simply depress
the release tab or button located in the center of the
buckle.
25
PRESS HERE TO RELEASE
Care of Belts-Keep belts clean and dry. Clean with a
mild soap solution and lukewarm water. Keep sharp
edges and damaging objects away from belts. Periodi
cally inspect belts, buckles, retractors, and anchors for
damage that could materially lessen the effectiveness
of the belt installation and repair or replace the ques
tionable parts. Do not bleach or dye belts as this may
cause severe loss of strength.
Page 29 of 56

Downloaded from www.Manualslib.com manuals search engine HEAD RESTRAINTS
Head restraints are available for the driver and front
right
passenger as factory installed options. They can be
adjusted to different heights by pulling up or pushing
down by
hand. Detents provide positive head restraint
location. Head restraints should be adjusted, within
limits of travel, to contact the center of the back of head
when the head is moved straight back.
CHILD RESTRAINT
Children in automobiles should be restrained. A
restraint system
designed by General Motors specifically
for
children is available from your dealer. If children
are traveling in a vehicle not equipped with this child
restraint system, the following precautions should be
taken:
1. Children should be placed in the rear seat. Never
allow a child to stand or kneel on the rear seat as
this raises his center of gravity.
2. Infants unable to sit up by themselves should be
restrained by placing them in a covered, padded
bassinet which is placed crossways on th·e rear
REARVIEW MIRRORS
Inside and outside rearview mirrors have been care
fully designed and located to give the driver a clear and
reasonably unobstructed view of the rear of the car. It
is not intended that these mirrors be used for operation
in reverse gear, or for surveillance of conditions close
to
the back of the car. It is suggested that the driver
turn his
head and look close to the back for backing
26
seat. The bassinet should be securely restrained
with the regular vehicle seat belt. An alternative
method is to position the bassinet crossways in the
vehicle so
that it rests against the back of the front seat. ..
3. When a child is old enough to sit up by himself in
a car, he should sit on a firm cushion and use the
conventional lap belt to restrain him at the pelvis.
The cushion should be as firm as practical and
enable the child to look horizontally out of the car
windows.
4. The use
of the cushion should be discontinued as
soon as the child is old enough to see out of the
car windows without it.
5. Do not use shoulder belts on children shorter than approximately 55 inches in height.
6. If a child must stand, he should stand on the floor
directly behind the front seat. This will minimize
the possibility of his being thrown from the rear
compartment during a sudden stop. However, this
method
should be used only if more complete re
straint cannot be used.
operations, and survey the area to the immediate rear
of the car prior to entering the car for the backing
operation. The outside mirror and mounting is free of
sharp points or edges that could contribute to injury of
pedestrians. The inside rearview mirror incorporates provisions
for
vertical as well as tilt adjustments to provide better
positioning for the driver. The mounting is designed to
Page 47 of 56

Downloaded from www.Manualslib.com manuals search engine SPECIFICATIONS
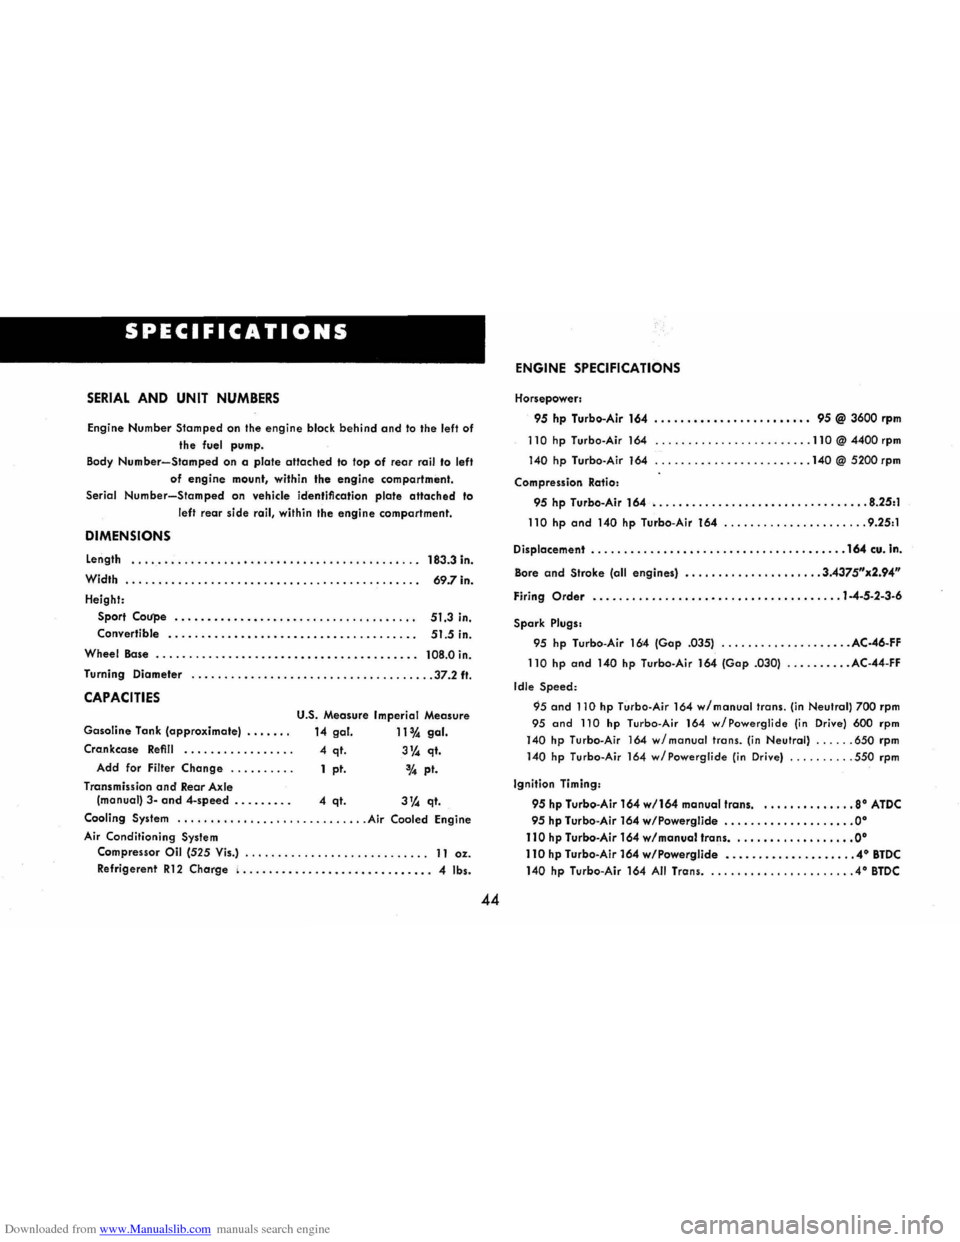
SERIAL AND UNIT NUMBERS
Engine Number Stamped on the engine block behind and to the left of
the fuel pump.
Body
Number-Stamped on a plate attached to top of rear rail to left
of engine mount, within the engine compartment .
Serial
Number-Stamped on vehicle identification plate attached to
left
rear side rail, within the engine compartment.
DIMENSIONS
Length .•...............•.•.•..................•... 183.3 in.
Width
.......•....•. . ....•..••......•.............• 69.7 in.
Height: Sport
Coupe ......•...••• ..•..••............•..•• 51.3 in.
Convertible
..........•.....••..•...•............. 51.5 in.
Wheel Base
...................•..•...•.... , ........ 108.0 in.
Turning Diameter .
.•..........•............... ........ 37.2 ft.
CAPACITIES
U.S. Measure Imperial Measure
Gasoline Tank (approximate) ...... .
14 gal. 11 % gal.
Crankcase Refill •....•..... ...... 4 qt. 3~ qt.
Add for Filter Change ......... . 1 pt. 3,4 pt.
Transmission
and Rear Axle
(manual) 3-and 4-speed ........ . 4 qt. 3~ qt.
Cooling System .....••...................... Air Cooled Engine
Air Conditioning System
Compressor Oil (525 Vis.) ...•............. ......... " 11 oz.
Refrigerent
R12 Charge ( •......•................•.... 4 Ibs.
44
ENGINE SPECIFICATIONS
Horsepower:
95 hp Turbo-Air 164 ......••.•.•........•.•• 95 @ 3600 rpm
110 hp Turbo-Air 164 ........................ 110 @ 4400 rpm
140 hp Turbo -Air 164 ........................ 140 @ 5200 rpm
Compression Ratio:
95 hp Turbo-Air 164 •...•........•.•.••••.•...••.•••. 8.25:1
110 hp and 140 hp Turbo-Air 164 ...................... 9.25:1
Displacement
......•....••••••..••••••...•..•.••\
•.•• 164 cu. In.
Bore and Stroke (all engines) ................. .... 3.4375"x2.94"
Firing Order •.........•..•••••••..•.•.••.•\
..••..•. 1-4-5-2-3·6
Spark Plugs.
95 hp Turbo-Air 164 (Gop .035)
.................... AC-46-FF
110
hp and 140 hp Turbo-Air 164 (Gop .030) .......... AC- 44-FF
Idle
Speed:
95 and 110 hp Turbo-Air 164 wi manual trans. (in Neutral) 700 rpm
95
and 110 hp Turbo-Air 164 w/Powerglide (in Drive) 600 rpm
140 hp Turbo-Air 164 wi manual trans. (in Neutral) ...... 650 rpm
140 hp Turbo-Air 164 w/Powerglide (in Drive) .......... 550 rpm
Ignition Timing:
95 hp Turbo-Air 164 wl164 manual trans •..•...•.•••.•. 8· ATDC
95 hp Turbo-Air 164 w/Powerglide ••.•..•••.••••..•••• 0·
110 hp Turbo-Air 164 wi manual Irons •....•..•..••....•. 0·
110 hp Turbo-Air 164 w/Powerglide •.••..•••.•..•••••.. 4· BTDC
140 hp Turbo-Air 164 All Trans ....................... 4° BTDC