1985 FORD GRANADA battery
[x] Cancel search: batteryPage 2 of 255
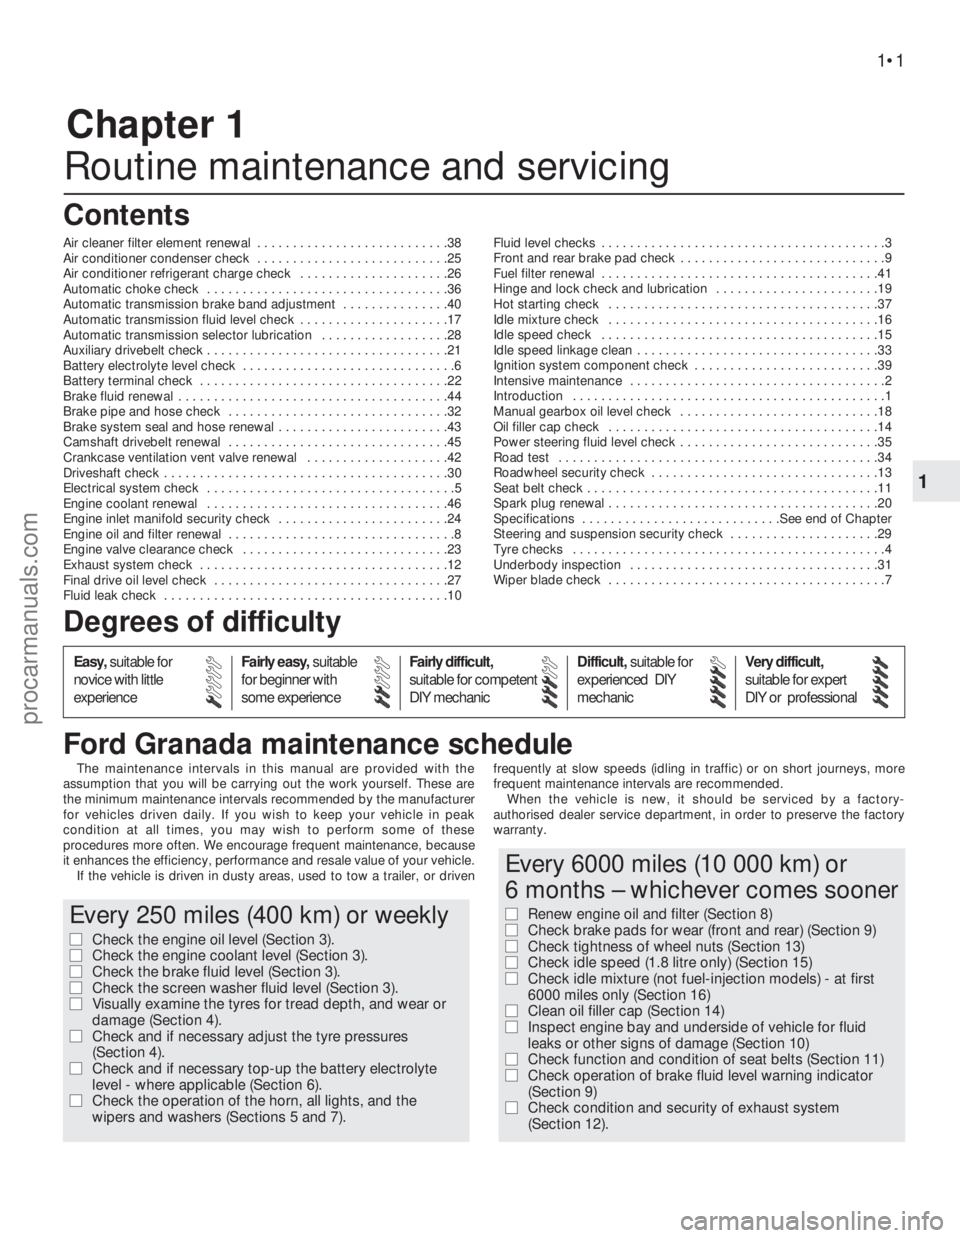
Chapter 1
Routine maintenance and servicing
Air cleaner filter element renewal . . . . . . . . . . . . . . . . . . . . . . . . . . .38
Air conditioner condenser check . . . . . . . . . . . . . . . . . . . . . . . . . . .25
Air conditioner refrigerant charge check . . . . . . . . . . . . . . . . . . . . .26
Automatic choke check . . . . . . . . . . . . . . . . . . . . . . . . . . . . . . . . . .36
Automatic transmission brake band adjustment . . . . . . . . . . . . . . .40
Automatic transmission fluid level check . . . . . . . . . . . . . . . . . . . . .17
Automatic transmission selector lubrication . . . . . . . . . . . . . . . . . .28
Auxiliary drivebelt check . . . . . . . . . . . . . . . . . . . . . . . . . . . . . . . . . .21
Battery electrolyte level check . . . . . . . . . . . . . . . . . . . . . . . . . . . . . .6
Battery terminal check . . . . . . . . . . . . . . . . . . . . . . . . . . . . . . . . . . .22
Brake fluid renewal . . . . . . . . . . . . . . . . . . . . . . . . . . . . . . . . . . . . . .44
Brake pipe and hose check . . . . . . . . . . . . . . . . . . . . . . . . . . . . . . .32
Brake system seal and hose renewal . . . . . . . . . . . . . . . . . . . . . . . .43
Camshaft drivebelt renewal . . . . . . . . . . . . . . . . . . . . . . . . . . . . . . .45
Crankcase ventilation vent valve renewal . . . . . . . . . . . . . . . . . . . .42
Driveshaft check . . . . . . . . . . . . . . . . . . . . . . . . . . . . . . . . . . . . . . . .30
Electrical system check . . . . . . . . . . . . . . . . . . . . . . . . . . . . . . . . . . .5
Engine coolant renewal . . . . . . . . . . . . . . . . . . . . . . . . . . . . . . . . . .46
Engine inlet manifold security check . . . . . . . . . . . . . . . . . . . . . . . .24
Engine oil and filter renewal . . . . . . . . . . . . . . . . . . . . . . . . . . . . . . . .8
Engine valve clearance check . . . . . . . . . . . . . . . . . . . . . . . . . . . . .23
Exhaust system check . . . . . . . . . . . . . . . . . . . . . . . . . . . . . . . . . . .12
Final drive oil level check . . . . . . . . . . . . . . . . . . . . . . . . . . . . . . . . .27
Fluid leak check . . . . . . . . . . . . . . . . . . . . . . . . . . . . . . . . . . . . . . . .10Fluid level checks . . . . . . . . . . . . . . . . . . . . . . . . . . . . . . . . . . . . . . . .3
Front and rear brake pad check . . . . . . . . . . . . . . . . . . . . . . . . . . . . .9
Fuel filter renewal . . . . . . . . . . . . . . . . . . . . . . . . . . . . . . . . . . . . . . .41
Hinge and lock check and lubrication . . . . . . . . . . . . . . . . . . . . . . .19
Hot starting check . . . . . . . . . . . . . . . . . . . . . . . . . . . . . . . . . . . . . .37
Idle mixture check . . . . . . . . . . . . . . . . . . . . . . . . . . . . . . . . . . . . . .16
Idle speed check . . . . . . . . . . . . . . . . . . . . . . . . . . . . . . . . . . . . . . .15
Idle speed linkage clean . . . . . . . . . . . . . . . . . . . . . . . . . . . . . . . . . .33
Ignition system component check . . . . . . . . . . . . . . . . . . . . . . . . . .39
Intensive maintenance . . . . . . . . . . . . . . . . . . . . . . . . . . . . . . . . . . . .2
Introduction . . . . . . . . . . . . . . . . . . . . . . . . . . . . . . . . . . . . . . . . . . . .1
Manual gearbox oil level check . . . . . . . . . . . . . . . . . . . . . . . . . . . .18
Oil filler cap check . . . . . . . . . . . . . . . . . . . . . . . . . . . . . . . . . . . . . .14
Power steering fluid level check . . . . . . . . . . . . . . . . . . . . . . . . . . . .35
Road test . . . . . . . . . . . . . . . . . . . . . . . . . . . . . . . . . . . . . . . . . . . . .34
Roadwheel security check . . . . . . . . . . . . . . . . . . . . . . . . . . . . . . . .13
Seat belt check . . . . . . . . . . . . . . . . . . . . . . . . . . . . . . . . . . . . . . . . .11
Spark plug renewal . . . . . . . . . . . . . . . . . . . . . . . . . . . . . . . . . . . . . .20
Specifications . . . . . . . . . . . . . . . . . . . . . . . . . . . .See end of Chapter
Steering and suspension security check . . . . . . . . . . . . . . . . . . . . .29
Tyre checks . . . . . . . . . . . . . . . . . . . . . . . . . . . . . . . . . . . . . . . . . . . .4
Underbody inspection . . . . . . . . . . . . . . . . . . . . . . . . . . . . . . . . . . .31
Wiper blade check . . . . . . . . . . . . . . . . . . . . . . . . . . . . . . . . . . . . . . .7
The maintenance intervals in this manual are provided with the
assumption that you will be carrying out the work yourself. These are
the minimum maintenance intervals recommended by the manufacturer
for vehicles driven daily. If you wish to keep your vehicle in peak
condition at all times, you may wish to perform some of these
procedures more often. We encourage frequent maintenance, because
it enhances the efficiency, performance and resale value of your vehicle.
If the vehicle is driven in dusty areas, used to tow a trailer, or drivenfrequently at slow speeds (idling in traffic) or on short journeys, more
frequent maintenance intervals are recommended.
When the vehicle is new, it should be serviced by a factory-
authorised dealer service department, in order to preserve the factory
warranty.
1•1
Easy,suitable for
novice with little
experienceFairly easy,suitable
for beginner with
some experienceFairly difficult,
suitable for competent
DIY mechanicDifficult,suitable for
experienced DIY
mechanicVery difficult,
suitable for expert
DIY or professional
Degrees of difficulty Contents
1
Every 250 miles (400 km) or weekly
m mCheck the engine oil level (Section 3).
m mCheck the engine coolant level (Section 3).
m mCheck the brake fluid level (Section 3).
m mCheck the screen washer fluid level (Section 3).
m mVisually examine the tyres for tread depth, and wear or
damage (Section 4).
m mCheck and if necessary adjust the tyre pressures
(Section 4).
m mCheck and if necessary top-up the battery electrolyte
level - where applicable (Section 6).
m mCheck the operation of the horn, all lights, and the
wipers and washers (Sections 5 and 7).
Every 6000 miles (10 000 km) or
6 months – whichever comes sooner
m mRenew engine oil and filter (Section 8)
m mCheck brake pads for wear (front and rear) (Section 9)
m mCheck tightness of wheel nuts (Section 13)
m mCheck idle speed (1.8 litre only) (Section 15)
m mCheck idle mixture (not fuel-injection models) - at first
6000 miles only (Section 16)
m mClean oil filler cap (Section 14)
m mInspect engine bay and underside of vehicle for fluid
leaks or other signs of damage (Section 10)
m mCheck function and condition of seat belts (Section 11)
m mCheck operation of brake fluid level warning indicator
(Section 9)
m mCheck condition and security of exhaust system
(Section 12).
Ford Granada maintenance schedule
procarmanuals.com
Page 3 of 255
1•2
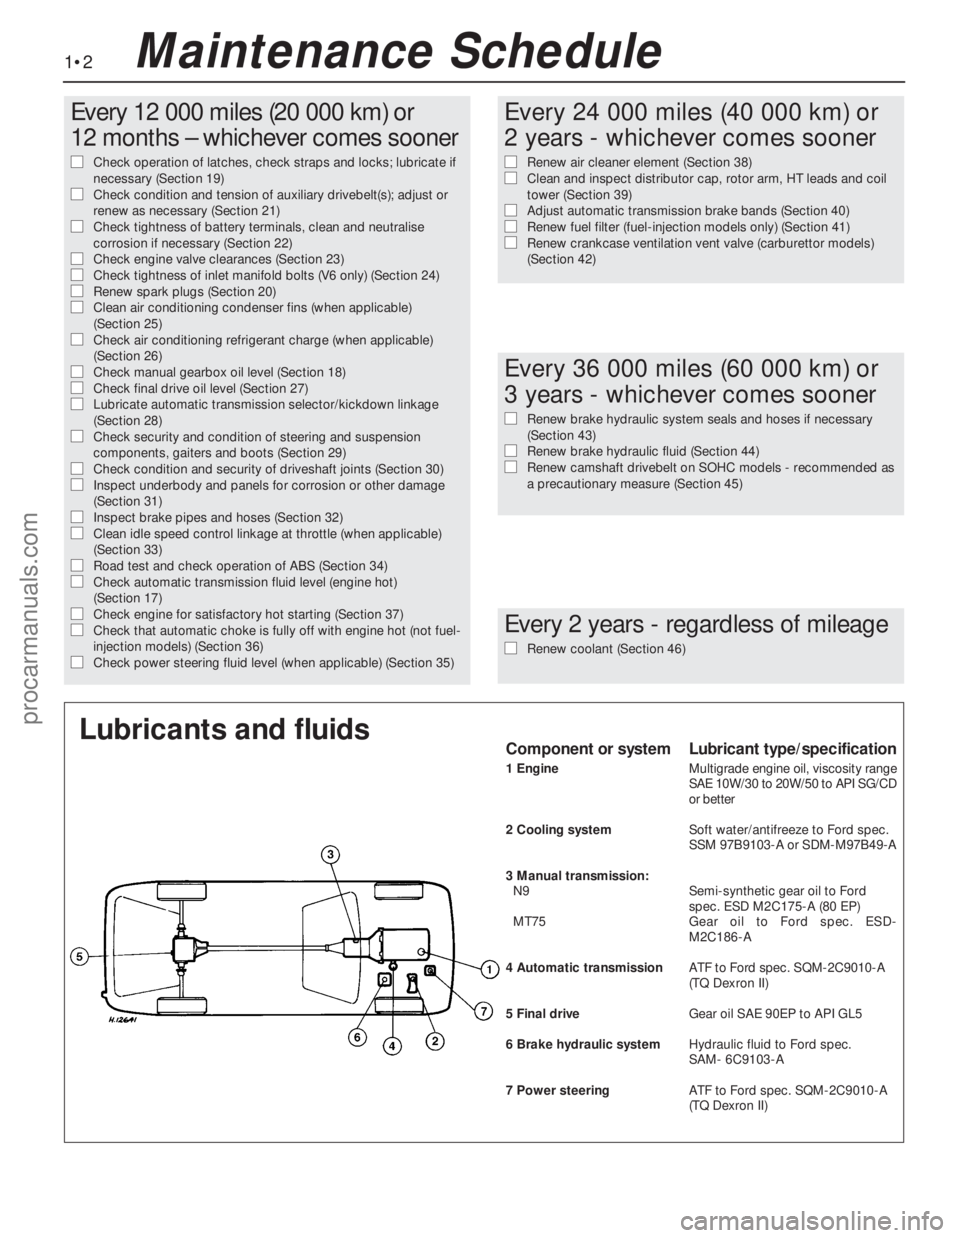
Every 12 000 miles (20 000 km) or
12 months – whichever comes sooner
m mCheck operation of latches, check straps and locks; lubricate if
necessary (Section 19)
m mCheck condition and tension of auxiliary drivebelt(s); adjust or
renew as necessary (Section 21)
m mCheck tightness of battery terminals, clean and neutralise
corrosion if necessary (Section 22)
m mCheck engine valve clearances (Section 23) m
mCheck tightness of inlet manifold bolts (V6 only) (Section 24) m
mRenew spark plugs (Section 20) m
mClean air conditioning condenser fins (when applicable)
(Section 25)
m mCheck air conditioning refrigerant charge (when applicable)
(Section 26)
m mCheck manual gearbox oil level (Section 18) m
mCheck final drive oil level (Section 27) m
mLubricate automatic transmission selector/kickdown linkage
(Section 28)
m mCheck security and condition of steering and suspension
components, gaiters and boots (Section 29)
m mCheck condition and security of driveshaft joints (Section 30) m
mInspect underbody and panels for corrosion or other damage
(Section 31)
m mInspect brake pipes and hoses (Section 32) m
mClean idle speed control linkage at throttle (when applicable)
(Section 33)
m mRoad test and check operation of ABS (Section 34)m
mCheck automatic transmission fluid level (engine hot)
(Section 17)
m mCheck engine for satisfactory hot starting (Section 37)m
mCheck that automatic choke is fully off with engine hot (not fuel-
injection models) (Section 36)
m mCheck power steering fluid level (when applicable) (Section 35)
Every 24 000 miles (40 000 km) or
2 years - whichever comes sooner
m
mRenew air cleaner element (Section 38) m
mClean and inspect distributor cap, rotor arm, HT leads and coil
tower (Section 39)
m mAdjust automatic transmission brake bands (Section 40)m
mRenew fuel filter (fuel-injection models only) (Section 41) m
mRenew crankcase ventilation vent valve (carburettor models)
(Section 42)
Every 36 000 miles (60 000 km) or
3 years - whichever comes sooner
m
mRenew brake hydraulic system seals and hoses if necessary
(Section 43)
m mRenew brake hydraulic fluid (Section 44) m
mRenew camshaft drivebelt on SOHC models - recommended as
a precautionary measure (Section 45)
Every 2 years - regardless of mileage
m
mRenew coolant (Section 46)
Lubricants and fluidsComponent or systemLubricant type/specification
1 EngineMultigrade engine oil, viscosity range
SAE 10W/30 to 20W/50 to API SG/CD
or better
2 Cooling systemSoft water/antifreeze to Ford spec.
SSM 97B9103-A or SDM-M97B49-A
3 Manual transmission:
N9Semi-synthetic gear oil to Ford
spec. ESD M2C175-A (80 EP)
MT75Gear oil to Ford spec. ESD-
M2C186-A
4 Automatic transmissionATF to Ford spec. SQM-2C9010-A
(TQ Dexron II)
5 Final driveGear oil SAE 90EP to APIGL5
6 Brake hydraulic systemHydraulic fluid to Ford spec.
SAM- 6C9103-A
7 Power steeringATFto Ford spec. SQM-2C9010-A
(TQDexron II)
Maintenance Schedule
procarmanuals.com
Page 4 of 255
1•3
1
Maintenance Schedule
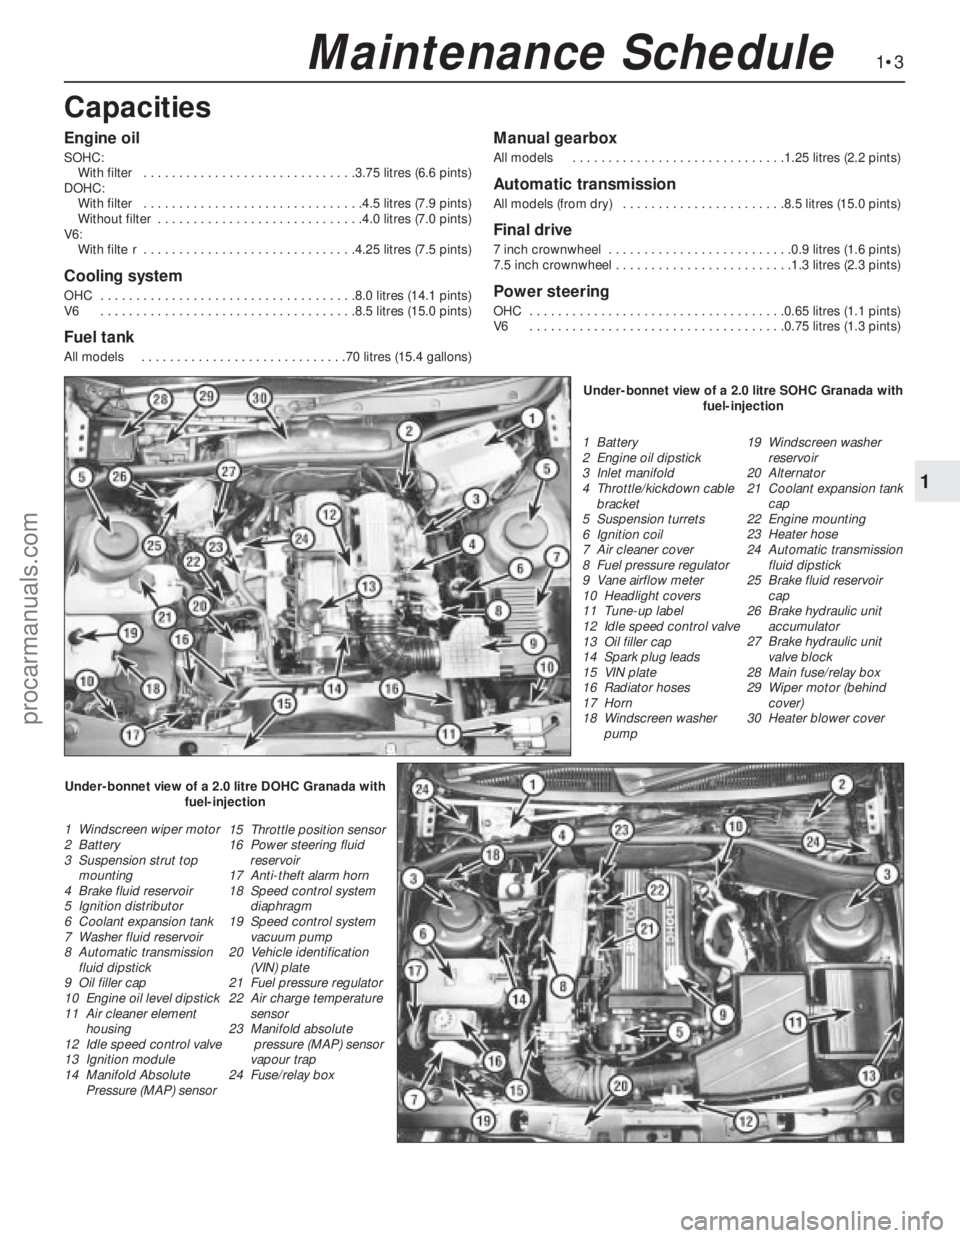
Engine oil
SOHC:
With filter . . . . . . . . . . . . . . . . . . . . . . . . . . . . . .3.75 litres (6.6 pints)
DOHC:
With filter . . . . . . . . . . . . . . . . . . . . . . . . . . . . . . .4.5 litres (7.9 pints)
Without filter . . . . . . . . . . . . . . . . . . . . . . . . . . . . .4.0 litres (7.0 pints)
V6:
With filter . . . . . . . . . . . . . . . . . . . . . . . . . . . . . .4.25 litres (7.5 pints)
Cooling system
OHC . . . . . . . . . . . . . . . . . . . . . . . . . . . . . . . . . . . .8.0 litres (14.1 pints)
V6 . . . . . . . . . . . . . . . . . . . . . . . . . . . . . . . . . . . .8.5 litres (15.0 pints)
Fuel tank
All models . . . . . . . . . . . . . . . . . . . . . . . . . . . . .70 litres (15.4 gallons)
Manual gearbox
All models . . . . . . . . . . . . . . . . . . . . . . . . . . . . . .1.25 litres (2.2 pints)
Automatic transmission
All models (from dry) . . . . . . . . . . . . . . . . . . . . . . .8.5 litres (15.0 pints)
Final drive
7 inch crownwheel . . . . . . . . . . . . . . . . . . . . . . . . . .0.9 litres (1.6 pints)
7.5 inch crownwheel . . . . . . . . . . . . . . . . . . . . . . . . .1.3 litres (2.3 pints)
Power steering
OHC . . . . . . . . . . . . . . . . . . . . . . . . . . . . . . . . . . . .0.65 litres (1.1 pints)
V6 . . . . . . . . . . . . . . . . . . . . . . . . . . . . . . . . . . . .0.75 litres (1.3 pints)
Capacities
1 Battery
2 Engine oil dipstick
3 Inlet manifold
4 Throttle/kickdown cable
bracket
5 Suspension turrets
6 Ignition coil
7 Air cleaner cover
8 Fuel pressure regulator
9 Vane airflow meter
10 Headlight covers
11 Tune-up label
12 Idle speed control valve
13 Oil filler cap
14 Spark plug leads
15 VIN plate
16 Radiator hoses
17 Horn
18 Windscreen washer
pump19 Windscreen washer
reservoir
20 Alternator
21 Coolant expansion tank
cap
22 Engine mounting
23 Heater hose
24 Automatic transmission
fluid dipstick
25 Brake fluid reservoir
cap
26 Brake hydraulic unit
accumulator
27 Brake hydraulic unit
valve block
28 Main fuse/relay box
29 Wiper motor (behind
cover)
30 Heater blower cover
1 Windscreen wiper motor
2 Battery
3 Suspension strut top
mounting
4 Brake fluid reservoir
5 Ignition distributor
6 Coolant expansion tank
7 Washer fluid reservoir
8 Automatic transmission
fluid dipstick
9 Oil filler cap
10 Engine oil level dipstick
11 Air cleaner element
housing
12 Idle speed control valve
13 Ignition module
14 Manifold Absolute
Pressure (MAP) sensor15 Throttle position sensor
16 Power steering fluid
reservoir
17 Anti-theft alarm horn
18 Speed control system
diaphragm
19 Speed control system
vacuum pump
20 Vehicle identification
(VIN) plate
21 Fuel pressure regulator
22 Air charge temperature
sensor
23 Manifold absolute
pressure (MAP) sensor
vapour trap
24 Fuse/relay boxUnder-bonnet view of a 2.0 litre SOHC Granada with
fuel-injection
Under-bonnet view of a 2.0 litre DOHC Granada with
fuel-injection
procarmanuals.com
Page 5 of 255
1•4Maintenance Schedule
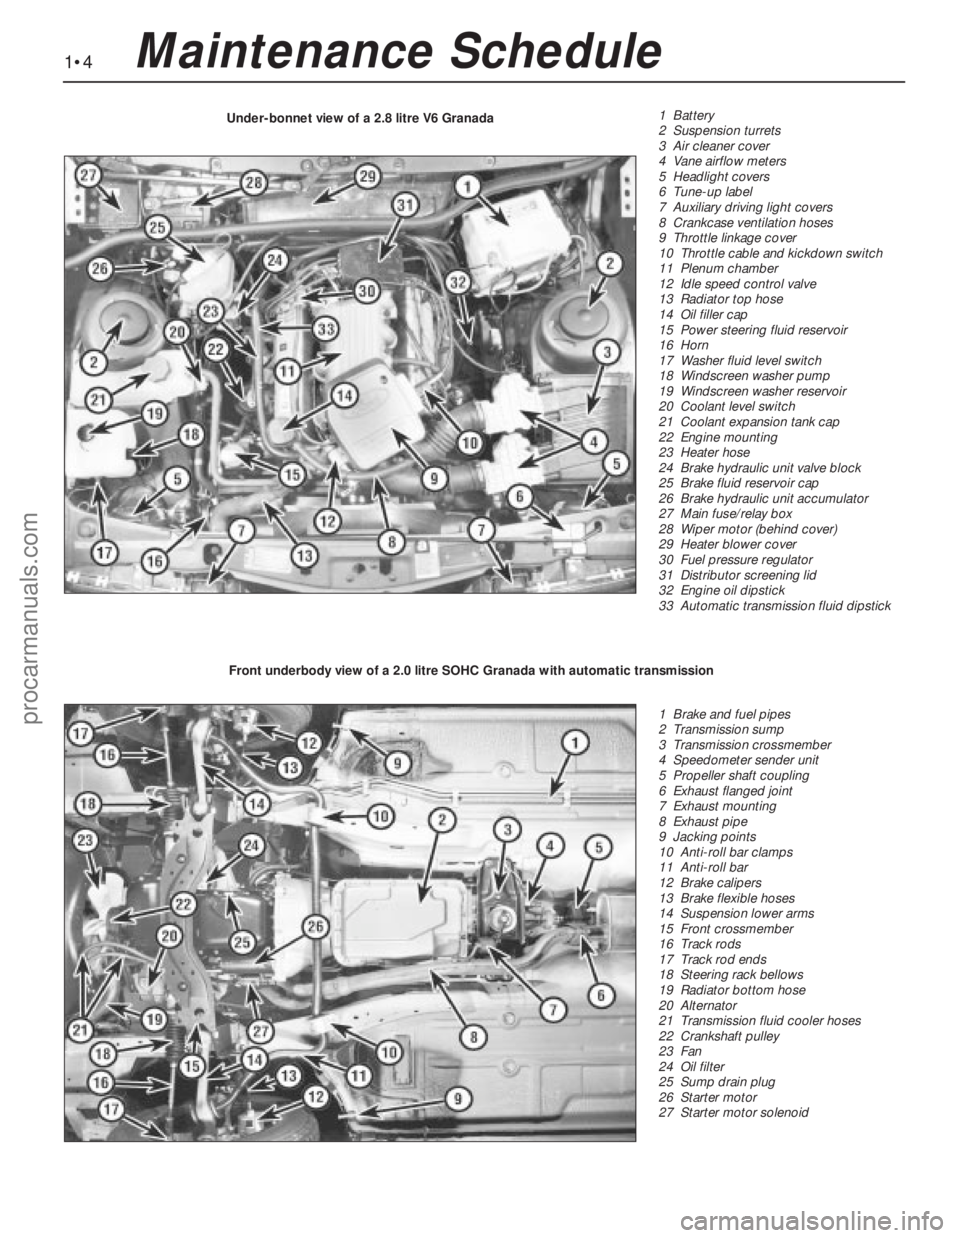
1 Battery
2 Suspension turrets
3 Air cleaner cover
4 Vane airflow meters
5 Headlight covers
6 Tune-up label
7 Auxiliary driving light covers
8 Crankcase ventilation hoses
9 Throttle linkage cover
10 Throttle cable and kickdown switch
11 Plenum chamber
12 Idle speed control valve
13 Radiator top hose
14 Oil filler cap
15 Power steering fluid reservoir
16 Horn
17 Washer fluid level switch
18 Windscreen washer pump
19 Windscreen washer reservoir
20 Coolant level switch
21 Coolant expansion tank cap
22 Engine mounting
23 Heater hose
24 Brake hydraulic unit valve block
25 Brake fluid reservoir cap
26 Brake hydraulic unit accumulator
27 Main fuse/relay box
28 Wiper motor (behind cover)
29 Heater blower cover
30 Fuel pressure regulator
31 Distributor screening lid
32 Engine oil dipstick
33 Automatic transmission fluid dipstick Under-bonnet view of a 2.8 litre V6 Granada
1 Brake and fuel pipes
2 Transmission sump
3 Transmission crossmember
4 Speedometer sender unit
5 Propeller shaft coupling
6 Exhaust flanged joint
7 Exhaust mounting
8 Exhaust pipe
9 Jacking points
10 Anti-roll bar clamps
11 Anti-roll bar
12 Brake calipers
13 Brake flexible hoses
14 Suspension lower arms
15 Front crossmember
16 Track rods
17 Track rod ends
18 Steering rack bellows
19 Radiator bottom hose
20 Alternator
21 Transmission fluid cooler hoses
22 Crankshaft pulley
23 Fan
24 Oil filter
25 Sump drain plug
26 Starter motor
27 Starter motor solenoid Front underbody view of a 2.0 litre SOHC Granada with automatic transmission
procarmanuals.com
Page 7 of 255
1•6Maintenance Procedures
This Chapter is designed to help the home
mechanic maintain his/her vehicle for safety,
economy, long life and peak performance.
The Chapter contains a master maintenance
schedule, followed by Sections dealing
specifically with each task in the schedule.
Visual checks, adjustments, component
renewal and other helpful items are included.
Refer to the accompanying illustrations of the
engine compartment and the underside of the
vehicle for the locations of the various
components.
Servicing your vehicle in accordance with
the mileage/time maintenance schedule and
the following Sections will provide a planned
maintenance programme, which should result
in a long and reliable service life. This is a
comprehensive plan, so maintaining some
items but not others at the specified service
intervals, will not produce the same results.
As you service your vehicle, you will
discover that many of the procedures can -
and should - be grouped together, because of
the particular procedure being performed, or
because of the close proximity of two
otherwise-unrelated components to one
another. For example, if the vehicle is raised
for any reason, the exhaust can be inspected
at the same time as the suspension and
steering components.
The first step in this maintenanceprogramme is to prepare yourself before the
actual work begins. Read through all the
Sections relevant to the work to be carried out,
then make a list and gather together all the
parts and tools required. If a problem is
encountered, seek advice from a parts
specialist, or a dealer service department.
If, from the time the vehicle is new, the
routine maintenance schedule is followed
closely, and frequent checks are made of fluid
levels and high-wear items, as suggested
throughout this manual, the engine will be kept
in relatively good running condition, and the
need for additional work will be minimised.
It is possible that there will be times when
the engine is running poorly due to the lack of
regular maintenance. This is even more likely if
a used vehicle, which has not received regular
and frequent maintenance checks, is
purchased. In such cases, additional work
may need to be carried out, outside of the
regular maintenance intervals.
If engine wear is suspected, a compression
test will provide valuable information regarding
the overall performance of the main internal
components. Such a test can be used as a
basis to decide on the extent of the work to be
carried out. If, for example, a compression test
indicates serious internal engine wear,
conventional maintenance as described in this
Chapter will not greatly improve theperformance of the engine, and may prove a
waste of time and money, unless extensive
overhaul work is carried out first.
The following series of operations are those
most often required to improve the
performance of a generally poor-running
engine:
Primary operations
a)Clean, inspect and test the battery
(Section 6)
b)Check all the engine-related fluids
(Section 3).
c)Check the condition and tension of the
auxiliary drivebelt (Section 21).
d)Renew the spark plugs (Section 20).
e)Inspect the distributor cap, rotor arm and
HT leads - as applicable (Chapter 5).
f)Check the condition of the air cleaner filter
element, and renew if necessary (Section 38).
g)Renew the fuel filter (Section 41).
h)Check the condition of all hoses, and
check for fluid leaks (Section 10).
i)Check the idle speed and mixture settings
- as applicable (Chapter 4).
If the above operations do not prove fully
effective, carry out the following secondary
operations:
Secondary operations
a)Check the charging system (Chapter 5).
b)Check the ignition system (Chapter 5).
c)Check the fuel system (Chapter 4).
d)Renew the distributor cap and rotor arm -
as applicable (Chapter 5).
f)Renew the ignition HT leads - as
applicable (Chapter 5).
2Intensive maintenance
1Introduction
Engine oil
1Check the oil level as follows.
2With the vehicle parked on level ground,
and with the engine having been stopped for a
few minutes, open and prop the bonnet.
Withdraw the dipstick, wipe it on a clean ragand re-insert it fully. Withdraw it again and
read the oil level relative to the marks on the
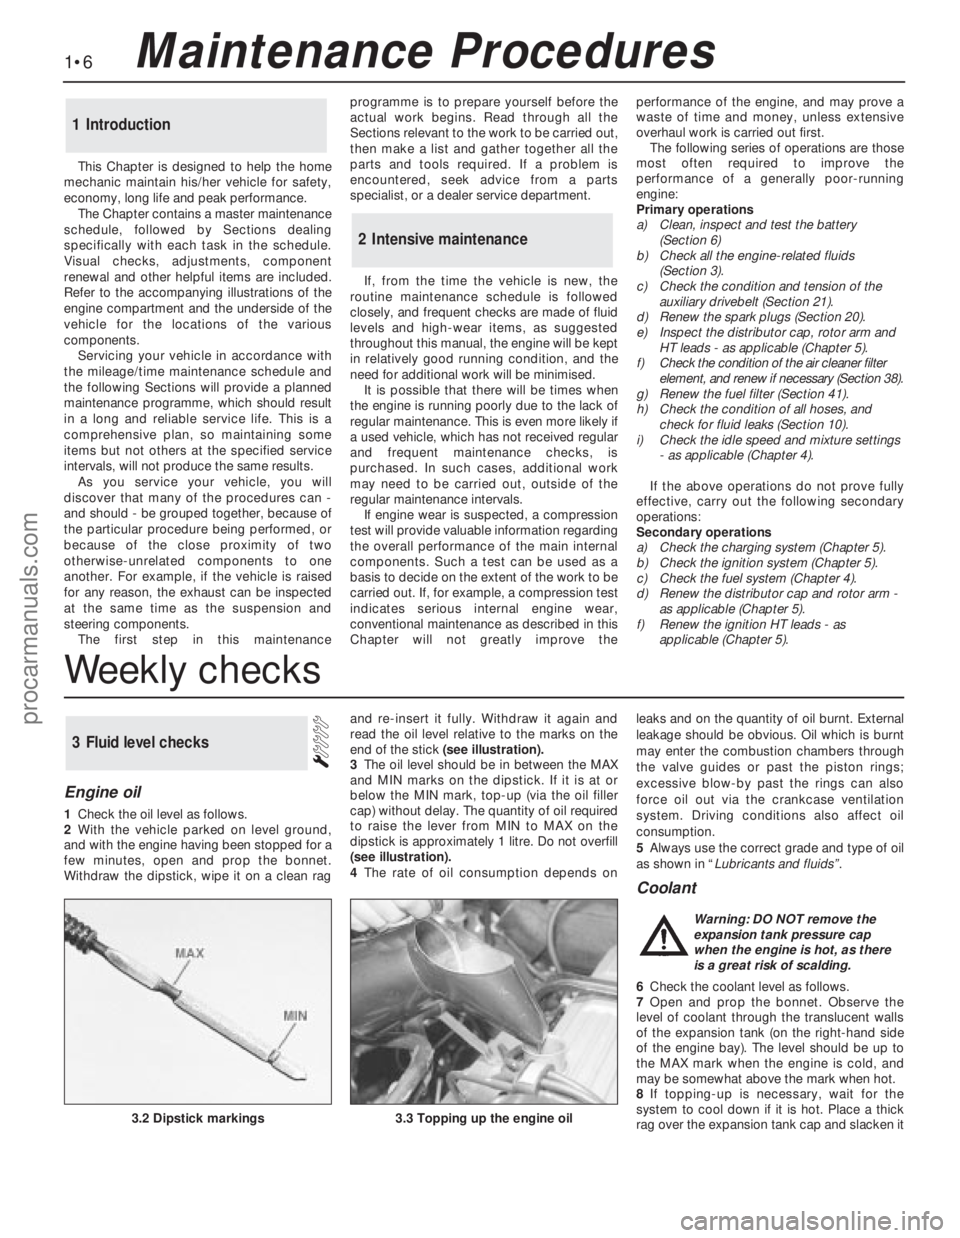
end of the stick (see illustration).
3The oil level should be in between the MAX
and MIN marks on the dipstick. If it is at or
below the MIN mark, top-up (via the oil filler
cap) without delay. The quantity of oil required
to raise the lever from MIN to MAX on the
dipstick is approximately 1 litre. Do not overfill
(see illustration).
4The rate of oil consumption depends onleaks and on the quantity of oil burnt. External
leakage should be obvious. Oil which is burnt
may enter the combustion chambers through
the valve guides or past the piston rings;
excessive blow-by past the rings can also
force oil out via the crankcase ventilation
system. Driving conditions also affect oil
consumption.
5Always use the correct grade and type of oil
as shown in “Lubricants and fluids”.
Coolant
6Check the coolant level as follows.
7Open and prop the bonnet. Observe the
level of coolant through the translucent walls
of the expansion tank (on the right-hand side
of the engine bay). The level should be up to
the MAX mark when the engine is cold, and
may be somewhat above the mark when hot.
8If topping-up is necessary, wait for the
system to cool down if it is hot. Place a thick
rag over the expansion tank cap and slacken it
3Fluid level checks
3.2 Dipstick markings3.3 Topping up the engine oil
Warning: DO NOT remove the
expansion tank pressure cap
when the engine is hot, as there
is a great risk of scalding.
Weekly checks
procarmanuals.com
Page 9 of 255
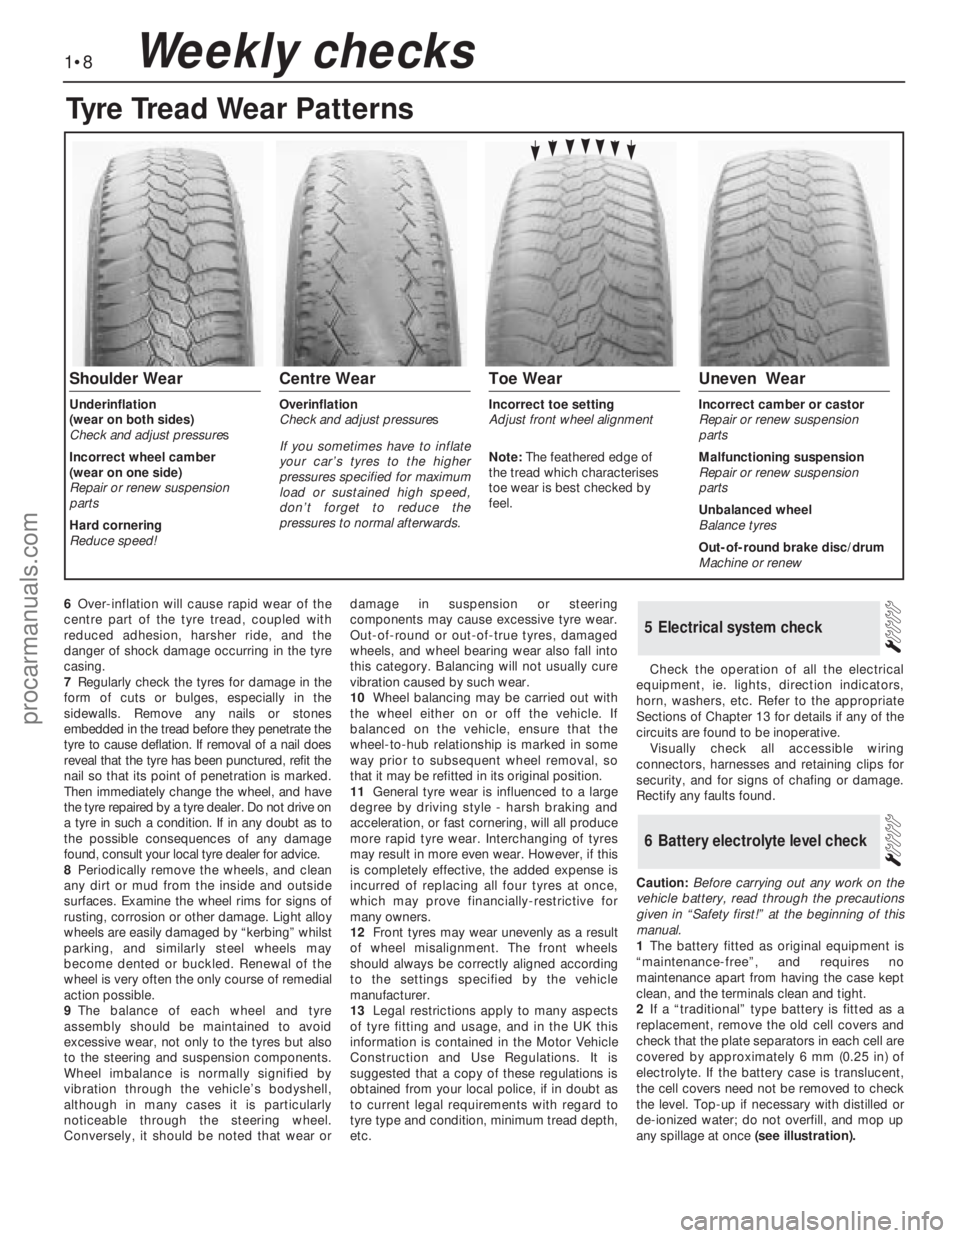
6Over-inflation will cause rapid wear of the
centre part of the tyre tread, coupled with
reduced adhesion, harsher ride, and the
danger of shock damage occurring in the tyre
casing.
7Regularly check the tyres for damage in the
form of cuts or bulges, especially in the
sidewalls. Remove any nails or stones
embedded in the tread before they penetrate the
tyre to cause deflation. If removal of a nail does
reveal that the tyre has been punctured, refit the
nail so that its point of penetration is marked.
Then immediately change the wheel, and have
the tyre repaired by a tyre dealer. Do not drive on
a tyre in such a condition. If in any doubt as to
the possible consequences of any damage
found, consult your local tyre dealer for advice.
8Periodically remove the wheels, and clean
any dirt or mud from the inside and outside
surfaces. Examine the wheel rims for signs of
rusting, corrosion or other damage. Light alloy
wheels are easily damaged by “kerbing” whilst
parking, and similarly steel wheels may
become dented or buckled. Renewal of the
wheel is very often the only course of remedial
action possible.
9The balance of each wheel and tyre
assembly should be maintained to avoid
excessive wear, not only to the tyres but also
to the steering and suspension components.
Wheel imbalance is normally signified by
vibration through the vehicle’s bodyshell,
although in many cases it is particularly
noticeable through the steering wheel.
Conversely, it should be noted that wear ordamage in suspension or steering
components may cause excessive tyre wear.
Out-of-round or out-of-true tyres, damaged
wheels, and wheel bearing wear also fall into
this category. Balancing will not usually cure
vibration caused by such wear.
10Wheel balancing may be carried out with
the wheel either on or off the vehicle. If
balanced on the vehicle, ensure that the
wheel-to-hub relationship is marked in some
way prior to subsequent wheel removal, so
that it may be refitted in its original position.
11General tyre wear is influenced to a large
degree by driving style - harsh braking and
acceleration, or fast cornering, will all produce
more rapid tyre wear. Interchanging of tyres
may result in more even wear. However, if this
is completely effective, the added expense is
incurred of replacing all four tyres at once,
which may prove financially-restrictive for
many owners.
12Front tyres may wear unevenly as a result
of wheel misalignment. The front wheels
should always be correctly aligned according
to the settings specified by the vehicle
manufacturer.
13Legal restrictions apply to many aspects
of tyre fitting and usage, and in the UK this
information is contained in the Motor Vehicle
Construction and Use Regulations. It is
suggested that a copy of these regulations is
obtained from your local police, if in doubt as
to current legal requirements with regard to
tyre type and condition, minimum tread depth,
etc.Check the operation of all the electrical
equipment, ie. lights, direction indicators,
horn, washers, etc. Refer to the appropriate
Sections of Chapter 13 for details if any of the
circuits are found to be inoperative.
Visually check all accessible wiring
connectors, harnesses and retaining clips for
security, and for signs of chafing or damage.
Rectify any faults found.
Caution: Before carrying out any work on the
vehicle battery, read through the precautions
given in “Safety first!” at the beginning of this
manual.
1The battery fitted as original equipment is
“maintenance-free”, and requires no
maintenance apart from having the case kept
clean, and the terminals clean and tight.
2If a “traditional” type battery is fitted as a
replacement, remove the old cell covers and
check that the plate separators in each cell are
covered by approximately 6 mm (0.25 in) of
electrolyte. If the battery case is translucent,
the cell covers need not be removed to check
the level. Top-up if necessary with distilled or
de-ionized water; do not overfill, and mop up
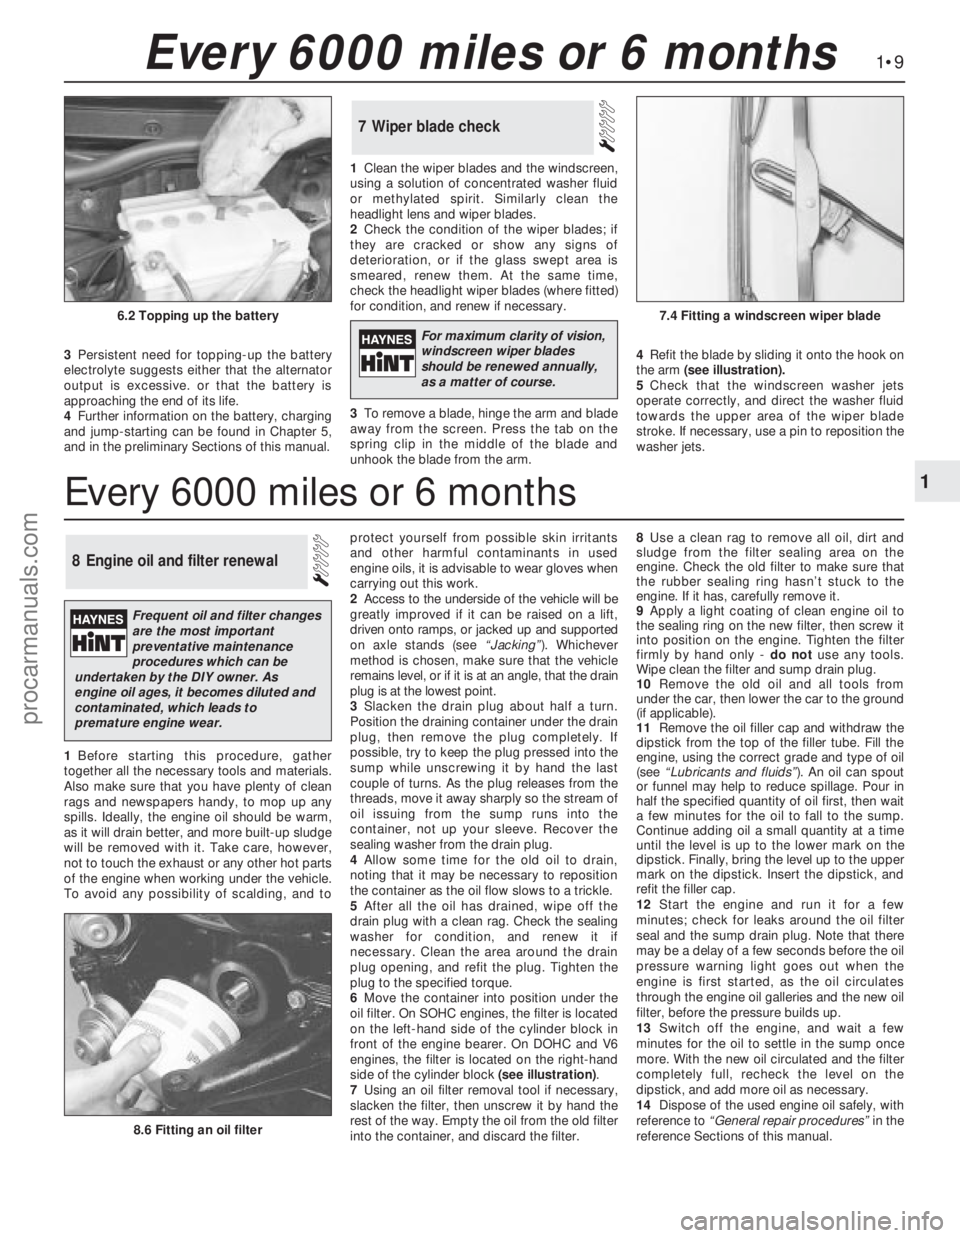
any spillage at once(see illustration).
6Battery electrolyte level check
5Electrical system check
1•8Weekly checks
Tyre Tread Wear Patterns
Shoulder Wear
Underinflation
(wear on both sides)
Check and adjust pressures
Incorrect wheel camber
(wear on one side)
Repair or renew suspension
parts
Hard cornering
Reduce speed!
Centre Wear
Overinflation
Check and adjust pressures
If you sometimes have to inflate
your car’s tyres to the higher
pressures specified for maximum
load or sustained high speed,
don’t forget to reduce the
pressures to normal afterwards.
Toe Wear
Incorrect toe setting
Adjust front wheel alignment
Note: The feathered edge of
the tread which characterises
toe wear is best checked by
feel.
Uneven Wear
Incorrect camber or castor
Repair or renew suspension
parts
Malfunctioning suspension
Repair or renew suspension
parts
Unbalanced wheel
Balance tyres
Out-of-round brake disc/drum
Machine or renew
procarmanuals.com
Page 10 of 255
3Persistent need for topping-up the battery
electrolyte suggests either that the alternator
output is excessive. or that the battery is
approaching the end of its life.
4Further information on the battery, charging
and jump-starting can be found in Chapter 5,
and in the preliminary Sections of this manual.1Clean the wiper blades and the windscreen,
using a solution of concentrated washer fluid
or methylated spirit. Similarly clean the
headlight lens and wiper blades.
2Check the condition of the wiper blades; if
they are cracked or show any signs of
deterioration, or if the glass swept area is
smeared, renew them. At the same time,
check the headlight wiper blades (where fitted)
for condition, and renew if necessary.
3To remove a blade, hinge the arm and blade
away from the screen. Press the tab on the
spring clip in the middle of the blade and
unhook the blade from the arm. 4Refit the blade by sliding it onto the hook on
the arm(see illustration).
5Check that the windscreen washer jets
operate correctly, and direct the washer fluid
towards the upper area of the wiper blade
stroke. If necessary, use a pin to reposition the
washer jets.
7Wiper blade check
1Before starting this procedure, gather
together all the necessary tools and materials.
Also make sure that you have plenty of clean
rags and newspapers handy, to mop up any
spills. Ideally, the engine oil should be warm,
as it will drain better, and more built-up sludge
will be removed with it. Take care, however,
not to touch the exhaust or any other hot parts
of the engine when working under the vehicle.
To avoid any possibility of scalding, and toprotect yourself from possible skin irritants
and other harmful contaminants in used
engine oils, it is advisable to wear gloves when
carrying out this work.
2Access to the underside of the vehicle will be
greatly improved if it can be raised on a lift,
driven onto ramps, or jacked up and supported
on axle stands (see “Jacking”). Whichever
method is chosen, make sure that the vehicle
remains level, or if it is at an angle, that the drain
plug is at the lowest point.
3Slacken the drain plug about half a turn.
Position the draining container under the drain
plug, then remove the plug completely. If
possible, try to keep the plug pressed into the
sump while unscrewing it by hand the last
couple of turns. As the plug releases from the
threads, move it away sharply so the stream of
oil issuing from the sump runs into the
container, not up your sleeve. Recover the
sealing washer from the drain plug.
4Allow some time for the old oil to drain,
noting that it may be necessary to reposition
the container as the oil flow slows to a trickle.
5After all the oil has drained, wipe off the
drain plug with a clean rag. Check the sealing
washer for condition, and renew it if
necessary. Clean the area around the drain
plug opening, and refit the plug. Tighten the
plug to the specified torque.
6Move the container into position under the
oil filter. On SOHC engines, the filter is located
on the left-hand side of the cylinder block in
front of the engine bearer. On DOHC and V6
engines, the filter is located on the right-hand
side of the cylinder block (see illustration).
7Using an oil filter removal tool if necessary,
slacken the filter, then unscrew it by hand the
rest of the way. Empty the oil from the old filter
into the container, and discard the filter.8Use a clean rag to remove all oil, dirt and
sludge from the filter sealing area on the
engine. Check the old filter to make sure that
the rubber sealing ring hasn’t stuck to the
engine. If it has, carefully remove it.
9Apply a light coating of clean engine oil to
the sealing ring on the new filter, then screw it
into position on the engine. Tighten the filter
firmly by hand only - do notuse any tools.
Wipe clean the filter and sump drain plug.
10Remove the old oil and all tools from
under the car, then lower the car to the ground
(if applicable).
11Remove the oil filler cap and withdraw the
dipstick from the top of the filler tube. Fill the
engine, using the correct grade and type of oil
(see “Lubricants and fluids”). An oil can spout
or funnel may help to reduce spillage. Pour in
half the specified quantity of oil first, then wait
a few minutes for the oil to fall to the sump.
Continue adding oil a small quantity at a time
until the level is up to the lower mark on the
dipstick. Finally, bring the level up to the upper
mark on the dipstick. Insert the dipstick, and
refit the filler cap.
12Start the engine and run it for a few
minutes; check for leaks around the oil filter
seal and the sump drain plug. Note that there
may be a delay of a few seconds before the oil
pressure warning light goes out when the
engine is first started, as the oil circulates
through the engine oil galleries and the new oil
filter, before the pressure builds up.
13Switch off the engine, and wait a few
minutes for the oil to settle in the sump once
more. With the new oil circulated and the filter
completely full, recheck the level on the
dipstick, and add more oil as necessary.
14Dispose of the used engine oil safely, with
reference to “General repair procedures”in the
reference Sections of this manual.
8Engine oil and filter renewal
1•9
1
Every 6000 miles or 6 months
8.6 Fitting an oil filter
6.2 Topping up the battery7.4 Fitting a windscreen wiper blade
Every 6000 miles or 6 months
For maximum clarity of vision,
windscreen wiper blades
should be renewed annually,
as a matter of course.
Frequent oil and filter changes
are the most important
preventative maintenance
procedures which can be
undertaken by the DIY owner. As
engine oil ages, it becomes diluted and
contaminated, which leads to
premature engine wear.
procarmanuals.com
Page 13 of 255
1Work around the vehicle, and lubricate the
hinges and locks with a light machine oil.
2Lightly lubricate the bonnet release
mechanism and exposed sections of inner
cable with a smear of grease.
3Check the security and operation of all
hinges, latches and locks, adjusting them
where required. Where applicable, check the
operation of the central locking system.
4Check the condition and operation of the
tailgate struts, renewing them if either is
leaking or is no longer able to support the
tailgate securely when raised.
SOHC and V6 engines
1The correct functioning of the spark plugs is
vital for the correct running and efficiency of
the engine. It is essential that the plugs fitted
are appropriate for the engine.
2Make sure that the ignition is switched off
before inspecting the HT leads to see if they
carry their cylinder numbers - if not, number
each lead using sticky tape or paint.
3Pull the HT lead connectors off the plugs.
Pull on the connectors, not on the leads.
4Blow away any dirt from around the spark
plug recesses in the cylinder head(s).
5Unscrew and remove the plugs, using a
proprietary plug spanner or a spark plug
socket, extension and ratchet.
6The condition of the plugs will tell much
about the overall condition of the engine. If the
insulator nose of the spark plug is clean and
white, with no deposits, this is indicative of a
weak mixture or too hot a plug (a hot plug
transfers heat away from the electrode slowly,
a cold plug transfers heat away quickly).
7If the tip and insulator nose are covered with
hard black-looking deposits, then this is
indicative that the mixture is too rich. Should
the plug be black and oily, then it is likely that
the engine is fairly worn, as well as the mixture
being too rich.
8If the insulator nose is covered with light tan
to greyish-brown deposits, then the mixture is
correct, and it is likely that the engine is in
good condition.
9Apply a smear of anti-seize compound to
the threads of the new plugs. Make sure that
theinsulators are clean and that the screwed
HT lead adapters are tight. Pay particular
attention to the plug seating surfaces on OHC
engines, since these plugs have no sealing
washers (“taper seat” type) and any dirt will
cause a bad seal.
10Screw each plug into its hole by hand. If a
plug is reluctant to go in, do not force it with a
spanner, but unscrew it and try again. If the
plug is cross-threaded, it is the cylinder head
which will be damaged.11Final tightening of the spark plugs should
ideally be carried out using a torque wrench.
The tightening torques are given in the
Specifications. If a torque wrench is not
available, tighten the plugs beyond the point
where they contact the head as follows:
OHC (taper seat plugs) - One-sixteenth of a
turn maximum
V6 (plugs with washers) - One-quarter of a
turn maximum
12If the taper seat type of plug is
overtightened, the sealing faces will bite
together and removal will be very difficult.
13Refit the HT leads to the plugs, paying
attention to the cylinder numbers. Push each
connector firmly onto its plug.
14Run the engine to verify that the HT leads
have been refitted correctly.
DOHC engines
15Proceed as described above whilst noting
the following points.
a)Remove the air cleaner as described in
Chapter 4.
b)The minimal length of number 3 HT lead
makes removal from the spark plug
difficult. It is advisable to remove this lead
from the distributor prior to removing it
from the spark plug.
c)The spark plugs are deeply recessed in
the cylinder head and it will be necessary
to use a spark plug socket with a long
extension bar. If possible, use a spark plug
socket with a rubber grip inside as this will
hold onto the spark plug once loosened
and will enable the spark plugs to be
withdrawn and refitted more easily.
SOHC and all V6 engines
1All of these engines have one or two
drivebelts which drive the water pump and
alternator from the crankshaft pulley. When
power steering is fitted, the same belts drive
the steering pump. The air conditioning
compressor, when fitted, is driven
independently.
2Periodically inspect the drivebelt(s) for
fraying, cracks, glazing or other damage. Turn
the engine so that the full length of the belt(s)
can be viewed. Renew belts which are in poor
condition. When twin drivebelts are fitted, both
must be renewed together, even if only one is
damaged.
3Check the tension of the drivebelt(s) by
pressing firmly with the fingers in the middle of
the longest belt run (engine stopped). Tension
is correct when the belt can be deflected by
10 mm (0.4 in) under firm finger pressure (see
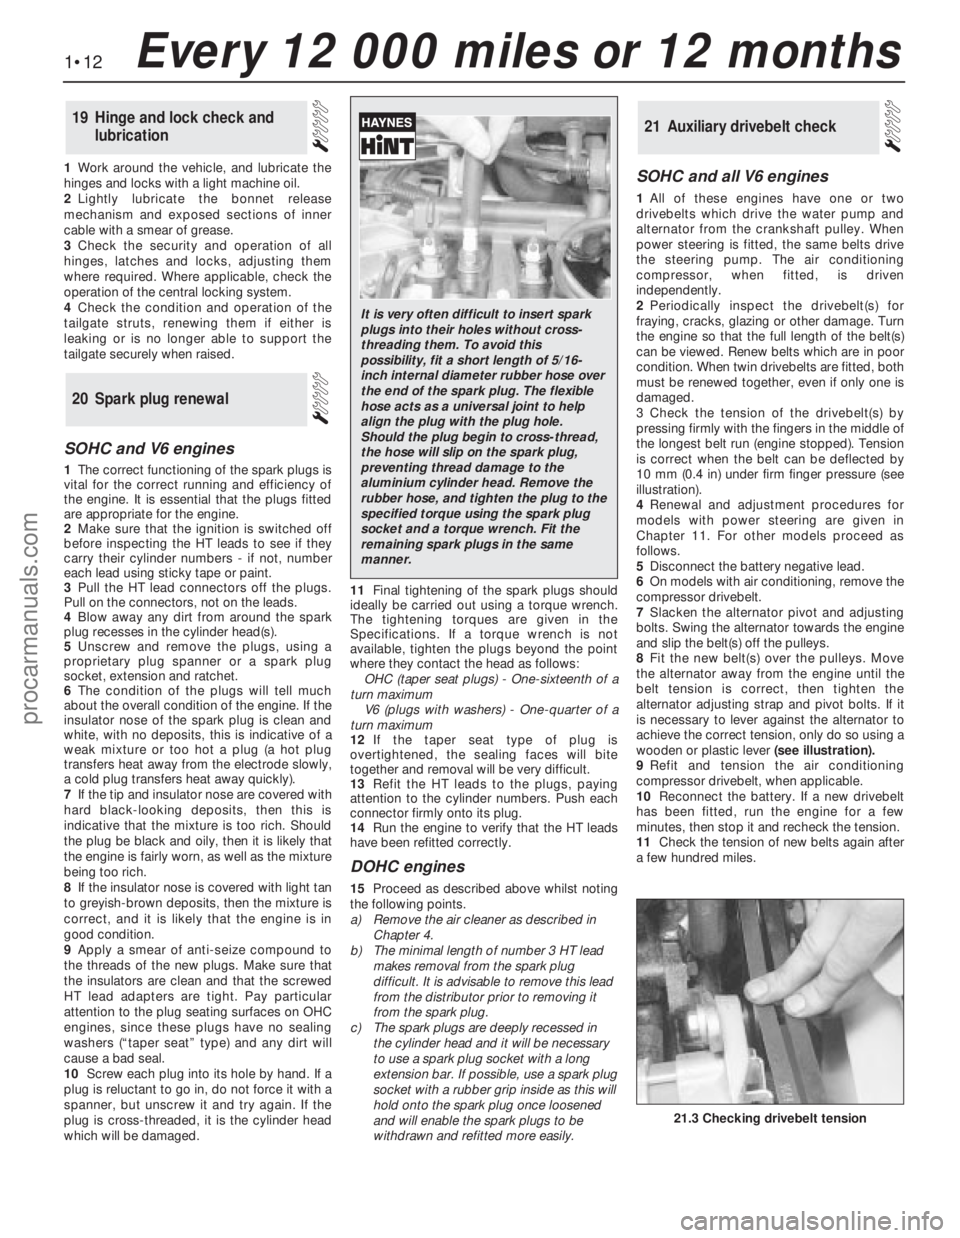
illustration).
4Renewal and adjustment procedures for
models with power steering are given in
Chapter 11. For other models proceed as
follows.
5Disconnect the battery negative lead.
6On models with air conditioning, remove the
compressor drivebelt.
7Slacken the alternator pivot and adjusting
bolts. Swing the alternator towards the engine
and slip the belt(s) off the pulleys.
8Fit the new belt(s) over the pulleys. Move
the alternator away from the engine until the
belt tension is correct, then tighten the
alternator adjusting strap and pivot bolts. If it
is necessary to lever against the alternator to
achieve the correct tension, only do so using a
wooden or plastic lever(seeillustration).
9Refit and tension the air conditioning
compressor drivebelt, when applicable.
10Reconnect the battery. If a new drivebelt
has been fitted, run the engine for a few
minutes, then stop it and recheck the tension.
11Check the tension of new belts again after
a few hundred miles.
21Auxiliary drivebelt check
20Spark plug renewal
19Hinge and lock check and
lubrication
1•12Every 12 000 miles or 12 months
21.3 Checking drivebelt tension
It is very often difficult to insert spark
plugs into their holes without cross-
threading them. To avoid this
possibility, fit a short length of 5/16-
inch internal diameter rubber hose over
the end of the spark plug. The flexible
hose acts as a universal joint to help
align the plug with the plug hole.
Should the plug begin to cross-thread,
the hose will slip on the spark plug,
preventing thread damage to the
aluminium cylinder head. Remove the
rubber hose, and tighten the plug to the
specified torque using the spark plug
socket and a torque wrench. Fit the
remaining spark plugs in the same
manner.
procarmanuals.com