1984 CHEVROLET CAVALIER warning
[x] Cancel search: warningPage 41 of 105
Downloaded from www.Manualslib.com manuals search engine Headlight "ON" Warning Buzzer/Chime
The optional headlight reminder buzzer/chime provides an audible warning that the main light switch is in one 01 the "on" positions , either parking lights
or headlights.
The reminder buzzer/chime is activated only when the ignition switch is turned to "OFF," "LOCK" or "ACCESSORY" position and the lights are on.
When the parking lights
or headlights are to be operated with the key in the
OFF position, the reminder buzzer/chime can be shut off by turning the light
switch knob until the instrument cluster lights are not on,
CIgarette Ughter (Optional)
The cigarette lighter is located on the instrument pane! face. To operate, push
~ in. When ~ becomes heated, ~ automatically pops out ready for use. Avoid
holding the lighter in by hand while ~ is heating as damage to the heating
element may result.
Ashtray
The ashtray may be simply pulled out for cleaning:
• Open ashtray.
• Pull ashtray up and remove for cleaning .
•
Push ashtray back into bracket.
VENTILATION SYSTEM
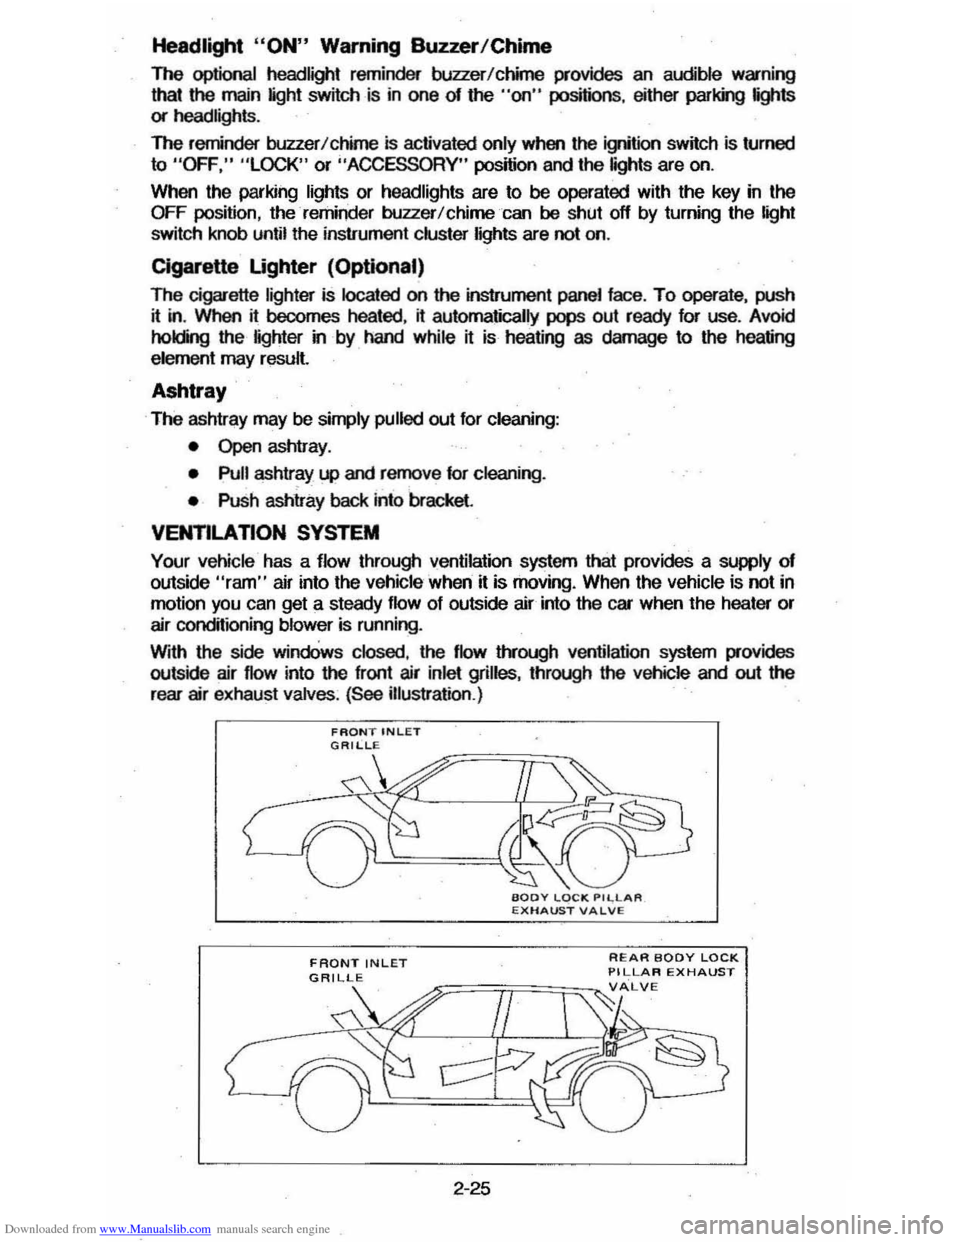
Your vehicle has a flow through ventilation system that provides a supply of outside "ram" air into the vehicle ' when it is moving . When the vehicle is not in
motion you can get a steady flow of outside air into the car when the heater or
air conditioning blower is running.
With the side
windOws closed, the flow lIYough ventilation system provides
outside air flow into the front air inlet grilles, through the vehicle and out the
rear air exhaust valves. (See illustration .)
FRONT INLET
2-25
REAR BODY LOCK PILLAR EXHAUST
Page 52 of 105
Downloaded from www.Manualslib.com manuals search engine • Adjust the heating or cooWng system to force outside air into the cal as
follows :
1. On cars not equipped with air conditioning , set the fan to high speed
and the upper control lever to any position except "Off."
2 . On cars equipped with air condition ing, set the fan to high speed and
the
upper control lever to any position except "Off" or "Max."
• On cars that have outside air vents in or under the instrument panel, open
vents
fully .
"Gate Ajar" Ught
Station wagons have a "GATE AJAR" warning light located in the instrument
cluster . It is designed to come on ~ the liftgate is not lully closed and the
ignition is on , thus warning against driving with the liftgate even partially open.
See "Engine Exhaust Gas Caution (Carbon Monoxide)" at the beginning 01
"Starting and Operating ," Section 2 of this manual . To test that the ight circuit
is working correctly , start the car and check that the light comes on when the liftgate is open or only partially latched.
Electric Trunk, Hatchback , Or Tailgate Release
An electric release permits opening the trunk, hatchback or station wagon tailgate from inside the car by pressing a release bunon in the instrument panel
glove box. The release lor the hatchback and the station wagon tailgate will
function only II the automatic transaxle is in "P" (Park) or "N" (Neutral) or, on
manual transaxle cars, ~ the parking brake is applied .
SUNSHADE (OPTIONAL)
n your hatchback model is equipped with the optional louvered rear window
sunshade, the
sunshade·is hinged at the top and heid down at the boUom by a
one-quarter tum fastener on each end of the sunshade. This method of
attachment
allows you to raise the sunshade lor cleaning the exterior of the
hatchback glass :
To clean the hatchback lid exterior glass:
1. Using a coin or screwdriver , rotate each lastener one-quarter turn until they pop up; the sunshade is now unlocked .
2. Grasp the lower edge 01 the sunshade approximately in the middle and lift
the sunshade away Irom the hatchback lid.
3. Clean the hatchback glass as desired while holding the sunshade in the
open position.
4 . Lower the sunshade to
its original position and locate the one-quarter turn
fasteners over the holes in the lower bracket assemblies; using a coin or
screwdriver, push the one-quarter turn stud downward
until it engages the
wire bail on the bracket and rotate one-quarter turn to lock. (Make sure the
lastener is
locked to the bracket by. lifting each corner 01 the sunshade.)
NOnCE: DO NOT DRIVE when sunshade is not lOcked in position.
To remove the sunshade from the car, ~ desired , release the sunshade as you would lor cleaning. Then, remove the four nuts which secure the sunshade
hinges to the hinge base
plate on the hatchback lid. Wft the sunshade assembly from the car.
2-36
Page 59 of 105
Downloaded from www.Manualslib.com manuals search engine •
~-
SECTION 3
IN CASE OF EMERGENCY
. FOUR·WAY HAZARD WARNING FLASHER
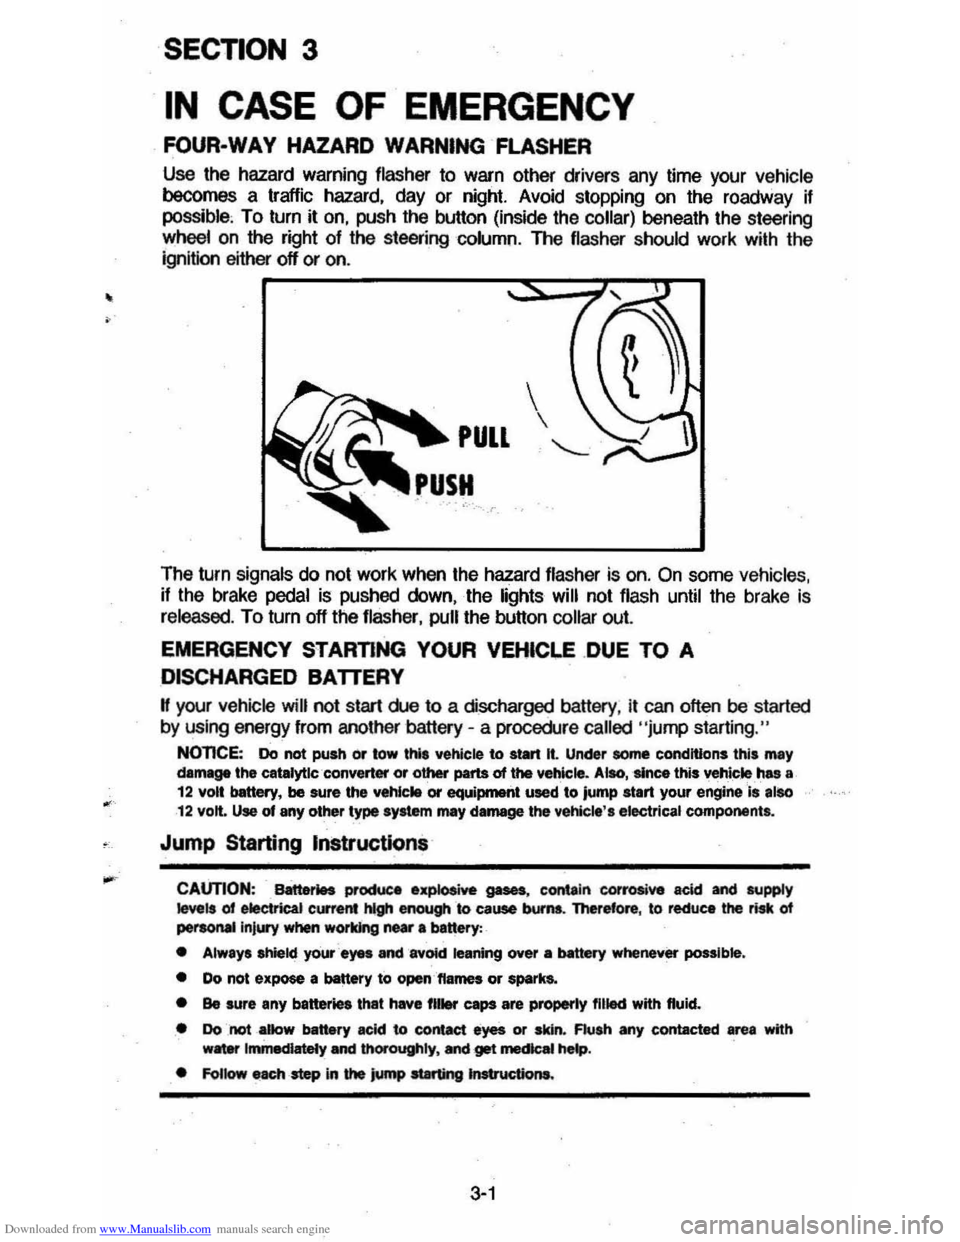
Use the hazard warning flasher to warn other drivers any time your vehicle becomes a traffic hazard. day or night. Avoid stopping on the roadway if possible, To turn it on. push the button (inside the collar) beneath the steering
wheelan the right of the steering column. The flasher should work with the
ignition either off or on .
The turn
signals do not work when the hazard flasher is on. On some vehicles. if the brake pedal is pushed down. the lights will not flash until the brake is
released. To turn off the flasher. pull the button collar out.
EMERGENCY STARTING YOUR VEHICI.E .DUE TO A
DISCHARGED BATTERY
H your vehicle will not start rue to a discharged battery. it can often be started
by using energy from another battery -a procedure called "jump starting."
NOnCE: Do not push or tow thl' vehicle to start It. Under some conditions this may damage the catalytlc ·converter or other parts of the vehicle. Alao, 'since this vehicle ,has a 12 volt bettery, be sure the vehlc .. or equiprnetlt used to jump start your engine Is also 12 volt. Use of any other type syltem mey damage the vehicle', electrical components.
Jump Starting Instructions
CAUTION: Battet1H productl .~ gases, contain corrosive acid and supply ~ls of electrical current hlgh enough &0 cause bums. Therefore, to reduce the risk of peraoMIlnjury when working near 8 banery:
• Always shield your ayes and avOid leaning over a MtttIry whenever possible.
• Do not expose a battery to open,'ftames or spark&.
• Be sure any batter. that have fll .... caps are properly filled with fluid.
• Do not _aDow battery acid to contact eyes or skin. Flush any contacted area with w8ter Immediately and thOrOughly. Mel get mecIcaI hMp.
• FoUow each -step in the jump at8rting Jnstructiona.
3-1
Page 61 of 105
Downloaded from www.Manualslib.com manuals search engine ENGINE COOLING SYSTEM OVERHEATING
If you see or hear escaping steam or have other reason to suspect there is a
serious overheat condition, stop and park the vehicle as soon as it is safe
to do so and turn off the engine immediately and get out of the vehicle.
The cooling system may overheat if the coolant level is too low, if there is a
sudden
loss of coolant (such as a worn hose splitting), or if other problems occur. It may also temporarily overheat during severe operating conditions
such as:
• climbing a long hill on a hot day,
• stopping after high-speed driving,
• idling for long periods in trallic, or
• towing a trailer.
I! the Engine Coolant Temperature light comes on (or if you have an Engine
Coolant Temperature gage and it shows an overheat condition), or you have
any reason to suspect the engine may be overheating:
• tfyour air conditioner is on, turn it off.
• If you are stopped in traffic, shift the transaxle to "N" (Neutral).
If the warning light does not go off (or engine coolant temperature does not
start to drop) within a minute
Or two:
• Pull over, stop and park the vehicle as soon as it is safe to do so.
• Let the engine run at normal idle speed for two or three minutes.
I! the warning light does not go off (or engine coolant temperature does not
start to drop),
turn off the engine and get out of the car, then proceed as
follows:
CAUTION: To help avokt being burned:
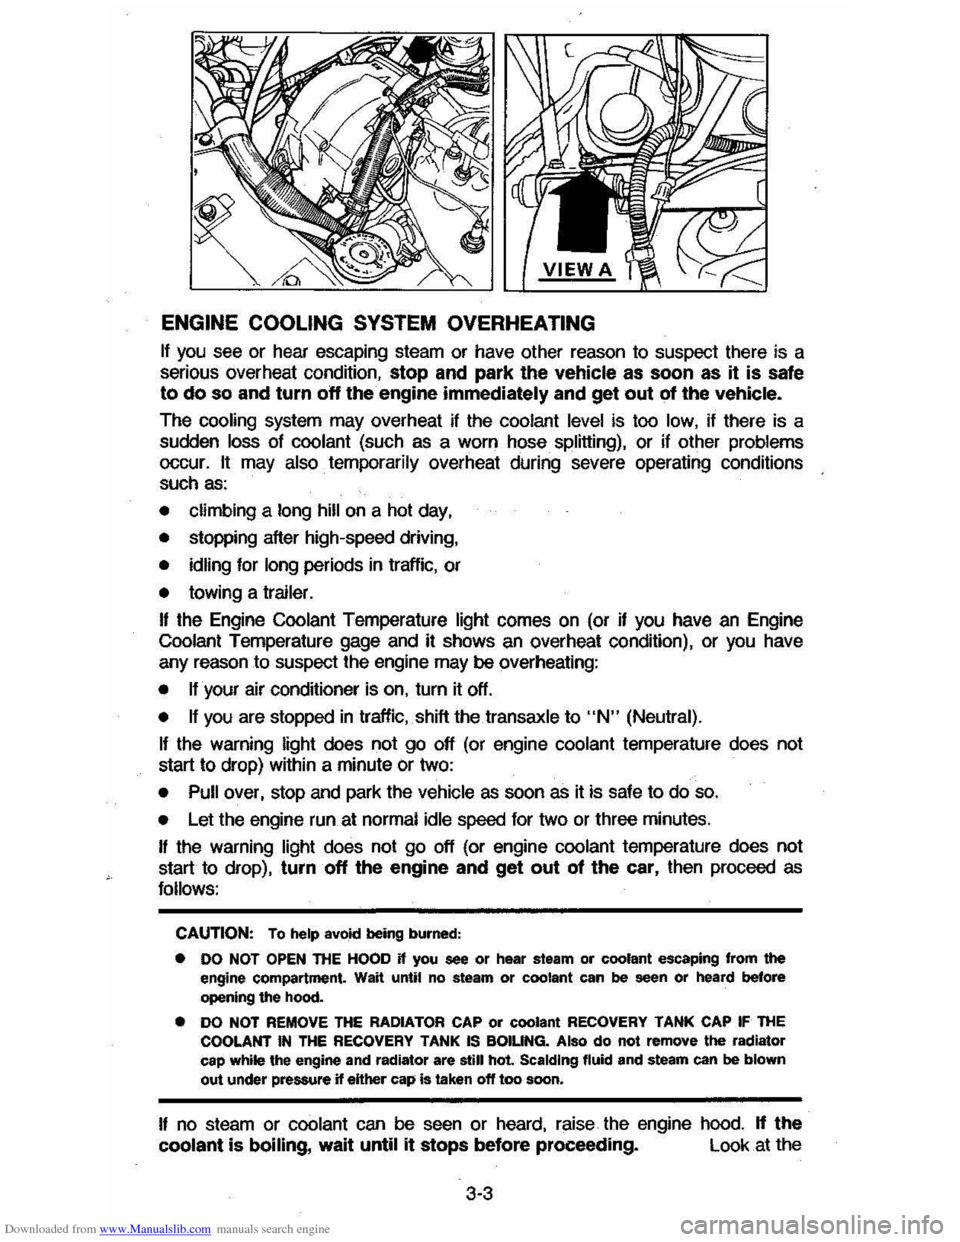
• DO NOT OPEN ntE HOOD if you see or hear steam or coolant escaping from the engine compartment. Wait until no steam or coolant can be seen or heard before opening the hood.
• DO NOT REMOVE THE RADIATOR CAP or coolant RECOVERY TANK CAP IF THE COOLANT IN THE RECOVERY TANK IS BOIUNG. Also do not remove the radiator
cap while the engine and radiator are still hot Scalding fluid and steam can be blown out under pressure if eHher cap is taken off too soon.
I! no steam or coolant can be seen or heard, raise the engine hood. If the
coolant is boiling, wait until it stops before proceeding. Look at the
3-3
Page 63 of 105
Downloaded from www.Manualslib.com manuals search engine JACKING INSTRUCTIONS
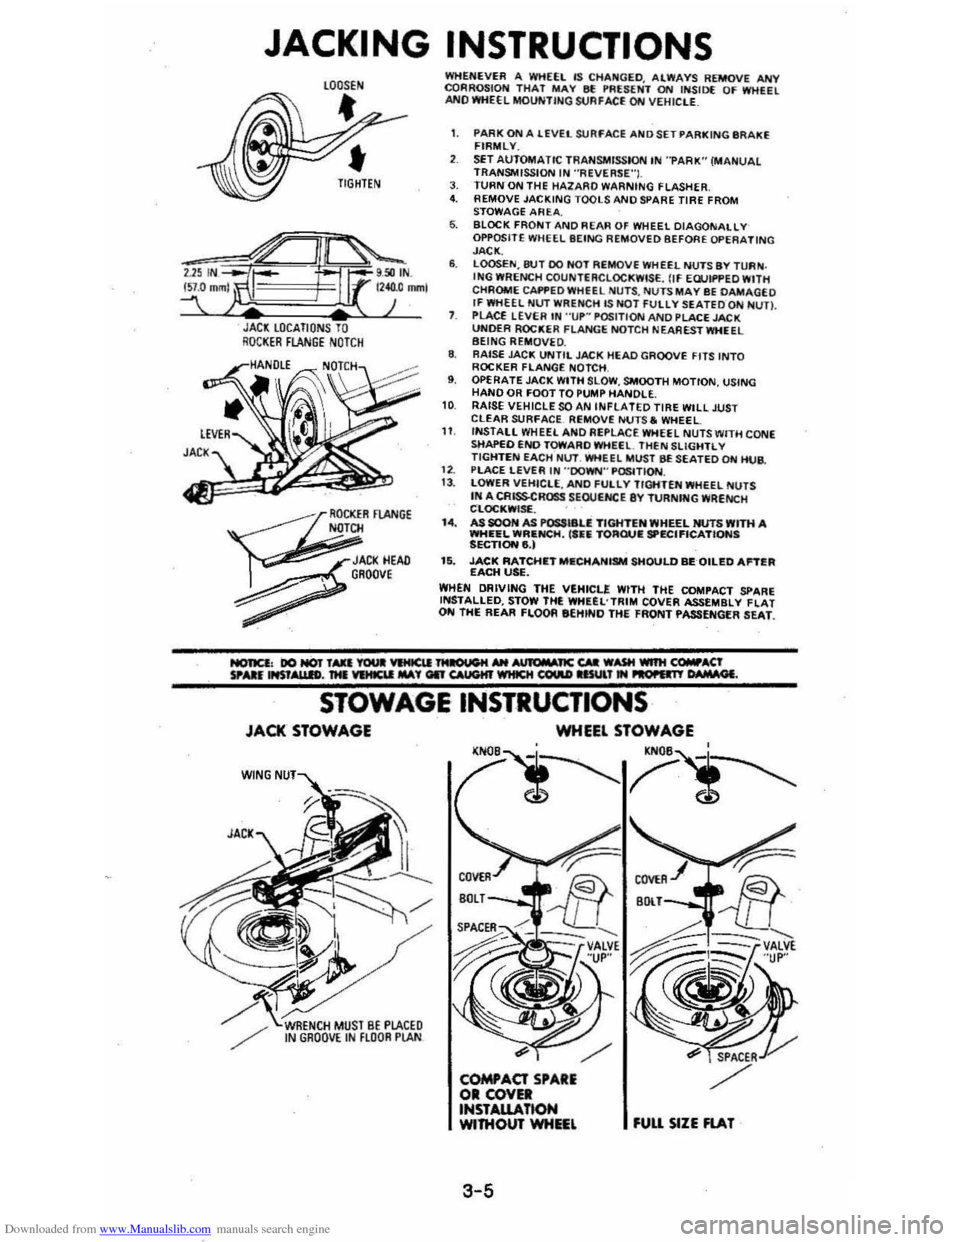
JACl LOCATIONS TO RQCI(ER FLANGE NOTCH
~
OCKER FlANGE N
JACI(HEAD , GROOve
~
WHENEVER A WHEEL IS CHA~GED. ALWAYS REMOVE ANY CQRROSIOH THAT MAY 8f !'RUENT ON INSID( OF WHEEL ANO WHEEL MOUNTING StJAFACE ON VEHIClE_
1. PARK ON A lEVEL SURFACE AND SET PARKING IIR AKE FIRMLY.
SET AUTOMATIC TRANSMISSION IN "PARK" (MANUAL TRANSMISSION IN ·'ReVERSE"I. J. TURN ON THE HAlARO WARNING FLASHER 4. REMOVE JACKING TOOLS AND SPARE TIRE FROM
STOWAGE AREA. 6. BLOCK FRONT AND REAR OF WHEEL DIAGONALLY OPPOSITE WHEEL BEING REMOVED BEFORE OPERATING JACK. 6. LOOSEN,8tH DO HOT REMOVE WHEEL NUTS BY TURN . ING WRENCH COUNTERCLOCKWISE. flf EWIf'PED WITH
CHROME CAI'f'EDWHfEL NU TS , NUTS MAY BE DAMAGEO If WHEEL NUT WRENCH lS NOT FUllY SEATEDQN NUn. PLACE LEVER IN "UP~ POSITION AND PLACE JACK UNOER ROCKER FLANGE NOTCH NEA REST WHEEL BEING REMOVE D. 8. RAISE JAC!!; UNTIL JACK HEAD GROOVE FITS INTO ROCKER FLANGE NOTCH , 9. OPERATE JACK WITH SLOW , SMOOTH MOTION, USING HAND OR FOOT TO PUMP HANDLE. 10 RAISE VEHICLE SOAN INfLATED TIRE WILL JUST CLEAR SURfACE. Ri;MOVE NUTS. WHEEL 11 INSTALL WHEEL ANO Ai;PLACE WHEEL NUTS WITH CONE sttAPEO END TOWARO WHEEl. THEN SLiGHTL V TIGHTEN EACH Nl.IT. WHEEL MUST BE SEATED ON HUB.
1 2. PlACE LEVER IN "'DOWN'" P~TION. 13 . lOWER VEHICLE, ANO fULlY TIGHTEN WHEEL NUTS IN A CRISSCROSS SEOUtNCE 8Y TURNfNG WRENCH CLOC!!;WISf. . I.. AS SOON AS POSSI8U TIGHTEN WHEEL NUTS WITH A WHEEL WRIlNCH, ('fiIi TORQUIE SPECIFICATIONS SECTIONe,) 15. JACK RATCHIETMIlCHANISM SHOULD BEQILED Antill EACH USE. WHEN DRIVING THE VEHICLE WITH THE COMPACT SPARE INSTALLED, STOW THE WHUL'TRIM COVER ASSEMBLY flAT ON THE REAR FLOOR eEHINO THE FRONT PASSENGER SEAT.
STOWAGE INSTRUCTIONS
JACK STOWAGE
W(NG
WHEEL STOWAGE
'N
3-5
fUU SIZE FlAT
Page 89 of 105
Downloaded from www.Manualslib.com manuals search engine • Install the chains on the front tires as tightly as possible, then tighten them
again after driving 1/4 to 1/2 mile (0.4 to 0.8 kilometer). The use of chains
on the rear tires is not recommended; the chains may contact and
possibly damage the vehicle. If you intend to use chains on the rear tires, be sure
there is enough clearance.
• Do not exceed 45 mph (70 km/h), or the chain manufacturer's speed limitation, if lower.
• Drive in a restrained manner and avoid large bumps, potholes, severe turns and other manuevers which CQuid cause the tires to bounce up and down.
• Follow any other instructions of the chain manufacturer which do not
disagree with the above.
Spare Tire
For the use and installation of your spare tire, see "In Case of Emergency,"
Section 3 of this manual.
Tire Replacement
CAUTION:" 00 not mix different tire construction types (such as radial, bias, and biasbetted) on your vehicle exceptio emergencies, because your vehicle's handling could be affected and may result in loss Of control. This caution does not apply to a compact spare tire furnished with your vehicle.
On most vehicles originally eqUipped with radial tires, you will find a TPC Spec.
No. (Tire Performance Criteria Specification Number)
molded into the tire
sidewall
near the tire size marking. This shows that the tire meets rigid size
and performance standards which were developed for your vehicle. The TPC
Spec. No. assures a proper combination of endurance,
handHng, load capacity,
ride and traction on wet, dry, or snow-covered surfaces. When you replace your tires with tires having the same TPC Spec. No., your new tires will be
compatible with your vehicle.
When replacing tires with those not having a TPC Spec. No., you should use
the same size, load range, and construction type (bias, bias-belted, or radial)
as the original tires on your vehicle. A different size or type of tire may affect
such things as ride, handling, speedometer/odometer calibration, vehicle
ground clearance, and tire or tire chain clearance to the body or chassis. If
replacing only a single tire, it should be paired on the same axle with the least worn tire of the other three.
Uniform Tire Quality Grading
The following information relates to the tire grading system developed by the
United States
National Highway Traffic Safety Administration which will grade
tires by traction and temperature performance. (This applies only to vehicles
sold in the United States.)
Traction -A, B, C
The traction grades, from highest to lowest are: A, S, and C. They represent
the tire's
::ability to stop on wet pavement as measured under controlled
conditions on specified government test
~urfaces of asphalt and concrete. A
tire marked C may have poor traction performance.
Warning: The traction grade assigned to this tire is based on braking (straight
ahead) traction tests
and does not include cornering (turning) traction.
5-16
Page 90 of 105
Downloaded from www.Manualslib.com manuals search engine ,
Temperature -A, B, C
The temperature grades are A (the highest), B, and C, representing the tire's
resistance 10 the generation of heat and its ability 10 dissipate heat when tested
under controlled conditions on a specified indoor laboratory test wheel.
Sustained high temperature can cause the material of the tire to degenerate
and reduce tire life, and excessive temperature can lead to sudden tire failure .
The grade
C corresponds 10 a level of performance which all passenger car
tires must meet under the Federal Motor
Vehicle Safety Standard No. 109. Grades B and A represent higher levels of performance on the laboratory lest
wheel than the ",nimum required by law.
Warning : The temperature grade forlhis tire is established for a tire that is properly inflated and not overloaded . . Excessive speed, underinflation, or
excessive loading, either separately or in combination , can cause heal buildup and possible tire failure .
These grades are molded on the sidewalls 01 passenger car tires.
While
the tires available as 'standard or optional equipment .on General
Motors vehicles may vary with respect to these grades, all such tires meet General Motors performance s!andards and have been approved for
use on General Motors vehicles. All passenger car tires must conform to Federal safety requirements in addition to these grades.
You
should replace your tires when:
1 . The tires are worn to a point where 1.6
milHmeters (2/ 32 inch) or less t.read remains, or the cord or fabric is showing. '.
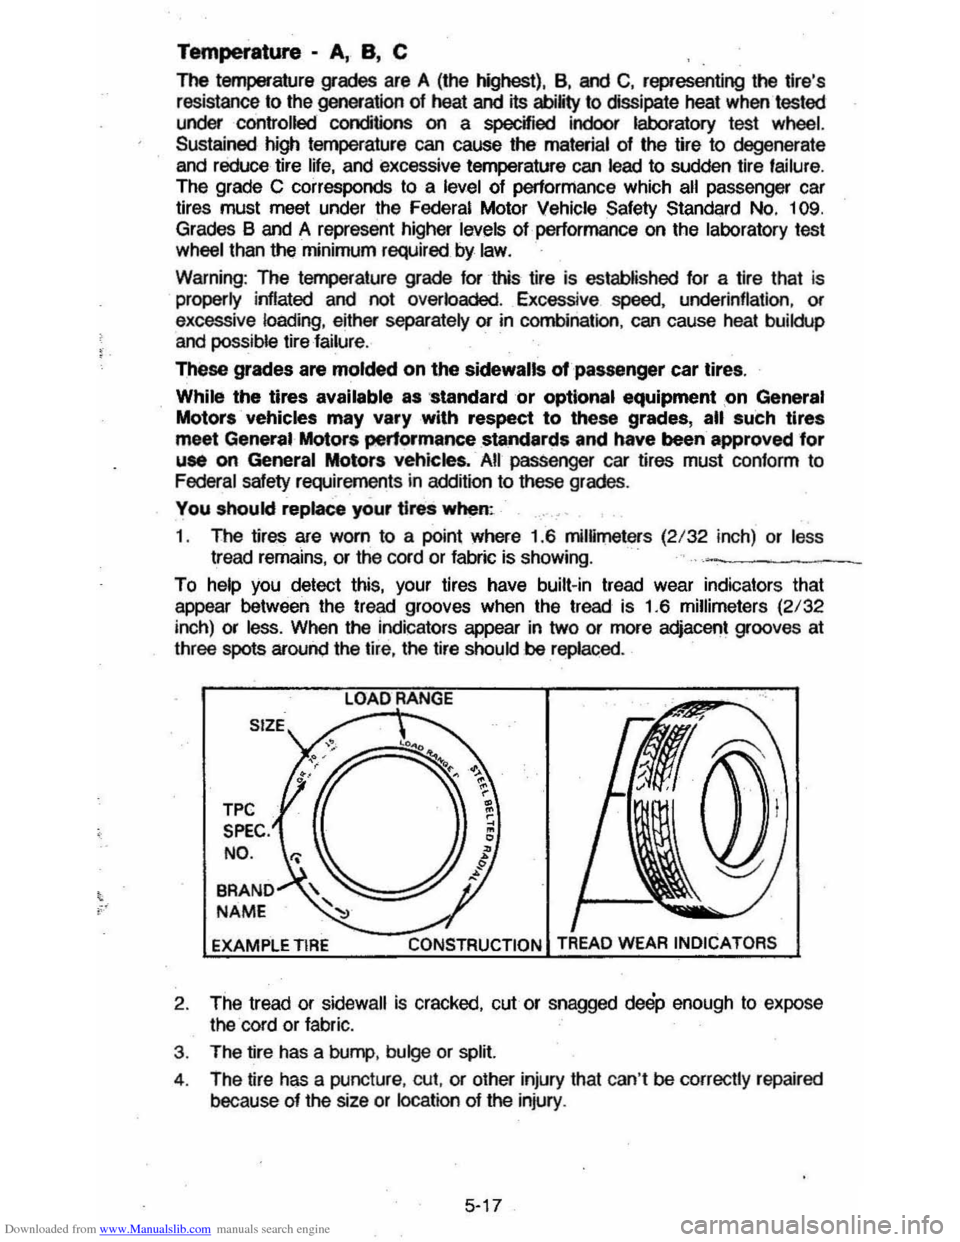
To help you detect this, your tires have built-in tread wear indicators that
appear between the tread grooves when the tread is 1.6 millimeters
(2/32
inch) or less. When the indicators appear in two or more adjacent grooves at
three spots around the tire, the tire should be replaced.
TPC
SPEC. NO .
BRAND
NAME
EXAMPLE TIRE LOAD
RANGE
CONSTRUCTION
2
. The tread or sidewall is cracked, cut or snagged deep enough to expose
the cord or fabric.
3. The tire has a bump , bulge or split.
4 . The tire has a puncture , cut, or other injury thai can 't
be correctly repaired
because of the size or
location of the injury .
5-17
Page 91 of 105
Downloaded from www.Manualslib.com manuals search engine Wheel Replacement
Damaged wheels must be replaced. For example, replace wheels if they are
bent,
cracked,or heavily rusted, or if wheel nuts often become loose. Also
replace wheels which leak air (except some aluminum wheels which can be repaired-- see your authorized dealer). See the Caution under "Inspection and
Rotation"
in this section regarding the importance of obtaining good metal-tometal contact when replacing or changing wheels.
Do not use bent wheels which have been straightened, and do not use inner
tubes in leaking wheels designed for tubeless tires. Such wheels may have
structural damage and could fail without warning. When replacing wheels for
any reason, the new wheels should be equal in load limit. diameter, width,
offset, and mounting configurations to those originally installed on your vehicle.
A wheel of the wrong size or type may adversely affect such things
as wheel
and bearing life, brake cooling, speedometer I odometer calibration, stopping
ability, headlight
aim, bumper height, vehicle ground clearance, and tire or tire
chain clearance to the body and chassis. Replacement with used wheels is not advised; they may have been treated harshly or have very high mileage, and
could fail without warning.
You can get wheels from your dealer.
Warranty
Tires are warranted by the tire manufa9turers. Warranty information is included
in the manufacturer's Warranty folder furnished With your vehicle.
5-18