1983 FIAT UNO wheel bolts
[x] Cancel search: wheel boltsPage 47 of 303
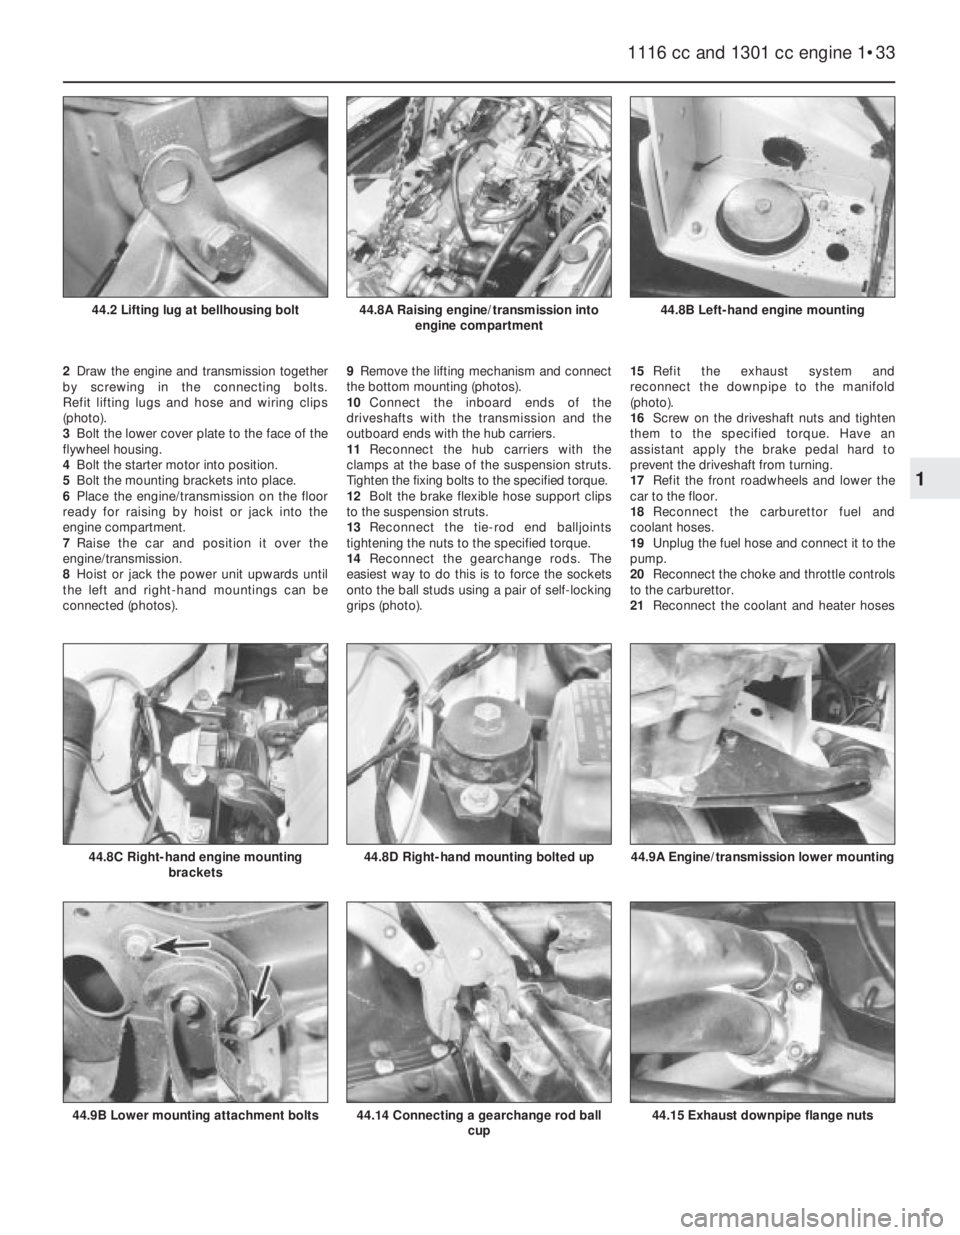
2Draw the engine and transmission together
by screwing in the connecting bolts.
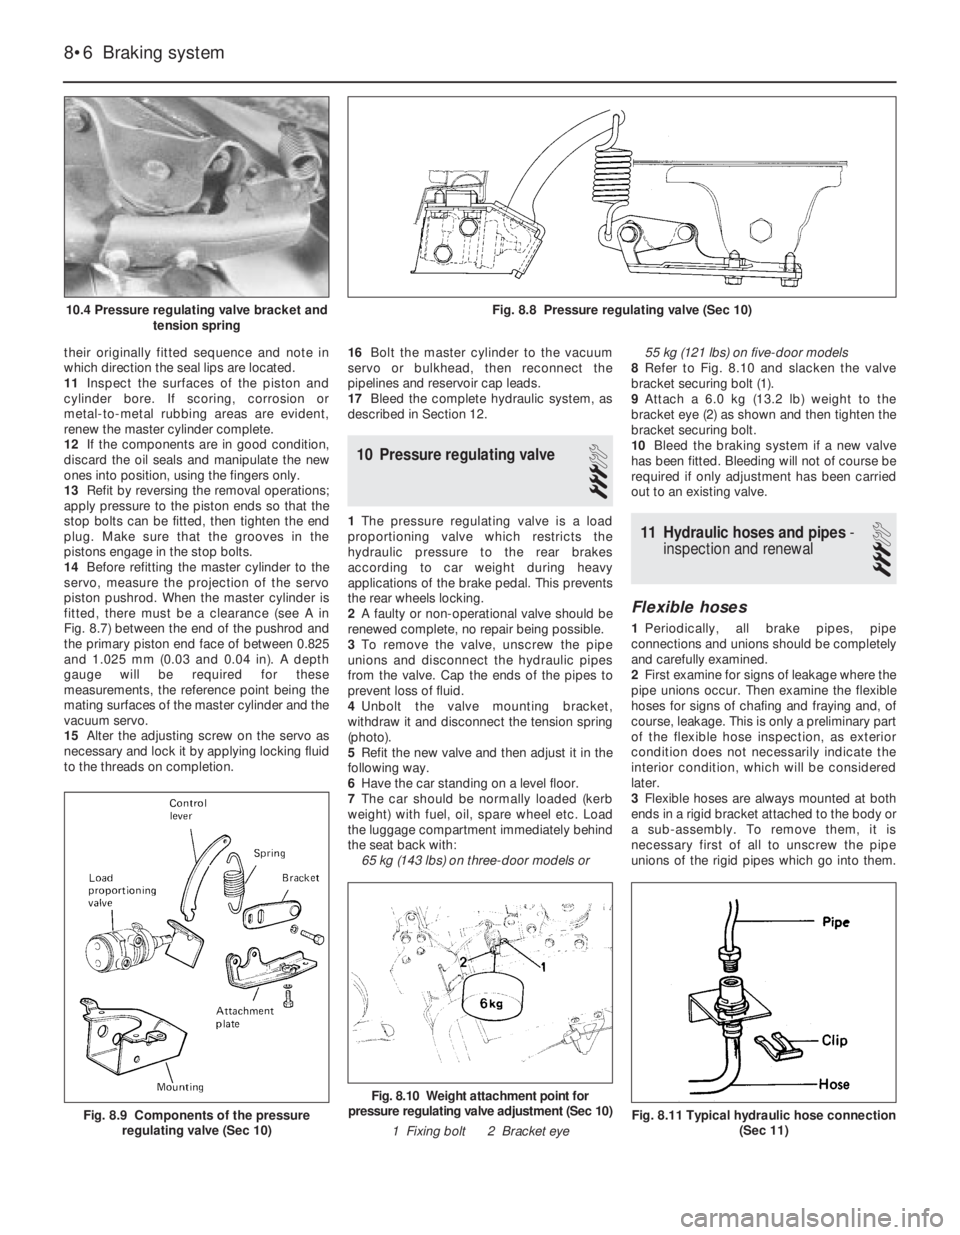
Refit lifting lugs and hose and wiring clips
(photo).
3Bolt the lower cover plate to the face of the
flywheel housing.
4Bolt the starter motor into position.
5Bolt the mounting brackets into place.
6Place the engine/transmission on the floor
ready for raising by hoist or jack into the
engine compartment.
7Raise the car and position it over the
engine/transmission.
8Hoist or jack the power unit upwards until
the left and right-hand mountings can be
connected (photos).9Remove the lifting mechanism and connect
the bottom mounting (photos).
10Connect the inboard ends of the
driveshafts with the transmission and the
outboard ends with the hub carriers.
11Reconnect the hub carriers with the
clamps at the base of the suspension struts.
Tighten the fixing bolts to the specified torque.
12Bolt the brake flexible hose support clips
to the suspension struts.
13Reconnect the tie-rod end balljoints
tightening the nuts to the specified torque.
14Reconnect the gearchange rods. The
easiest way to do this is to force the sockets
onto the ball studs using a pair of self-locking
grips (photo).15Refit the exhaust system and
reconnect the downpipe to the manifold
(photo).
16Screw on the driveshaft nuts and tighten
them to the specified torque. Have an
assistant apply the brake pedal hard to
prevent the driveshaft from turning.
17Refit the front roadwheels and lower the
car to the floor.
18Reconnect the carburettor fuel and
coolant hoses.
19Unplug the fuel hose and connect it to the
pump.
20Reconnect the choke and throttle controls
to the carburettor.
21Reconnect the coolant and heater hoses
1116 cc and 1301 cc engine 1•33
44.8B Left-hand engine mounting44.8A Raising engine/transmission into
engine compartment44.2 Lifting lug at bellhousing bolt
44.15 Exhaust downpipe flange nuts44.14 Connecting a gearchange rod ball
cup44.9B Lower mounting attachment bolts
44.9A Engine/transmission lower mounting44.8D Right-hand mounting bolted up44.8C Right-hand engine mounting
brackets
1
Page 81 of 303
8
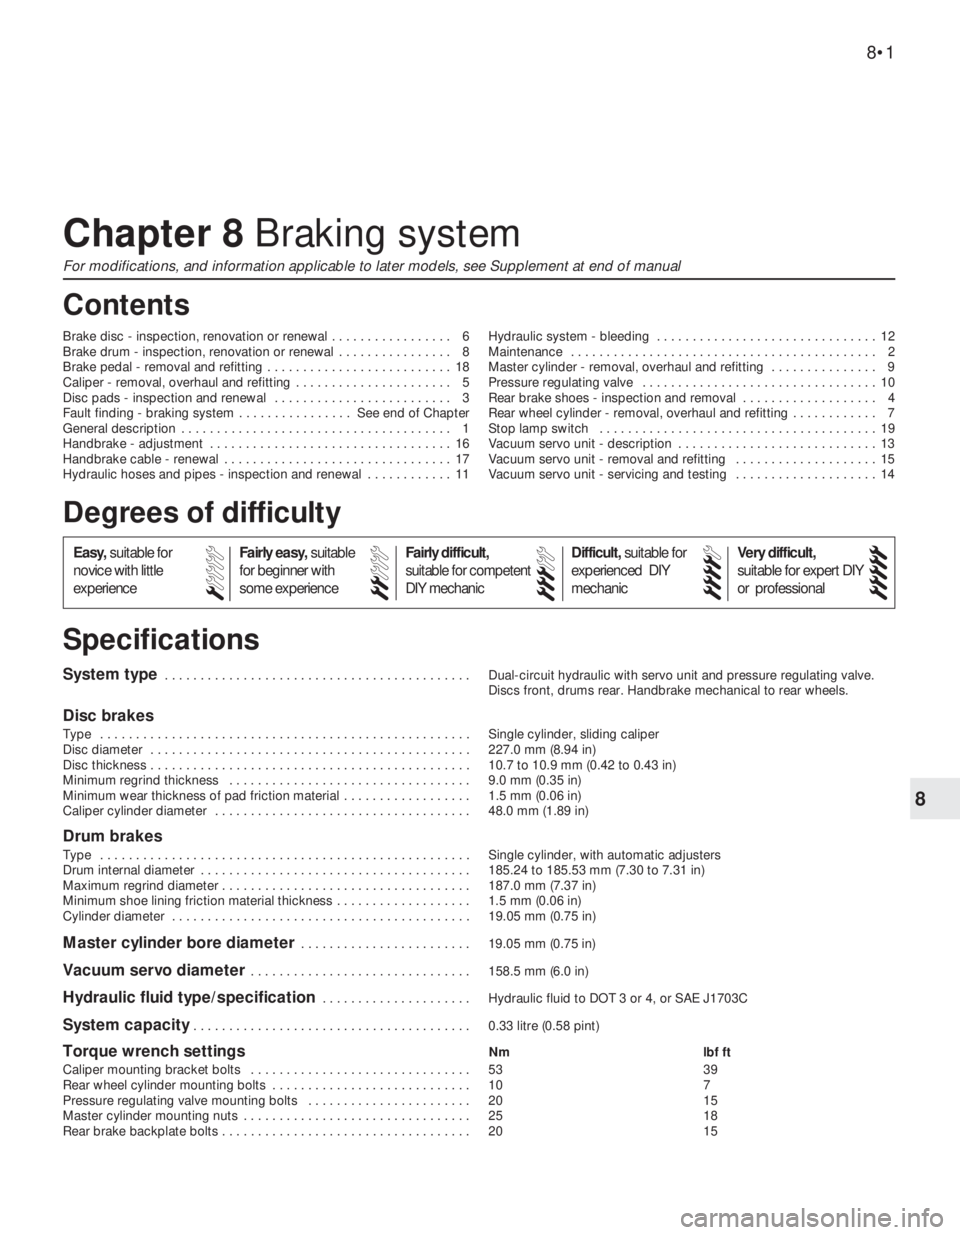
System type . . . . . . . . . . . . . . . . . . . . . . . . . . . . . . . . . . . . . . . . . . . Dual-circuit hydraulic with servo unit and pressure regulating valve.
Discs front, drums rear. Handbrake mechanical to rear wheels.
Disc brakes
Type . . . . . . . . . . . . . . . . . . . . . . . . . . . . . . . . . . . . . . . . . . . . . . . . . . . . Single cylinder, sliding caliper
Disc diameter . . . . . . . . . . . . . . . . . . . . . . . . . . . . . . . . . . . . . . . . . . . . . 227.0 mm (8.94 in)
Disc thickness . . . . . . . . . . . . . . . . . . . . . . . . . . . . . . . . . . . . . . . . . . . . . 10.7 to 10.9 mm (0.42 to 0.43 in)
Minimum regrind thickness . . . . . . . . . . . . . . . . . . . . . . . . . . . . . . . . . . 9.0 mm (0.35 in)
Minimum wear thickness of pad friction material . . . . . . . . . . . . . . . . . . 1.5 mm (0.06 in)
Caliper cylinder diameter . . . . . . . . . . . . . . . . . . . . . . . . . . . . . . . . . . . . 48.0 mm (1.89 in)
Drum brakes
Type . . . . . . . . . . . . . . . . . . . . . . . . . . . . . . . . . . . . . . . . . . . . . . . . . . . . Single cylinder, with automatic adjusters
Drum internal diameter . . . . . . . . . . . . . . . . . . . . . . . . . . . . . . . . . . . . . . 185.24 to 185.53 mm (7.30 to 7.31 in)
Maximum regrind diameter . . . . . . . . . . . . . . . . . . . . . . . . . . . . . . . . . . . 187.0 mm (7.37 in)
Minimum shoe lining friction material thickness . . . . . . . . . . . . . . . . . . . 1.5 mm (0.06 in)
Cylinder diameter . . . . . . . . . . . . . . . . . . . . . . . . . . . . . . . . . . . . . . . . . . 19.05 mm (0.75 in)
Master cylinder bore diameter . . . . . . . . . . . . . . . . . . . . . . . . 19.05 mm (0.75 in)
Vacuum servo diameter . . . . . . . . . . . . . . . . . . . . . . . . . . . . . . . 158.5 mm (6.0 in)
Hydraulic fluid type/specification . . . . . . . . . . . . . . . . . . . . . Hydraulic fluid to DOT 3 or 4, or SAE J1703C
System capacity . . . . . . . . . . . . . . . . . . . . . . . . . . . . . . . . . . . . . . . 0.33 litre (0.58 pint)
Torque wrench settingsNm lbf ft
Caliper mounting bracket bolts . . . . . . . . . . . . . . . . . . . . . . . . . . . . . . . 53 39
Rear wheel cylinder mounting bolts . . . . . . . . . . . . . . . . . . . . . . . . . . . . 10 7
Pressure regulating valve mounting bolts . . . . . . . . . . . . . . . . . . . . . . . 20 15
Master cylinder mounting nuts . . . . . . . . . . . . . . . . . . . . . . . . . . . . . . . . 25 18
Rear brake backplate bolts . . . . . . . . . . . . . . . . . . . . . . . . . . . . . . . . . . . 20 15
Chapter 8 Braking system
For modifications, and information applicable to later models, see Supplement at end of manual
Brake disc - inspection, renovation or renewal . . . . . . . . . . . . . . . . . 6
Brake drum - inspection, renovation or renewal . . . . . . . . . . . . . . . . 8
Brake pedal - removal and refitting . . . . . . . . . . . . . . . . . . . . . . . . . . 18
Caliper - removal, overhaul and refitting . . . . . . . . . . . . . . . . . . . . . . 5
Disc pads - inspection and renewal . . . . . . . . . . . . . . . . . . . . . . . . . 3
Fault finding - braking system . . . . . . . . . . . . . . . . See end of Chapter
General description . . . . . . . . . . . . . . . . . . . . . . . . . . . . . . . . . . . . . . 1
Handbrake - adjustment . . . . . . . . . . . . . . . . . . . . . . . . . . . . . . . . . . 16
Handbrake cable - renewal . . . . . . . . . . . . . . . . . . . . . . . . . . . . . . . . 17
Hydraulic hoses and pipes - inspection and renewal . . . . . . . . . . . . 11Hydraulic system - bleeding . . . . . . . . . . . . . . . . . . . . . . . . . . . . . . . 12
Maintenance . . . . . . . . . . . . . . . . . . . . . . . . . . . . . . . . . . . . . . . . . . . 2
Master cylinder - removal, overhaul and refitting . . . . . . . . . . . . . . . 9
Pressure regulating valve . . . . . . . . . . . . . . . . . . . . . . . . . . . . . . . . . 10
Rear brake shoes - inspection and removal . . . . . . . . . . . . . . . . . . . 4
Rear wheel cylinder - removal, overhaul and refitting . . . . . . . . . . . . 7
Stop lamp switch . . . . . . . . . . . . . . . . . . . . . . . . . . . . . . . . . . . . . . . 19
Vacuum servo unit - description . . . . . . . . . . . . . . . . . . . . . . . . . . . . 13
Vacuum servo unit - removal and refitting . . . . . . . . . . . . . . . . . . . . 15
Vacuum servo unit - servicing and testing . . . . . . . . . . . . . . . . . . . . 14
8•1
Specifications Contents
Easy,suitable for
novice with little
experienceFairly easy,suitable
for beginner with
some experienceFairly difficult,
suitable for competent
DIY mechanic
Difficult,suitable for
experienced DIY
mechanicVery difficult,
suitable for expert DIY
or professional
Degrees of difficulty
54321
Page 83 of 303
into its cylinder to accommodate them. This
will cause the fluid level to rise in the reservoir.
Anticipate this by syphoning some out
beforehand, but take care not to let it drip
onto the paintwork - it acts as an effective
paint stripperl
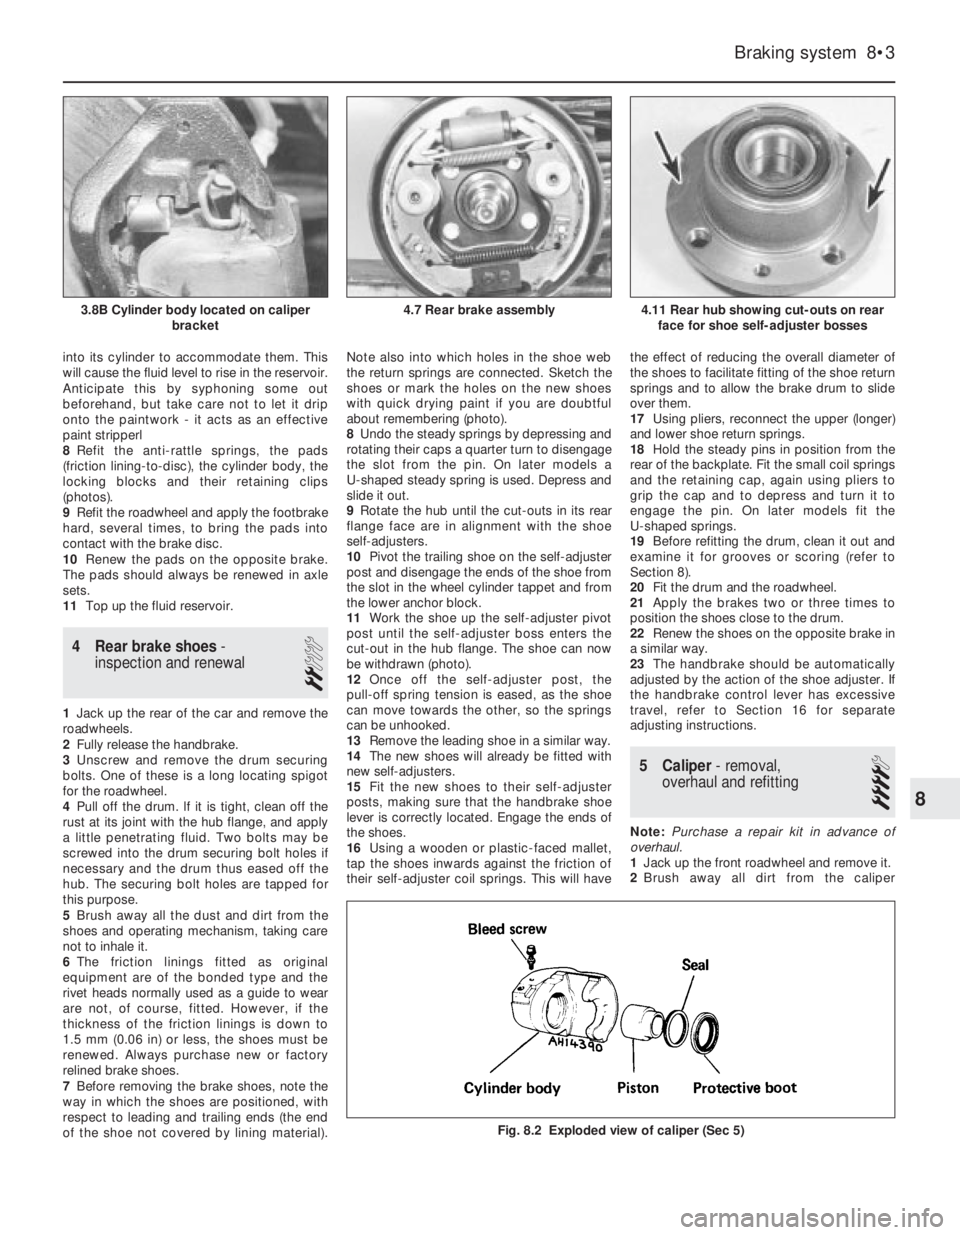
8Refit the anti-rattle springs, the pads
(friction lining-to-disc), the cylinder body, the
locking blocks and their retaining clips
(photos).
9Refit the roadwheel and apply the footbrake
hard, several times, to bring the pads into
contact with the brake disc.
10Renew the pads on the opposite brake.
The pads should always be renewed in axle
sets.
11Top up the fluid reservoir.
4 Rear brake shoes-
inspection and renewal
2
1Jack up the rear of the car and remove the
roadwheels.
2Fully release the handbrake.
3Unscrew and remove the drum securing
bolts. One of these is a long locating spigot
for the roadwheel.
4Pull off the drum. lf it is tight, clean off the
rust at its joint with the hub flange, and apply
a little penetrating fluid. Two bolts may be
screwed into the drum securing bolt holes if
necessary and the drum thus eased off the
hub. The securing bolt holes are tapped for
this purpose.
5Brush away all the dust and dirt from the
shoes and operating mechanism, taking care
not to inhale it.
6The friction linings fitted as original
equipment are of the bonded type and the
rivet heads normally used as a guide to wear
are not, of course, fitted. However, if the
thickness of the friction linings is down to
1.5 mm (0.06 in) or less, the shoes must be
renewed. Always purchase new or factory
relined brake shoes.
7Before removing the brake shoes, note the
way in which the shoes are positioned, with
respect to leading and trailing ends (the end
of the shoe not covered by lining material).Note also into which holes in the shoe web
the return springs are connected. Sketch the
shoes or mark the holes on the new shoes
with quick drying paint if you are doubtful
about remembering (photo).
8Undo the steady springs by depressing and
rotating their caps a quarter turn to disengage
the slot from the pin. On later models a
U-shaped steady spring is used. Depress and
slide it out.
9Rotate the hub until the cut-outs in its rear
flange face are in alignment with the shoe
self-adjusters.
10Pivot the trailing shoe on the self-adjuster
post and disengage the ends of the shoe from
the slot in the wheel cylinder tappet and from
the lower anchor block.
11Work the shoe up the self-adjuster pivot
post until the self-adjuster boss enters the
cut-out in the hub flange. The shoe can now
be withdrawn (photo).
12Once off the self-adjuster post, the
pull-off spring tension is eased, as the shoe
can move towards the other, so the springs
can be unhooked.
13Remove the leading shoe in a similar way.
14The new shoes will already be fitted with
new self-adjusters.
15Fit the new shoes to their self-adjuster
posts, making sure that the handbrake shoe
lever is correctly located. Engage the ends of
the shoes.
16Using a wooden or plastic-faced mallet,
tap the shoes inwards against the friction of
their self-adjuster coil springs. This will havethe effect of reducing the overall diameter of
the shoes to facilitate fitting of the shoe return
springs and to allow the brake drum to slide
over them.
17Using pliers, reconnect the upper (longer)
and lower shoe return springs.
18Hold the steady pins in position from the
rear of the backplate. Fit the small coil springs
and the retaining cap, again using pliers to
grip the cap and to depress and turn it to
engage the pin. On later models fit the
U-shaped springs.
19Before refitting the drum, clean it out and
examine it for grooves or scoring (refer to
Section 8).
20Fit the drum and the roadwheel.
21Apply the brakes two or three times to
position the shoes close to the drum.
22Renew the shoes on the opposite brake in
a similar way.
23The handbrake should be automatically
adjusted by the action of the shoe adjuster. If
the handbrake control lever has excessive
travel, refer to Section 16 for separate
adjusting instructions.
5 Caliper- removal,
overhaul and refitting
4
Note: Purchase a repair kit in advance of
overhaul.
1Jack up the front roadwheel and remove it.
2Brush away all dirt from the caliper
Braking system 8•3
4.11 Rear hub showing cut-outs on rear
face for shoe self-adjuster bosses4.7 Rear brake assembly3.8B Cylinder body located on caliper
bracket
Fig. 8.2 Exploded view of caliper (Sec 5)
8
Page 84 of 303
assembly and the flexible pipe, particularly the
fixing bracket and union at the car end of the
flexible pipe.
3Have ready a container suitable to catch
the brake fluid, and sheets of clean
newspaper on which to put parts.
4Take out the spring clips and locking
blocks, and take the caliper off the support
bracket.
5Disconnect the hydraulic flexible pipe at the
under wing support bracket and cap both
pipe ends. It may help to prevent loss of fluid
if the vent in the reservoir cap is sealed with
adhesive tape, to create a vacuum.
6Remove the caliper to the bench or other
work surface, and clean it thoroughly with
hydraulic fluid or methylated spirit.
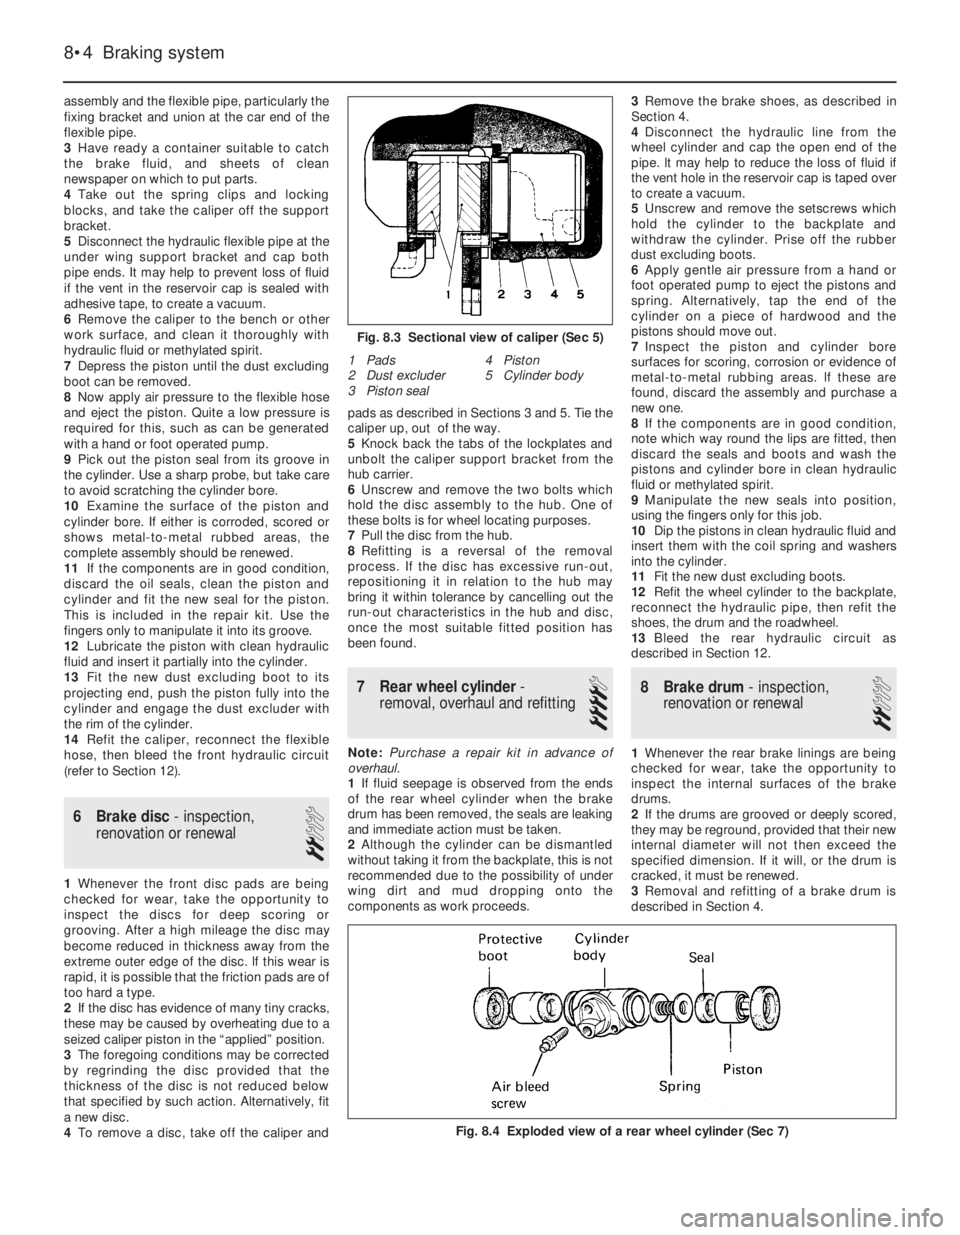
7Depress the piston until the dust excluding
boot can be removed.
8Now apply air pressure to the flexible hose
and eject the piston. Quite a low pressure is
required for this, such as can be generated
with a hand or foot operated pump.
9Pick out the piston seal from its groove in
the cylinder. Use a sharp probe, but take care
to avoid scratching the cylinder bore.
10Examine the surface of the piston and
cylinder bore. If either is corroded, scored or
shows metal-to-metal rubbed areas, the
complete assembly should be renewed.
11If the components are in good condition,
discard the oil seals, clean the piston and
cylinder and fit the new seal for the piston.
This is included in the repair kit. Use the
fingers only to manipulate it into its groove.
12Lubricate the piston with clean hydraulic
fluid and insert it partially into the cylinder.
13Fit the new dust excluding boot to its
projecting end, push the piston fully into the
cylinder and engage the dust excluder with
the rim of the cylinder.
14Refit the caliper, reconnect the flexible
hose, then bleed the front hydraulic circuit
(refer to Section 12).
6 Brake disc- inspection,
renovation or renewal
2
1Whenever the front disc pads are being
checked for wear, take the opportunity to
inspect the discs for deep scoring or
grooving. After a high mileage the disc may
become reduced in thickness away from the
extreme outer edge of the disc. lf this wear is
rapid, it is possible that the friction pads are of
too hard a type.
2If the disc has evidence of many tiny cracks,
these may be caused by overheating due to a
seized caliper piston in the “applied” position.
3The foregoing conditions may be corrected
by regrinding the disc provided that the
thickness of the disc is not reduced below
that specified by such action. Alternatively, fit
a new disc.
4To remove a disc, take off the caliper andpads as described in Sections 3 and 5. Tie the
caliper up, out of the way.
5Knock back the tabs of the lockplates and
unbolt the caliper support bracket from the
hub carrier.
6Unscrew and remove the two bolts which
hold the disc assembly to the hub. One of
these bolts is for wheel locating purposes.
7Pull the disc from the hub.
8Refitting is a reversal of the removal
process. If the disc has excessive run-out,
repositioning it in relation to the hub may
bring it within tolerance by cancelling out the
run-out characteristics in the hub and disc,
once the most suitable fitted position has
been found.
7 Rear wheel cylinder-
removal, overhaul and refitting
4
Note: Purchase a repair kit in advance of
overhaul.
1If fluid seepage is observed from the ends
of the rear wheel cylinder when the brake
drum has been removed, the seals are leaking
and immediate action must be taken.
2Although the cylinder can be dismantled
without taking it from the backplate, this is not
recommended due to the possibility of under
wing dirt and mud dropping onto the
components as work proceeds. 3Remove the brake shoes, as described in
Section 4.
4Disconnect the hydraulic line from the
wheel cylinder and cap the open end of the
pipe. lt may help to reduce the loss of fluid if
the vent hole in the reservoir cap is taped over
to create a vacuum.
5Unscrew and remove the setscrews which
hold the cylinder to the backplate and
withdraw the cylinder. Prise off the rubber
dust excluding boots.
6Apply gentle air pressure from a hand or
foot operated pump to eject the pistons and
spring. Alternatively, tap the end of the
cylinder on a piece of hardwood and the
pistons should move out.
7Inspect the piston and cylinder bore
surfaces for scoring, corrosion or evidence of
metal-to-metal rubbing areas. lf these are
found, discard the assembly and purchase a
new one.
8If the components are in good condition,
note which way round the lips are fitted, then
discard the seals and boots and wash the
pistons and cylinder bore in clean hydraulic
fluid or methylated spirit.
9Manipulate the new seals into position,
using the fingers only for this job.
10Dip the pistons in clean hydraulic fluid and
insert them with the coil spring and washers
into the cylinder.
11Fit the new dust excluding boots.
12Refit the wheel cylinder to the backplate,
reconnect the hydraulic pipe, then refit the
shoes, the drum and the roadwheel.
13Bleed the rear hydraulic circuit as
described in Section 12.
8 Brake drum- inspection,
renovation or renewal
2
1Whenever the rear brake linings are being
checked for wear, take the opportunity to
inspect the internal surfaces of the brake
drums.
2If the drums are grooved or deeply scored,
they may be reground, provided that their new
internal diameter will not then exceed the
specified dimension. If it will, or the drum is
cracked, it must be renewed.
3Removal and refitting of a brake drum is
described in Section 4.
8•4 Braking system
Fig. 8.4 Exploded view of a rear wheel cylinder (Sec 7)
1 Pads
2 Dust excluder
3 Piston seal4 Piston
5 Cylinder body
Fig. 8.3 Sectional view of caliper (Sec 5)
Page 86 of 303
their originally fitted sequence and note in
which direction the seal lips are located.
11Inspect the surfaces of the piston and
cylinder bore. If scoring, corrosion or
metal-to-metal rubbing areas are evident,
renew the master cylinder complete.
12If the components are in good condition,
discard the oil seals and manipulate the new
ones into position, using the fingers only.
13Refit by reversing the removal operations;
apply pressure to the piston ends so that the
stop bolts can be fitted, then tighten the end
plug. Make sure that the grooves in the
pistons engage in the stop bolts.
14Before refitting the master cylinder to the
servo, measure the projection of the servo
piston pushrod. When the master cylinder is
fitted, there must be a clearance (see A in
Fig. 8.7) between the end of the pushrod and
the primary piston end face of between 0.825
and 1.025 mm (0.03 and 0.04 in). A depth
gauge will be required for these
measurements, the reference point being the
mating surfaces of the master cylinder and the
vacuum servo.
15Alter the adjusting screw on the servo as
necessary and lock it by applying locking fluid
to the threads on completion.16Bolt the master cylinder to the vacuum
servo or bulkhead, then reconnect the
pipelines and reservoir cap leads.
17Bleed the complete hydraulic system, as
described in Section 12.
10 Pressure regulating valve
3
1The pressure regulating valve is a load
proportioning valve which restricts the
hydraulic pressure to the rear brakes
according to car weight during heavy
applications of the brake pedal. This prevents
the rear wheels locking.
2A faulty or non-operational valve should be
renewed complete, no repair being possible.
3To remove the valve, unscrew the pipe
unions and disconnect the hydraulic pipes
from the valve. Cap the ends of the pipes to
prevent loss of fluid.
4Unbolt the valve mounting bracket,
withdraw it and disconnect the tension spring
(photo).
5Refit the new valve and then adjust it in the
following way.
6Have the car standing on a level floor.
7The car should be normally loaded (kerb
weight) with fuel, oil, spare wheel etc. Load
the luggage compartment immediately behind
the seat back with:
65 kg (143 lbs) on three-door models or 55 kg (121 lbs) on five-door models
8Refer to Fig. 8.10 and slacken the valve
bracket securing bolt (1).
9Attach a 6.0 kg (13.2 lb) weight to the
bracket eye (2) as shown and then tighten the
bracket securing bolt.
10Bleed the braking system if a new valve
has been fitted. Bleeding will not of course be
required if only adjustment has been carried
out to an existing valve.11 Hydraulic hoses and pipes-
inspection and renewal
3
Flexible hoses
1Periodically, all brake pipes, pipe
connections and unions should be completely
and carefully examined.
2First examine for signs of leakage where the
pipe unions occur. Then examine the flexible
hoses for signs of chafing and fraying and, of
course, leakage. This is only a preliminary part
of the flexible hose inspection, as exterior
condition does not necessarily indicate the
interior condition, which will be considered
later.
3Flexible hoses are always mounted at both
ends in a rigid bracket attached to the body or
a sub-assembly. To remove them, it is
necessary first of all to unscrew the pipe
unions of the rigid pipes which go into them.
8•6 Braking system
Fig. 8.11 Typical hydraulic hose connection
(Sec 11)
Fig. 8.10 Weight attachment point for
pressure regulating valve adjustment (Sec 10)
1 Fixing bolt 2 Bracket eye
Fig. 8.9 Components of the pressure
regulating valve (Sec 10)
Fig. 8.8 Pressure regulating valve (Sec 10)10.4 Pressure regulating valve bracket and
tension spring
Page 89 of 303
locknut and turn the adjuster nut on the
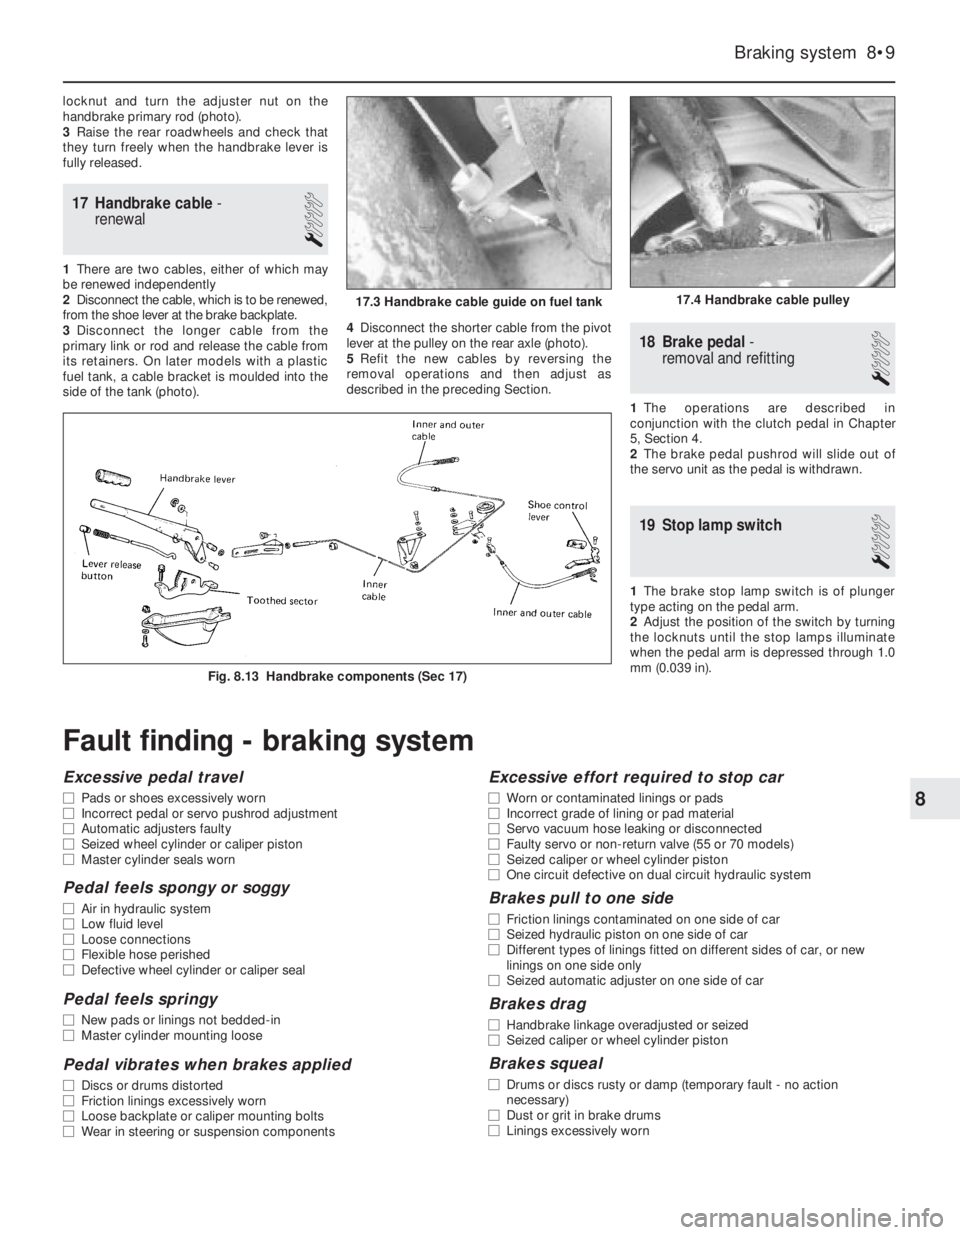
handbrake primary rod (photo).
3Raise the rear roadwheels and check that
they turn freely when the handbrake lever is
fully released.
17 Handbrake cable-
renewal
1
1There are two cables, either of which may
be renewed independently
2Disconnect the cable, which is to be renewed,
from the shoe lever at the brake backplate.
3Disconnect the longer cable from the
primary link or rod and release the cable from
its retainers. On later models with a plastic
fuel tank, a cable bracket is moulded into the
side of the tank (photo).4Disconnect the shorter cable from the pivot
lever at the pulley on the rear axle (photo).
5Refit the new cables by reversing the
removal operations and then adjust as
described in the preceding Section.
18 Brake pedal-
removal and refitting
1
1The operations are described in
conjunction with the clutch pedal in Chapter
5, Section 4.
2The brake pedal pushrod will slide out of
the servo unit as the pedal is withdrawn.
19 Stop lamp switch
1
1The brake stop lamp switch is of plunger
type acting on the pedal arm.
2Adjust the position of the switch by turning
the locknuts until the stop lamps illuminate
when the pedal arm is depressed through 1.0
mm (0.039 in).
Braking system 8•9
Fig. 8.13 Handbrake components (Sec 17)
17.4 Handbrake cable pulley17.3 Handbrake cable guide on fuel tank
8
Fault finding - braking system
Excessive pedal travel
m mPads or shoes excessively worn
m mIncorrect pedal or servo pushrod adjustment
m mAutomatic adjusters faulty
m mSeized wheel cylinder or caliper piston
m mMaster cylinder seals worn
Pedal feels spongy or soggy
m
mAir in hydraulic system
m mLow fluid level
m mLoose connections
m mFlexible hose perished
m mDefective wheel cylinder or caliper seal
Pedal feels springy
m
mNew pads or linings not bedded-in
m mMaster cylinder mounting loose
Pedal vibrates when brakes applied
m
mDiscs or drums distorted
m mFriction linings excessively worn
m mLoose backplate or caliper mounting bolts
m mWear in steering or suspension components
Excessive effort required to stop car
m
mWorn or contaminated linings or pads
m mIncorrect grade of lining or pad material
m mServo vacuum hose leaking or disconnected
m mFaulty servo or non-return valve (55 or 70 models)
m mSeized caliper or wheel cylinder piston
m mOne circuit defective on dual circuit hydraulic system
Brakes pull to one side
m
mFriction linings contaminated on one side of car
m mSeized hydraulic piston on one side of car
m mDifferent types of linings fitted on different sides of car, or new
linings on one side only
m mSeized automatic adjuster on one side of car
Brakes drag
m
mHandbrake linkage overadjusted or seized
m mSeized caliper or wheel cylinder piston
Brakes squeal
m
mDrums or discs rusty or damp (temporary fault - no action
necessary)
m mDust or grit in brake drums
m mLinings excessively worn
Page 92 of 303
3 Alternator-
maintenance and precautions
1
To avoid damage to the alternator, the
following precautions should be observed.
1Disconnect the leads from the battery
before connecting a mains charger to the
battery terminals.
2Never stop the engine by pulling off one of
the battery leads.
3Disconnect the battery if electric welding is
to be carried out on the vehicle.
4If using booster cables from another battery
to start the car, make sure that they are
connected positive to positive and negative to
negative.
5Maintenance consists of keeping the
outside of the alternator clean, the electrical
connections secure and the drivebelt correctly
tensioned, see Chapter 2, Section 8.
4 Alternator-
removal and refitting
1
Note: Depending on the model, access to the
alternator from above may be poor in which
case it will be necessary to work from the
underside of the vehicle, through the
right-hand wheel arch (after removing the
roadwheel and the lower undershield). Refer
to Chapter 13 for details.
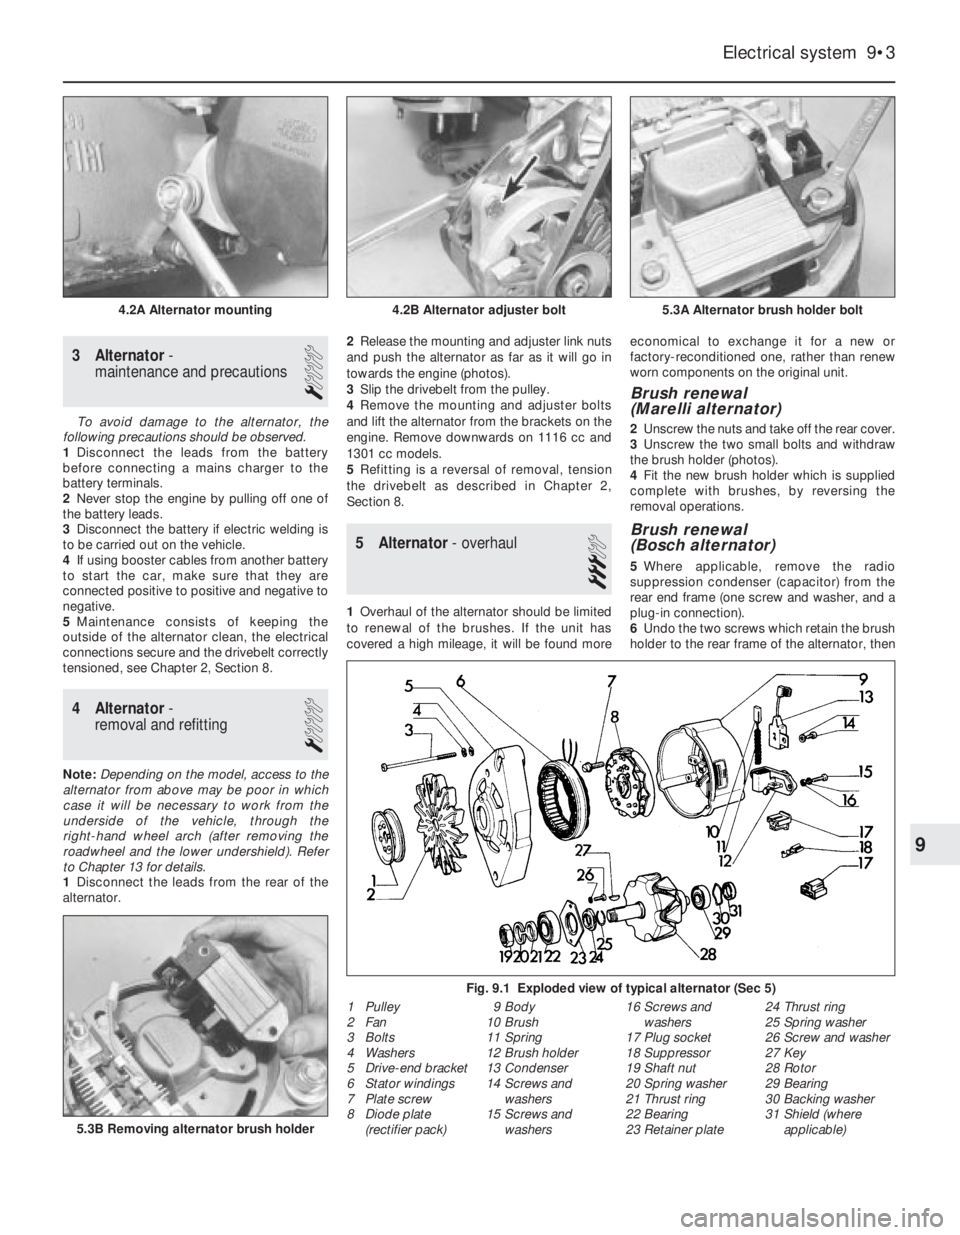
1Disconnect the leads from the rear of the
alternator.2Release the mounting and adjuster link nuts
and push the alternator as far as it will go in
towards the engine (photos).
3Slip the drivebelt from the pulley.
4Remove the mounting and adjuster bolts
and lift the alternator from the brackets on the
engine. Remove downwards on 1116 cc and
1301 cc models.
5Refitting is a reversal of removal, tension
the drivebelt as described in Chapter 2,
Section 8.
5 Alternator- overhaul
3
1Overhaul of the alternator should be limited
to renewal of the brushes. If the unit has
covered a high mileage, it will be found moreeconomical to exchange it for a new or
factory-reconditioned one, rather than renew
worn components on the original unit.
Brush renewal
(Marelli alternator)
2Unscrew the nuts and take off the rear cover.
3Unscrew the two small bolts and withdraw
the brush holder (photos).
4Fit the new brush holder which is supplied
complete with brushes, by reversing the
removal operations.
Brush renewal
(Bosch alternator)
5Where applicable, remove the radio
suppression condenser (capacitor) from the
rear end frame (one screw and washer, and a
plug-in connection).
6Undo the two screws which retain the brush
holder to the rear frame of the alternator, then
Electrical system 9•3
5.3A Alternator brush holder bolt4.2B Alternator adjuster bolt4.2A Alternator mounting
Fig. 9.1 Exploded view of typical alternator (Sec 5)
1 Pulley
2 Fan
3 Bolts
4 Washers
5 Drive-end bracket
6 Stator windings
7 Plate screw
8 Diode plate
(rectifier pack)9 Body
10 Brush
11 Spring
12 Brush holder
13 Condenser
14 Screws and
washers
15 Screws and
washers16 Screws and
washers
17 Plug socket
18 Suppressor
19 Shaft nut
20 Spring washer
21 Thrust ring
22 Bearing
23 Retainer plate24 Thrust ring
25 Spring washer
26 Screw and washer
27 Key
28 Rotor
29 Bearing
30 Backing washer
31 Shield (where
applicable)
5.3B Removing alternator brush holder
9
Page 93 of 303

ease the holder out of the alternator. Inspect
the brushes and if worn below the specified
minimum length, they must be renewed.
7Disconnect the brush leads by unsoldering
or carefully cutting them.
8When soldering the new brush leads, do
not allow solder to run down them or their
flexibility will be ruined.
9When inspecting or renewing brushes,
check the surface of the slip rings. Clean them
with solvent or if they are very discoloured,
use very fine glasspaper.
6 Voltage regulator
1This is of integral type and is part of the
brushholder assembly.
2No provision is made for adjustment or
overhaul.
7 Starter motor-
description and testing
2
1The starter motor may be one of two
different makes. Both are of pre-engaged
type.
2This type of starter motor incorporates a
solenoid mounted on top of the starter motor
body. When the ignition switch is operated,
the solenoid moves the starter drive pinion,
through the medium of the shift lever, into
engagement with the flywheel starter ring
gear. As the solenoid reaches the end of its
stroke, and with the pinion by now partially
engaged with the flywheel ring gear, the main
fixed and moving contacts close and engage
the starter motor to rotate the engine.
3This pre-engagement of the starter drive
does much to reduce the wear on the flywheel
ring gear associated with inertia type starter
motors.
4If the starter fails, some fault-finding can be
done with it still on the car. Check the ignition
warning light comes on, and does not go out
when the starter is switched on. If it goes out,
the fault is probably in the battery. If it stays
bright, get an assistant to work the switch,whilst listening to the starter. Listen to find out
if the solenoid clicks into position. If it does
not, pull off the solenoid wire, and check it
with a test bulb. If the wire is live when the key
is turned, but the solenoid does not move,
take off the starter and remove it to the bench
for overhaul.
8 Starter motor-
removal and refitting
1
1Disconnect the battery negative lead.
2Disconnect the lead from the starter motor
(photo).
3Unscrew the fixing bolts and withdraw the
starter motor, downwards on 1116 cc and
1301 cc models (photo).
4Refitting is a reversal of the removal
procedure.
9 Starter motor- overhaul
3
1As with the alternator, the operations
should normally be limited to renewal of the
brushes. If the unit has covered a high
mileage it will usually be more economical to
purchase a new or factory-reconditioned one
rather than renew several components of the
original unit.
2Owing to the possibility that a fault can
develop in the starter motor solenoid or drive
assembly, full dismantling procedures are
given later in this Section.
Brush - renewal
3Slide off the cover band.
4Using a hooked piece of wire, pull up the
springs so that the brushes can be withdrawn
and their lengths checked for wear. If they
have worn below the specified minimum
length, renew them by extracting the brush
lead connecting screws (photo).
Solenoid
5Disconnect the field connecting wire from
the solenoid.
6Unscrew the bolts which hold the solenoid
to the end-frame.
7Unscrew the yoke tie-rod nuts.
9•4 Electrical system
9.4 Starter motor brush partly withdrawn
8.2 Starter motor connections8.3 Removing starter motor
Fig. 9.2 Exploded view of typical starter motor (Sec 9)
1 Armature
2 Drive pinion/clutch3 Drive end bracket
4 Shift lever5 Solenoid
6 Brush endplate7 Brush
8 Field windings
Gripping the brush leads with
a pair of pliers to act as a
heat sink will prevent heat
transfer to the internal
components of the alternator.