1982 VOLVO 700 check engine
[x] Cancel search: check enginePage 51 of 168
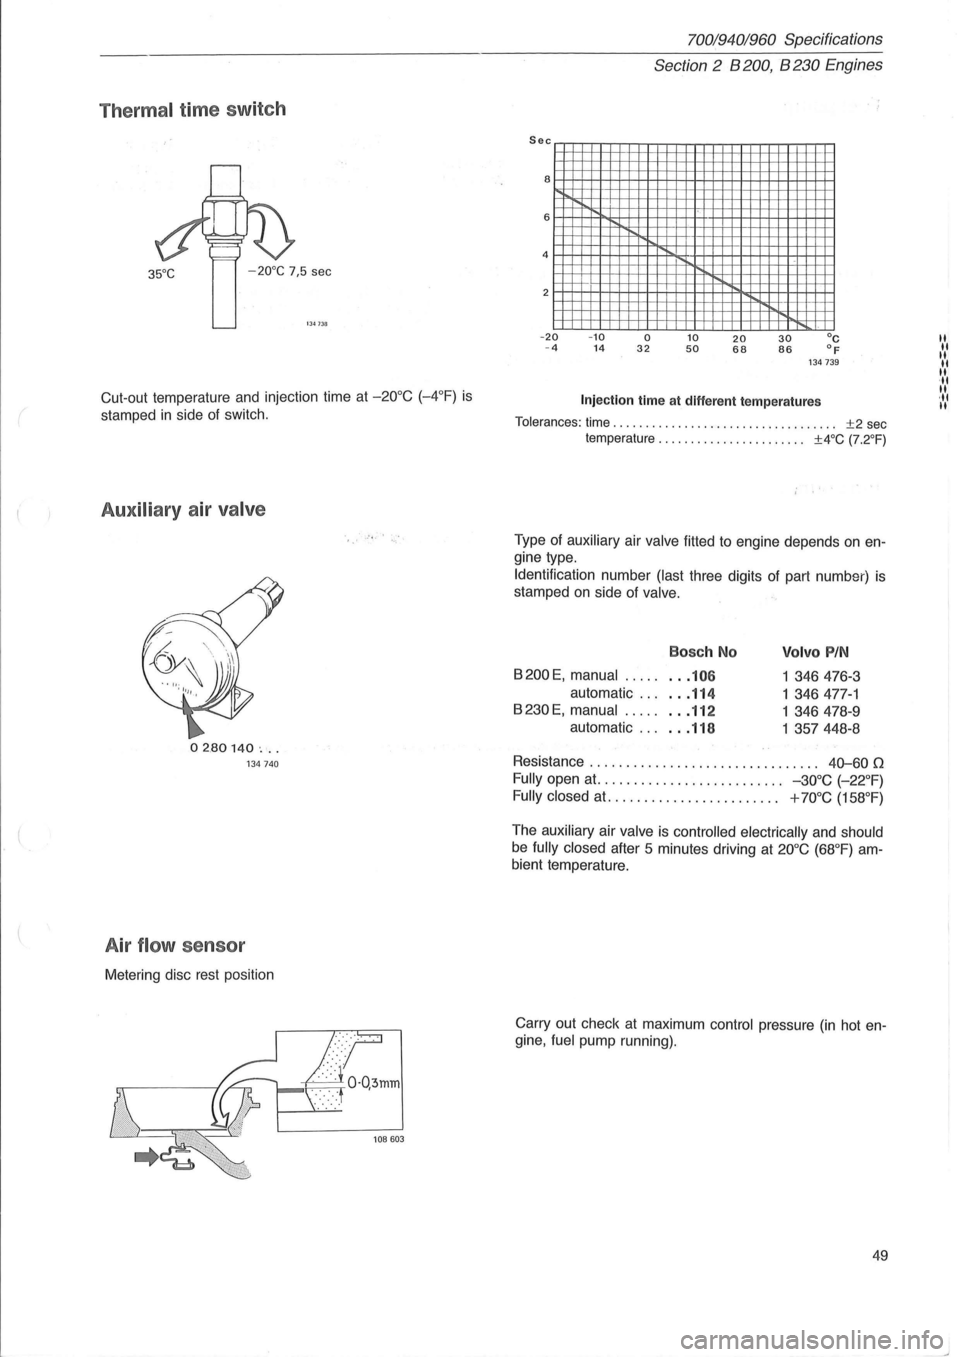
Thermal time sw itch
35°C -20°C 7,5 sec
1 341111
Cut -out temperature and injection time at -20°C (-4°F) is
stamped in side of switch.
Auxiliary air valve
02.80140 ' ... 134740
A ir flow se nsor
Metering disc rest position
.• -'j,' ,.,'
70019401960 Specifications
Section
2 B 200, B 230 Engines
2mmmwm_
-20 -10 0 10 20 30°C -4 14 32 50 68 86 of 134739
Injection time at different temperatures
Tolerances: time. . . . . . . . . . . . . . . . . . . . . . . . . . . . . . . . . . . ±2 sec temperature. . . . . . . . . . . . . . . . . . . . . .. ±4°C (7.2°F)
Type of auxiliary air valve fitted to engine depends on en
gine type.
Identification number
(last three digits of part number) is
stamped
on side of valve.
Bosch No
8200 E, manual ..... . .. 106
automatic . .. . .. 114
8230E, manual ........ 112
automatic . .. . .. 118
Volvo PIN
1 346476-3
1 346477-1
1
346478- 9
1 357448-8
Resistance . . . . . . . . . . . . . . . . . . . . . . . . . . . . . .
.. 40-60 0
Fully open at. . . . . . . . . . . . . . . . . . . . . . . . . . -30°C (-22°F)
Fully closed
at. . . . . . . . . . . . . . . . . . . . . . .. + 70°C (158°F)
The auxiliary air valve is controlled electrically and should
be fully closed after 5 minutes driving at 20°C (68°F) am
bient temperature.
Carry out check
at maximum control pressure (in hot en
gine , fuel pump running).
49
"
"
" II
" . "
" ·11 II
Page 66 of 168
700/940/960 Specifications
Section 2' 8200,8230 Engines
Group 25 Intake and exhaust systems
Turbo engines
'-198~
Engine type .... ; ......... . , ............ .. .............
Charg~ pressure, at full load and ................... r/min
checking
.. ................... kPa (psi)
setting. . . . . . . . . . . . . . . . . . . . .
.. kPa (psi)
Charge air overpressure, switch opens at ....... kPa
(psi)
Charge air pressure, switch closes at ........... kPa (psi)
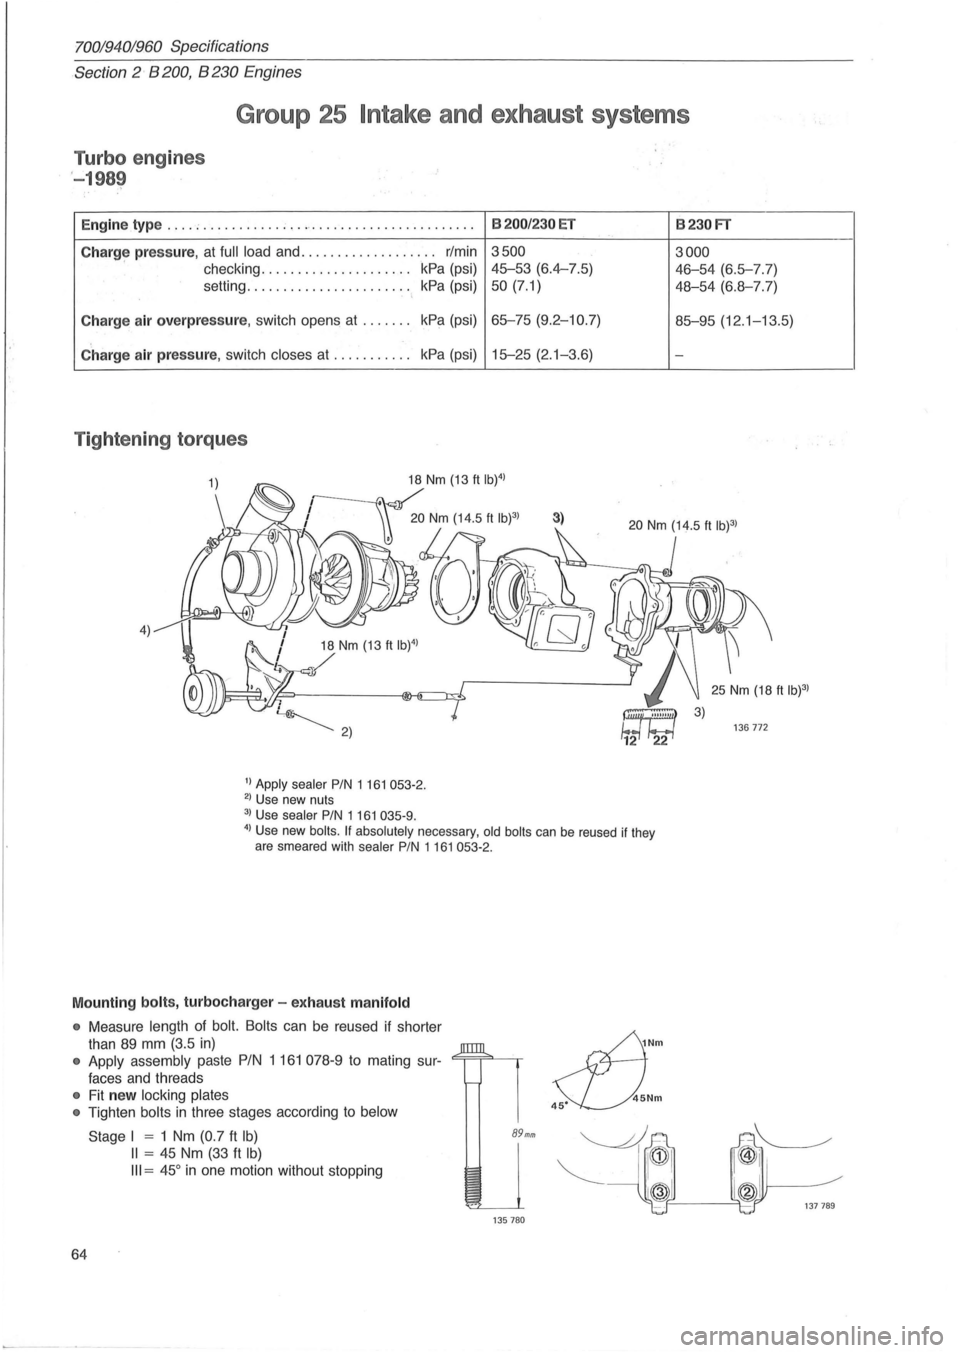
Tightening torques
4) 18 Nm (13 ft IW)
/
1) Apply sealer PIN 1 161 053-2. 2) Use new nuts
3) Use sealer PIN 1161 035-9.
8200/230 ET
3500
45-53 (6.4-7.5)
50 (7.1)
65-75 (9.2-10.7)
15-25 (2. 1-3.6)
3)
4) Use new boils. If absolutely necessary, old boils can be reused if they
are smeared with sealer PIN 1161053-2.
Mounting bolts, turbocharger -exhaust manifold
• Measure length of bolt. Bolts can be reused if shorter
than
89 mm (3.5 in)
• Apply assembly paste PIN 1 161 078-9 to mating sur-<=;==;=""-~
faces and threads
• Fit new locking plates
•
Tighten bolts in three stages according to below
64
Stage I = 1 Nm (0.7 ft Ib)
II = 45 Nm (33 ft Ib)
III = 45° in one motion without stopping
89mm
135780
~Nm
s::L).Nm
8230FT
3000
46-54 (6.5-7.7)
48-54 (6.8-7.7)
85-95 (12 .1-13.5)
-
136772
Page 67 of 168
Turbo engines
1990-
700194 01960 Specifications
Section
2 B 200, B 230 E ngines
Engine type ......... ................................ ..... .. .... B23 0FT/GT
Charge p ressure, at full load and ......... ' .................. r/min 3000
checking ............................. kPa (psi)
48-54 (6.8-7.7)
setting ...... .................... ' ...... kPa (psi) 51 (7.3)
Pressure sensor, leak test kPa (psi)
Relief valve , fully open at pressure difference kPa (psi)
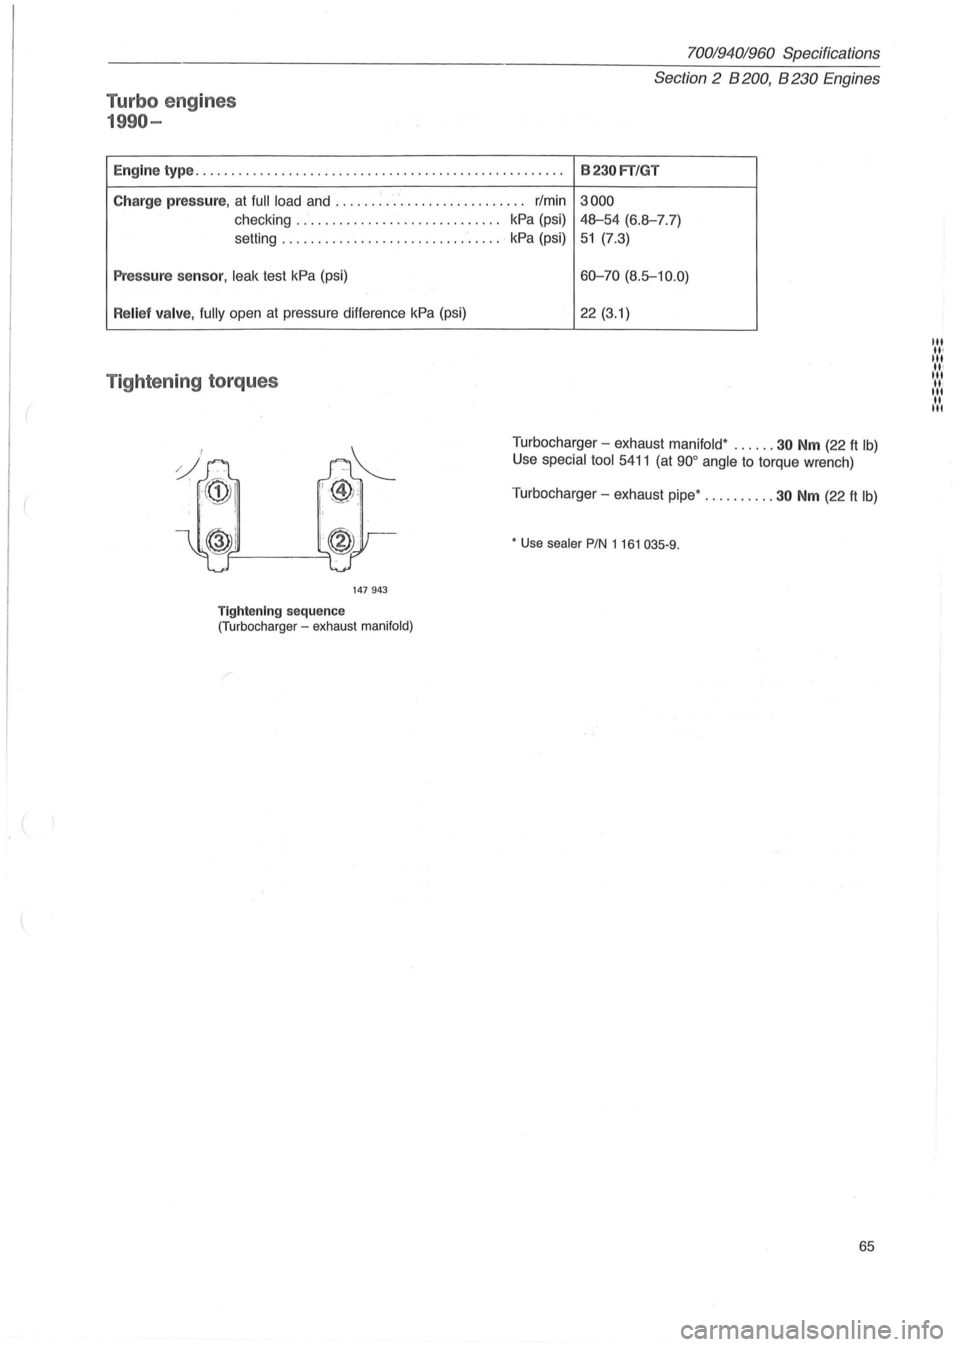
Tightening torques
J.
'1:C@1 ,
147 943
T ightening sequ ence (Turbocharger -exhaust manifold)
60-70 (8.5-10.0)
22 (3.1)
Turbocharger -exhaust manifold ' ...... 3 0 N m (22 ft Ib)
Use special tool 5411 (at 90° angle to torque wrench)
T urbocharger
-exhaust pipe ' .......... 30 Nm (22 ft Ib)
• Use sealer PIN 1161035-9 .
65
Page 72 of 168
70019401960 Specifications
Section'-2" B 28 Engine
Group 21 Engine block
Cylinder head
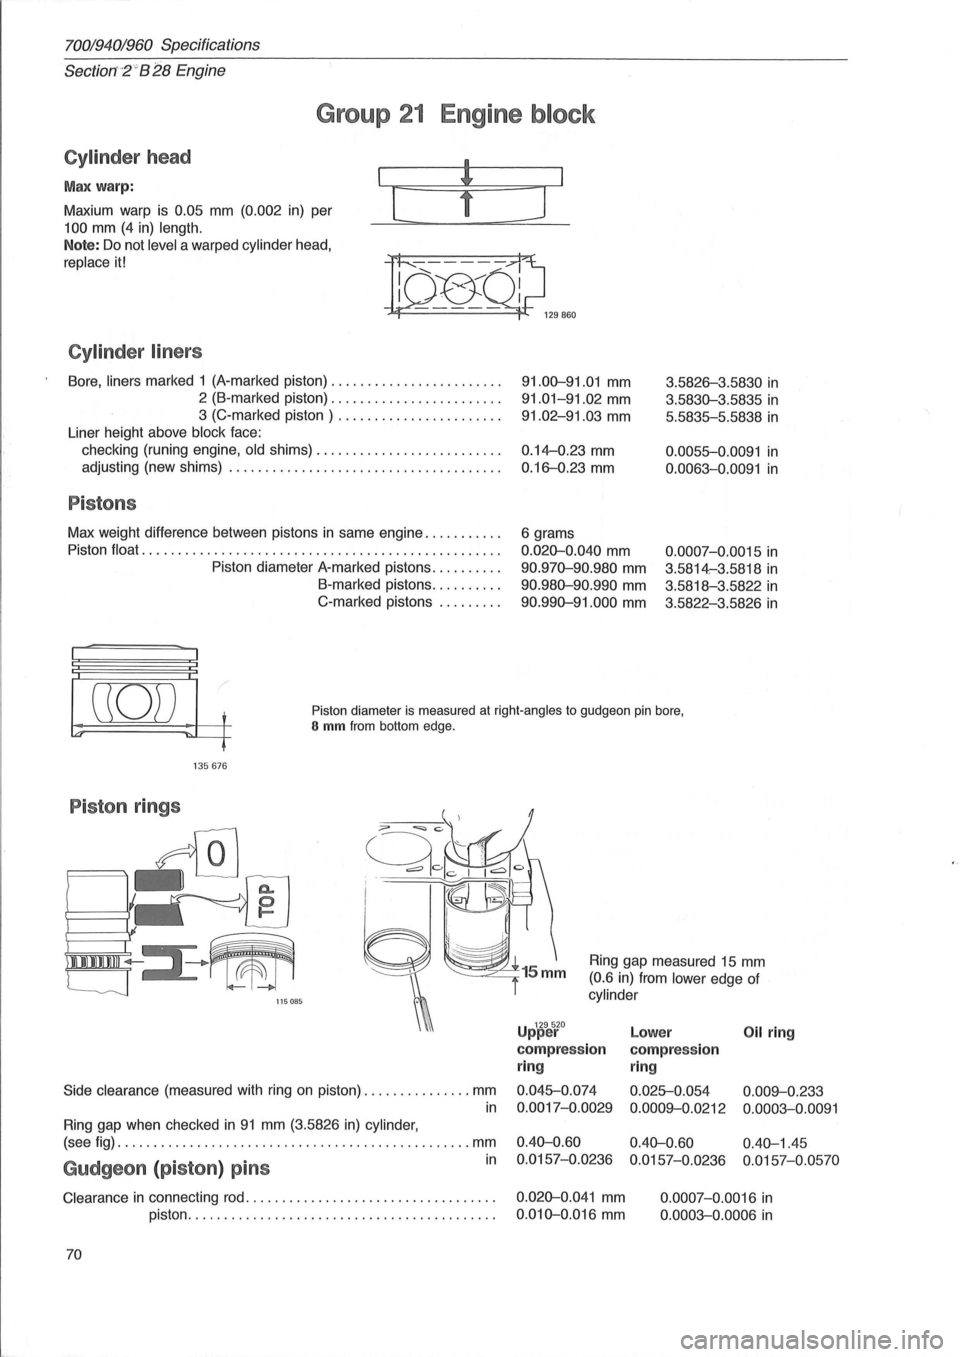
Max warp:
Maxium warp is
0.05 mm (0.002 in) per
100 mm (4 in) length.
Note: Do not level a warped cylinder head,
replace it!
Cylinder liners
[
Bore, liners marked 1 (A-marked piston) ....................... .
2 (B-marked piston) ....................... .
3 (C-marked piston) ...................... .
Liner height above
block face:
checking (runing engine,
old shims) ....................... .. .
adjusting (new shims)
..................................... .
Pistons
Max weight difference between pistons in same engine .......... .
Piston
float ................................................. .
Piston diameter A-marked pistons
......... .
B-marked pistons
......... .
C-marked pistons
........ .
]
91.00-91.01 mm
91.01-91.02 mm
91.02-91.03 mm
0.14--0.23 mm
0.16-0.23 mm
6 grams
0.020-0.040 mm
90.970-90.980 mm
90.980-90.990 mm
90.990-91.000 mm
3.5826-3.5830 in
3.5830-3.5835 in
5.5835-5.5838 in
0.0055-0.0091 in
0.0063-0.0091 in
0.0007-0. 0015 in
3.5814-:3.5818 in
3.5818-3.5822 in
3.5822-3.5826 in
((0)) t
'" ~L-f
Piston diameter is measured at right-angles to gudgeon pin bore, S mm from bottom edge.
135676
Piston rings
/,
I 111111111 ~III
'--J 115085
Side clearance (measured with ring on piston) ............... mm
in
Ring gap when checked in 91 mm (3.5826 in) cylinder,
Ring gap measured 15 mm
(0.6 in) from lower edge of
cylinder
U 129520 pper
compression
ring
0.045-0.074
0.0017-0.0029
Lower Oil ring
compression
ring
0.025-0.054 0.009--0.233
0.0009--0.0212 0.0003-0.0091
(see fig) ................................................. mm 0.40-0.60 0.40-0.60 0.40-1.45
in 0.0157-0.0236 0.0157-0.0236 0.0157-0.0570 Gudgeon (piston) pins
Clearance in connecting rod. . . . . . . . . . . . . . . . . . . . . . . . . . . . . . . . . . . 0.020-0.041 mm
piston. . . . . . . . . . . . . . . . . . . . . . . . . . . . . . . . . . . . . . . . . . .
0.010-0.016 mm
70 0.0007-0.0016
in
0.0003-0.0006 in
Page 74 of 168
70019401960 Specifications
Section
2 B 28 Engine
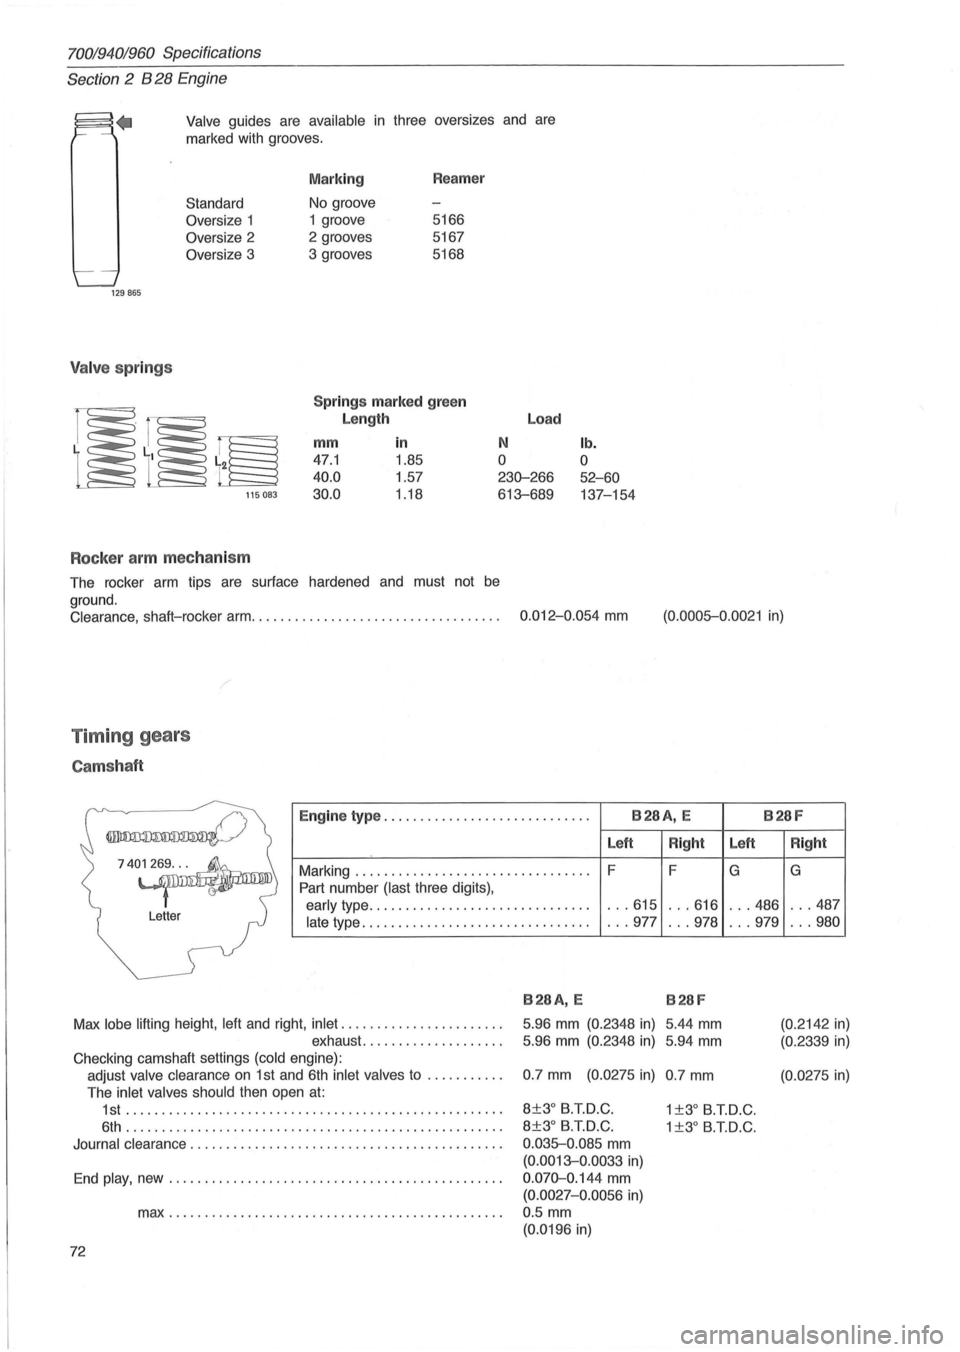
.. Valve guides are available in three oversizes and are
marked with grooves.
Standard
Oversize 1
Oversize 2
Oversize 3
129865
Valve springs
115083
Rocker arm mechanism
Marking Reamer
No groove
1 groove 5166
2 grooves 5167
3 grooves 5168
Springs marked green
Length
mm
in
47.1 1.85
40.0 1.57
30.0 1 .18
Load
N
o
230-266
613-689
The rocker arm tips are surface hardened and must not
be
ground.
lb.
o
52-60
137-154
Clearance. shaft-rocker arm. . . . . . . . . . . . . . . . . . . . . . . . . . . . . . . . . . . 0.012-0 .054 mm (0.0005-0.0021 in)
Timing gears
Camshaft
Engine type ............................. B28A, E B28F
Left
Right
Marking ................................. F
F
Part number
(last three digits).
early type ............................... .. .615 . . .616
late type ................................ . .. 977 .. .978
740~
Letter
B28A, E B28F
Max lobe lifting height. left and right. inlet ...................... .
exhaust. .
................ "
5.96 mm (0.2348 in) 5.44 mm
5.96 mm (0.2348 in) 5.94 mm
Checking camshaft settings (cold engine):
adjust
valve clearance on 1 st and 6th inlet valves to .......... . 0.7 mm (0.0275 in) 0.7 mm
The inlet valves should then open at:
Left
G
... 486
. . .979
1 st .................................................... . 8±3° B.T.D.C. 1 ±3° B.T.D.C.
6th .. ,
................................................. . 8±3° B.T.D.C. 1 ±3° B.T.D.C.
Journal clearance ........................................... . 0.035-0.085 mm
(0.0013-0.0033 in)
End play, new .............................................. . 0.070-0.144 mm
(0.0027-0.0056 in)
max .............................................. . 0.5 mm
(0.0196 in)
72
Right
G
... 487
... 980
(0.2142
in)
(0.2339 in)
(0. 0275 in)
Page 77 of 168
(
70019401960 Specifications
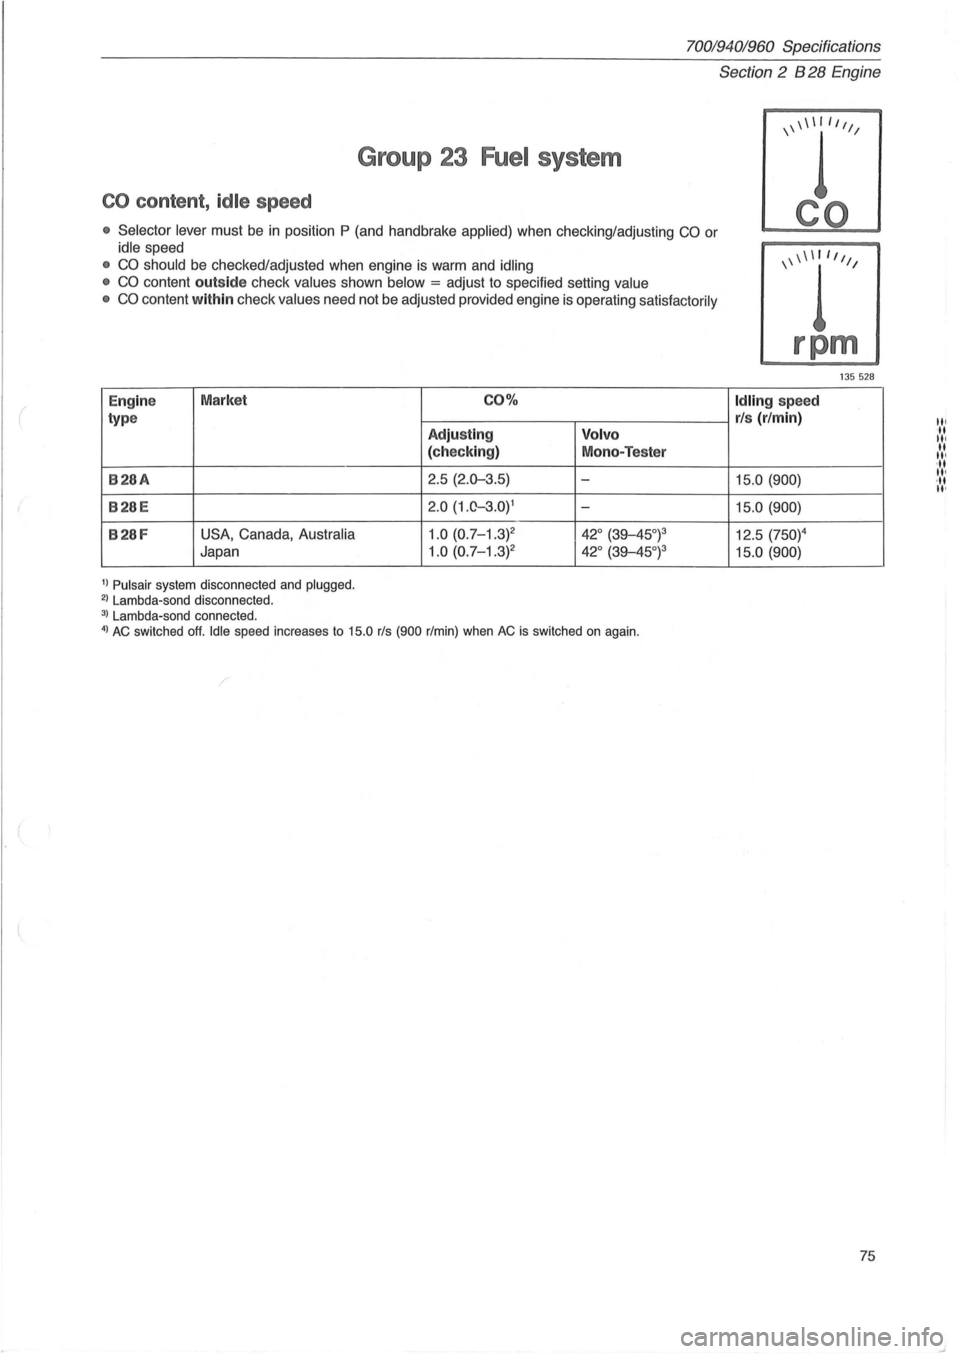
Group 23 Fuel system
CO content , idle speed
• Selector lever must be in position P (and handbrake applied) when checking/adjusting CO or
idle speed
• CO should be checked/adjusted when engine is warm and idling
•
CO content outside check values shown below = adjust to specified setting value
• CO
content within check values need not be adjusted provided engine is operating satisfactorily
Eng
ine Market CO%
type
Adjusting Volvo
(checking) Mono-Tester
B28A 2.5 (2.0-3.5) -
B28E 2.0 (1. 0-3.0)1 -
B28F USA, Canada, Australia 1.0 (0.7-1.3)2 42
° (39-45°)3
Japan 1.0 (0.7-1.3) 2 42° (39-45°)3
1) Pulsair system disconnected and plugged. 2) Lambda-sand disconnected . 3) Lambda-sand connected. 4) AC switched off. Idle speed increases to 15.0 rls (900 r/min) when AC is switched on again .
Section 2 B 28 Engine
\\\\Iffll
rpm
1 35 528
Idling speed
r/s (r/min)
15.0 (900)
15.0 (900)
12.5 (750)4
15.0 (900)
75
II' .. III .. II' ... II' ... II'
Page 81 of 168
(
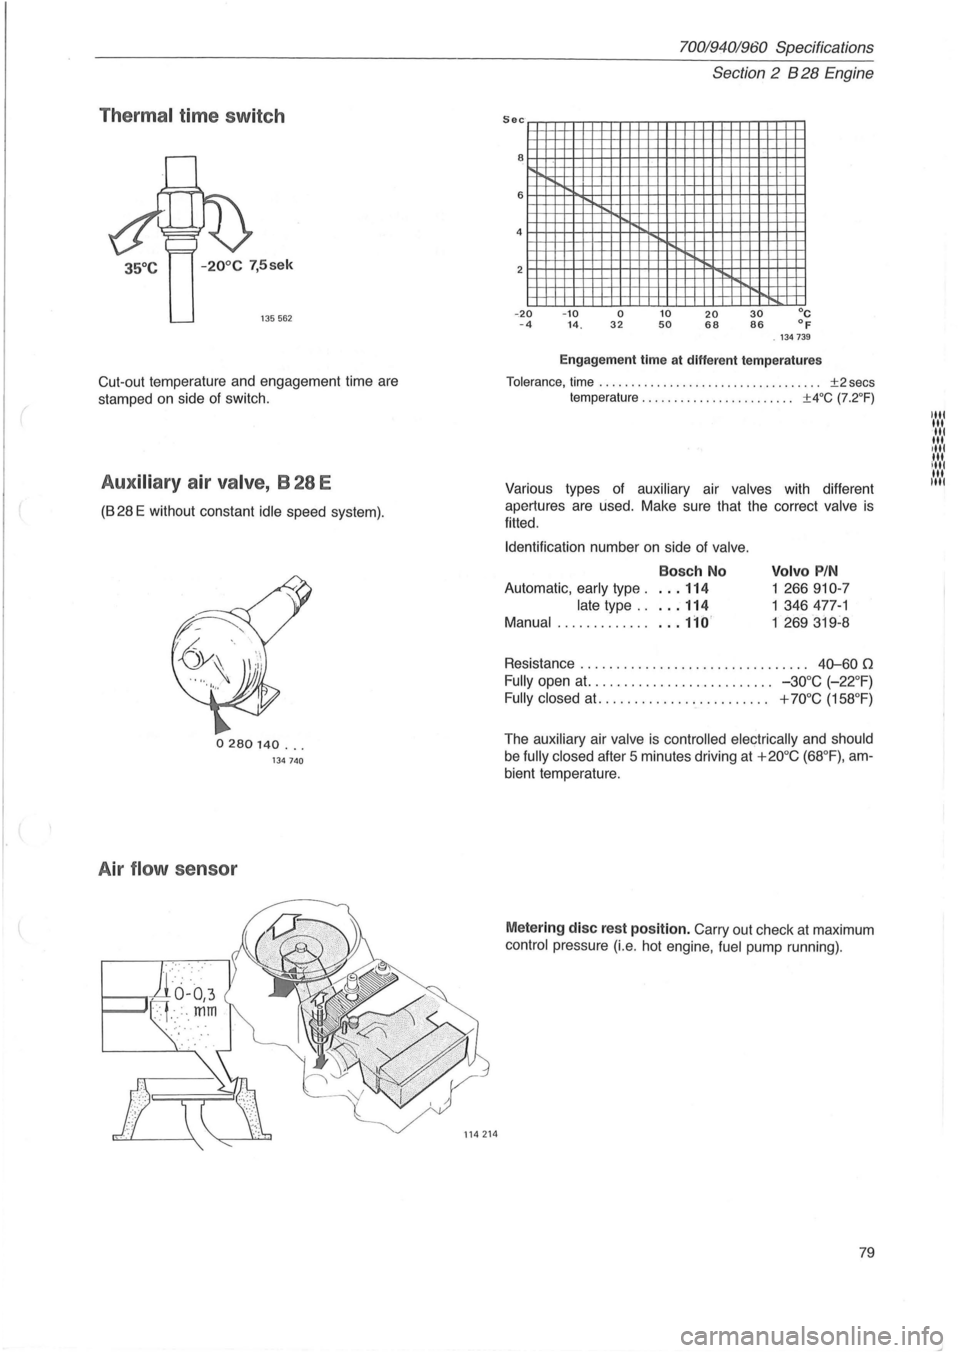
Thermal time switch
-20° C 7,5sek
135562
Cut-out temperature and engagement time are
stamped on side
of switch.
Aux iliary air valve, B 28 E
(828 E without constant idle speed system) .
0280140 ... 134740
Air flow sensor
70019401960 Specifications
Section
2 B 28 Engine
Sec
8
6
4
2
- .20 - 4 -10 14. o 32 10 50 20 68 30 86 ° C of . 134739
Engagement time at different temperatures
Tolerance, time. . . . . . . . . . . . . . . . . . . . . . . . . . . . . . . . . .. ±2 secs
temperature . . . . . . . . . . . . . . . . . . . . . . .. ±4°C (7.2 °F)
Various types of auxiliary air valves with different
apertures are
used. Make sure that the correct valve is
fitted .
Identification number
on side of valve .
Bosch No
Automatic, early type. . .. 114
late type .. . .. 114
Manual ................ 110'
Volvo PIN
1 266910-7
1 346477-1
1
269319~8
Resistance . . . . . . . . . . . . . . . . . . . . . . . . . . . . . . . . 40--60 0
Fully open at. . . . . . . . . . . . . . . . . . . . . . . . .. -30°C (-22°F)
Fully closed at. ............ '. ' . . . . . . . .. + 70°C (158 °F)
The auxiliary air valve is controlled electrically and should
be fully closed after 5 minutes driving at +20°C (68 °F), am
bient temperature.
Metering disc rest position. Carry out check at maximum
control pressure (i.e. hot engine, fuel pump running).
79
Page 89 of 168
(
70019401960 Specifications
Section
2 B 280 Engine
Group 21 Engine block
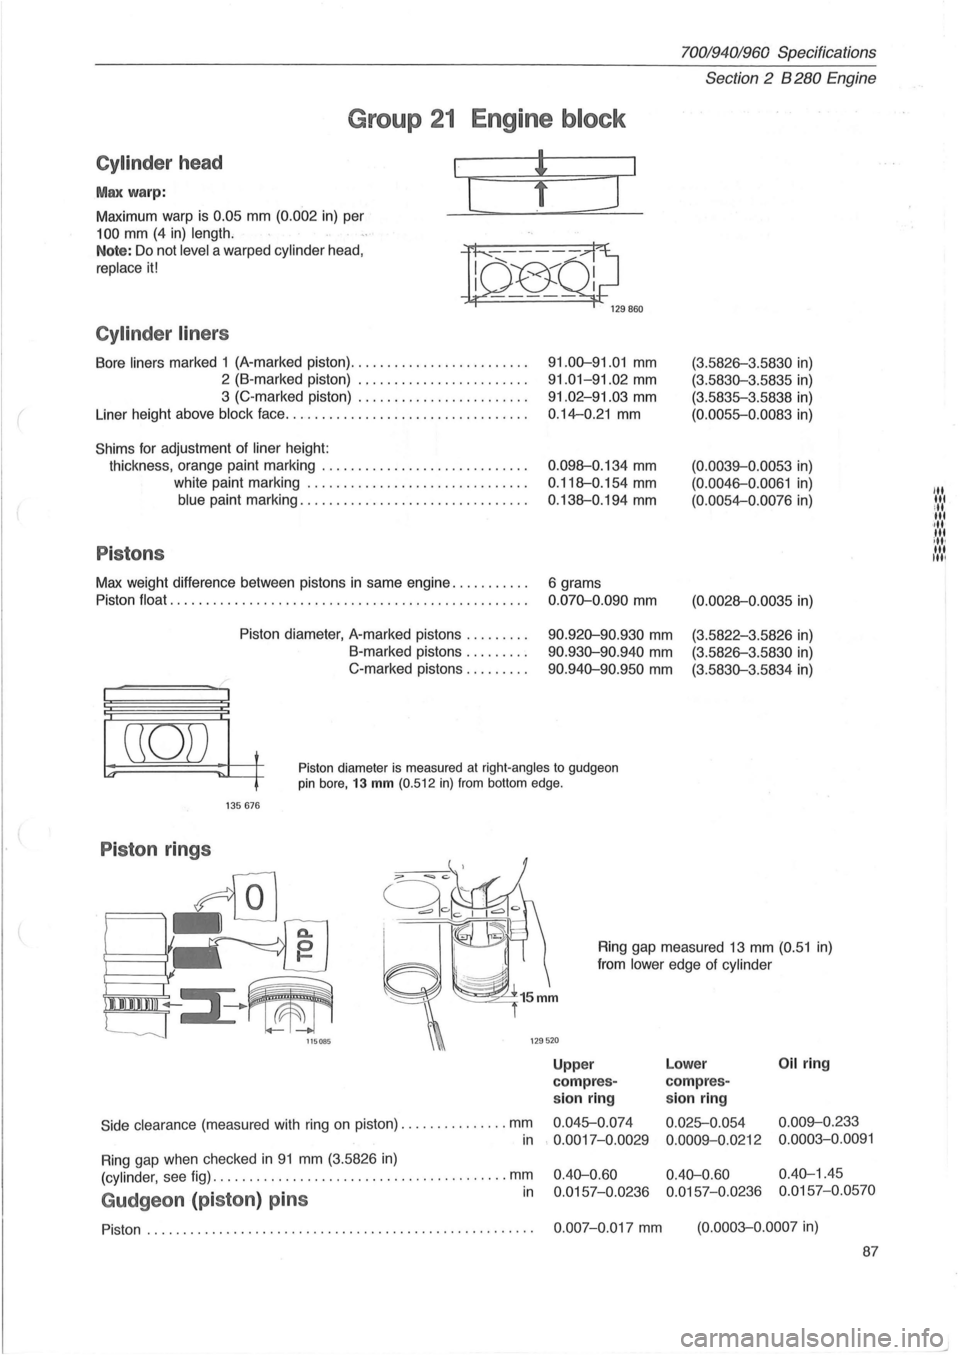
Cylinder head
Max warp:
Maximum warp is 0.05 mm (0.002 in) per
100 mm (4 in) length.
I
[
Note: Do not level a warped cylinder head,
replace it!
n~Ql;J 129860
Cylinder liners
Bore liners marked 1 (A-marked piston) ........................ .
2 (B-marked piston) ....................... .
3 (C-marked piston) ....................... .
Liner height above
block face ................................. .
Shims for adjustment of liner height:
thickness, orange paint marking
............................ .
white paint marking
.............................. .
blue paint marking ............................... .
Pistons
Max weight difference between pistons in same engine .......... .
Piston
float ..................................... ............ .
Piston diameter, A-marked pistons
........ .
B-marked pistons .
....... .
C-marked pistons
........ .
91.00-91.01 mm
91.01-91.02 mm
91.02-91.03 mm
0.14-0.21 mm
0 .098-0.134 mm
0.118-0.154 mm
0.138-0.194 mm
6 grams
0.070-0.090 mm
90.920-90.930 mm
90.930-90.940 mm
90 .940-90.950 mm
(3.5826-3 .5830 in)
(3.5830-3.5835 in)
(3.5835-3.5838 in)
(0.0055-0.0083 in)
(0.0039-0.0053 in)
(0. 0046-0.0061 in)
(0.0054-0.0076 in)
(0.0028-0 .0035 in)
(3.5822-3.5826 in)
(3.5826-3.5830 in)
(3.5830-3.5834 in)
((0)) t
~ ~~ Piston diameter is measured at right-angles to gudgeon pin bore, 13 mm (0.512 in) from bottom edge.
135676
Piston rings
Side clearance (measured with ring on piston) .. ............ . mm
Ring gap measured 13 mm (0.51 in)
from
lower edge of cylinder
Upp er Lower Oil ring
com pres-compres-
sion ring sion ring
0.045-0.
074
0.025-0.054 0.009-0.233
in
Ring gap when checked in 91 mm (3.5826 in)
. 0.0017-0.0029
0.0009-0.0212 0.0003-0.0091
(cylinder,
see fig) ..................................... .... mm
Gudgeon (piston ) pins in
0.40-0.60 0.40-0.60 0.40-1.45
0.0157-0.0236 0.0157-0.0236 0.0157-0.0570
Piston. . . . . . . . . . . . . . . . . . . . . . . . . . . . . . . . . . . . . . . . . . . . . . . . . . . . . . 0.007-0.017 mm (0.0003-0.0007 in)
87
"' lit ill lit ·,11 tit ill, til Itil