1982 CHEVROLET CAMARO water pump
[x] Cancel search: water pumpPage 363 of 875

GM – CAMARO 1982-1992 – Repair Guide (Checked by WxMax) 363
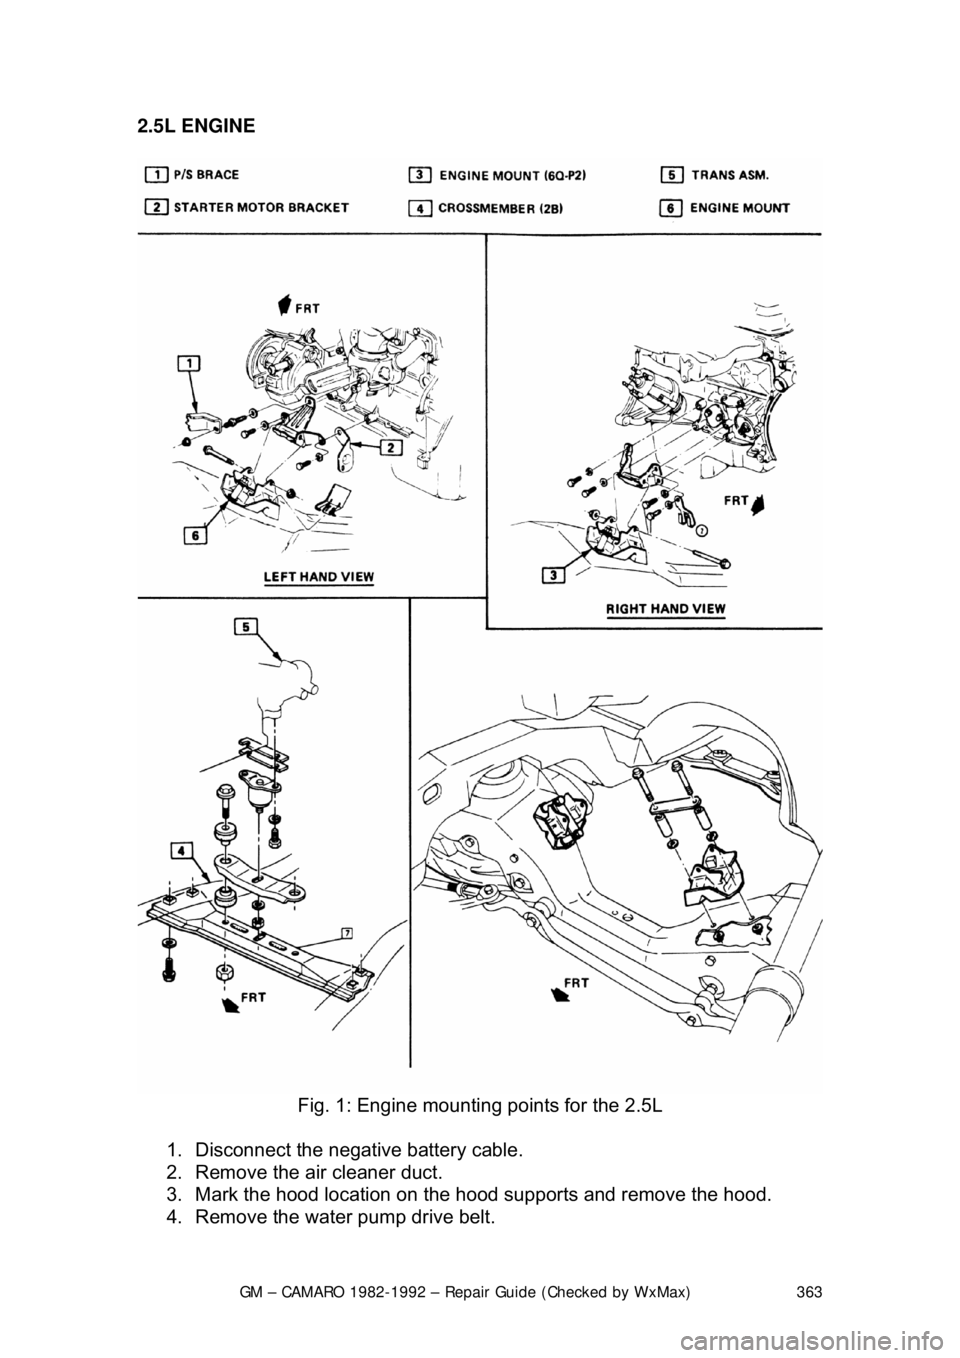
2.5L ENGINE
Fig. 1: Engine mountin g points for the 2.5L
1. Disconnect the negative battery cable.
2. Remove the air cleaner duct.
3. Mark the hood location on the hood supports and remove the hood.
4. Remove the water pump drive belt.
Page 365 of 875

GM – CAMARO 1982-1992 – Repair Guide (Checked by WxMax) 365
31. Connect the bulkhead harness connec
tor, wires and hoses. Reroute the
ECM harness in its original location. Install the hush panel and fenderwell
splash panel.
32. Install the radiator, fan and fan sh roud. Connect the radiator and heater
hoses, along with the transmission cooler lines.
33. Connect the vacuum brake booster li ne, the throttle linkage and cruise
control cable. Install the distributor cap.
34. Fill the cooling system with the proper type and amount of coolant and
the crankcase with the proper type of oil to the correct level.
35. Install the water pump drive bel t, the air cleaner duct and the hood.
36. Connect the negative battery cable, st art the engine and check for leaks.
2.8L AND 3.1L ENGINES
Fig. 2: Engine mountin g points for the V6
1. Disconnect the negative battery cable.
2. Remove the air cleaner duct.
3. Mark the hood location on the hood supports and remove the hood.
4. Remove the water pump drive belt.
5. Drain the radiator and remove t he radiator hoses. Disconnect the heater
hoses and the transmission cooler lines.
6. Remove the fan shroud, fan and radiator.
7. Disconnect the throttle linkage, includi ng the cruise control detent cable.
Page 366 of 875

GM – CAMARO 1982-1992 – Repair Guide (Checked by WxMax) 366
8. Remove the air conditioning co
mpressor and lay aside. Remove the
power steering pump and lay aside.
Do not disconnect the air conditioning or power steering lines.
9. Remove the vacuum brake booster line.
10. Remove the distributor cap and spark plug wires.
11. Disconnect the necessary elec trical connections and hoses.
12. Raise and safely support the vehicle.
13. Disconnect the exhaust pipes at the exhaust manifolds.
14. Remove the flywheel cover and remove the converter bolts.
15. Disconnect the star ter wire connections.
16. Remove the bellhousing and t he motor mount through-bolts.
17. Lower the vehicle.
18. Relieve the fuel system pressu re. Disconnect the fuel lines.
19. Support the transmission with a suit able jack. Attach an engine lifting
device.
20. Remove the engine assembly.
To install: 21. Position the engine assembly in the vehicle.
22. Attach the motor mount to engine br ackets and lower the engine in place.
Remove the engine lifting device and the transmission jack.
23. Raise and support the vehicle safely.
24. Install the motor mount through-bolts and tighten the nuts to 50 ft. lbs. (68 Nm). Install the bellhousing bolts and tighten to 35 ft. lbs. (47 Nm).
25. On vehicles with automatic transmissi on, install the converter to flywheel
attaching bolts to 46 ft. lbs. (63 Nm).
26. Install the flywheel splash shield and tighten to 89 inch lbs. (10 Nm).
27. Connect the starter wires and the fuel lines.
28. Install the exhaust pipe on the exhaust manifold.
29. Lower the vehicle.
30. Install the power steering pump and the air conditioning compressor.
31. Connect the necessary wires and hoses.
32. Install the radiator, fan and fan sh roud. Connect the radiator and heater
hoses and the transmission cooler lines.
33. Connect the vacuum brake booster li ne, the throttle linkage and cruise
control cable. Install the distributor cap.
34. Fill the cooling system with the proper type and amount of coolant and
the crankcase with the proper type of oil to the correct level.
35. Install the water pump drive bel t, the air cleaner duct and the hood.
36. Connect the negative battery cable, st art the engine and check for leaks.
Page 405 of 875

GM – CAMARO 1982-1992 – Repair Guide (Checked by WxMax) 405
3. Remove the fan-to-water pum
p attaching bolts or nuts.
4. Remove the fan belts.
5. Remove the cooling fan and clut ch assembly. Separate the clutch
assembly from the fan.
Store the clutch in an upright position to prevent seal leakage.
6. Installation is the revers e of the removal procedure.
WATER PUMP
REMOVAL & INSTALLATION
CAUTION - When draining the coolant, keep in mind that cats and dogs are
attracted by the ethylene gl ycol antifreeze, and are quite likely to drink any that
is left in an uncovered container or in puddles on the ground. This will prove
fatal in sufficient quantity. Always drai n the coolant into a sealable container.
Coolant should be reused unless it is contaminated or several years old.
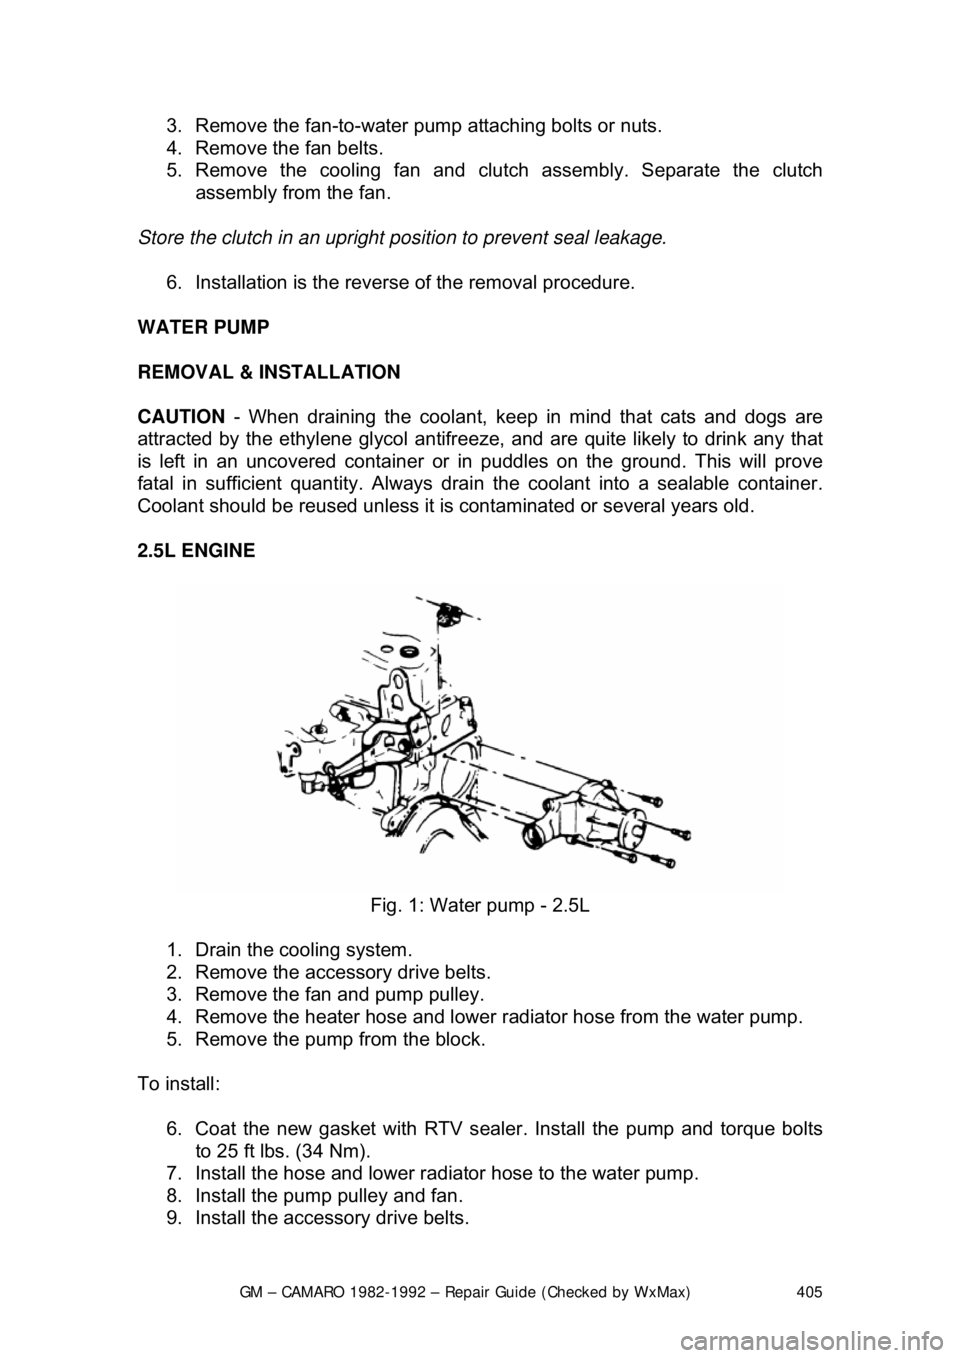
2.5L ENGINE
Fig. 1: Water pump - 2.5L
1. Drain the cooling system.
2. Remove the accessory drive belts.
3. Remove the fan and pump pulley.
4. Remove the heater hose and lower r adiator hose from the water pump.
5. Remove the pump from the block.
To install: 6. Coat the new gasket with RTV sealer . Install the pump and torque bolts
to 25 ft lbs. (34 Nm).
7. Install the hose and lower radi ator hose to the water pump.
8. Install the pum p pulley and fan.
9. Install the accessory drive belts.
Page 406 of 875

GM – CAMARO 1982-1992 – Repair Guide (Checked by WxMax) 406
10. Fill the cooling syst
em, start the engine and check for leaks.
V6 ENGINES 1. Disconnect the negative battery cable.
2. Drain the cooling system.
3. Remove the air intake duct and air cleaner, if necessary.
4. Remove the drive belt.
5. Disconnect the heater and radiator hoses from the water pump.
6. Remove the power steering pump bracket and swing aside.
7. Remove the water pump bolts. Mark the bolts to their corresponding
locations for proper installation.
To install: 8. Clean the gasket surface.
9. Install the water pump with a new gasket. Apply sealer to the bolt
threads.
10. Tighten the large bolts to 25 ft lbs. ( 34 Nm), medium bolts to 15 ft lbs. (21
Nm) and the small bolts to 88 inch lbs. (10 Nm).
11. Install the power steering pump bracket.
12. Connect the heater and radiator hoses.
13. Install the drive belt.
14. Install the air cleaner and duct.
15. Fill the cooling syst em. Start the engine and check for leaks.
V8 ENGINES
Fig. 2: Removing the heater hoses
Page 408 of 875

GM – CAMARO 1982-1992 – Repair Guide (Checked by WxMax) 408
Fig. 5: Scraping off the old gasket material
1. Disconnect the negative battery cable.
2. Drain the cooling system.
3. Remove the air intake duct and air cleaner, if necessary.
4. Remove the drive belt(s) and the water pump pulley.
5. Disconnect the heater and radiator hoses from the water pump.
6. Remove the water pump attaching bolts, then remove the pump. Mark
the bolts to their corresponding loca tions for proper installation.
To install: 7. Clean the gasket mating surfaces.
8. Install the water pump with a new gasket.
9. Install the coolant pump and bolts to the front cover using the dowel pins
as a guide.
10. Tighten the bolts to 30 ft lbs. (41 Nm).
11. Connect the heater and radiator hoses to the water pump.
12. Install the water pump pu lley and the drive belt(s).
13. Fill the cooling syst em. Start the engine and check for leaks.
CYLINDER HEAD
REMOVAL & INSTALLATION
CAUTION - Properly relieve the fuel system pressure before disconnecting any
lines.
Page 425 of 875

GM – CAMARO 1982-1992 – Repair Guide (Checked by WxMax) 425
1. Drain and remove the oil pan.
CAUTION - The EPA warns that prolonged contact with used engine oil may
cause a number of skin disorders, incl uding cancer! You should make every
effort to minimize your exposure to used engine oil. Pr otective gloves should be
worn when changing the oil. Wash y our hands and any other exposed skin
areas as soon as possible after exposure to used engine oil. Soap and water, or
waterless hand cleaner should be used.
2. Remove the oil pump-to-rear main bearing cap bolt. Remove the pump
and the extension shaft.
3. Remove the cotter pin, spring and pressure regulator valve.
Place your thumb over the pressure r egulators bore before removing the cotter
pin, as the spring is under pressure.
To install: 4. Assemble pump and extension shaft to rear main bearing cap, aligning
slot on top end of extension shaft with drive tang on lower end of
distributor driveshaft.
When assembling the driveshaft extensi on to the driveshaft, the end of the
extension nearest the washers must be inserted into the driveshaft.
5. Insert the driveshaft extension through the opening in the main bearing
cap and block until the shaft mates in to the distributor drive gear.
6. Install the pump onto t he rear main bearing cap and install the attaching
bolts. Torque the bolts to specifications:
• L4 engines: 22 ft lbs. (30 Nm)
• V6 engines: 25-35 ft lbs. (35-47 Nm)
• V8 engines: 65 ft lbs. (88 Nm)
7. Install the oil pan and fill t he crankcase with engine oil.
CRANKSHAFT DAMPER
REMOVAL & INSTALLATION
Page 428 of 875

GM – CAMARO 1982-1992 – Repair Guide (Checked by WxMax) 428
1. Disconnect the battery ground c
able. Drain the cooling system.
2. Remove the fan shroud or the upper radiator support and drive belts.
Remove the fan and pulley from the water pump.
3. Remove the alternator upper and lower brackets, air brace with brackets,
and power steering lower bra cket (move it aside).
4. Remove the radiator lower hose and the heater hose from the water
pump. Remove the water pump bolts and the water pump.
5. If A/C equipped, remove the comp ressor and move aside. Remove the
compressor mounting bracket.
6. Remove the damper pulley retain ing bolt and the damper pulley.
7. Remove the timing gear cover bolts and the timing gear cover.
With the timing gear cover removed, use a large screwdriver to pry the oil seal
from the cover. To install the new oil se al, lubricate it with engine oil and drive it
into place.
To install: 8. Prepare the mating surfaces for reinst allation of the timing gear cover.
Coat the new gasket with RTV sealer.
9. Install the timing gear cover and timing gear cover bolts. Torque the
cover bolts to specifications:
• V6 engines (M8 x 1.25 bolts): 13-22 ft. lbs. (18-30 Nm)
• V6 engines (M10 x 1.5 bolts): 20-35 ft. lbs. (27-48 Nm)
• V8 engines (all bolts): 69-130 inch lbs. (8-14 Nm)
10. Install the damper pulley by pulli ng the damper onto the crankshaft. Use
tool J-23523 or equivalent. Install t he damper pulley retaining bolt and
torque bolts to 67-85 ft lbs. (90-110 Nm).
11. If A/C equipped, install the compressor mounting bracket and
compressor.
12. Install the water pump and the water pump bolts.
13. Install the radiator lower hose and the heater hose to the water pump.
14. Install the alternator upper and lower brackets, air brace with brackets
and the power steering lower bracket.
15. Install the fan and pull ey to the water pump. Inst all the fan shroud or the
upper radiator support and drive belts and adjust.
16. Connect the battery ground cable.
17. Fill the cooling syst em, start the engine and check for leaks.