1980 CHEVROLET CITATION tire type
[x] Cancel search: tire typePage 46 of 95
Downloaded from www.Manualslib.com manuals search engine Insta"ation
To install the cargo cover:
1. Insert the left hinge pin in the bracket attached to the body of the car.
2. Slide the release lever to the right to engage hinge pin in the 'bracket. See figure
B.
3. Move the lever up to lock the cover in place.
4. Reconnect the rubber 'lifting cords.
STOWING THINGS IN (OR ON) THE CAR
CAUTION: luggage or other cergo should not be piled higher than the seatbacks, When at all possible, luggage or cargo should be C8rrifHj in the trunk area. The filler panel or cargo cover, between the rear 88atback and the rear window should not be used to carry objects-even those that are small and light. All nems should be secured in place. This will help keep such things from being thrown about and Injurying people in the car during an accident. Cargo weight whether inside or on the roof, should be positioned as evenly as possible from front to rear.
ROOF LUGGAGE CARRIER
The optional roof luggage carrier is designed to allow loading of items onto the
roof
of your car. The roof luggage carrier does not increase the total load carrying
capacity of th e car , as shown opposite "Max Load" on the Tire Placard located
on the left front door. Be sure the total weight of the cargo on the roof, plus the
weight
of the cargo and passe ngers inside the car, plus the tongue load of any
trailer you are towing does
,1;10t exc_eed this "Max Load" vehicle capacity weight. See Section 5, page "5-11 for more information on Vehicle Loading . Also see the
infonnation on Trailer Towing
in Section 1 of this manual . if needed .
NOTICE:To helpayoid pOSSible damage, do not exceed 70 kilograms (1 50 pounds), cargo weight on the roof. Position the cargo in the luggage carrier as evenly as: pOssible. If carrying long items, never exceed car length and fasten such loads securely at the front and rear of the car, as well as to the luggage rack.
The roof luggage carrier consists of: five roof slats bolted to the top of the car,
two crossrails with knobs at each end th~t allow the crossrails to be adjusted or removed, and six' adjustable tie-downs.
The operation
of each item is as follows: the crossrails are easily adjusted forward
or rearward in order to help position your load. To move the crossrails , rotate
the large adjustable knob, ··No. 3" in the figure above. counterclockwise to loosen
(or remove) the crossrails and 'clockwise to tighten down the cros srails. Attached
to the top
of the crossrails are two adjustable tie-downs, "No.4" in the figure.
Ther e is also one adjustable lie-down located in the center of each outer roof slat
assembly (also called
"No.4" in the figure) . The tie-downs may be easily moved
forward and rearward within the outer slat assembly and across the top
of the
crossrails to the desired position.
To move the tie-down . rotate it countetclockwise
to loosen and clockwise to tighten down. If needed to sec ure a certain type of lead,
the tie-downs on the
crossratls may be removed and repos itioned on the outer roof
slat assemblies. While underway, periodically check to make sure that
the crossrails and the tie-downs are securely fastened to help
prevent loss of cargo, or the roof rack equipment itself.
The crossrails may be removed when not in use and stowed in the trunk or behind
the second seat on the rear load floor (with the carg o cover installed) in hatchback
style
s. When stowing the cressrails, al5..1 attach the tie-downs from the outer roof
2-29
Page 53 of 95
Downloaded from www.Manualslib.com manuals search engine JACKING
CAUTION
To help avoid personal injury:
• Follow all jackin g and stowag e instructions.
• Use jack only fo r liftin g this venicle du -rin g wheel c h a ng e.
• Nev er ge t ben eath th e vehiCle, start or run en g in e while vehicle is supported b y jac k.
• Always securely res tow spare tire (o r flat tire ) an d all jackin g equipment.
Wheel Nut Torque
CAUTION: As soon as possible after Installing 8 wheel-and at the intervals shown on the chart-in the Maintenance Schedule foldet-han 8 m.chanic tighten whe&l nuta with II torque wrench to the specifications shown in "SpeCifications ," Section 7 of this manual. Wheel nuts should be tightened alternately and evenly to the correct torque. Never us. oil or grease on studs or nuts. Improperly tightened wheel nuts could eventually allow the wheel to come off while the vehicle is moving, possibty causing loss of control.IAlso see the Caution in "Service and Maintenance," Seetion 5 of this manual regarding the danger of mixing metric and customary fasteners.)
Stowage of Tire and Jack
CAUTION:·AlwaYs MOurely restow the spare tire assembty (or flat tire). all jacking equipment. and the cover, using the means provided. When driving the car with the compact spare installed and the reer seat folded down, stow the wheel cover flat on the rear floor behind the-right front seat. When the rear seat is up (or If It does not fold), stow the wheel cover in the trunk area. This will help keep such things from being thrown about and injuring peopla In the car in an accident.
Compact Spare
The compa ct sp are is des ig ned to save space in yo ur trunk, and its lighler weig ht
m ak es
it easi er to in stall if a flat tire occurs. The light~r weig ht als o helps improve fuel eco no my.
If you have a flat tire, follow the jack ing in struction s in this manual while keeping
t h ese point s in min d:
• Chec k inflati on press ure as soo n as practical after in sta llin g the s pa re ( use of a pocke t type: high pressure inflatio n gage is adv ised) and adjust to 415
k Pa (60 psi). The tire pressur e sh o uld be checked at least monthl y and kept at 415 kPa (60 ps i) while the tire is s tored.
• Co ntinuou s use at spe eds over 50 mph (80 km/h) is not re c omme nded .
NOTICE: Because this tire is amaUer than the standar d tire, vehicle ground clearance is reduced, Avoid driving over obstacles, and do not take your car U,rough an automatic car wash whila the spare is installed. The car may get caught possibly resulting in property damage.
• A trea d life of up to 3,000 mil es (4 800 kilomet ers) ca n b e expe cted, depe nding
on roa d condi tions and you r
driv ing habits . T o co nserve tire t read life. return the spar e to the sto rage area as soo n as the sta nd ard tir e ca n be repa ir ed -or
r
epl ac ed .
• Beca use the co mpac t spare was spec ifica lly designe d for your car, it s hould
no t be used on any other vehicle.
3-6
Page 54 of 95
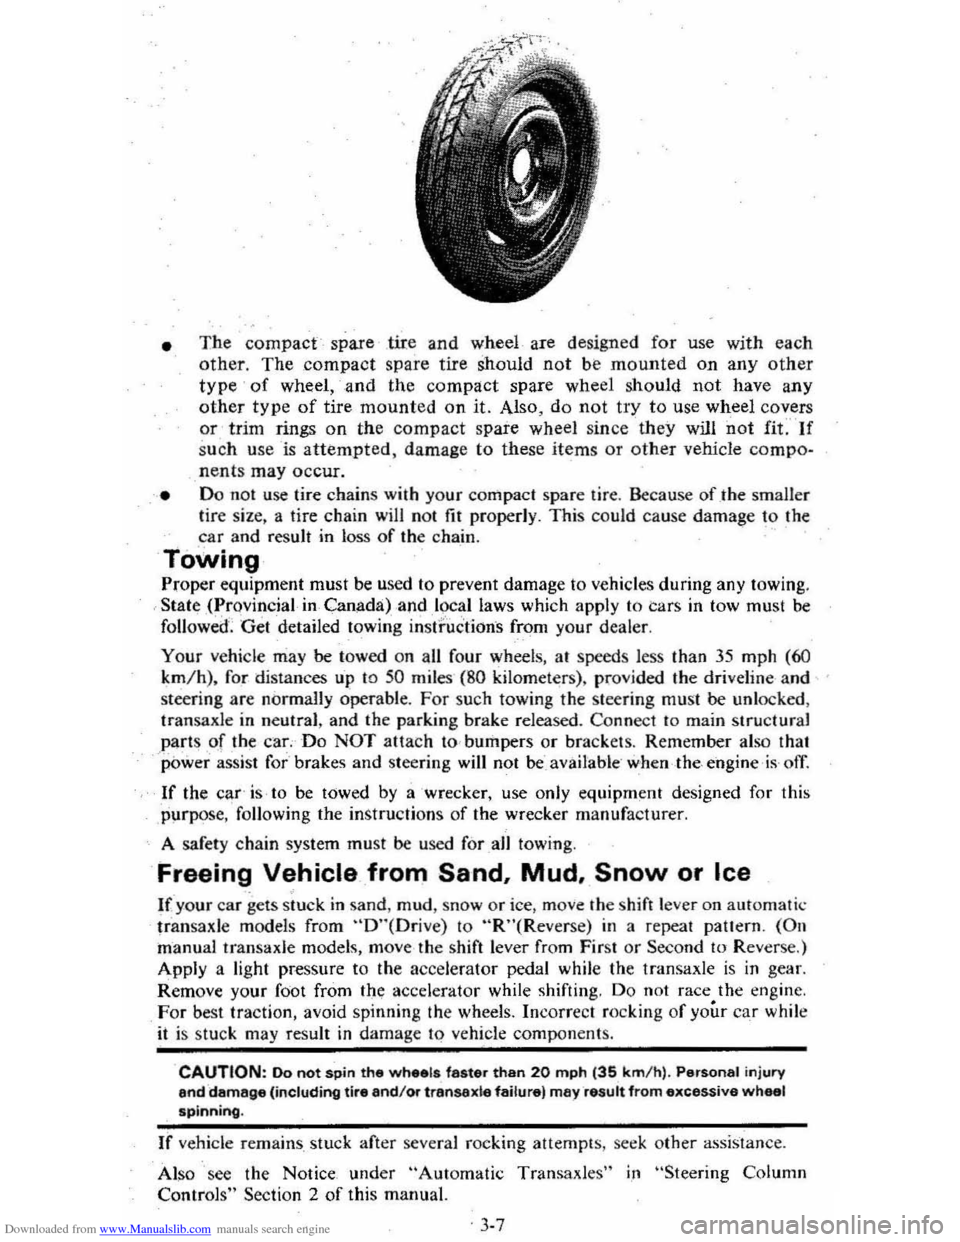
Downloaded from www.Manualslib.com manuals search engine • The compact spare .tire and wheel are design ed for use with each
other. The compact spare tire should not be mounted on any other
type of wheel, and the compact spare wheel should not have any
other type of tire mounted on it. Also, do not try to use wheel covers or trim rings on the compact spare wheel since they will not fif" If
s u ch u se is attempted, damage to these items or other vehicle compo~
nent s may occur.
• Do 1I0t use tire chains with your compact spar e tir e. Because of .the smaller lire size, a tire chain will no t fit properly . This could cause damage to the car and result in loss of the cha,in.
Towing
Prop er equipment must be used 10 prevent damage to ve hicle s during any towing .
State ,(.,rovincial in Canada) ,and l~~l laws which apply to Cars in tow must be
followed '. Get detailed towing instructions from your deale r.
Your
vehicle may be towed on all fo ur wheels, at speeds less than 35 mph (60
km /h) , for distances u'p 1O 50 miles ( 8 0 kilometer s). pro vided the driveline and
steering are normally operabl
e. For such towing the steering must be unlocked ,
tran saxle in neutral , and the parking brake released . Co
nnec t to main structural
part s of th~ car; Do NOT attach to , bumpers or brackets . Remember also that power assist for brakes and steering will not beavailable ' when the, engine is ofl
If the car' is to be towed by a 'wrecker, use only equipm~nt designed for this
purpos
e, following the instru ction s of the wrecker manufacturer.
A safety chain system must
be used forall towing .
Freeing Vehicle from Sand. Mud. Snow or Ice
If your car gets stuck in sa nd , mud , snow or ice , move the s hift lever on aut om atic
tr ans ax le models from "D"(Orive) to "R"(Reverse) in a repeat pattern. (On
manual transaxle models, move the shift lever from First or Second to Rever se.)
Apply a
light pressure to the acce lerator pedal while the transaxle is in gear.
Remove your
foot from the;: accelerator while shifting . Do not race the engine.
For best traction, avoid spinnin g the wheels. Incorrect rocking of your car while it is stuc k may result in damage to vehicle components.
CAUTION: 00 not spin the wh •• ls faster than 20 mph (35 km/ h) . Personal injury end damage (including tire and/Of transexle failure) rna)' result from excessive wheal spinning.
If vehide re mains stuck after several roc king attempt s, s eek other assistan ce.
Also 'see the Notice under
"Automatic Transaxles" i,n "Steering Column
Contro ls" Section 2 of this manu al.
. 3-7
Page 56 of 95
Downloaded from www.Manualslib.com manuals search engine 4. If a ring forms after spot cleaning, dean the entire area IMMEDIATELY.
5. Follow specific instructions on cleaner labels.
CLEANING GENERAL SOILAGE OR WATER SPOTS FROM
FABRIC-TYPE TRIM WITH FOAM-TYPE CLEANER
GM Multi~Purpose Powdered Cleaner is excellent for this type of cleaning, and
for cleaning panel sections where
small cleaning rings may be left from spot
cleaning .
• Vacuum'~rea thoroughly to remove loose dirt.
• AL WAYS clean a fuJI trim assembly or complete trim section. Mask
surrounding trim along stitch
or well Hnes.
• Mi x Multi-Purpose Powdered Cleaner in -strict accordance with direction s
on label of container. Mix in proportion for smaller quantities.
• USE SUDS ONLY ON A CLEAN SPONGE OR SOFT BRISTLE BRUSH. DO NOT SATURATE FABRIC OR RUB HARSHLY WITH BRUSH.
•
IMMEDIATELY AFTER CLEANING, WIPE OFF EXCESS CLEANER WITH SLIGHTLY DAMP ABSORBENT TOWEL OR CLOTH.
IMPORTANT' -IMMEDIATELY AFTER WIPING, FORCE-DRY
FABRIC WITH AIR HOSE, HEAT DRYER OR HEAT LAMP. (Use
ca ution with-beat dryer
or lamp to, help prev~nt damage to fabri c.)
• When trim materials with a sheen or luster finish are dry, wipe fabric lightly with a soft. dry,c1ean cloth to restore its sheen or luster.
SPOT CLEANING FABRIC-TYPE TRIM WITH SOLVENT
TYPE CLEANER
Before trying to remove -a spot or stain from fabric , detennine as accurately as
y o u ca n wha t kind and how old the spot
or stain is. Some spots or stains can be removed with water or mild ~p solution (see "Removal of Specific Stains ").
Spots or stains should always be removed as soon as possi ble.
Some tyPes of stains or soilage, such as lipstick, . ink s and gre ase"are very difficult
(sometimes impossible) to completely reIilove~ When cleaning this type ·of stain or soilage ,' be,: sure not to en)arg e,:the soiled area. .
GM Fabric Cleaner (Solvent Type) is exceHent for spot c1ea,ning grease, oil, or
fat stains .
• Gently scrape -exceSs stain otT trim material with a clean . DULL knife or .
sc raper .
USE VERY LITTLE CLEANER, light pressure, and clean cloths
(preferably c heesecloth) . Cleaning , shquld be from outside of stain "FEATHERING" towards the center;-Keep changing to a clean section of
cloth .
• Wben stain is cleaned from ,fabric,immediately dry area with an air hose.
heat dryer, or heat lamp 'to help ,prevent a cleaning ring. (Use caution with
heat dryer or lamp to prevent damage to fabric) .
• If a ring forms . immediately repeat the deaning operation over a slightly
larger area with emphasi s on "FEA THERINO" toward s its center. If ring
still remains, mask ofT surrounding trim-sections and clean entire affected area
with
GM MUlti-Purpose Powdered Cleaner (as described under -"Cleaning
' General Soilage or Water Spots with -Foam Type Cleaner").
4-2
Page 60 of 95
Downloaded from www.Manualslib.com manuals search engine PART
NUMBER
1051516
1050017
1052277
1050172 1050173
1050174
1050214
t 1050237
1050244
1052280
1050427 1050429
1052349
1050729
1051055 1051398 1051515
1051772 1051855
1051858
1052103
1052271 1052272
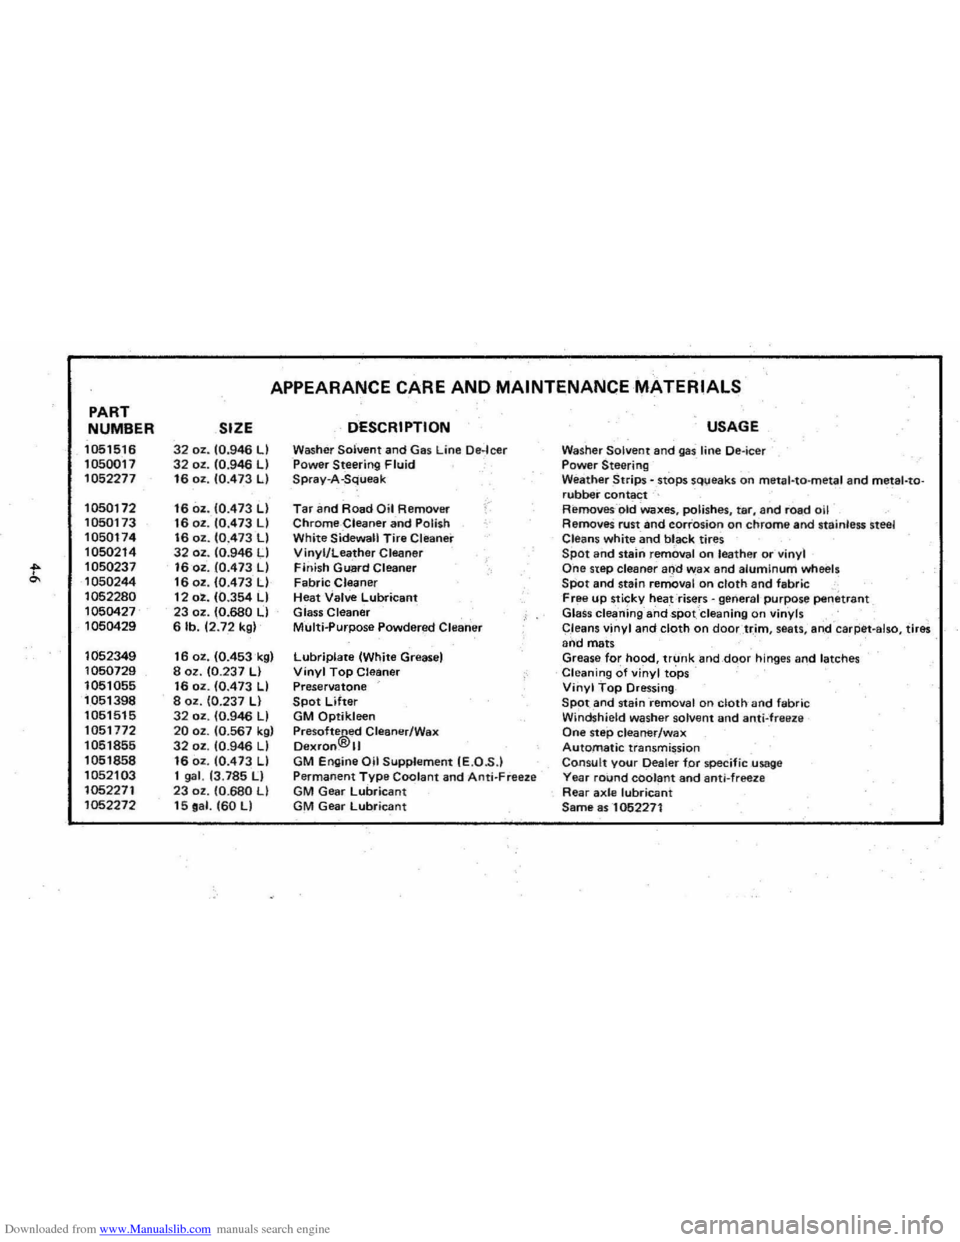
APPEARANCE CARE AND MAINTENANCE MATERIALS
SIZE DESCRIPTION
32 oz. 10.946 LI Washer Solvent and Gas Line De·leer 32 oz. 10.946 LI Power Steering Fluid 16 oz. 10.473 LI Spray-A-Squeak
16 oz. 10.473 LI Tar an d Road Oil Removirr /"
16 oz . 10.473 LI Chrome-Cleaner and Polish 16 oz. 10.473 LI White Sidewall Tire Cleaner 32 oz. 10:946 LI Vinyl/Leather Cleaner 16 oz . 10.473 LI Finish Guard Cleaner 16 oz. 10.473 LI Fabric Cleaner 12 oz. 10.354 LI Heat Valve Lubricant 23 oz. (0.680 LI Glass Cleaner 6 lb. 12.72 kgl Multi..purpose Powdered Clearier
16 oz. 10.453k91 Lubriplate (White Greasel 8 oz. 10.237 LI Vinyl Top Cleaner 16 oz. 10.473 LI Preservatone 8 oz. 10.237 LI Spot Lifter 32 oz. 10.946 LI GM Qptikleen 20 oz. 10.567 kgl Pre softe®ed Cleaner/Wax 32 oz. 10.946 LI Dexfon. II 16 oz. 10.473 LI GM Engine Oil Supplement IE.O .S .) 1 gal. 13.785 II Permanent Type Coolant and Anti- Freeze 23 oz . 10.680 LI GM Gear lubricant 15 oa l. 160 LI GM Gear Lubricant
USAGE
Washer Solvent and gas line Oe-ieer Power Steering Weather Strips - .stops sq\;leaks on meta l-ta-metal and metal-torubber contact Removes- -old Waxes, polishes, tar, and road oil RemoveS rust and corrosion on chrome and stainless steel
Cleans white and bl _ack tires Spot and stalrl removal o n leather or vinyl One step cleaner and wax and alumInum wh eels SPot and stain removal on cloth and fabric , Free up sticky heat risers -general 'purpose penetrant Glass cleaning ahdspot Cleaning on vinyls
C,leans vinyl and cloth on doortr,im , seats , ari,d -caq:iet -also, tires and mats Grease for hood, trunk and,dQor hinges and latches Cleaning of vinyl tops Vinyl Top Dressing SPOt and staini-emoval on cloth and fabric Windshield washer solvent and anti-freeze One step cleaner/wax Automatic transmission Consult your Dealer for specific usage Yea r round coolant and anti-freez e Rear axle lubricant Same as -1052271
Page 73 of 95
Downloaded from www.Manualslib.com manuals search engine STANDARD EXTRA B C o
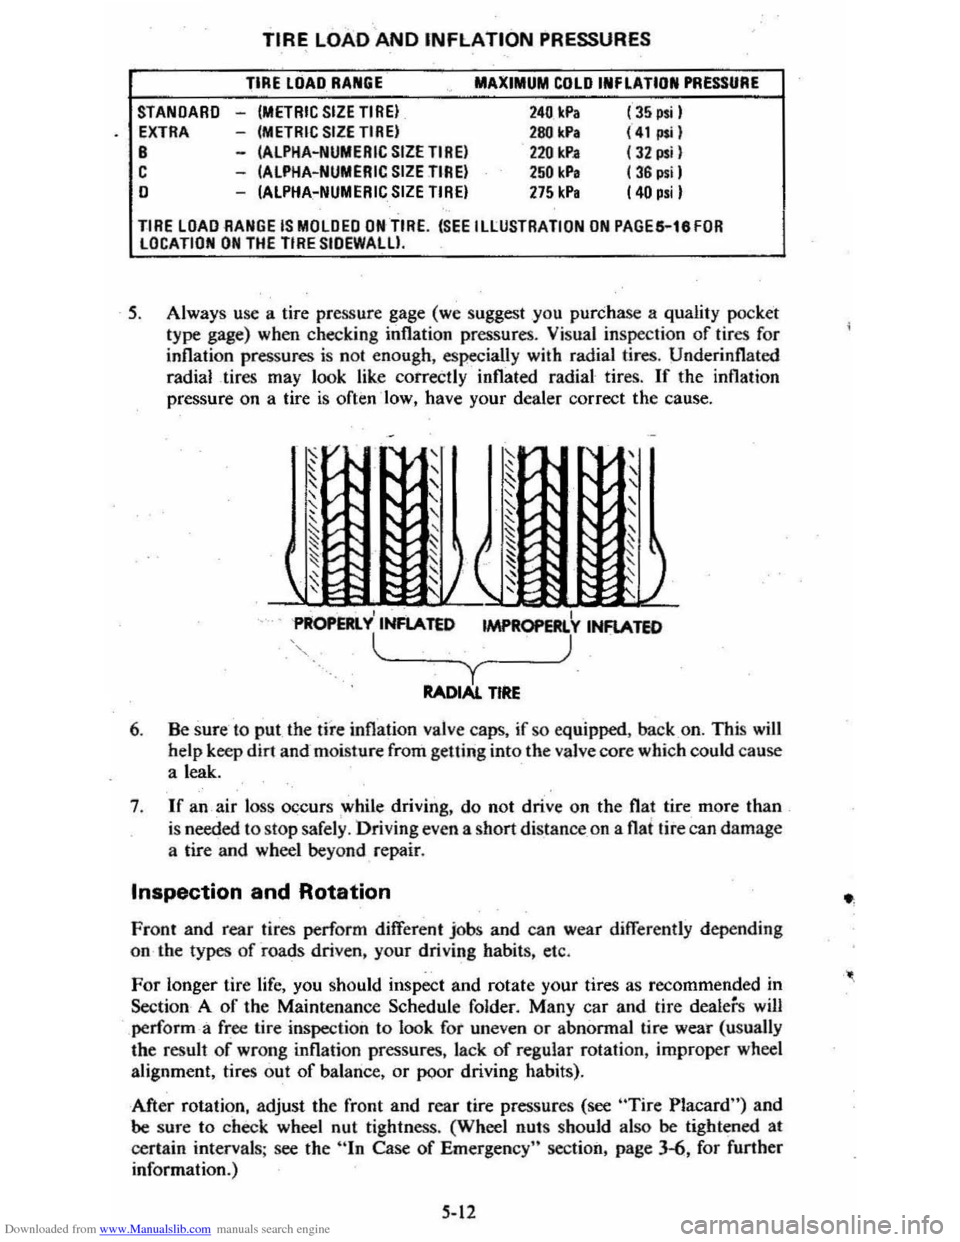
TIRE LOAD AND INFLATION PRESSURES
TIRE LOAD RANGE
-(METRIC SIZETIREI -(METRIC SIZETIREI -(ALPHA-NUMERIC SIZE TIREI -(ALPHA-NUMERIC SIZE TIREI -(ALPHA-NUMERIC SIZE TIREI
MAXIMUM COLD INFLATION PRESSURE
240 Ic.Pa 280 kPa 2211 kP. 250 kP, 275 kP,
(35 psi I (41";1 (J2 psil ( 36 psil (40 p.iI
TIRE LOAD RANGE IS MOLDED ON TIRE. (SEE ILLUSTRATION ON PAGES-leFOR LOCATION ON THE TIRE SIOEWALU.
5. Always use a tire pressure gage (we suggest you purchase a quality pocket
type gage) when checking inflation pressures. Visual inspection of tires for
inflation pressures is nol enough, especially with radial tires. Underinflated
radial tires may look like correctly inflated radial tires.
If the inflation
pressure on a tire
is often ·low, have your dealer correct the cause.
, I PROPERlY INFlATED 1MPR0PERl Y INFlATED
l~_~~_~) y RADIAl. TIRE
6. Be sure to put the tire inflation valve caps, if so equipped. back on. This will help keep dirt and-moisture from getting into the valve core which could cause
a leak.
7 .
If an air loss occurs while driving. do not drive on the flat tire more than
is needed to stop safely . Driving even a short distance _on a flat tire can damage
a tire and wheel beyond repair.
Inspection and Rotation
Front and rear tires perform different jobs and can wear differently depending
on the types
of roads driven, your driving habits, etc.
For longer tire life, you should inspect and rotate your tires as recommended in
Section A
of the Maintenance Schedule folder. Many car and tire dealers will perform -a free lire inspection to look for uneven or abnormal tire wear (usually
the result of wrong inflation pressures, lack of regular rotation, improper wheel
alignment, tires out
of balance, or poor driving habits).
After rotation, adjust the front and rear tire pressures (see
"Tire Placard") and be sure to check wheel nut tightness. (Wheel nulS should also be tightened at
certain intervals ; see the
hIn Case of Emergency" section, page 3-6, for further
information.)
5-12
Page 74 of 95
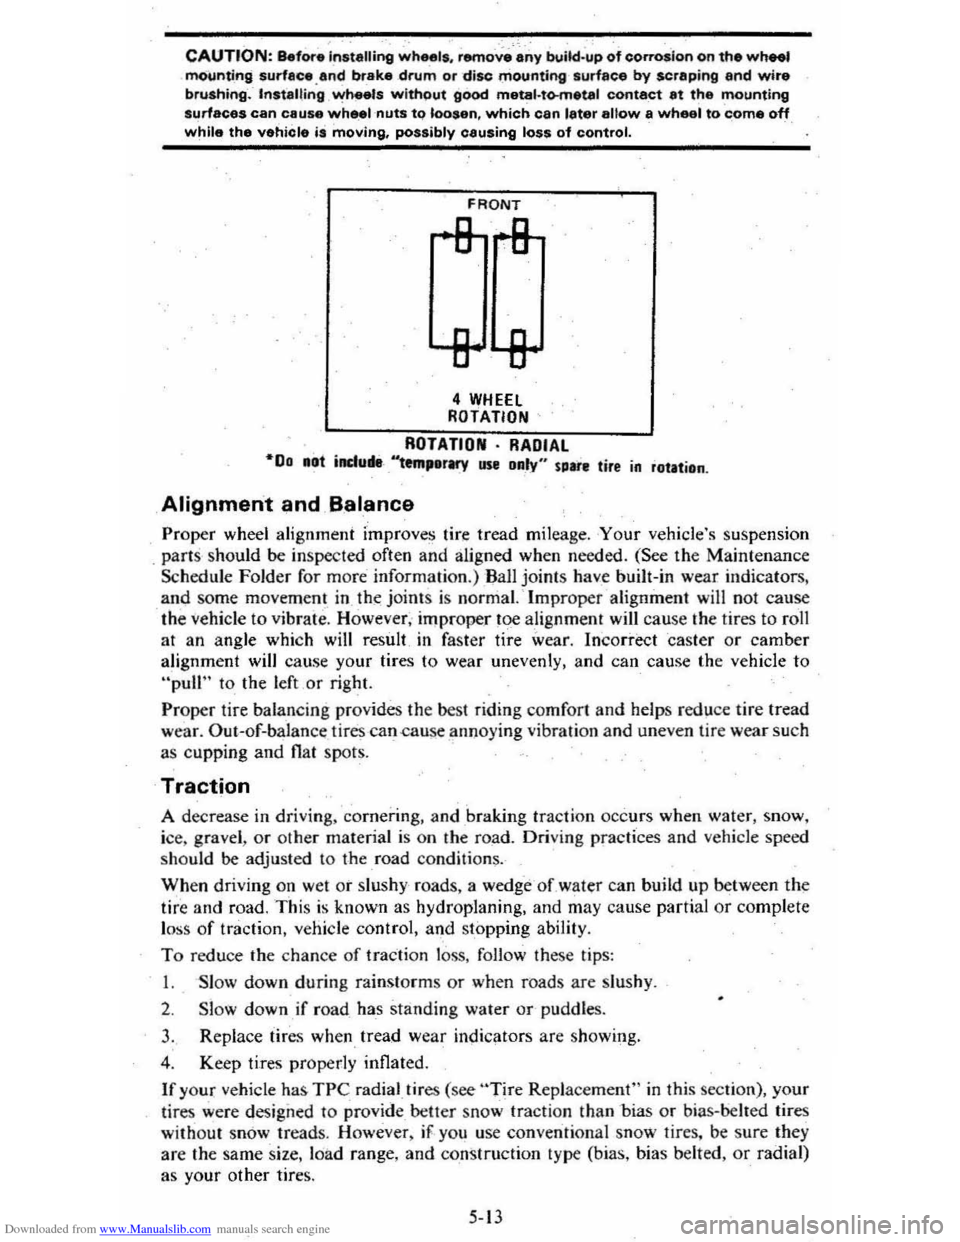
Downloaded from www.Manualslib.com manuals search engine CAUTION: BefOf"e Installing wheels. remo';.'~-~y build.up of corrosion on the wheel mOOnti_ng surfllce.and brake .drum or disc mounting surface by scrllping and wire brushing~-Installing ~h •• ls without good metal·to-metal contact at the mounting surfaces can cause whe.lnuts to loosen. which can later allow a wheel to c;ome off while the vehicle is moving. possibly causing loss of control.
FRONT
4 WHEEl ROTATION
ROTATION· RADIAL "00 .at induM-'''tm,erMY use Daly" sure tire in rotation .
Alignment and B.alance
Proper wheel alignment improves tire tread mileage . Your vehicle's suspension
. parts should be inspected often and aligned when needed. (See the Maintenance
Schedule Folder for m ore information.) Ball joints have built-in wear indicators,
and some movem ent in th~ joint s is normal. ' Improper alignment will not cause
the
vehicle to vibrate. However, improper toe alignment will cause the tires to roll
at an angle which will result in faster tire wear. Incorrect caster or camber
alignment will cause your tires to wear unevenly, and can cause the vehicle to
"pull" to the left or right.
Proper tire balan cing provides the best riding comfort and helps reduce tire tread
wear. Out--of-balan ce tires -can .cause annoying vibration and uneven tire wear such
as cupping and
flat spots.
Traction
A decrease in driving. cornerin g, and braking traction occurs when water, snow,
ice, gravel ,
or other material is on the road. Driving practices and vehicle speed
should be adjusted to the road condition~.
When driving on wet or slushy roads, a wedge -of water can build up between the
tire and road. This is known as hydroplaning, and may cause partial or complete
l oss
of traction, vehicle control, and stopping ability.
To reduce the chance of traction loss, follow these tips:
I. Slow down during rainstorms or when roads are Slu shy .
2. Slow down if road has standing water or-pUddles.
3. Replace tires when tread wear indicators are showing.
4 . Keep tires properly inflated.
If your vehicle has TPC radial.tires (see "Tire Replacement" in this section), your
lir es were design ed to
provide _ better snow tracti on than -bias or bias-belled tires
without snow treads. However , iF . yo u use conventional snow tires. be sure they
are the same size. loa d range, and construction type (bias, bias belted,
or radial)
as your other tire
s.
5-13
Page 75 of 95
Downloaded from www.Manualslib.com manuals search engine Tire Chains or Similar Traction Devices
Use of chains may adversely affect your vehicle's handling. When using chains : (I) adjust speed to roa d conditions, (2) avoid sharp turns, and (3) when possible,
avoid
locked-wheel braking . In addition, to help preve nt chain -damage to your
vehicle:
• Install the chain s on the front tires as tightly as possible, then tighten again
after driving 114 to 1/2 mile (0 .4 to 0 .8 kilometer). The use of chains on the
rear tires is not recommended; the chains may contact and possibly damage
the
car. If you intend to use chains on the rear tires , m ake certain there is
enough clearance.
• Do not exceed 45 mph (76 km /h), or chain manufacturer's speed limit, jf
lower.
• Drive in a restrained manner and avoid large bumps. potholes, severe turns
and other maneuvers which could cause the tires to bounce up and down .
• Follow any other chain manufacturer's instructions which do no t disagre e
with the above.
If you purchase tire chains for your Citation, make sure they are designated as
SAE Class "S" type chains. U se of other types of chains may cause damage to
your car.
Spare Tire
For the use and installation of your spare tire, see "In Case of Emergency" Section
3
of this manual.
Tire Replacement
CAUTION: Do not mix different tire construction types of tires (such as rediel, bias, and bias.belted) on your vehieleexcept in emeruencies, because your vehicle's handling could be affected and may result In loss of contrOl. This caution does not a~y to 8 stowaway. compact,. or temporary spar. tlr. fumished with your vehtcle.
On most ve hicles originally equipped with radial tires, you will find a TPC Spec.
No. (Tir e Performan ce Criteria Specification Numbe-r) molded into the tire
sidewall ne
ar the tire size marking. This shows that the tire meets rigid size and
performanc e standards which were developed -for your vehicle. The TPC Spec.
No. assures a proper combination of endurance, handling, load capacity, ride, and
traction on wet , dry, and sn o w covered surfaces . When you re place your tires with
tires having the same
TPC Spec. No., your new tires will be co mpatible with your
vehicle.
When replacing tires with those not having a
TPC Spec. No., you should use the
same size, load range ,
and construction type (bias, bias-belted, or radial) "as the
original tires on your 'vehicle. Although it is not generally recommended. some
alpha-size and metri c- size tires can
be interchanged (for size equivalen cy contact
your Chevrolet dealer or a lire dealer). A different size or type of tire may affect
ride, handling, speedometer /odometer calibration, vehicle ground clearance, and
tire
or tire chain clearance to the body or chassis . If replacing only a single tire,
it should be paired on the same axle with the least worn tire of the other three.
5·14