1980 CHEVROLET CITATION oil level
[x] Cancel search: oil levelPage 34 of 95
Downloaded from www.Manualslib.com manuals search engine Oil/Choke Indicator Light
This light will c0!TIe on to provide a "bulb check", w hen the igni tion is turned on, but sh Qu19 go out after the _ engine is started. If tight fails to
come on wit h ignitio~ turned on, it could indicate a burned out bulb , a
defective electric choke hea ter circuit (on L4 and V6 engines), or a blown
instrument lamp fuse. Have system repaired if light does not come on d min g ch eck .
Occa sionally. this light may flicker momentarily while the engine is running. Should this occur, CHECK EN GINE OIL LEVEL as outlined in Section 5,
"Checking Oil Level." If the light comes on continuously, pull over toa safe place and STOP THE ENGINE until the source of trouble can be loca ted and corrected.
The source of tro uble could be any of the following:
• Loss of engine oil press ure (cbec k eng ine oil level).
• Blown choke heater fuse.
• Loss. of electric choke heate r voltage.
Continuing to run the engine with an illuminated oil pressure light can cause
serious engine damage or unusu ally high exhaust system temperature which can
r esult in serio us damage to the
vehicle. Pull over to a safe place and STOP THE
VEHICLE IMMEDIATELY AND SHUT OFF ENGINE. If the light flashe s
momentarily , ch
eck engine oil leve l as outlined in Sectio n 5 of thi s manu al
Choke Warning Indicator Light
On some vehicles equipped with the optiona l oil pressure gage, an amber choke
warning indicator light replaces the red oil pressure indicator light in the
instrument cluste
r. If this light comes on, indicating loss of electric choke heater
volta
ge, have your authoriz ed Dea ler .locate and correct th e tro uble as soon as
p ossib l
e.
Generator Indicator Light The red ligh t GEN will go on when the ignition key is in the "run" _posit ion, but
before the engi ne
is started. After the engine s tarts, the light should 'go out and
r e m ain out .
If th e light remains on when en gine is running , have your Authorized
D eale r loca te and correct the troubl e as soo n as possibl
e.
Engine Temperature .Indicator Light This indicator light is provided in th e instrument cluster to quickly warn of an
overh eated en gi ne. With the igniti on switch in the START position, the red
TEMP indicator (hot light) will light to let you know that it is operati ng prope rly.
When the engi ne is started ;-th e re d light will go out imm ediate ly. It wilUight up
a t n o other time unleSS for some reason the engine reaches a dangerously high ope ra tin g temperature . 1f the light comes on during extreme driving condition s,
such as an exte nded idle, see "E ngine Cooling
System" on page 3-3. Glance at
th e instrument cluster frequently as you drive to see if this
ligh t is on.
Brake System Warning Light
The regular braking system is a dual system designed so that one part will provide
some braking action if there is a loss of hydraulic pressure in the other part of
the system. The system has a "Brake" warning light loca ted in the instrum ent
pane\.
• To serve as a reminder , the "Bra ke" lig ht is designed to come on while the
park ing brake is se t and the ignition key
is on.
• The light is also designed to come on briefly during engine starting so you
can chec k that the bulb is okay.
• Have the system repaired if the light does not come on during engine starting
o r when the parking brake
is set. 2-17
Page 51 of 95
Downloaded from www.Manualslib.com manuals search engine • pull over-to a 'safe p'late and stop (he car:-=Set the parking brake and shift to "P"(Park) (with a manual transaxle. shift to Neutral first, then set the parking
brake).
• DON'T TURN OFF THE ENGINE AND DON'T INCREASE THE ENGINE SPEED~ Let the engin e run at normal idle speed for two or three
minutes.
If the
''TEMP'' light still doesn't go off (or the gage needle doesn't start to drop) , NOW TURN OFF THE ENGINE and proceed as follows.
CAUTION: Keep henda, tools end clothing awey from'the engine COOling fen to help prevent personal Injury. This fen ia electric end can come on whether or not the eR8ine is runnirl'jJ. The fan Cen etert eutomatically in reapon .. to a heet ~, wrth the ignitkNl in ~Run."
• Lift the engine hood. Look at the coolant level.in the "see through " coolant
recovery tank. The coolant level should be at or above the "Fun Hot" mark
o n the tank.
If it looks like the coolant is boiling, wait until it stops before
proceeding You should :not need to remove the radiator cap to check the
coolant level and it can be dangerous if the coolant is still hot. See the
following Caution.
CAUTION: To help avoid the dange, of being burned:
• cia not remove the coolent recov.ry tank cap while the coolant is boiling.. and
• cia not remove the .rad~:_c.p white the engine end radiator are atill hot.
Scelding fluid and ateam can be blow, Qut under presau,.. If either cap ia taken off too soon.
• If the coolant level is low:
• look for leak s at the radiator hoses and connectio ns, heater hoses and
connections. radiator, and water pump.
See that the water pump belts
are not
brok~ or otT the pulleys and that the fan runs when the engine is running and theUTEMP" light ison (or the gage needle is in the
warning zone).
• add coolant to the recovery tank.
If the level in the recovery tank is at the correct level and the "TEMP" light (gage) still comes on, air may be-trappedin the, cooling system . This may prevent coolant
from returning to the radiator.
In this case. you may have to add coolant directly
to th e radiator.
See "Coolant Replacement" in "Service and Maintenance," Section 5 of this manual. Follow steps I and 10 for the correct way to remove
the radiator cap and add coolant to the radiator.
After the "TEMP" light is out (or the gage needle is out of the warning zone).
resume driving
at a reduced speed. Return to normal driving after about ten
minutes if the light does not come back on (or the gage needle does not go back
into the warning
~one).
J.4
Page 65 of 95
Downloaded from www.Manualslib.com manuals search engine USE Tlltst: SAE VISCOSITY GItotoDH
I , , , cl.
*
::0';'~ ,.,..~,: , , , ,
I
lOW , , , ,
,
I I I I , . , " • '" ,~, ." ., , " " " ~ lVitPl .... 1Ul:( lAN<* YOU ElU'EClltfOll( NUT OIl CHANG(
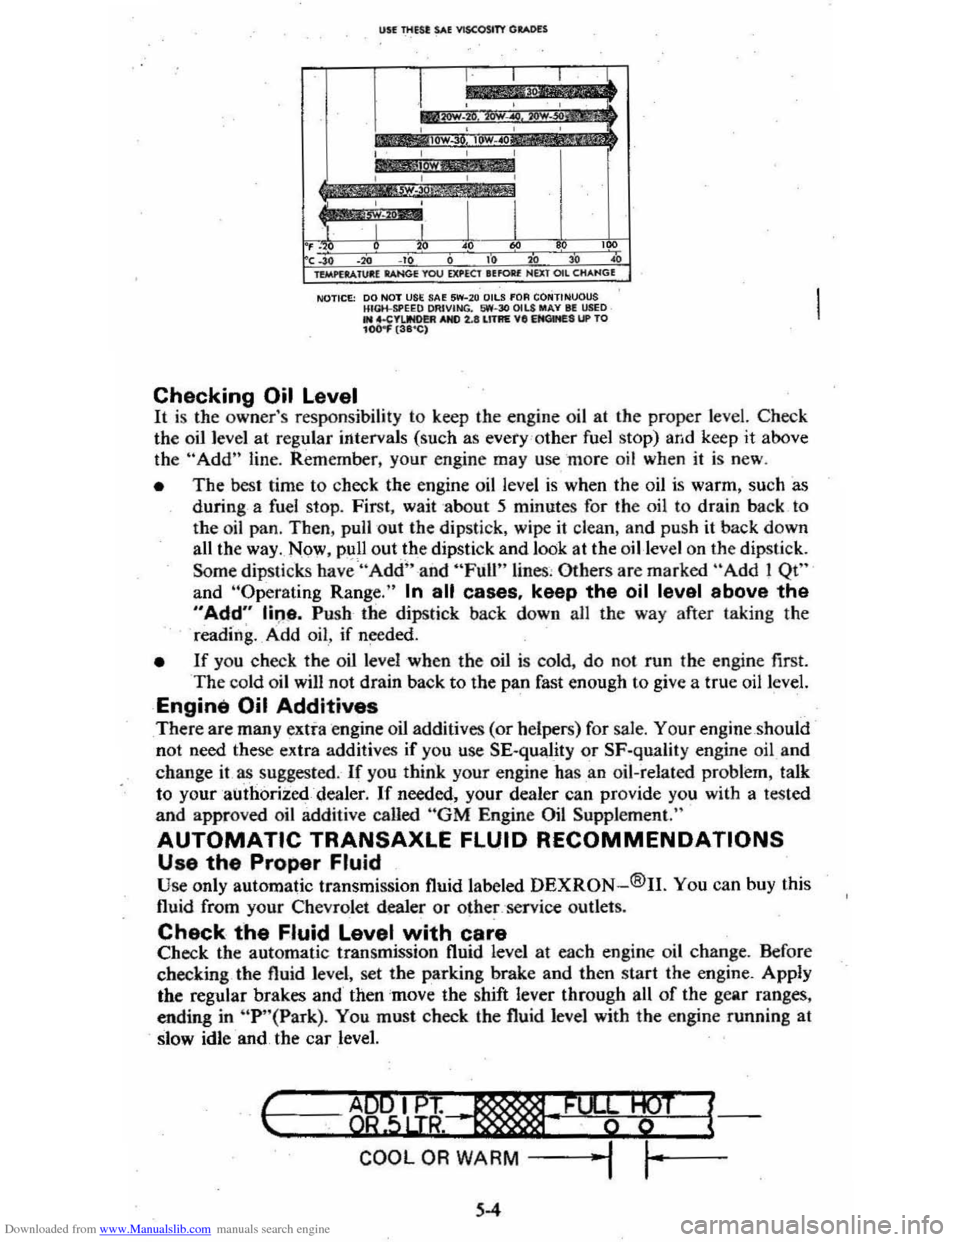
NOTICE: 00 NOT USE SA~ 5W-2 0 OilS fOA CONTINUOUS HIGH-SPEEQ OAIVING. 1,iW-30 OILS MAY III USED .. 4.CYIJNO!!R AND 2.lIll1AE VII EItClMES UP TO 104)
the oil level at regular intervals (such as every 'o ther fuel stop) and keep it above
th e "Add" line. Rem ember, your engine may use more oil when it is new .
• The best time to check the engine oil level is when the oil is warm, such as
during a fuel stop. First, wait about 5 minutes for the oil to drain back to
the oil pan, Then, pull out the dipstick, wipe
it clean, and push it back down
all the way . Now , pull out.th e dipstick and look at the oil-level on the dipstick.
Some
dipSlicks have "Add" and "Full" lines , Others are marked "Add! Qt"
and "Operaling Range." In all cases, keep the oil level above the
"Add" line. Push· the dipstick back down all the way after taking the
reading. _ A ·dd oil , if needed.
• If you check the oil level when the oil is cold, do no t run the engine first. The cold oil wilJ not drain back to the pan fast enough to give a true oil level.
Engine Oil Additives
There are many extra engine oil additives (or helpers) for sale. Your engine should
not need these extra additives if you use SE-quality or SF·quality engine oil and
change
it as suggested. If you think your engine has .an oil-related problem, talk
to your authorized dealer.
If needed, your dealer can provide you with a tested
and approved oil additive called "GM Engine Oil Supplement."
AUTOMATIC TRANSAXLE FLUID RECOMMENDATIONS
Use the Proper Fluid Use only automatic transmission fluid labe led DEXRON-®II. You can buy this
fluid from your Chevrolet dealer or
othe~,'service outlets.
Check the Fluid Level with care Check the automatic transmission fluid level at each engine oil change. Before
checking the fluid level, set the parking brake and then start the engine. AppJy
the regular brakes and then
'mov e the shift lever through all of the gear ranges,
ending in
"P '·(Park). You must check the fluid level with the engine funning at
slow idle and the car level.
I-c ..... --=---=..,~ ..... B9"""5IL.u;~~"-·, __ .........,; ..... _·F_%¥-W+--T -l{
COOL OR WARM -j ""I ,~-
5-4
Page 66 of 95
Downloaded from www.Manualslib.com manuals search engine NOTICE: You cannot read the correct fluid level if you have just driven the car for a long time at high speed, in city traffic in hot weather, or if the car has been pulling a trailer. Wait. until the fluid has cooled down (about 30 minutes).
Remove the dipstick located on the driver's side forward of the cowl. Carefully
touch the wet end of the dipstick to find out if the fluid is cool, warm or hot. Wipe
it clean and push it back in until the cap seats. Pull
out the dipstick and read the
fluid level.
• If it felt cool or warm (about room temperature), the level should be
between the dimples above the "Full" mark.
• If it was too hot to hold. the level should be at or in the hatched area.
Add just enough DEXRON-®n fluid to fill the transaxle. It takes only 0.5 liter
(one pint)to raise the level from "Add" to "Full" with a hot transaxle.
Do not overfill the transaxle. Overfilling can cause foaming and loss of fluid, which
could result in transaxle damage.
Automatic Transaxle Drain Intervals
Change the transmission fluid and change the filter (or clean the screen) as
outlined in Section
A of the Maintenance Schedule folder.
ELECTRIC FAN
CAUTION: Keep hands, tools, and clothing away from the angine cooling fan to help prevent personal injury. This fan is electric and can come on whether or not the engine is running. The fan can start automatically in response to a heat sensor when the ignition is in the "Run" position.
ENGINE COOLING SYSTEM
The coolant recovery system is standard. The coolant in the radiator expands with
heat, and the overflow collects in the recovery tank. When the system cools down,
the coolant
is drawn back into the radiator.
The cooling system was filled at the factory with a quality coolant that meets
GM Specification 1899-M. The cooling system is designed to use coolant (a mixture
of water and ethylene glycol antifreeze) rather than plain water. The coolant
solution should be used year round. It has many advantages, such as:
• provides freezing protection down to _37°C, (-34°P)
•
provides boiling protection up to 128QC, (262°P)
•
protects against rust and corrosion in the cooling system,
• maintains the proper engine temperature for efficient operation and emission
control, and
• allows proper operation of the coolant temperature light (or gage).
See Section A of the Maintenance Schedule folder to find out when the coolant
must
be replaced.
COOLING SYSTEM CARE
Check the cooling system at regular intervals, such as during fuel stops. You
usually do not need to remove the radiator cap to check the coolant level. Lift
the engine hood and look at the "see through" coolant recovery tank. When the
engine
is cold, the coolant level -should be at or slightly above the "Full Cold"
mark on the tank. When the engine has fully warmed up, the level should be at ')r slightly below the "Full Hot" mark on the tank. If the coolant level is low,
5-5
Page 67 of 95
Downloaded from www.Manualslib.com manuals search engine remOve tlie cap on the coolant ~ecove~y tank : Add to the tank enough of a 50 150 . mixture of w ater and a g ood quality eth)dene glycol antifreez e to bring the level
up to the .
proper mark. Put the cap bac k on the tank .
Certain
conditi ons; "Such as air trapped in the syste m, may affe ct the coolant level
in
the radiator. You sho uld ch ec k the co olant ·Ievel ·in the radiator while you
change the engine oil and the e ng ine is col d. Follow steps I , 8, 9 and 10 und er
"Coola nt Rep lacement" for the correct way to rt!move the radiator cap .an d add
. coolant.
If you have to add coola nt more than f our tim es a yea r (ei ther to th e recov ery
tank
or to the radiat or). see your dealer. for a. c oo lin g system chec k.
NOTICE: If the proper quality antifreeze is used, there is no .nee~ to add extra inhibltOf"s or additives which claim to improve the svstem .. They may be harmful to the proper operation. I)f the system.
Cooling System Service
The cooling syste m should be serviced at the intervals specifi ed inSection A of
the Maintenan ce Sch edule fold er as follows:
I. W ash the radiatqr cap .and filler neck with clean water. See step J of "Coolant
Replacement" to remove rapiator cap. .
2. C hec k the coolant level in the radiator and have it tes ted for freeze proteCtion . Add·· ethylene gly col antifreeze, if needed, to· m aintain freeze protecti on at -37'C(-34'F),
3~ Have ·the coOlin-g sys tem and radiat or cap tested fo r a press ure capacity of
105 kPa (15 psi) . If a repl acement cap is needed"Hse an AC ca'p,or an
equivalent · cap, designed fOl: coolant recovery system ·s and spe cified for your model;
4. Tighten all radiator hose clamps and heater hose clamps and inspect an hose s.
R
eplace the hose s if they are swollen, "checked" or otherwise worn .
NOTICE: Take care when tightenjng·the hose clemps at tMI radiator. Overtightening COUld. bend or collapse .the radiator fittings.
5. Clean the front. of the radiator core and air condit ioning condenser to re m ove
dirt and oth er·objects. Al so clean the auxiliary engine oil andlor transmission -fluid ' cooler if the vehicle has them.
Coolant, Replacement
At the interval s specified in Section A of the Maintenance Schedule folder, flu sh
a
nd refill the cool ing system as follows :
1. Remove the·radiat or·cap when the engin e is ·cool :
•
Turn . t he cap s lowly to the len until ·it reaches a " stop. " Do not press down while turning the cap.
• 'Wait until any rem aining press ure (indicated by a hissing sound) is
reliev ed. then press down on the cap an d continue turning it t(j the left.
CAUTION:· To help ~lVoid the danger of being ,burned, do not remove the radiator cap while the angine and radiator are still hot s.c.lding flutd and steam can be bk)wn out under pressure if the·cap is taken off.too soon.
2. Whe n the cap is re m oved, run the eng ine until the upper radiator hose is hot.
(This shows that the thermostat is open and the coola nt is flow ing through
the . system.)
5·6
•
Page 70 of 95
Downloaded from www.Manualslib.com manuals search engine CAUTION: If the air cleaner is removed during repair or maintenance, be sure to . put It back on correctly. If the air cleaner is not correctly installed, there could be II fire In the engine compartment (if there should happen to be a backfire), or other engine malfunction.
Power Steering System
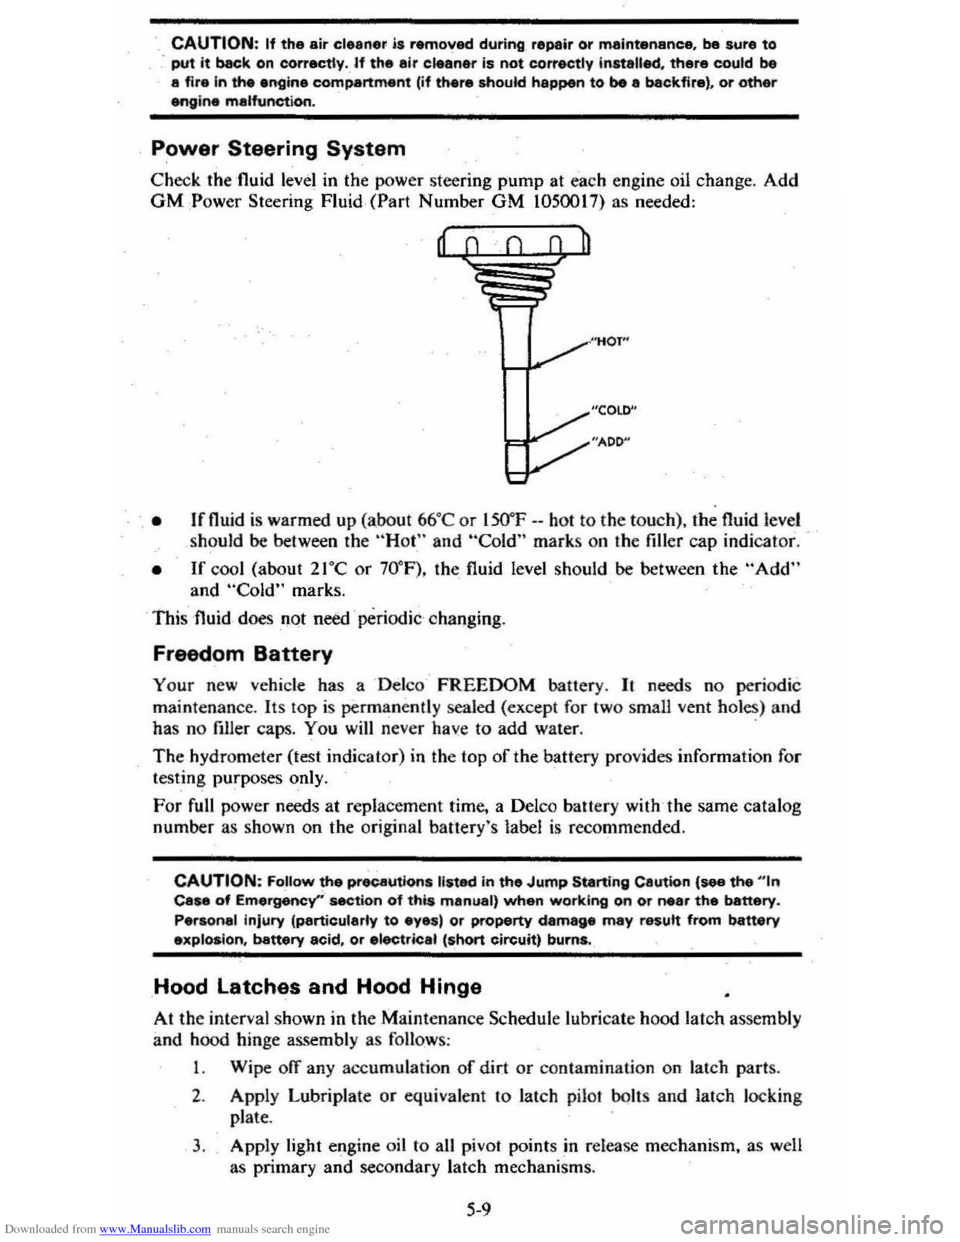
Check the 'fluid level in the power steering pump at each engine oil change. Add GM :Power Steering Fluid, (Part Number GM 1050017) as needed:
, • Ifnuid is warmed up (abo ut 66°C or lSO"F --hot to the to uch), the fluid level
should be between the "Hot" and "Cold" marks on the filler cap indicat or.
• If cool (about 21°C or 70° F), the fluid level should be between the "Add" and "Cold" marks.
This fluid
does not need ' periodic changing.
Freedom Battery
Your new vehicle has a Delco FREEDOM battery. It needs no periodic
maint enance . Its
lOp is permanently sealed (except for two small vent holes) and
has no filler caps. You will never have to add water. .
The hydrometer (test indicat or) in the top of the battery provides information for
testing purposes only.
For full power needs at repla cement time, a Delco battery with ,the same catalog
number as shown on the original banery's label
is recommended.
CAUTION: FoUow the precautions listed in the Jump Starting Cautton {see the "'n Case of Emergency''' section o"f this manual, when working on or near the battery.
Personal injury (particularly to eyes) or property damage may result from battery explosion, battery acid, or electric.1 (short circuit) burns.
Hood latches and Hood Hinge
At the interval shown in the Maintenance Schedule lubricate hood latch assembly
and hood hinge assembly as follows :
1 . Wipe off any accumulation
of dir.t or contamination on latch parts.
2. Apply Lubriplate or equivalent to latch pilaf bolts and latch loc king
plate .
3. Apply light engine oil to all pivot points in release mechanism, as well
as primary
and secondary latch mechanisms.
5-9
Page 90 of 95
Downloaded from www.Manualslib.com manuals search engine Switch Headlights .... TEMP (Temperature) .. Locks Door ...
2~19 2-17 1-2
Ignition ............................................. .. 2-5 1-1 2-2
2-25 Keys .. Theft Protection .. Lowering Seats .. Love Seat, Child & Infant: .. Lugglige/Cargo Capacity ... Luggage Rack ... Maintenance Record .. Maintenance Schedule .. Manual Transaxle Clutch Adjustment. .. .
1-10 5-11 2·29 7-12 5-.1
Maintenance ........................................... . 5-8
5-8
2-11
2· 10 2-12 4-1 4-5
1-3
Operating Tips .. Operation .. Shift Speeds. Metal Cleaners .. Metal Damage, Body ... Mirrors, Rearview .. Mobile Radios-. Monoxide Caution, Carbon .. . 2-25 2-1
2-1 2-2
2-2
2-15 Muffler ............................................... . New Car Break-In Period Octane Rating, Gasoline ... Odometer Oil, Engine Capacity .. Change Interval.. Dipstick ... Filter ... PreSsure Gage .. Pressure Light... Recommendation (Gas) .. OIL Light.. Openings, Roof... Opening The Hatchback ... Hood .. Windows ..
6-.1 5-3 (inside Back Cover) 5-3,7·1 2·1-9 2-17
5-3
2-17 (See "Roofs")
2·26 (Inside Back Cover) 1-5 Operating Speeds, New Car... 2-2 Operating Tips Fuel Economy.. 2-4 Trailer Towing.. 1-13 Transaxle... 2-9 Ventilation System.. 2.20 Operation in Foreign Countries.. 2"3 Outside Rearview Mirror.. 1.3 Overheating, Engine.. 3-3 Overseas Operation.. 2.3 Owner Assistance.. 6-1 Owner's Record... 7-11 Oxygen Sensor., 5.2 Paint Care.. 4-4
Paint Damage .. Parking;. Parking Brake .. Parking Lights .. PCV Valve & Filter .. Peda'·TI"avel, Brake ... Pedal Travel, Clutch .. Polishing & Waxing .. Pollution Control Power
4-' 2-. 2-14 7-3 7·2 2-14 5~8
.-. (See "Emission Contron
7-8
Antennas Brakes .. Door Locks .... Seats ... Steering Pressure, Oil Light ... Pressure. Tire Inflation ... Pulse Wiper ...
2-25
2-14
1-2 1-' 2·12
2-15
5-11
2-7
Pushing to Start ................................ .. 5-2 Radiator Antifreeze (Coolant) .. Cap, Prassure .. Checking Level .. Overheating .. Thermostat...
Radios & Antennas ... Raising Seats ... Rear Cargo Cover ...................... .. Compartment .. . Window Defogger .. Trailering .. Rearview Mirrors .. Reclining Seats .. Recovery Tank, Coolant .. Release
Hatc.hback
Hood .. Seatback Latch ... Reminder Lights ....
Replacement Fasteners
5-5 5-. 5-5 3-3 5-7
2-23 -2-25
2-25
2-:27
2-2,2-28 2-21 '·11 1-3 1-' 5-5
2-25 (Inside Back Cover)
1-' (See "Lights") 5-1
5-1 Replacement Maintenance Schedule .. Raplacement Owner's·Manual... 7-13 Replacement Parts ............. ....................... 7-2 Restraints .. Rocking Car When Stuck .. Roofs Carrying Cargo On ... Luggage Carrier .. Rack .. Vinyl .. Vista-Vent. ... Rotation, Tire .. Rustproofing .. Rust Protection ... Sefety Belts .. Seats (See
"Seat Belts") 3-7
1-3,2-2,9 2·29 2·29
'-5 2-26 5-12
'-5 '-5 (See "Seat Belts")
Adjustment.. 1-4 Child... 1-10 Folding.. 2-25 Latches..
1-5 Reclining.... . '-4 Seat Belts Care.. 4.3 Child Restraint ............................................ 1.10 Inspection.. 1-10 Lap/Shoulder.. 1-6 Light/Buzzer Reminder... 1;8 Pregn~nt Women .. Rear Seat. ... Self-Adjusting Brakes .. SENSOR Indicator ..
1-8 2-25 2-14 2-18,5-2 Sensor, Oxygen.... 2-18,5-2 Service & Maintenance.. 5-1 Service Station Information (InSide Back Cover) Sheet Metlll Damage... 4-5
Page 95 of 95
Downloaded from www.Manualslib.com manuals search engine SERVICE STATION INFORMATION
Refer to "Service and Maintenance"
Section for Further Details
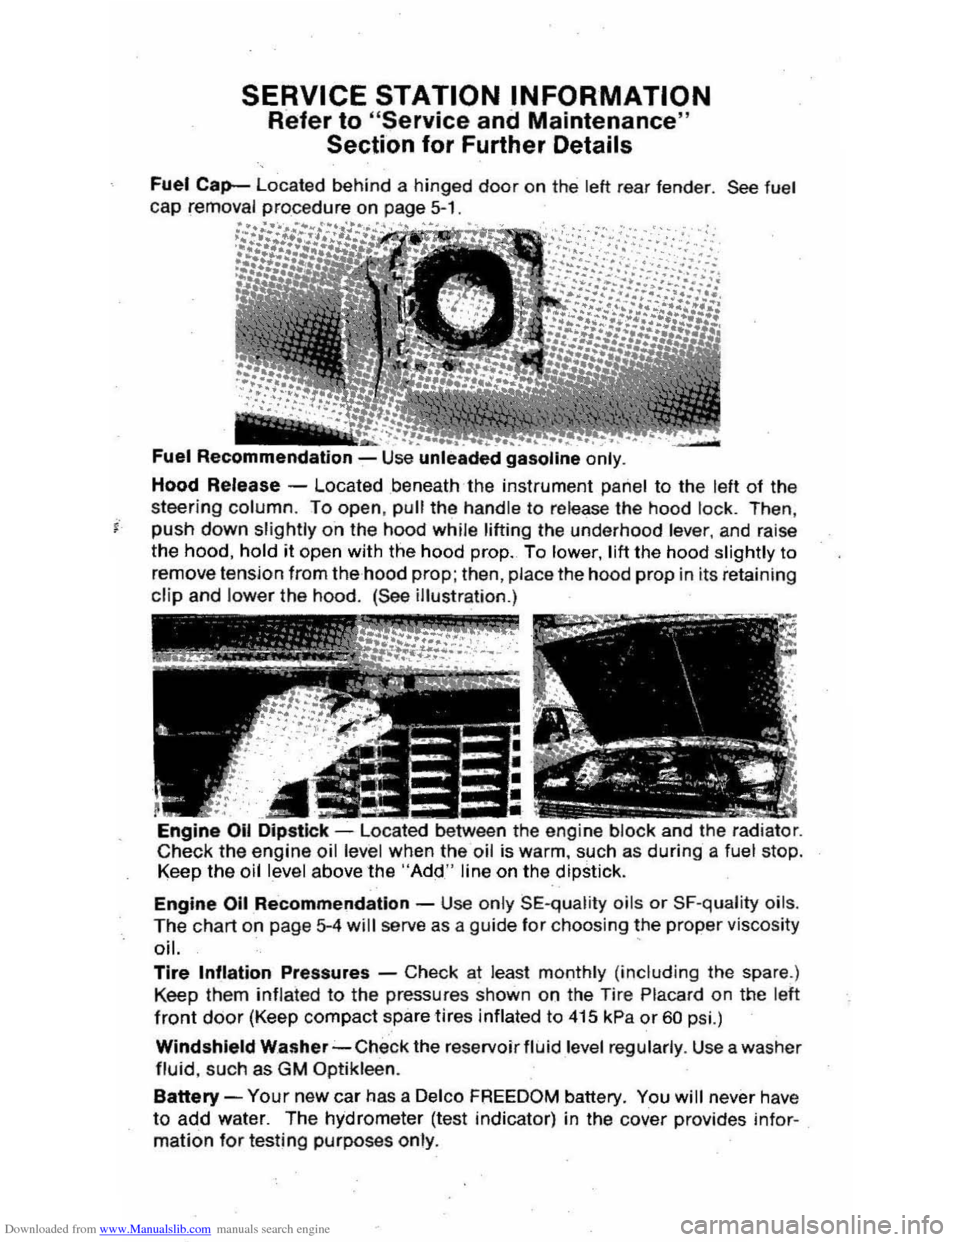
Fuel Cap-Located behind a hinged door on the lett rear fender. See fuel cap removal procedure on page 5-1.
Fuel Recommendation -Use unle~ded gasoline only .
Hood Release -Located beneath the instrument panel to the left of the
steering column. To open, pull the handle to re lease the hood lock . Then ,
j" push down slightly o "n the hood whil e lifting the underhood lever, and raise
the hood, hold it open with the hood prop. To lower, lift the hood slightly to
remove tension from the hood
prop; then , place the hood prop in its retainin g
clip and lower the hood. (See illustration.)
Engine Oil -located between the engine block and the radiator. Check the engine oil level when the oil is warm, such as during a fuel stop. Keep the oil level above the "Add" line on the .dipstick.
Engine Oil Re "commendatlon -Use only SE-q ualit y oils or SF-quality oils .
The chart o n page 5-4 will serve as a gu ide tor choosing the proper viscosity oil. .
Tire Inflation Pressures -Check at least monthly (including the spare .)
Keep them
inflated to the pressures shown on the Tire Placard on the left
front door (Keep compact spare tires inflated to 4t5 kPa or 60 psi.)
Windshield Washer-Check the reservoir fluid level regularly . Use a wa sher
fluid, such as GM Optikleen.
Battery -Your new car has a Delco FREEDOM battery. You will never have
to add water. The hydrometer (test indicator) in the cover provides infor
mation for testing purposes only.