1980 CHEVROLET CITATION odometer
[x] Cancel search: odometerPage 32 of 95
Downloaded from www.Manualslib.com manuals search engine • Never drive-the vehicle _with the parking brake set as this -may overheat the
reaf brakes reducing their effectiveness and causing excessive wear or damage,
DISC BRAKE WEAR INDICATORS
Front disc brakes have built-in wear indicators that are designed to make a
high-pitched
squealing or cricket-like warning sound when the brake linings are
worn 10 where -new linings are needed. The sound will come and go, or be heard
all the time
when the wheels are rolling, and when the brake pedal is pu~hed down
firmly . Expensive damage can result
if linings are not replaced when needed.
See also the brake checks listed in the Maintenance Schedule folder.
CLUTCH .PEDAL
On models equiPPed with a manual transaxle, a clutch pedal is used to engage
or disengage the clutch, thereby connecting
or disconnecting the engine from the
transaxle and drive1ine to the front wheels. -When the pedal is fully extended the
clutch
is engaged, driving the transaxle arid the front wheels.
INSTRUMENT PANEL P.ND CONTROLS
INSTRUMENTS
The instruments, gages and indicator lights conveniently grouped in the
instrument cluster are des igned to
tell you at a glance many important things about
_the perfonnance of your vehicle _, _ The following information will enable you to
more quickly -understand and properly it';:rerpretthese instruments.
Speedometer
The speedometer chand ·indicatt:5 vehicle speed in miles per hour and kilometers
per hour.
Odometer
The group of six figures . in the speedometer lower center section indicates the
accumulated mileage.
Fuel Gage
The fuel gagewiH register the_APPROXIMATE fuel level in the tank, when the
ignition
is in the RUN position.
When the gage registers
EMPTY, some fuel is still available as a reserve. When
the gage registers
FULL. some additional" fuel can"still be added to the tank. The
following conditiqns may be considered normal:
• Gas station _pump may shut off before fuel gage indicates FULL. •
•
Amount of gasoline required for fill-up may not exactly correspond to gage.
• Needle may not move away from FULL until some time after fill·up.
• Needle may !Dove during turns. stops and-accelerations.
When the ignition switch
is turned to the OFF position, the needle will not
necessarily
retiJrn · all the way to the EMPTY mark.
2-15
Page 33 of 95
Downloaded from www.Manualslib.com manuals search engine '" 0;
o STANDARD
o OPTIONAL
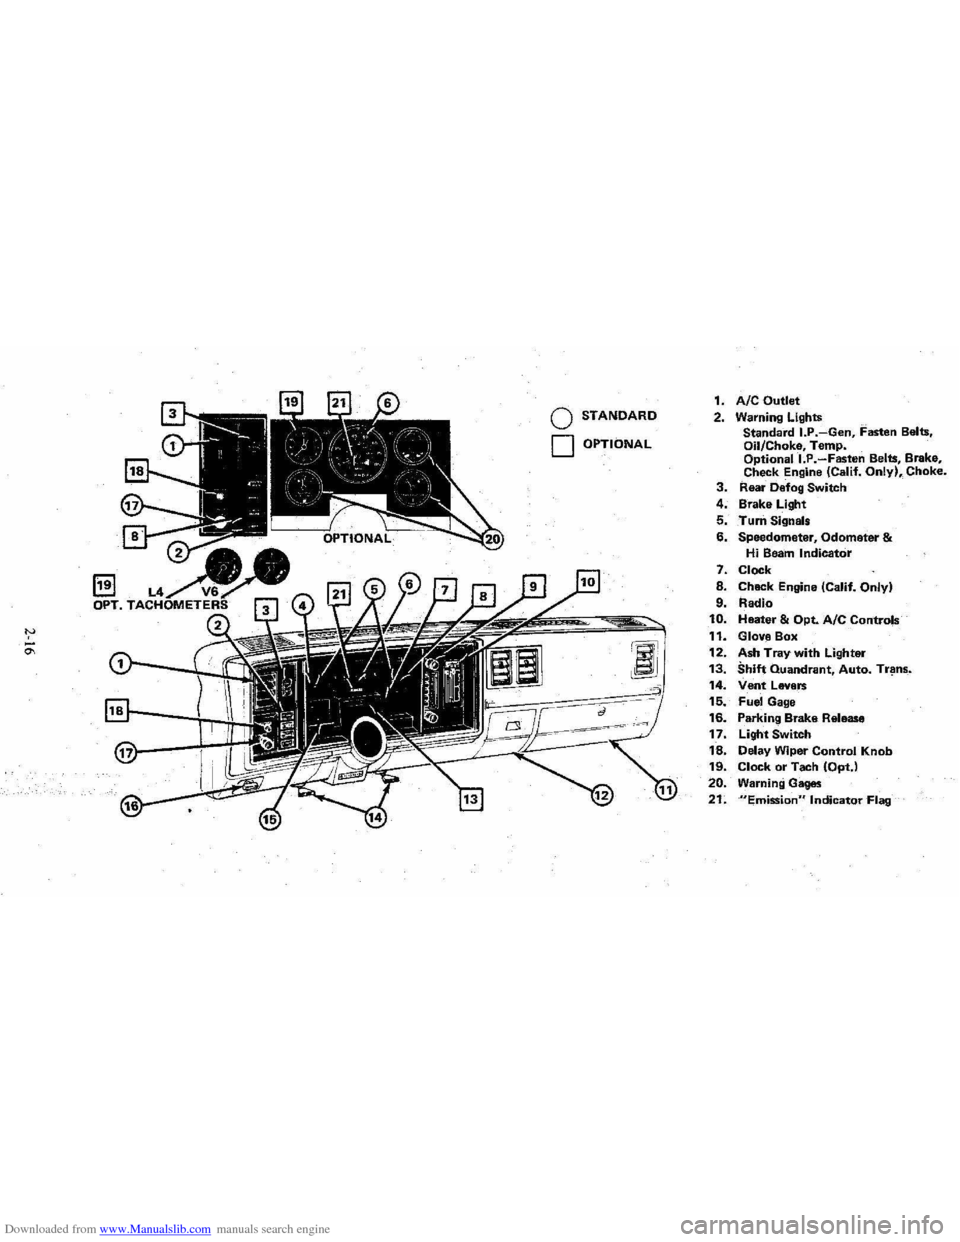
1. AIC Outlet 2. Warning Lights
Standard I.P.-Gen, Fasten Belts.
Oil/Choke, Temp.
Optionall.P.-Fasten Belts, Brake,
Check Engine (Calif. Only), Choke. 3. Rear Defog Switch
4. Brake Light
5. Turn Signals
6. Speedometer, Odometer & Hi Beam Indicator
7. Clock
8. Chack Engine (Calif. Only)
9. Radio 10. Heater & Opt. Ale Controls
11. Glove Box
12. Ash Tray with Lighter 13. Shift Quandrant, Auto. Tr~ns_.
14. Vent Levers 15. Fuel Gage
16. Parking Brake Release
17. Light Switch
18. Delay Wiper Control Knob 19. Clock or Tach (OptJ
20. Warning Gages
21. "Emission" Indicator Flag
Page 75 of 95
Downloaded from www.Manualslib.com manuals search engine Tire Chains or Similar Traction Devices
Use of chains may adversely affect your vehicle's handling. When using chains : (I) adjust speed to roa d conditions, (2) avoid sharp turns, and (3) when possible,
avoid
locked-wheel braking . In addition, to help preve nt chain -damage to your
vehicle:
• Install the chain s on the front tires as tightly as possible, then tighten again
after driving 114 to 1/2 mile (0 .4 to 0 .8 kilometer). The use of chains on the
rear tires is not recommended; the chains may contact and possibly damage
the
car. If you intend to use chains on the rear tires , m ake certain there is
enough clearance.
• Do not exceed 45 mph (76 km /h), or chain manufacturer's speed limit, jf
lower.
• Drive in a restrained manner and avoid large bumps. potholes, severe turns
and other maneuvers which could cause the tires to bounce up and down .
• Follow any other chain manufacturer's instructions which do no t disagre e
with the above.
If you purchase tire chains for your Citation, make sure they are designated as
SAE Class "S" type chains. U se of other types of chains may cause damage to
your car.
Spare Tire
For the use and installation of your spare tire, see "In Case of Emergency" Section
3
of this manual.
Tire Replacement
CAUTION: Do not mix different tire construction types of tires (such as rediel, bias, and bias.belted) on your vehieleexcept in emeruencies, because your vehicle's handling could be affected and may result In loss of contrOl. This caution does not a~y to 8 stowaway. compact,. or temporary spar. tlr. fumished with your vehtcle.
On most ve hicles originally equipped with radial tires, you will find a TPC Spec.
No. (Tir e Performan ce Criteria Specification Numbe-r) molded into the tire
sidewall ne
ar the tire size marking. This shows that the tire meets rigid size and
performanc e standards which were developed -for your vehicle. The TPC Spec.
No. assures a proper combination of endurance, handling, load capacity, ride, and
traction on wet , dry, and sn o w covered surfaces . When you re place your tires with
tires having the same
TPC Spec. No., your new tires will be co mpatible with your
vehicle.
When replacing tires with those not having a
TPC Spec. No., you should use the
same size, load range ,
and construction type (bias, bias-belted, or radial) "as the
original tires on your 'vehicle. Although it is not generally recommended. some
alpha-size and metri c- size tires can
be interchanged (for size equivalen cy contact
your Chevrolet dealer or a lire dealer). A different size or type of tire may affect
ride, handling, speedometer /odometer calibration, vehicle ground clearance, and
tire
or tire chain clearance to the body or chassis . If replacing only a single tire,
it should be paired on the same axle with the least worn tire of the other three.
5·14
Page 77 of 95
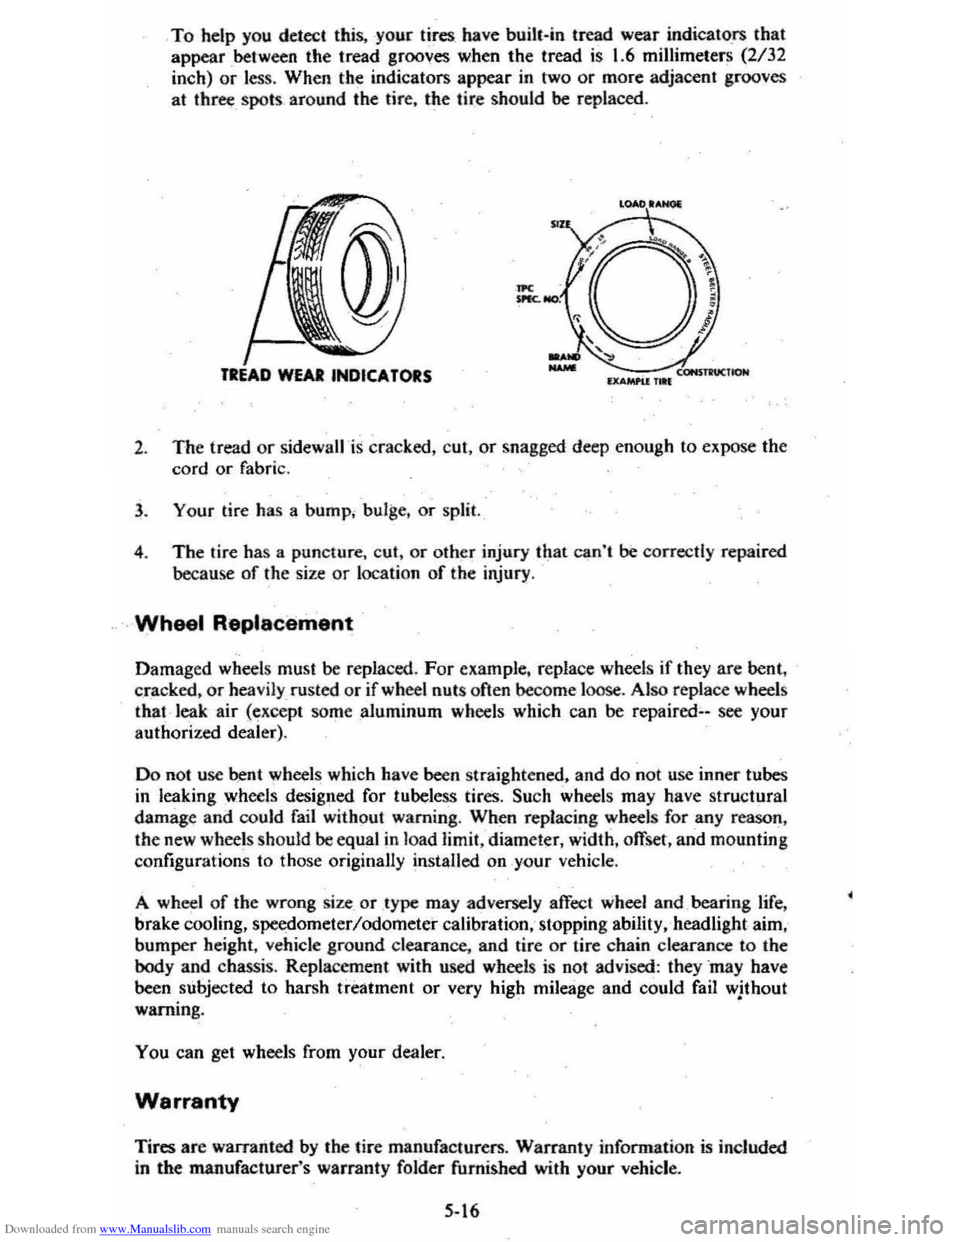
Downloaded from www.Manualslib.com manuals search engine To help you detect this, -your tires have bui1t-in tread wear indicato .fS that
appear between the tread grooves when the tread is 1.6 millimeters (2/32
inch)
or less . When the indicators appear in two or more adjacent grooves
at
three _ spots around the tire, the tire should be replaced .
LOAD lANal
''-----7.cONSTll"UCtlON IXAMI'U 1 .. 1
2. The tread or sidewall is cracked, cut, or snagged deep enough to expose the
cord
or fabric.
3 . Your tire has a bump . bulge. or split.
4 . The tire has a puncture . cut ,
or other injury that can't be correctly repaired
because of the size
or location of the injury .
. Wheel Replacement
Damaged wheels must be replaced . For example. replace wheels if they are bent .
cracked .
or heavily rusted or if wheel nuts often become -loose . Also replace wheels
that leak air (except someaJuminum wheels which can be repaired;.-see your
authorized dealer).
Do not use bent wheels which have been straightened, and do not use inner tubes
in leaking wheels designed for tubeless tires. Such wheels may have structural
damage and could fail without warning. When replacing wheels for any reason,
the new wheels should
be equal in load limit, diameter, width, offset, and mounting
configurations to those originally installed on your vehicle.
A wheel
of the wrong size. or type may adversely affect wheel and. bearing life,
brake cooling, speedometer/odometer calibration,· stopping ability, . headlight aim,
bumper height, vehicle ground clearance, and tire
or tire chain clearance to the body and chassis. Replacement with used wheels is not advised: they ·may have
been subjected to harsh treatment or very high mileage and could fail wjthout
warning .
You can get wheels from your dealer.
Warranty
Tires are warranted by the tire manufacturers. Warranty information is included
in the manufacturer's warranty folder furnished with your vehicle.
5-16
Page 90 of 95
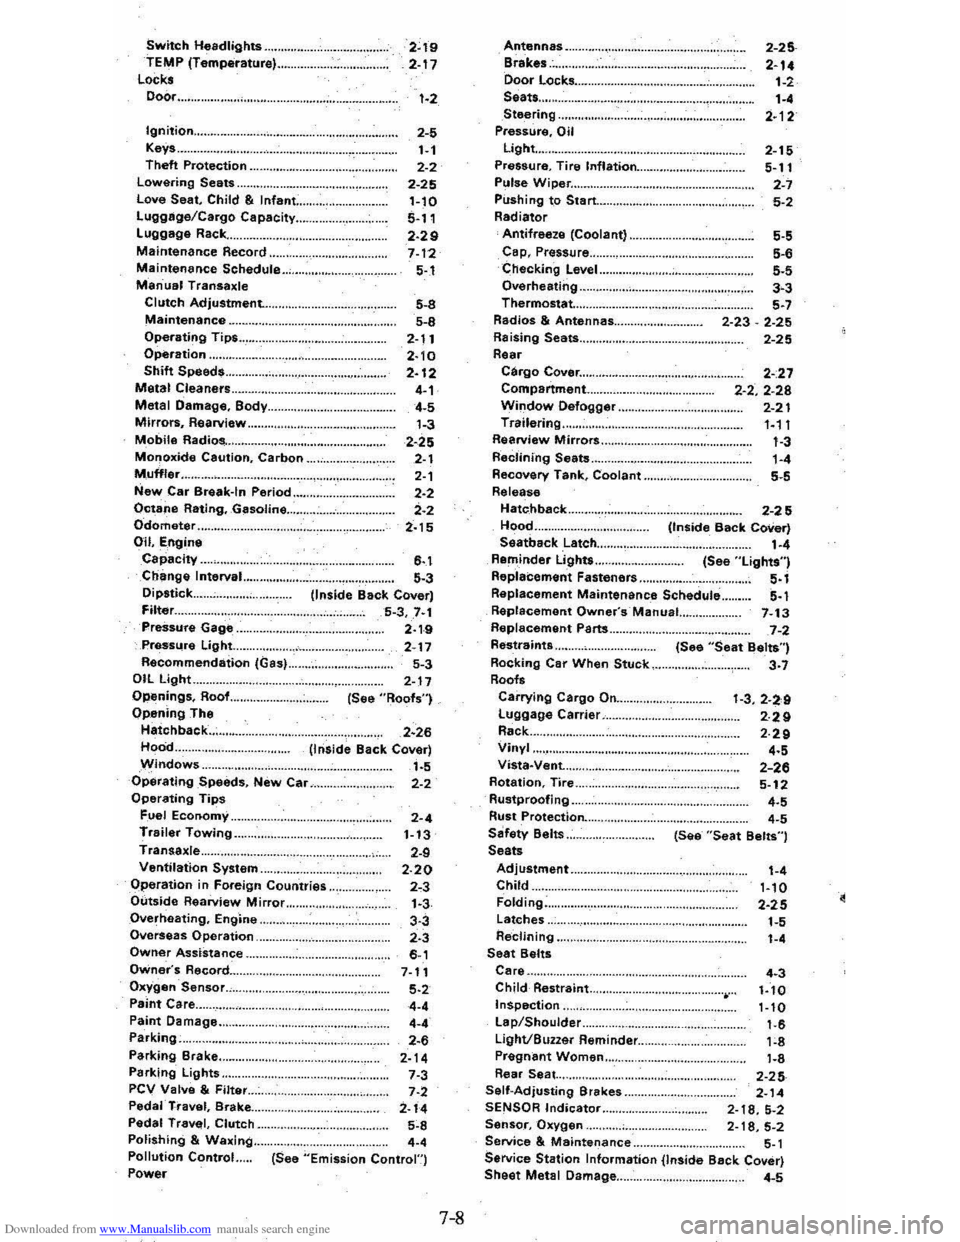
Downloaded from www.Manualslib.com manuals search engine Switch Headlights .... TEMP (Temperature) .. Locks Door ...
2~19 2-17 1-2
Ignition ............................................. .. 2-5 1-1 2-2
2-25 Keys .. Theft Protection .. Lowering Seats .. Love Seat, Child & Infant: .. Lugglige/Cargo Capacity ... Luggage Rack ... Maintenance Record .. Maintenance Schedule .. Manual Transaxle Clutch Adjustment. .. .
1-10 5-11 2·29 7-12 5-.1
Maintenance ........................................... . 5-8
5-8
2-11
2· 10 2-12 4-1 4-5
1-3
Operating Tips .. Operation .. Shift Speeds. Metal Cleaners .. Metal Damage, Body ... Mirrors, Rearview .. Mobile Radios-. Monoxide Caution, Carbon .. . 2-25 2-1
2-1 2-2
2-2
2-15 Muffler ............................................... . New Car Break-In Period Octane Rating, Gasoline ... Odometer Oil, Engine Capacity .. Change Interval.. Dipstick ... Filter ... PreSsure Gage .. Pressure Light... Recommendation (Gas) .. OIL Light.. Openings, Roof... Opening The Hatchback ... Hood .. Windows ..
6-.1 5-3 (inside Back Cover) 5-3,7·1 2·1-9 2-17
5-3
2-17 (See "Roofs")
2·26 (Inside Back Cover) 1-5 Operating Speeds, New Car... 2-2 Operating Tips Fuel Economy.. 2-4 Trailer Towing.. 1-13 Transaxle... 2-9 Ventilation System.. 2.20 Operation in Foreign Countries.. 2"3 Outside Rearview Mirror.. 1.3 Overheating, Engine.. 3-3 Overseas Operation.. 2.3 Owner Assistance.. 6-1 Owner's Record... 7-11 Oxygen Sensor., 5.2 Paint Care.. 4-4
Paint Damage .. Parking;. Parking Brake .. Parking Lights .. PCV Valve & Filter .. Peda'·TI"avel, Brake ... Pedal Travel, Clutch .. Polishing & Waxing .. Pollution Control Power
4-' 2-. 2-14 7-3 7·2 2-14 5~8
.-. (See "Emission Contron
7-8
Antennas Brakes .. Door Locks .... Seats ... Steering Pressure, Oil Light ... Pressure. Tire Inflation ... Pulse Wiper ...
2-25
2-14
1-2 1-' 2·12
2-15
5-11
2-7
Pushing to Start ................................ .. 5-2 Radiator Antifreeze (Coolant) .. Cap, Prassure .. Checking Level .. Overheating .. Thermostat...
Radios & Antennas ... Raising Seats ... Rear Cargo Cover ...................... .. Compartment .. . Window Defogger .. Trailering .. Rearview Mirrors .. Reclining Seats .. Recovery Tank, Coolant .. Release
Hatc.hback
Hood .. Seatback Latch ... Reminder Lights ....
Replacement Fasteners
5-5 5-. 5-5 3-3 5-7
2-23 -2-25
2-25
2-:27
2-2,2-28 2-21 '·11 1-3 1-' 5-5
2-25 (Inside Back Cover)
1-' (See "Lights") 5-1
5-1 Replacement Maintenance Schedule .. Raplacement Owner's·Manual... 7-13 Replacement Parts ............. ....................... 7-2 Restraints .. Rocking Car When Stuck .. Roofs Carrying Cargo On ... Luggage Carrier .. Rack .. Vinyl .. Vista-Vent. ... Rotation, Tire .. Rustproofing .. Rust Protection ... Sefety Belts .. Seats (See
"Seat Belts") 3-7
1-3,2-2,9 2·29 2·29
'-5 2-26 5-12
'-5 '-5 (See "Seat Belts")
Adjustment.. 1-4 Child... 1-10 Folding.. 2-25 Latches..
1-5 Reclining.... . '-4 Seat Belts Care.. 4.3 Child Restraint ............................................ 1.10 Inspection.. 1-10 Lap/Shoulder.. 1-6 Light/Buzzer Reminder... 1;8 Pregn~nt Women .. Rear Seat. ... Self-Adjusting Brakes .. SENSOR Indicator ..
1-8 2-25 2-14 2-18,5-2 Sensor, Oxygen.... 2-18,5-2 Service & Maintenance.. 5-1 Service Station Information (InSide Back Cover) Sheet Metlll Damage... 4-5