1976 CHEVROLET MONTE CARLO lock
[x] Cancel search: lockPage 3 of 102

Downloaded from www.Manualslib.com manuals search engine ,
BEFORE DRIVING YOUR CHEVROLET
DRIVER CHECKLIST
Before Entering Car
1. See that windows ; mirrors and
lights are clean.
2. Visually note inJIation condition
of tires.
3. Check that area to rear is clear
if about to back up.
Before Driving Off
1. Lock all doors.
2. Position seat, jmd adjust head
restraints, if
so ¢quipped.
3. Adjus!insidean'd outside mirrors.
4. Fasten seat belts.
5. Check that warning bulbs light
when key
is turned to start
position. .
6. Release parking brake ( and see
that brake warning light turns
off). ,
7. Be sure you understand your car
and how
to 'operate it safely.
Keys
Two separate keys are provided
for your car. Each key has a
differ
ent cross section so that it can be
inserted only in certain locks.
• Key with s qua r e hell d
(stamped "e") -for ignition
switch only.
• Key with oval head (stamped
"O")-for all other locks.
,
The code number of each key is
All OTHeR LOCKS
1-1
stamped on the "knock out" plug
in the '
key-bead. Your Chevrolet
dealer removed these plugs
and,.
placed them with the spare set of
keys in the special key envelope
. that was given to you at time of
delivery.
For your protection:
• Record the numbers on the key
envdope and discard the key
plugs.
• Keep the key envelope in a safe
place such
as YOII! wallet, NOT
IN THE CAR.
In the event
the original keys are
lost,
dl!plicates can be made by
your dealer or a locksmith using the
key code information.
Be sure to lock the Klove box
or console
90mpartment and re~
move the key from the car whenever
it is necessary to leave the ignition
key with
an attendant.
Page 4 of 102

Downloaded from www.Manualslib.com manuals search engine ,;
Door Locks
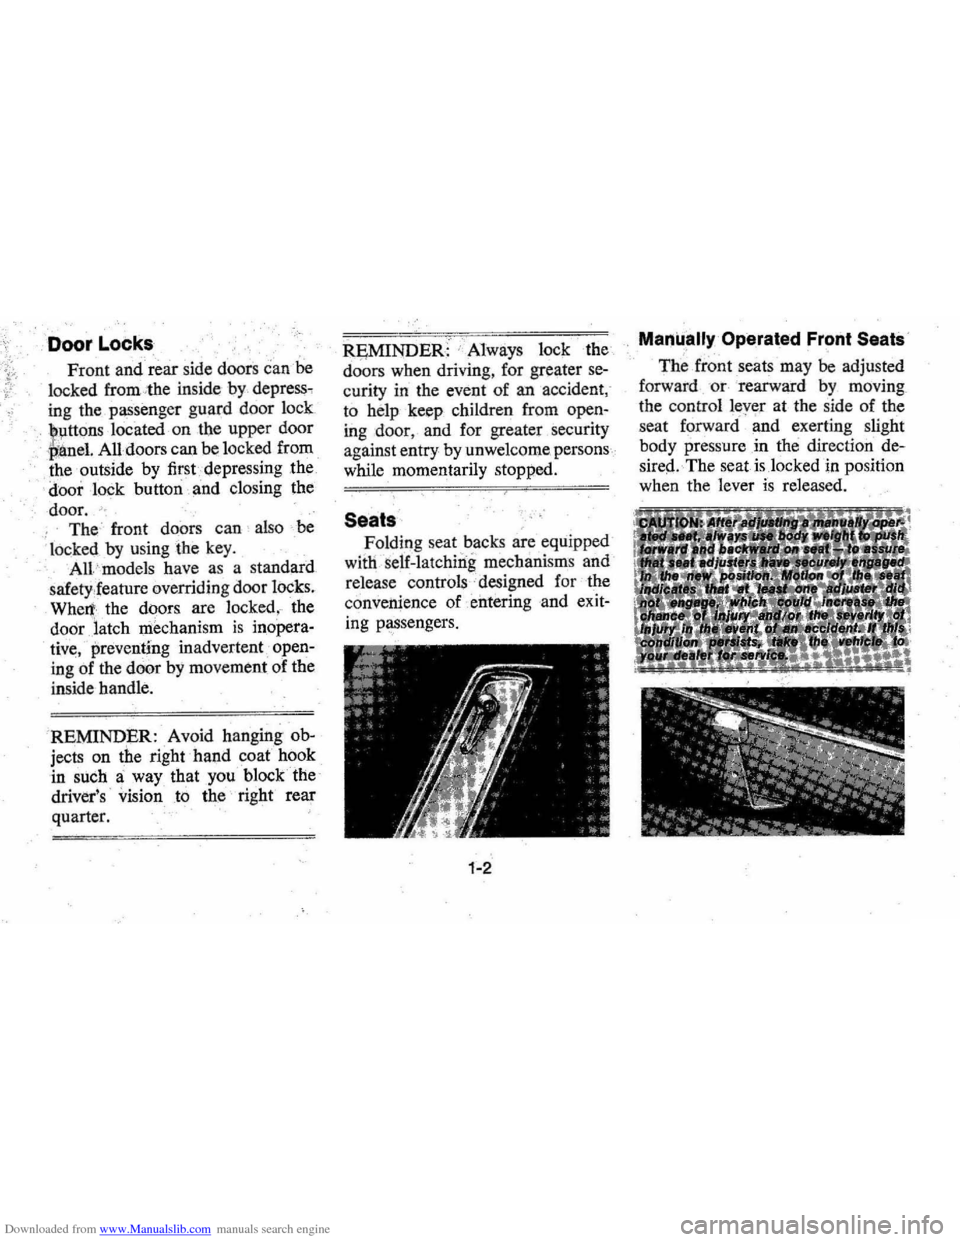
Front and rear side doors can be
locked from:the inside by. depress ,
ing the passenger guard door lock
lllttons located on tbe upper door
.Mne!. All doors can be locked from
. the outside by first depressing the
door lock button and
closing the
door.
"'.
The ' front doors can also ·be
locked by using the key,
A\I.'
models have as a standard
safety,feature overriding door locks.
Whert the doors are locked. the
door latch mechanism is inopera
tive,
preventing inadvertent open
ing of the door by movement of the
inside handle .
' REMINDER: Avoid hanging
ob
jects on the right hand coat hook
in
such a way that you block the
driver's ' vision
to the right rear
quarter.
R~MINDER: " Always lock the
doors when driving , for greater
se
curity in the event of an accident ,'
to help keep children from
open
ing door, and for greater security
against entry by unwelcome persons
while momentarily stopped.
Seats
Folding seat backs are equipped
witli
s elf -latch ing mechani sms and
release
controls · designed for the
convenience of entering
·and exit
ing passengers.
1-2
Manually Operated Front Seats , ,
The front seats may be adjusted
forward
or · rearward by moving
the control lever
at the side of the
seat
forward ' and ex erting slight
body pressure in the direction
de
sireq.
·· The seat is locked in position
when the lever
is released.
Page 5 of 102

Downloaded from www.Manualslib.com manuals search engine Front Seat Back ... ~'""\ ..
Front seat backs on two-door
styles are equipped with a self-lock
ing mechanism to
.• keep the seat
back locked in
phlge while in the
up position. The lock release lever
is located on the upper outboard
portion of the
s~at back.
To tilt the
sell,t back forward,
rotate the levertearward and tilt
the seat back
f?rward. When the
seat back
is r¢turned to the up
position,
• the se~t back will auto
matically 'lock.
Keep
belt re~traints.and buckles
clear of mechanism when tilting
folding seats
forward or backwards,
to help prevent damage
to these
belt systems.
Power Operated Front Seats
The six-way power seat control switch
is located
on the driver's seat
left side panel.
The seat can be operated
as
follows:
I. The front control provides up
and down movement of the
frontof the seat.
2. The center control provides
forward and backward move
ment and up and down move
ment of the entire front seat.
3. The provides up
and of the
Power Windows ,
Power windows have an ignition
interlock
so the windows cannot be
operated unless the ignition switch
is in the "on" position.
1-3
REMINDER: Remove the ignition
key when the vehicle
is not at
tended by a responsible person. A
master control for all windows
is
provided at the driver's position,
Individual switches are provided
under each window for passenger
use.
Inside Rearview Mirrors
Switch mirror to night position
to reduce glare from following
headlights. To raise or lower
mir
ror to achieve desired field of.view,
grasp mirror and exert sufficient
pressure by pushing or pulling up,
down or sideways.
Page 6 of 102

Downloaded from www.Manualslib.com manuals search engine Occupant Restraint Belts
Lap and sholjlder belts provide
added security and cgmfort for you
and your passengers. Proper
use
and care of these belts will assure
continuance of this security.
Front
Seat Lap-Shoulder
Belt Combination
• Adjust front seat to satisfaction
of driver and sit erect and well
back in seat.
• In a single motion, pull the lap
shoulder belt webbing across lap
far enough to permit inserting
. metal latch plate end of belt into
the buckle, until a snap
is heard.
If webbing is not pulled out far
enough
to reach buckle, let lap
belt rewind into its retractor to
release lock mechanism,
so belt
can be pulled out
to the proper
length.
• Position "lap" portion of belt
across lap
as LOW ON HIPS as
possible. To reduce the risk of
sliding under belt during an
ac
cident, adjust to a SNUG FIT by
pulling belt firmly across lap in
direction of lap belt retractor
so
it can take up slack. The belt re
tractors are designed to automat
ically take up excess webbing.
1-4
Page 7 of 102

Downloaded from www.Manualslib.com manuals search engine • The front seat shoulder belts in
this vehicle are equipped with
a
"vehicle sensitive retractor"
which
is de!\,igned to grip the belt
-only during a sudden stop or im
pact. At other times it is de
signed to move freely with the
occupant. .:
• For best restrainUhe slight ten
sion on the shoulder caused by
the shoulder belt retractor
is de
sirable.
• A comfort clipis provided for
those who
find the shoulder belt
tension a
source of discomfort. If
the shoulder belt tension becomes
uncomfortable ;. pull down on the
shoulder belt
to provide the least
amount of
slaek necessary to re
lieve tension (hot more than one
inch). Then
push the comfort
clip snugly against the guide
loop.
To unfasten button
in center
of buckle.
• When no longer in use, front seat
lap-shoulder belts can be stowed
by allowing
them to rewind into
their retractors. The comfort clip
can be adjusted when removing
belts,
so shoulder belt slack will
be fully taken up by retractor.
NOTE: Take care not to let the
pOlrtio,rl-of the belt twist while
1-5
it is being rewound into the retrac
tor. The bulk of the twisted belt
m .ay cause
t~e retractor to jam so it
WIll not reWind further, while at the
same time the retractor locking
mechanism may. prevent the belt
from being withdrawn. To release
a jammed belt, open the cover on
the rear of the retractor and rotate
the key slot while pulling the belt
upward. This should allow the belt
to be untwisted.
lfyour retractor
does not have such a key slot or for
some reason the lap belt portion
re
mains ' jammed, orother parts of
the restraint system do not operate
properly take the
ve!).ic1e to your
dealer
for service .
Page 16 of 102

Downloaded from www.Manualslib.com manuals search engine STEERING COLUMN CdNTROLS
Anti-. Steering
Column Lock
The
anti-th eft lock, located on
the right side of the stee ring col
umn, has five positions:
• Accessory -Permits operation
of electr i
cal accessories when
engine is not running. To
en
gage, push key in and turn
toward you (counterclockwise).
• Lock-Normal parking position.
L
ock s igniti on and provides added
theft protection
by prevent
ing normal operation of steering
wheel and shift controls . to
"lock"
po sition and removed until trans
mission is placed in "park".
• Off
-Permits turning engine off
without locking steering wheel and
shift controls.
• Run (ON) -Normal operating
position
. .
•
Start -Permits engagement of
starter.
NOTE: The ontl-theft otee,lng column lock is not 8:,lubltItUte tor· the parking brake. Always let the , parking brak, when leaving the car una"ended.
If difficulty is experienced in
turning the ignition key and lock
knob to unlock the ignition,
at
tempt to turn the steering wheel lIS
hard as possible in the direction the
wheels are turned.
At the same
time turn the ignition-lock knob in
2-2
a clockwise direction wi(h as.much
effort
as you can apply with your
own hand. Do not attempt to
use
a tool of any kind to apply addi
tional force on the lock knob, as
this could break the knob.
Parking
When leaving your car unattended:
• Set parking brake.
• Place automatic transmission se
lector in Park.
•
Turnkey to LOCK position.
• Remove key (the buzzer will re
mind you).
• Lock all doors.
IMPORTANT : Do not park your car over combustible materials, such 8S grlss or leaves, which can come Inlo contact with the hot exhaust system and cause such materials to Ignite under certain wind and weather condition ••
NOTICE:
Do not I.ave your car unattended with ~ engine running. If the engine
should overheat While your car is -unat·
tended , the temperature warning light or gauge would go unheed9d, which could result in extensive damage to your car.
Page 24 of 102

Downloaded from www.Manualslib.com manuals search engine INSTRUMENT PANEL AND CONTROLS
o STANDARD
o OPTIONAL
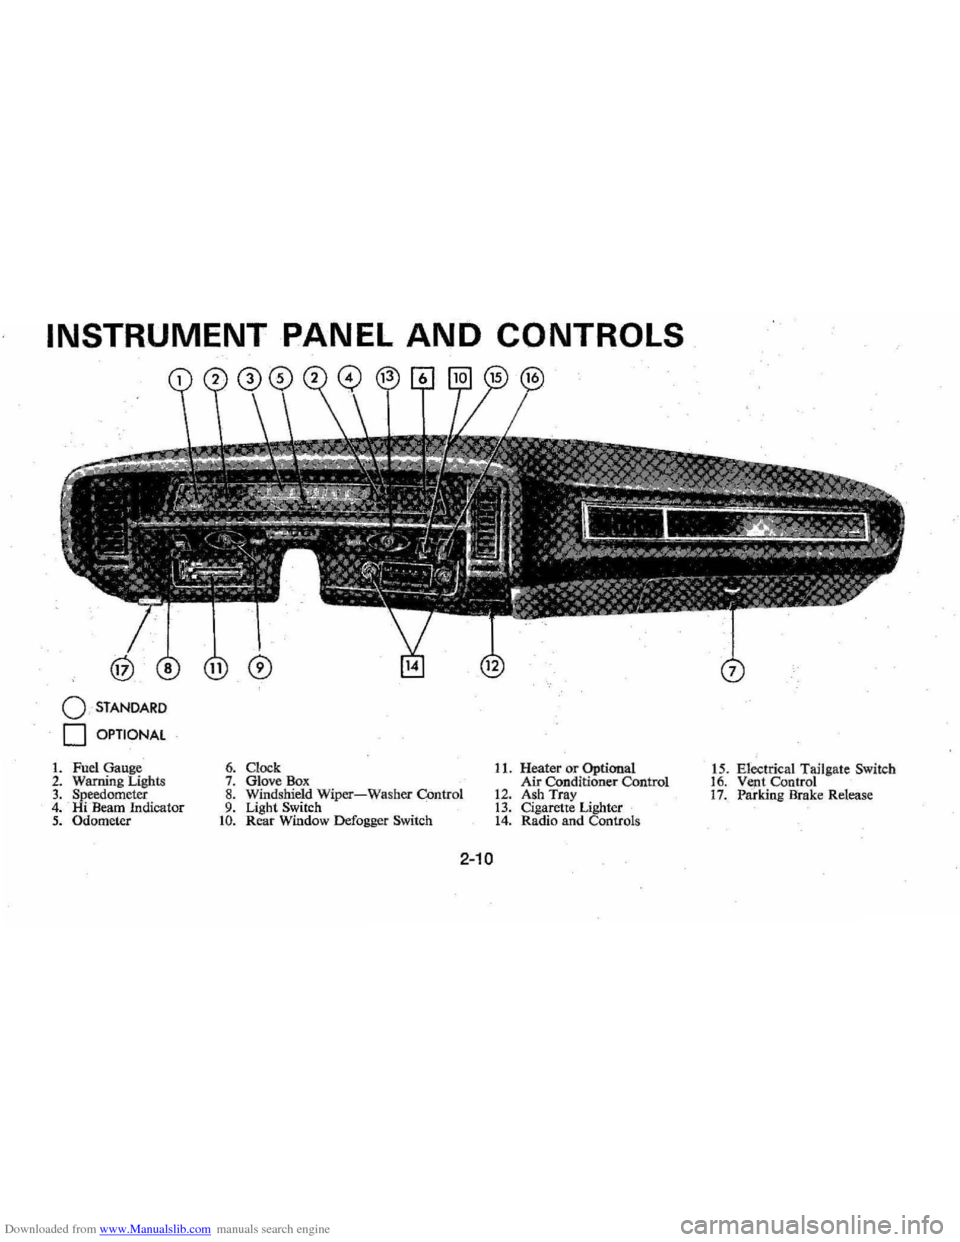
1. Fuel Gauge 2. Warning Lighls 3. Speedometer 4. Hi Beam Indicator 5. Odometer
6. Clock 7. Glove Box 8. Windshield Wiper-Washer COntrol 9. Light Switch to. Rear Window Defogger Switch
11. Heater or Optional
Air Conditioner Control
12. Ash Tray 13. Cigarette Lighter 14. Radio and Controls 1
5 . Electrical Tailgate Switch
16. Vent Control 17. Paridng Brake Release
2-10
Page 29 of 102

Downloaded from www.Manualslib.com manuals search engine I0'ads imp0'sed by .. trlliler hauling.
Cempensatef0'r thes~ l0'wer gauge
readings
resulting frem these heaVy
'Ib ads t0' produce gO'?d fuel ec0'n
emy.
. <,
Engine Temper~'iure. Gauge
This 0'Pti0'n~r',,'gauge indicates
c0'0'lant temperaplre which will
yary with air
teqiperature and 0'P
erating c0'nditi{>,iiS. The ignitien
switch must
be;" 0'n f0'r accurate
,re
the P0'inter to'iim0'vebey0'nd tije
center 0'f the ljimd. Should P0'inter
m0've t0' the line at the "H" end of
the band , stop engine 0'r reduce ,
speed
t0' penllit engine t0' cool.
Headlamp "ON"
Warning Buzzer
The eptienal headlamp reminder
buzzer provides
an audible warn
ing that the main light switch is in
one 0'f the "0'n"P0'siti0'ns ; either
pMking lights Of headlights.
The reminder ,buzzer is actuated
0'nly whenthe igniti0'n switch is
turned
i0' '''OFF'' er "LOCK" posi
ti0'n,
Clock
Reset th~ cl0'ck,if yeur car is S0'
'equipped, by pulling eut the kn0'b
.
and turning the hands cl0'ck\\fise if
slew , c0'unterclockwise if fast. This
will, if the
cl0'ck errer is five min
utes er. m0're,~utematicallyc0'm
pen sate f0'r tim.e' gain 0'r l~g, Sev
eral resettings, sev.eral daysi',apart,
maybe needed te pr0'perl y adjust
the
clOCk mechanism . Have yeur
c
l0'ck cleaned and 'eiled by a cem"
petent .cl0'ck serviceman "at least
every
twe years,
Cigarette Lighter
The cigarette lighter. is I0'cated
en the instrument panel face, T0'
,2-15
operate, push it in, When it be
C0'm.es heated, it aut0'matically P0'PS
eut ready fo r use,
WindshiEild Wiper and
Washer
The windshield wiping system
op(;lratesat tW0' speed s and is de
.
signed t0'wipe clear specific areas
of the windshield under m0'st in
, Clement "''leath
er cenditiens, The
windshielrlwipers w0'rk electri
cally and are not affected ' by en
gineeperatien,
FIlsh . the centrel levetDewn te
start the electric windshie ld wiper,
The
tW0'-speed electric wiper has
botli a' "lew " and a "high" speed
pesitien,
Pressing the centrel will send a
measured
ameunt ef water 0'r ether
cleaning agent ent0' the windshield,
Fill the washer
jar only % full
during the winter
te allew fer eX
pansien if the temperature sh0'uld