1973 CHEVROLET MONTE CARLO instrument panel
[x] Cancel search: instrument panelPage 72 of 86

Downloaded from www.Manualslib.com manuals search engine as a screwdriver handle or pliers. Replace the oir cleaner and attempt to start the engine in the normal manner. (E) If the car will start but stalls when hot or has a rough idle, you can suspect a faulty IDLE ADJUSTMENT, a malfunctioning AUTOMATIC CHOKE or an extremely dirty and blocked AIR CLEANER ELEMENT. Replace paper element air cleaner if necessary. Idle adjustment or automatic choke service (other than that outlined in paragraph 0 above) should be performed by your Chevrolet
Dealer. If the above Fuel System checks and the checks suggested under
the Electrical System following do not correct the malfunction, it is recommended that you turn to your Authorized Chevrolet Dealer
for further checks, adjustments or repairs. ELECTRICAL SYSTEM If when the ignition key is turned to "Start", the engine will not turn' over, yOu have good reason to suspect electrical trouble. NOTE: Never'remove Delcotron bat lead without first disconnecting battery ground cable. IF) When there is no response at all to attempts to start the car,
check the obvious-your AUTOMATIC TRANSMISSION SELECTOR LEVER must be in Neutral or Park position (manual transmission
must have clutch depressed all the way to floor) before the engine
can be starfed. Turning the IGNITION SWITCH rapidly back and forth several times will sometimes correct a poor internal switch
contact.
(GI The BATTERY may be discharged. If so, lights will be dim and the horn will have a poor tone if it will blow at all.
Usually a garage recharge will be necessary to return the battery to operation. Occasionally, however, a long drive will recharge the battery. . , •
NOTE: If the baHery is determined to be dead, and for no apparent reason, have your :Aflthori~ed Chevrolet Dealer check the baHery, the GENERATOR and the VOLTAGE REGULATOR.
GENERATOR trouble shqiJld already have been indicated by
69
the generator indicator light on the instrument panel.
POOR BATTERY CONNECTIONS may be suspected if the car has operated properly a short time before and now not even the horn will operate. Check both ends of both battery cables. If the connections are corroded, a car may sometimes be restored to operation by removing all cable ends, scraping all contacting surfaces
clean with a pen knife, and reassembling. If the cables are broken,
they must be replaced. The power supply should now be restored unless-the battery is dead.
(HI If, however, the lights and horn work properly but the starter will still not turn over, check the STARTER connections. A "click" from the starter solenoid indicates that the wiring to the starter is properly installed. If the wiring seems to be clean and tightly installed, the trouble is probably in the starter itself and should be referred to your Authorized Chevrolet Dealer.
When the engine will "turn over" but will not start, the following
items may be checked along with the Fuel Systems Checks listed previously.
(II With a clean dry cloth wipe the ce-amic portions of the spark plugs dry. In particularly damp or rainy weather dampness may be the cause of not starting, espe
cially when the engine is cold.
(JI Check the cables at the top
of the distributor and coil as well as each spark plug cable for
tightness.
(KI If the car will still not start,
check for spark at the spark plugs in the following manner: Pull one of the spark plug
wires off its spark plug. Insert a
short piece of bare wire (such as Distributor and Coli Cables
Page 73 of 86
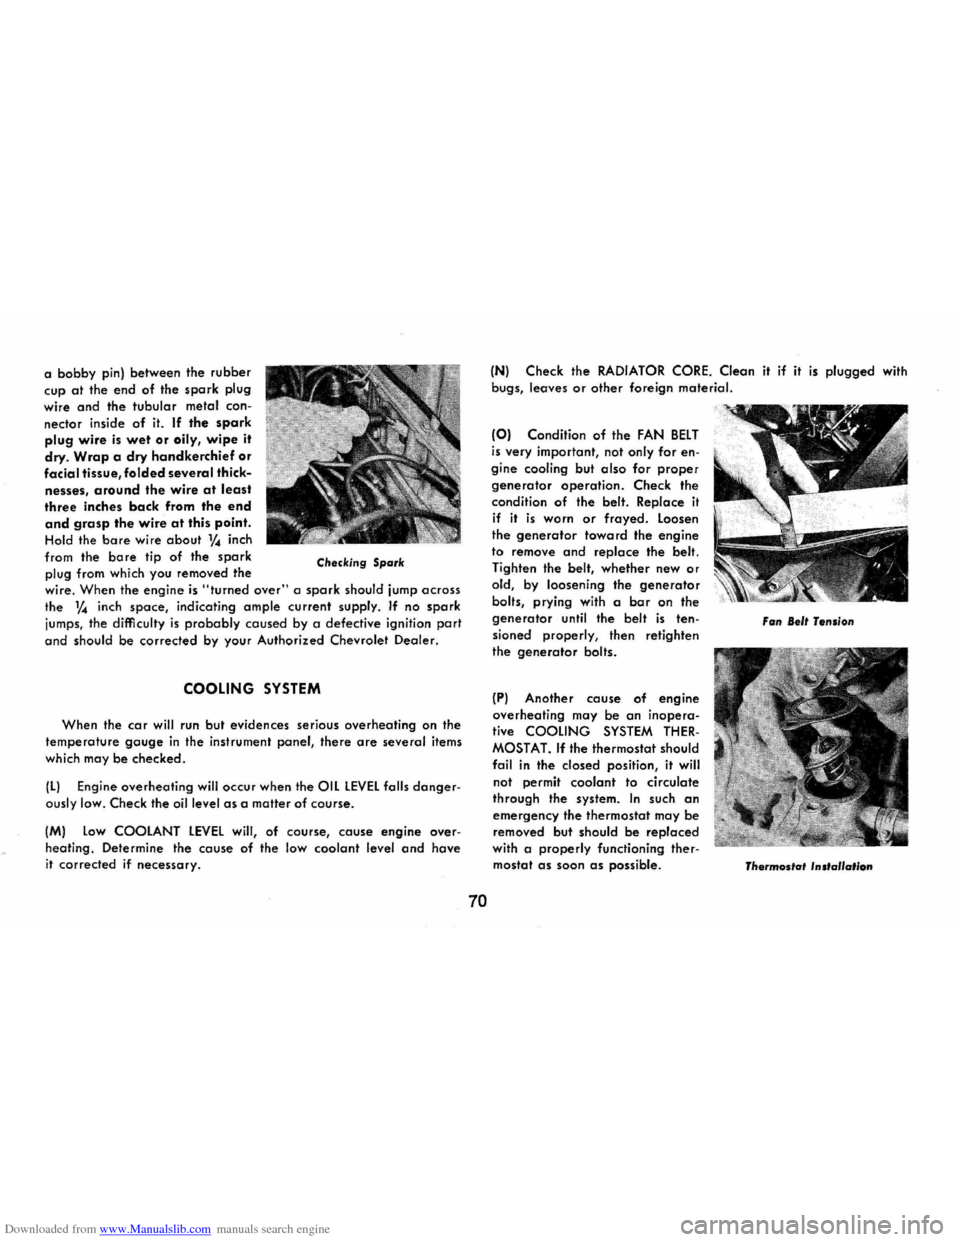
Downloaded from www.Manualslib.com manuals search engine a bobby pin) between the rubber
cup
at the end of the spark plug
wire
and the tubular metal con
nector inside
of it. If the spark plug wire is wet or oily, wipe it
dry.
Wrap a dry handkerchief or
facial tissue, folded several thick
nesses,
around the wire at least
three inches back from the end and grasp the wire at this point.
Hold the bare wire about V4 inch
from the
bore tip of the spark plug from which you removed the Checking Spark
wire. When the engine is "turned over" a spark should jump across
the 1,4 inch space, indicating ample current supply. If no spark
jumps, the difficulty is probably caused by a defective ignition part
and should be corrected by your Authorized Chevrolet Dealer.
COOLING SYSTEM
When the car will run but evidences serious overheating on the
temperature gauge in the instrument panel, there are several items
which may
be checked.
IL) Engine overheating will occur when the OIL LEVEL falls danger
ously low. Check the oil level as a mailer of course.
1M) Low COOLANT LEVEL will, of course, cause engine over
heating . Determine the
cause of the low coolant level and have it corrected if necessary.
70
IN) Check the RADIATOR CORE. Clean it if it is plugged with
bugs, leaves or other foreign material.
(0) Condition of the FAN BELT
is very important, not only for en
gine cooling but
also for proper
generator operation. Check the
condition of the belt. Replace it
if it is worn or frayed. Loosen
the generator toward the engine
to remove
and replace the belt.
Tighten the belt, whether new or
old, by loosening the generator
bolts, prying with a bar on the
generator until the belt is ten
sioned properly , then retighten
the
generator bolts.
(P) Another couse of engine
overheating may be
an inopera
tive
COOLING SYSTEM THER
MOSTAT. If the thermostat should
foil in the dosed position, it will
not permit
coolant to circulate
through the system. In such an
emergency the thermostat may be
removed but should be
replaced with a properly functioning ther
mostat as soon as possible.
Fan Belt Tension
Thermostat
'ns'alla"on
Page 74 of 86
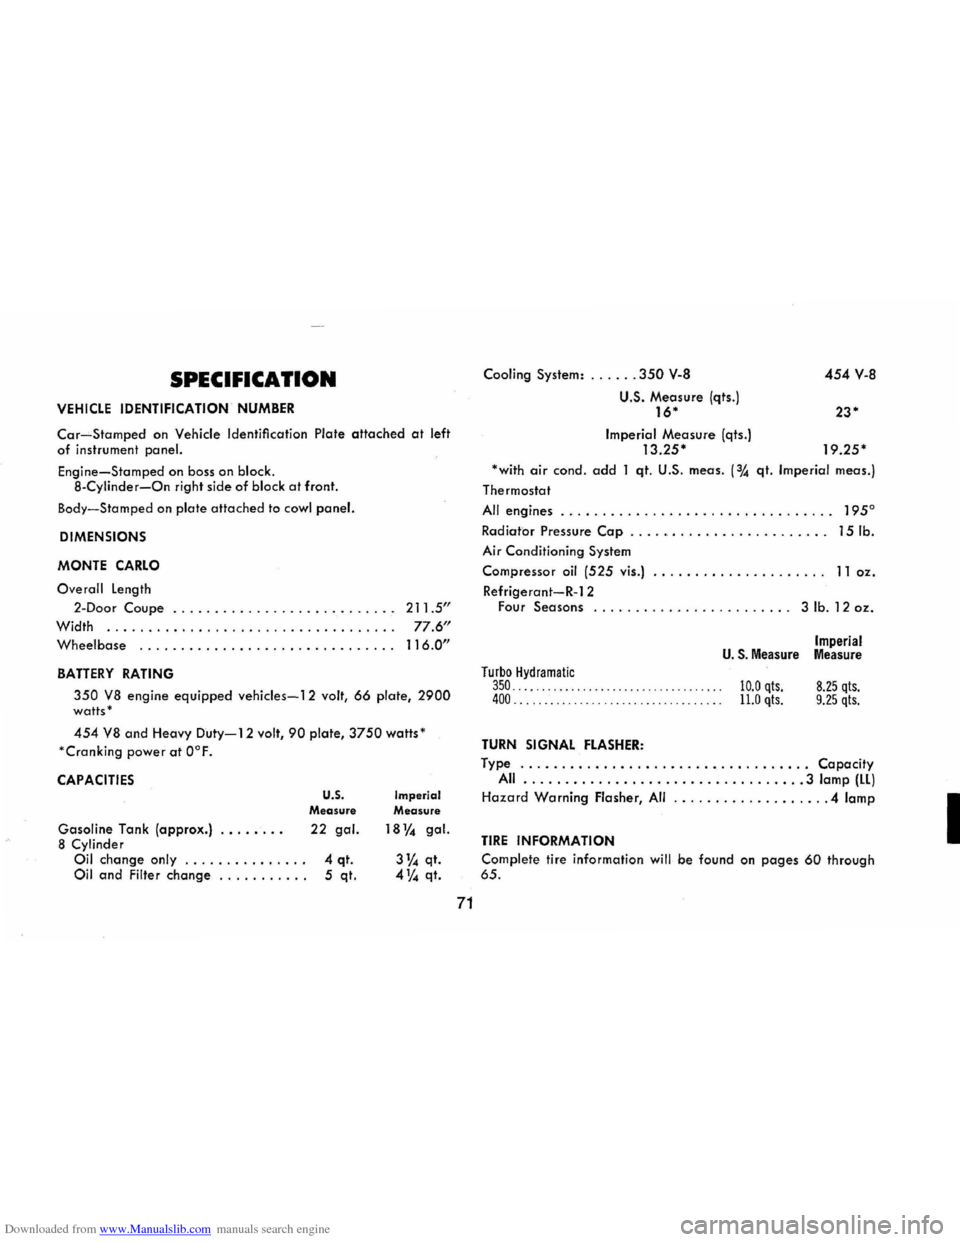
Downloaded from www.Manualslib.com manuals search engine SPECIFICATION
VEHICLE IDENTIFICATION NUMBER
Car-Stamped on Vehicle Identification Plate attached at left of instrument panel.
Engine-Stamped on boss on block .
8 -Cylinder-On right side of block at front.
Body-S tamped o n plate attached to cowl panel.
DIMENSIONS
MONTE
CARLO
O ve rall length
2-Door Coupe ...
.. . . . . . . . . . . . . . . . . . . . . . . 211.5"
Width ... ......... ......... ............ . . 77.6"
Wheelbase ............................... 116.0"
BATTERY RATING
350 VB engine equipped vehicles-12 volt, 66 plate, 2900 watts '
454 VB and Heavy Duty-12 volt, 90 plate, 3750 watts'
' Cranking
powe r at O°F.
CAPACITIES
Gasoline Tank (approx.) ....... . B Cylinder
Oil change only ... ... .... .... . Oil and Filter change .......... .
U.S. Measure
22 gal.
4 qt. 5 qt.
Imperial Measure
18% gal.
3% qt. 4% qt.
71
Cooling System: ...... 350 v-a
u.s. Measure (qts.) 16*
Imperial Measure (qts.) 13.25*
454 v-a
23*
19.25*
'with air cond o add 1 qt. U.S. meas. (% qt. Imperial meas.)
Thermostat
All engines . . . . . . . . . . . . . . . . . . . . . . . . . . . . . . . .. 195°
Radiator Pressure Cap . . . . . . . . . . . . . . . . . . . . . . .. 15 lb.
Air Condit ioning System
Compressor oil (525 vis .) .............. ... .... 11 oz.
Refrigerant-R-12 Four Seasons ........................ 3 lb. 12 oz.
Turbo Hydramatic 350 ........... .......... .. ... ........ . . 400 .. ................... .. ... .... .. .. .
TURN SIGNAL FLASHER:
Imperial U. S. Measure Measure
10.0 qts. 11.0 qts. 8.25 qts. 9.25 qts.
Type ................................... Capacity All ..... ..... ........................ 3 lamp (ll)
Hazard Warning Flasher, All .. , ............... . 4 lamp
TIRE INFORMATION
Complete
tire information will be found on pages 60 through 65.
I
Page 75 of 86
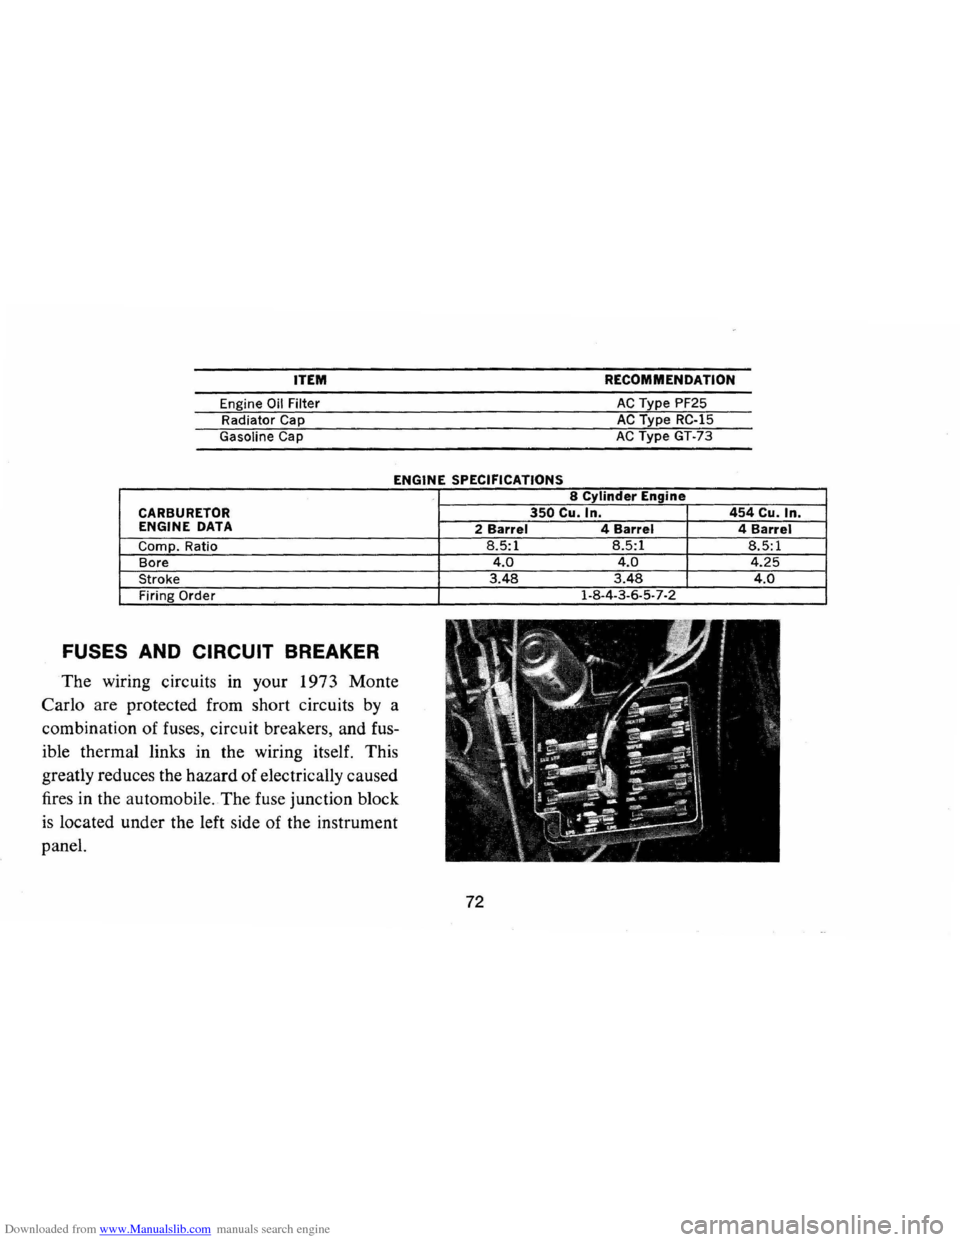
Downloaded from www.Manualslib.com manuals search engine ITEM RECOMMENDATION
Engine Oil Filter AC Type PF25
Radiator
Cap AC Type RC-15
Gasoline Cap AC Type GT-73
ENGINE SPECIFICATIONS
CARBURETOR ENGINE DATA
Compo Ratio
Bore
Stroke
Firing
Order
FUSES AND CIRCUIT BREAKER
The wiring circuits in your 1973 Monte
Carlo are protected from short circuits by a
combination of fuses, circuit breakers, and fus
ible thermal links in the wiring itself. This
greatly reduces the hazard of electrically caused
fires in the automobile .
The fuse junction block
is located under the left side of the instrument
paneL
2 Barrel 8.5:1 4 .0
3.48
72
8 Cylinder Engine
350 Cu. In. 454 Cu. In. 4 Barrel
4 Barrel
8.5:1 8.5:1 4.0 4.25 3.48 4.0 1-8-4-3-6-5-7-2
Page 76 of 86
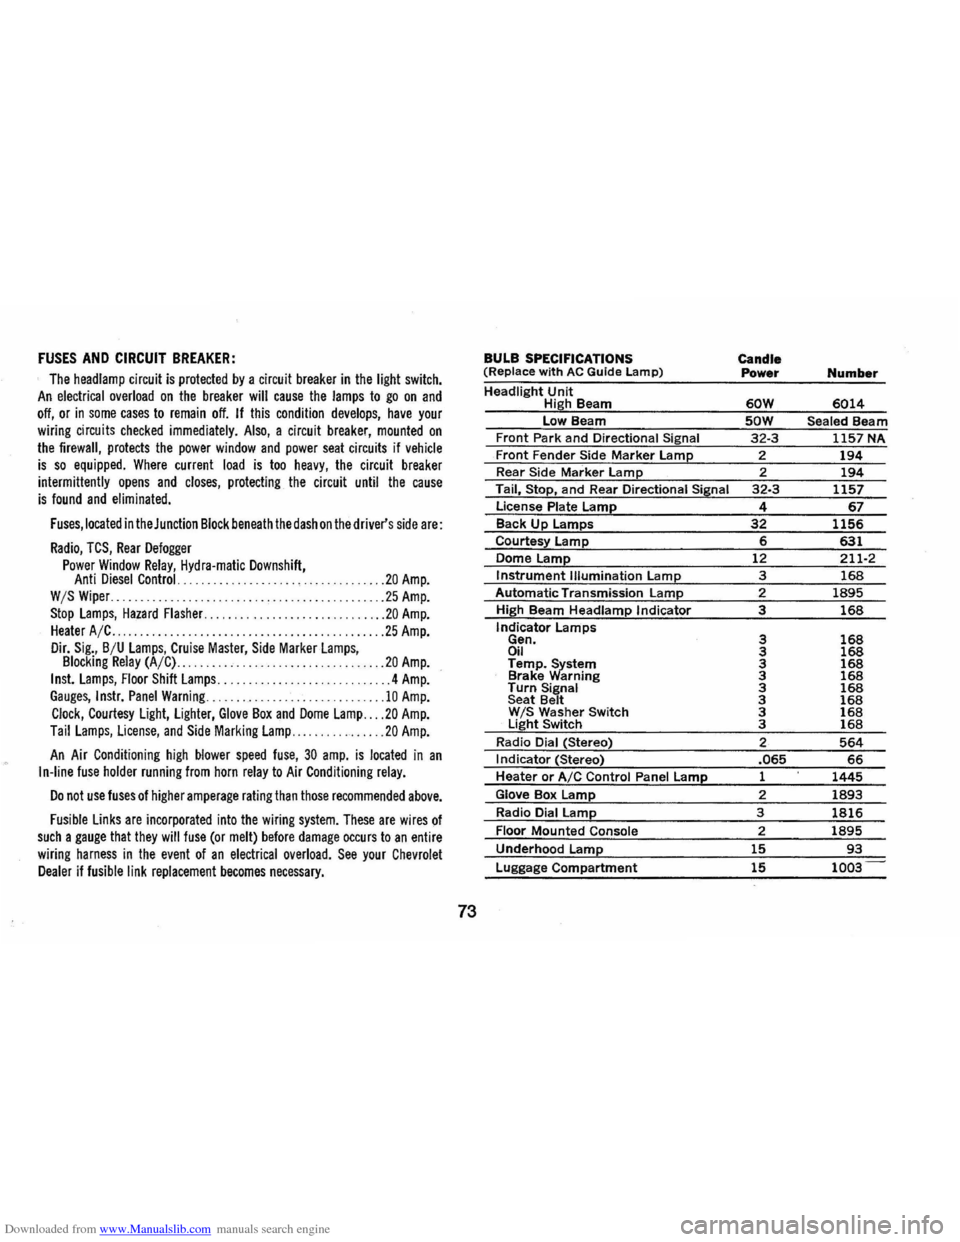
Downloaded from www.Manualslib.com manuals search engine FUSES AND CIRCUIT BREAKER:
The headlamp circuit is protected by a circuit breaker in the light switch. An electrical overload on the breaker will cause the lamps to go on and
off, or in some cases to remain off. If this condition develops, have your
wiring circuits checked immediately. Also, a circuit breaker, mounted on the firewall, protects the power window and power seat circuits if vehicle is so equipped. Where current load is too heavy, the circuit breaker
intermittently opens and closes, protecting the circuit until the cause is found and eliminated.
Fuses, located in the Junction Block beneath the dash on the driver's side are:
Radio, TCS, Rear Defogger
Power Window Relay, Hydra-matic Downshift, Anti Diesel Control. .... .. ................ ... ... .... .. 20 Amp. W /S Wiper. ... .......................................... 25 Amp.
Stop Lamps, Hazard Flasher .............................. 20 Amp. Heater A/C . . . . . . . . . .. . ..... ............................ 25 Amp.
Dir. Sig., B /U Lamps, Cruise Master, Side MarkerLamps, Blocking Relay (A/C) ............... .. .. .............. .. 20 Amp.
Inst. Lamps, Floor Shift Lamps ....... .... .. .... ............ 4 Amp. Gauges, Instr. Panel Warning .............................. 10 Amp.
Clock, Courtesy Light, Lighter, Glove Box and Dome Lamp ... . 20 Amp.
Tail Lamps, License, and Side Marking Lamp .............. .. 20 Amp.
An Air Conditioning high blower speed fuse, 30 amp. is located in an I n-line fuse holder running from horn relay to Air Conditioning relay.
Do not use fuses of higher amperage rating than those recommended above.
Fusible Links are incorporated into the wiring system. These are wires of such a gauge that they will fuse (or melt) before damage occurs to an entire
wiring harness in the event of an electrical overload. See your Chevrolet Dealer if fusible link replacement becomes necessary.
73
BULB SPECIFICATIONS
(Replace w ith AC Guide Lamp)
Headlight Unit High Beam
low Beam Front Park and Directional Signal
Front Fender Side Marker lamp Rear Side Marker lamp
Tail, Stop, and Rear Directional Siinal
License Plate Lame Back Up lamps
Courtes~ lamp
Dome Lame Instrument Illumination lamp
Automatic Transmission Lamp
High Beam Headlamp Indicator
Indicator
lamps Gen. Oil Temp.~stem Brake arning Turn Signal
Seat Belt W IS Washer Switch light Switch
Radio Dial (Stereo)
I ndicator (Stereo)
Heater or AIC Control Panel lame
Glove Box lamp
Radio Dial lamp
Floor Mounted Console
Underhood lame
Luggage Compartment
Candle
Power Number
60W 6014
SOW Sealed Beam 32-3 1157 NA
2
194 2 194 32-3 1157
4 67 32 1156 6 631 12 211-2
3 168 2 1895
3 168
3 168 3 168 3 168 3 168 3 168 3 168 3 168 3 168
2 564 .065 66 1 1445
2 1893
3 1816
2 1895
15 93
15 1003
Page 78 of 86
Downloaded from www.Manualslib.com manuals search engine the following information pro
vided:
• Your name, address, telephone
number
• Vehicle Identification number*
• Dealer's name and location
• Vehicle's delivery date and
mileage
• Nature of problem
STEP THREE -Contact the
Customer Services Manager,
Chevrolet Central Office, Chev
rolet Motor Division, Detroit, Michigan
48202 (313-556-5219)
(or in Canada contact the
Owner Relations
Supervisor,
General Motors of Canada
Limited, Oshawa, Ontario 416-
644-6624).
If after an additional
review of all facts involved he feels
that some further action can be
taken, he will so instruct the Zone.
In any case, your letter will be
acknowledged providing Chevro
let's position in the matter.
When contacting the Zone
or
Central Office, please bear in mind that
ultimately your problem likely
will be resolved in the dealership,
utilizing the dealer's facilities,
equipment and personnel. It is sug
gested, therefore, that you follow
the above steps in sequence when
pursuing a problem.
Your purchase of a Chevrolet
product
is greatly appreciated by
both your dealer and Chevrolet
Motor Division. It
is our sincere
desire to assist you in any way pos
sible to assure your complete sati
s
faction with your vehicle.
* A vaiIable from vehicle registration , title
or plate attached to left top of instrument panel and visible through
the windshield.
75
Page 83 of 86
Downloaded from www.Manualslib.com manuals search engine Gasoline (See Also Fuel) Do Not Use For Cleaning ........... 46 Filler Cap Location. .. .. .. . . . .. .. ... 51 Gauge ............................. 25 Low-Lead .......................... 50 Recommendations. . . . . . . . . . . . . . . . .. 50 Gauge, Fuel.. . . . . . . . . . . . . . . . . . . . . . . .. 26 Gearshift Lever. . . . . . . . . . . . . . . . . . . . . .. 18 Generator Indicator Light ("AMP") .......................... 27 Glove Box. . . . . . . . . . . . . . . . . . . . . . . . . .. 25 Harness, Safety (See Seat Belts)
Hazard Warning Flasher. .............. 41 Headlamp
Flickering (Circuit Breaker). . . . . . . . .. 73 High Beam Dimmer Switch .......... 24 High Beam Indicator ........... ; . . .. 28 Light and Instrument Panel
Switch ........................... 28 Head Restraints . . . . . . . . . . . . . . . . . . . . .. 10 Heater Operation. . . . . . . . . . . . . . . . . . . .. 34 High Speed Operation
During Break-In.. .... .. .. .. .... .... 2
Tires .............................. 60 Hitches, Trailer... . . . . . . . . . . . . . . . . . . .. II
Hood Latch Maintenance
.................. 56 Release .............. Inside Back Cover
Horn ................................ 22 "HOT" Light (See Engine
Temperature Light)
Hub Caps, Replacing.. . . . . . . . . . . . . . . .. 43 Hydroplaning. . . . . . . . . . . . . . . . . . . . . . .. 65 Identification Numbers
Body ........................... : .. 71 Engine ............................ 71 Vehicle ............................ 71
Ignition Keys.................. ............ 3
Lock ..... ......................... 15 In Case Of Emergency. . . . . . . . . . . . . . . .. 41 Indicator Lights
Brake ................ ............. 27 Electrical Charging (Generator) ....... 27 Engine Temperature. . . . . . . . . . . . . . . .. 27 Fuel .............................. 26 Oil Pressure. . . . . . . . . . . . . . . . . . . . . . .. 26 Infant Restraining Methods. . . . . . . . . . .. 10 Infant Safety Carrier. . . . . . . . . . . . . . . . .. 10 Inflation Pressure, Tires. . . . . . . . . . . . . . .. 60 InIets, Ventilation System .............. 32 Inside Rearview Mirror. . . . . . . . . . . . . . . . 6
Instrument Panel. . . . . . . . . . . . . . . . . . . .. 25 Interior Appearance Care .............. 47 Jack
Operation .......................... 44 Storage .............. ............. , 44 Jump Starting With Booster Battery. . . .. 43 Key Buzzer System ....... , ............ 15 Keys................................ 3
Knocking Engine (See Fuel)
(Recommendations)
Lacquer, Acrylic Care .
................ 49 Lane Changer and Turn Signal. . . . . . . .. 20 Lap and Shoulder Belts... . . . . . . . . . . . . . 6
Latches
Door............. ................. 4
Folding Seat Back. . . . . . . . . . . . . . . . .. 4
Hood ................. ............ 56 Lighter, Cigarette ......... ............ 31 Lights ...................... , ........ 73 Backup ............................ 73 Brake Warning . . . . . . . . . . . . . . . . . . . .. 27 Bright Beam Indicator ............... 28
80
Bright Beam Switch .............. , .. 24 Bulb Chart. . . . . . . . . . . . . . . . . . . . . . . .. 73 Courtesy. . . . . . . . . . . . . . . . . . . . . . . . . .. 73 Engine Temperature Indicator. . . . . . .. 27 Generator Indicator. . . . . . . . . . . . . . . .. 27 Hazard Flasher. . . . . . . . . . . . . . . . . . . .. 41 Headlamp Circuit Breaker. . . . . . . . . .. 73 Headlamps. . . . . . . . . . . . . . . . . . . . . . . .. 28 Maintenance . . . . . . . . . . . . . . . . . . . . . .. 73 Oil Pressure Indicator. . . . . . . . . . . . . .. 26 Sidemarker. . . . . . . . . . . . . . . . . . . . . . .. 73 Switch ............................. 28 Tail and Brake. . . . . . . . . . . . . . . . . . . .. 73 Turn Signal Indicator. . . . . . . . . . . . . .. 20 Turn Signals. . . . . . . . . . . . . . . . . . . . . .. 20 Linings, Brake ..................... 24, 56 Liquid Tire Chain .................... 41 Load, Full Rated (See Tires)
Locks
Door......................... .. ... 4
Glove Box....... .................. 4
Ignition. . . . . . . . . . . . . . . . . . . . . . . . . .. 15 Steering Column .................... 15 Low-Lead Fuels ...................... 51 "Low" (L) Transmission Range ........ 18 Lubrication Oils ............................... 51 Recommendations. . . . . . . . . . . . . . . . .. 51 Luggage Compartment, Driving
While Open ........................ 15 Luggage Or Cargo Caution. . . . . . . . . . .. 15 Maintenance
Appearance Care. . . . . . . . . . . . . . . . . .. 46 Schedule. . . . . . . . . . . . . . . . . . . . . . . . . .. 50 Manual Transmission ................. 19 Master Cylinder, Brake. . . . . . . . . . . . . . .. 56 Metal Cleaners. . . . . . . . . . . . . . . . . . . . . .. 49 Methods Of Restraining Children ....... 10