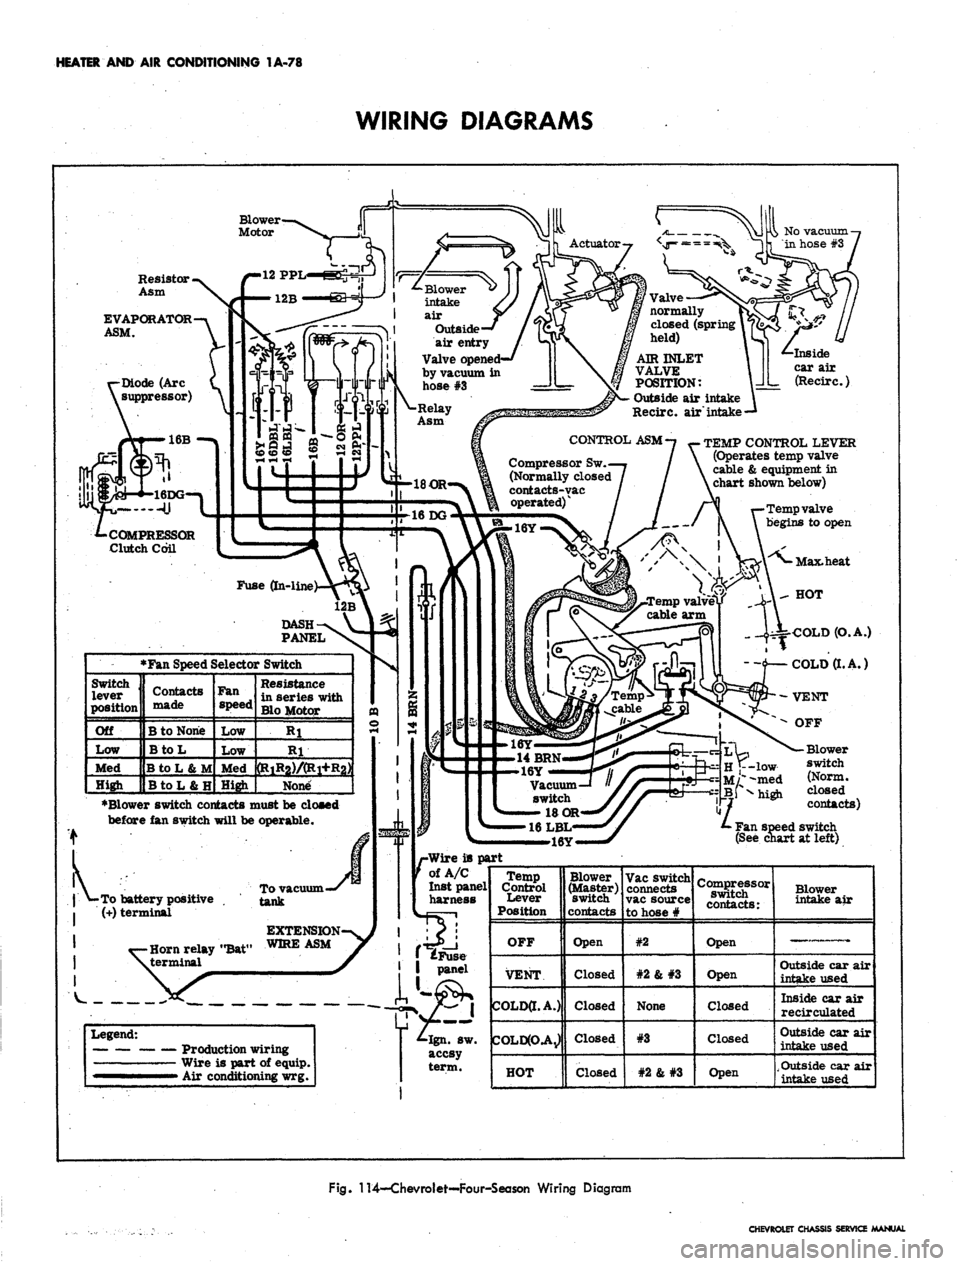
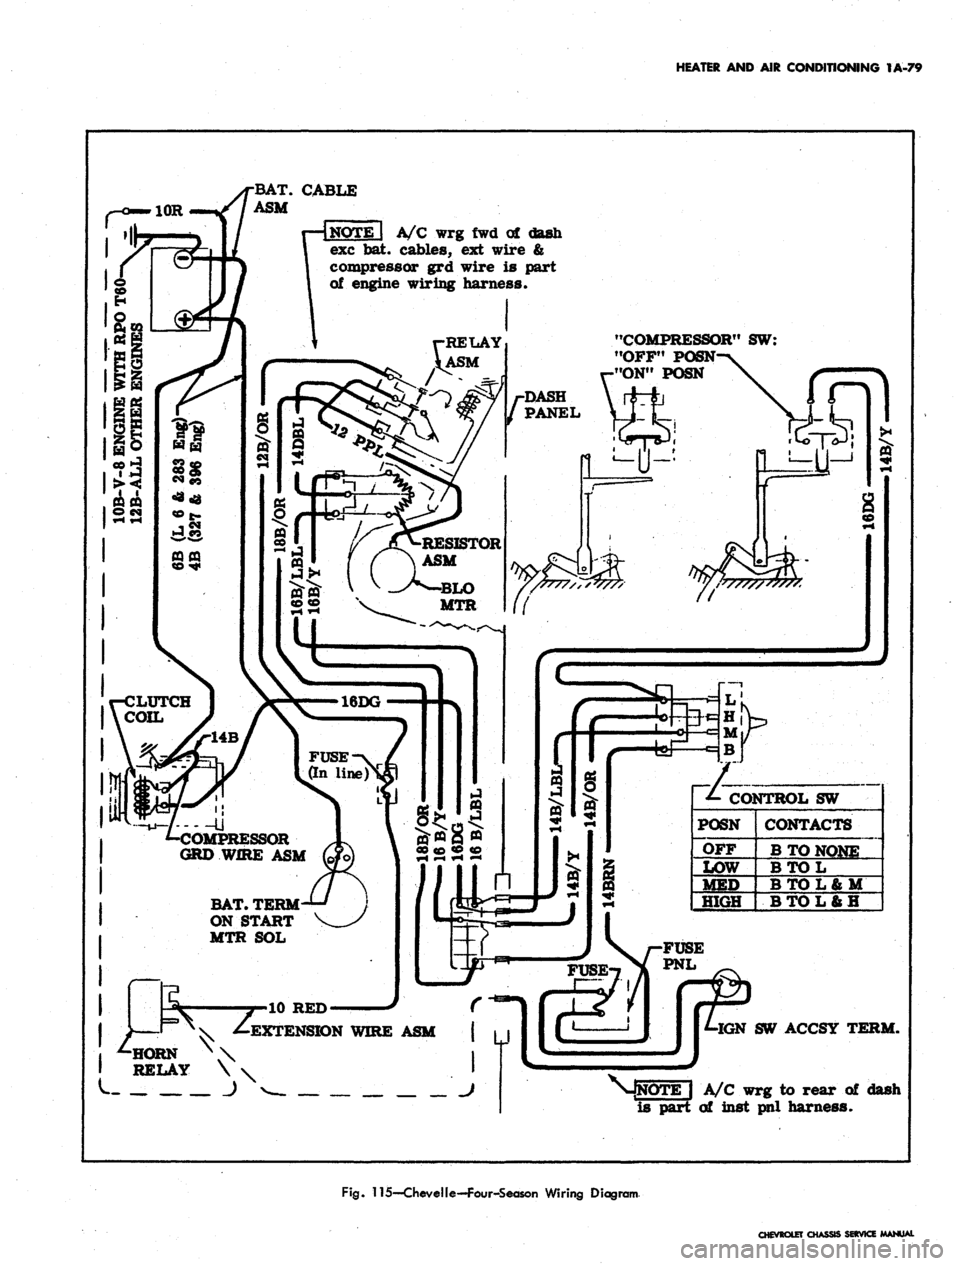
1967 CHEVROLET CAMARO wiring diagram
[x] Cancel search: wiring diagramPage 36 of 659

HEATER
AND AIR
CONDITIONING
1A-13
AIR CONDITIONING
INDEX
Page
General Description
1A-13
Four-Season System
1A-13
Controls
1A-16
Comfortron System
. 1A-18
System Components
lA-19
Controls
1A-20
Universal System
. .
1A-21
Chevy
n
All-Weather System
•
1A-21
Corvette Four-Season System
. 1A-22
General Information
. . . 1A-26
Precautions
in
Handling R-12
1A-26
Precautions
in
Handling Refrigerant Lines
1A-28
Maintaining Chemical Stability
in the
Refrigeration System
1A-28
Gauge
Set 1A-29
Charging Station
IA-29
Leak Testing
the
System
1A-29
Vacuum Pump
1A-30
Availability
of
Refrigerant-12
. . 1A-30
Compressor
Oil 1A-31
Compressor Serial Number
1A-31
Inspection
and
Periodic Service
1A-31
Pre-Delivery Inspection
1A-31
6,000 Mile Inspection
1A-32
Periodic Service
, 1A-32
Installing Gauge
Set to
Check System Operation
....
1A-32
Performance Test
1A-32
Performance Data lA-r33
Comfortron System Operational Test
1A-33
Chevrolet Comfortron Tester
1A-34
Complete System Checks
1A-35
Maintenance
and
Adjustments ......
1A-37
Evaporator Comtrol Valve (POA)
.
1A-37
Page
Thermostatic Switch
1A-37
Expansion Valve
1A-41
Engine Idle Compensator
. . .
1A-42
Evacuating
and
Charging Procedures
1A-42
Purging
the
System
1A-42
Evacuating
and
Charging
the
System
1A-43
Checking
Oil . 1A-43
Component Replacement
and
Minor Repair
1A-45
Refrigerant Line Connections
1A-45
Repair
of
Refrigerant Leaks
1A-46
Preparing System
for
Replacement
of
Component Parts
. 1A-46
Foreign Material
in the
System
.
1A-47
Condenser
.
1A-48
Receiver-Dehydrator
1A-48
Evaporator
1A-49
Expansion Valve
1A-57
Evaporator Control Valve (POA)
1A-59
Thermostatic Switch
or
Blower Switch
. .
1A-59
All Weather-Pull Cable
1A-61
Blower Assembly
1A-62
Air Inlet Valve
.
1A-64
Blower
and
Evaporator Assembly
1A-64
Air Distributor Assembly
and
Outlet Ducts ...... 1A-64
Comfortron Automatic Control Components
1A-66
Collision Procedure lA-70
Four-Season Heater Components
1A-73
Comfortron Heater Components
. . . 1A-75
Compressor
1A-76
Wiring Diagrams
1A-78
Special Tools
.
1A-84
GENERAL DESCRIPTION
Four
air
conditioning systems
are
covered
in
this
section. They are:
1.
The
Four-Season System (Chevrolet, Chevelle,
Camaro and Corvette).
2.
The Comfortron System (Chevrolet).
3.
The All Weather System (Chevy n).
4.
The Universal System (Chevrolet, Chevelle, Chevy
n,
Camaro)
Underhood components (that
is, the
compressor,
con-
denser
and
receiver-dehydrator)
are
much
the
same
in
type,
location
and
method
of
attachment
on all of
the
above systems. The six-cylinder reciprocating compres-
sor
is
bracket-mounted
to the
engine
and
belt driven
from
the
crankshaft pulley.
The
condenser
is
mounted
ahead
of the
engine cooling radiator
and the
receiver-
dehydrator
is
mounted
in
the refrigerant line downstream
of
the
condenser.
All
cooling system components
are
connected by means
of
flexible refrigerant lines.
Evaporator size
and
location differ from system
to
system
as do
methods
of
temperature control
and air
supply
and
distribution.
FOUR-SEASON SYSTEM
The Four-Season system used
in the
Chevrolet,
Chevelle, Camaro,
and
Corvette vehicles
may be
iden-
tified
by the
fact that
it
uses
an
evaporator pressure
control known
as the POA
(Pressure Operated Absolute)
suction throttling valve.
Both
the
heating
and
cooling functions
are
performed
by this system.
Air
entering
the
vehicle must pass
through
the
cooling unit (evaporator)
and
through
(or
around)
the
heating unit,
in
that order, and the system
is
thus referred to
as a
''reheat" system.
The evaporator provides maximum cooling
of the air
passing through
the
core when
the air
conditioning sys-
tem
is
calling
for
cooling.
The
control valve acts in the
system only
to
control
the
evaporator pressure
so
that
minimum possible temperature
is
achieved without core
freeze-up.
The
valve
is
preset,
has no
manual con-
trol,
is
automatically altitude compensated,
and non-
repairable.
The heater core will be hot
at
all times since no water
valve
is
present
in
the system.
System operation
is as
follows (See Figure 24 and 25):
Air, either outside
air or
recirculated
air
enters
the
system
and is
forced through
the
system by the blower.
As
the air
passes through
the
evaporator core,
it
receives maximum cooling
if
the
air
conditioning controls
are calling
for
cooling. After leaving
the
evaporator,
the
air
enters
the
Heater
and Air
Conditioner Selector
Duct Assembly where,
by
means
of
manually operated
diverter doors,
it is
caused
to
pass through
or to
bypass
the heater core
in the
proportions necessary
to
provide
the desired outlet temperature. Conditioned airflow then
enters
the
vehicle through either
the
floor distributor
duct
or the
dash outlets. Remember that the heater core
CHEVROLET CHASSIS SERVICE MANUAL
Page 59 of 659

HEATER AND AIR CONDITIONING 1A-36
(These tests should be performed with the engine at operating temperature.)
SYSTEM CHECKS
Control
Head
Setting
High
Front
Lo
Front
Lo
Front
Hi
Front
Hi
Front
Tester Settings
Function
Manual
Manual
Manual
Manual
De-ice
65° on
Temp.
Dial
Hi
Front
Hi
Front
Hi
Front
Auto-
Matic
1 1
Auto-
matic
Manual
Manual
Manual
Control
Max.
Heat
Rotate
from
Max.
Heat to
Max.
Cold
150
Max.
Cold
Max.
Cold
Max.
Cold
Max.
Heat
Max.
Heat
Max.
Cold
Voltage
Trans-
ducer
Trans-
ducer
Ampli-
fier
Trans-
ducer
Probe
Probe
Trans-
ducer
Trans.
Tester Should
Indicate:
High Blower
Maximum Heat
Reduced Blower
Speed
Complete series of
blower changes from
Hi to Lo to Hi
again.
AMPLIFIE:
Remove conn, from c
Voltage reading she
Short this lead to grc
Voltage reading she
No voltage change in<
COMPRESSOR C
Cooling System
Operation
DE-ICE i
Assuming rest of
system is operating
normally: Max. Heat
1
to windshield.
SENSOR STR
•—
TRAtfSDtfC
0-3"
Vac. Reading
8 Volts Min.
9"
Min.
Vac.
Reading
0-4 Voltage Reading
If not, check
the following:
Fuse in Slock
In Line Fuse
High Blower
Delay Relay
Duct Delay
Thermistor
High Blower
Delay Sensor
Power Servo
Blower Switch
Resistor
Blower Motor
Wiring Harness
Blower Switch
Master Delay
Thermistor
Master Delay
Relay
Resistor
Power Servo
Blower Motor
CHECK
Resistor
I CHECK
Electrical Diagram
Probe Points:
1-2
8-9
10-21
20
18
19
*
9-46
-r
^2-3
15
16
Checked during
above procedure.
(This is a com-
plete step-by-step
high blower circuit
check which also
checks wiring
harness.)
4
5
6
L2-13
L4
""§2-15
39-46
1
16 1
14
22-40-42-44-15
.ontrol head temperature dial.
>uld be 9 volts minimum,
jund.
>uld be 0 volts,
iicates malfunctioning of amplifier.
JUTCJH CHUCK
Compressor Clutch
(Grille Temp, must
be above 40°.)
IRCUIT
Blower Switch
Master Delay
Relay
Transd
NGCl
ucer
Sensor String
2R CHECK
Transducer voltage
&t Max. Cold
position)
Transducer Ground
Hi Blower Outside
air (air door closed
to car body). Hot air
from heater outlets.
Hi Blower Recirc.
Air (air door open
to car body) cold air
from A/C outlets.
24-25-26-27-28
Voltmete
should re
ad
Battery Voltage
Battery Voltage
Battery Voltage
. Vtinimum
6
volts
Battery Voltage
Minimum
6
volts
Battery Vo]
Batterv Vo]
Ltage
Ltage
Battery Voltage
Batterv Voltage
3a
Bai
:terv Vo
tterv Vo
tage
tage
Minimum
6
volts
Batterv Voltage
Minimum
6
volts
Battery Voltage
Minimum
8
volts
Minimum 8 volts
Minimum 8 volts
Batterv Voltage
Minimum 8 volts
1 III • II »ll. —..• —•— . !!•• 1
Battery Voltage
3-23
20-10-21
38
29-30-31-32-33-
34-35-36
37-38
Defective Power Servo; Leak in Vacuum
System; Temp.; Door Link Disconnected
or Jammed; Defective Vacuum Relay
Valve
Defective Mode Door Diaphragm
Batterv Voltage
Battery Voltage
Zero Voltage
Battery Voltage
Battery Voltage
CHEVROLET CHASSIS SERVICE MANUAL
Page 61 of 659

HEATER AND AIR CONDITIONING 1A-38
HIGH BLOWER
DELAY RELAY
O) MASTER AND
HIGH BLOWER
DELAY RELAY
GROUND
Fig.
49A-Comfortron Wiring Diagram-Underhood
CHEVROLET CHASSIS SERVICE AAANUAL
Page 62 of 659

HEATER AND AIR CONDITIONING 1A-39
BROWN
BROWN
LT.
GREEN
BROWN
DK. GREEN
CONTROL
SWITCH
N-CAR
SENSOR
"—ORANGE—(36
[y—LT. GREEN
*)WWWW 55|—jg
TRANSDUCER
POWER SERVO
HIGH BLOWER MASTER FEEDBACK
DELAY DELAY POTENTIOMETER
THERMISTER THERMISTER
Fig.
49B-Comforrron Wiring Diagram-Underdash
CHEVROLET CHASSIS SERVICE AAANUAL
Page 101 of 659

HEATER AND AIR CONDITIONING 1A-78
WIRING DIAGRAMS
Blower
Motor
Resistor
•
Asm
EVAPORATOR—v
ASM.
\
-Diode
(Arc I
suppressor)
^\
16B
—>
-COMPRESSOR
Clutch Coil
•To battery positive
(+) terminal
No vacuum
in hose
#3
Blower
intake
air
Outside
air entry
Valve
by vacuum
in
hose
#3
Valve
normally
closed (spring
held)
Inside
car
air
(Recirc.)
AIR INLET
VALVE
POSITION:
Outside
air
intake
Recirc. air'intake
CONTROL ASM
TEMP CONTROL LEVER
(Operates temp valve
cable
&
equipment
in
chart shown below)
Compressor
Sw.
(Normally closed
Temp valve
begins
to
open
valveV
cable
arm
•Fan Speed Selector Switch
Switch
lever
position
Off
Low
Med
High
Contacts
made
B
to
None
BtoL
B to L
&
M
B to
L
& H
Fan
speed
Low
Low
Med
High
Resistance
in series with
Bio Motor
Hi
Rl
(RiR2)/(Rl+R2)
None
•Blower switch contacts must
be
dosed
before
fan
switch will
be
operable.
COLD
(O.
A.)
COLD a.A.)
Blower
H
y—low
switch
M/
-med
(Norm,
closed
contacts)
Fan speed switch
(See chart
at
left)
To vacuum,
tank
EXTENSION—vy
Horn relay "Bat" WIRE
ASM
X
harness
terminal
V
.**-__.. ;_
1 I panel
Legend:
___. —
Production wiring
Wire
is
part
of
equip.
•—————* Air
conditioning
wrg.
| i
T Agn. sw.
accsy
I term.
I
Temp
Control
Lever
Position
OFF
VENT.
COLD(I.A.)
COLEKO.AJ
HOT
Blower
(Master)
switch
contacts
Open
Closed
Closed
Closed
Closed
Vac switch
connects
vac source
to hose
#
#2
#2
&
#3
None
#3
#2
&
#3
Compressor
switch
contacts:
Open
Open
Closed
Closed
Open
Blower
intake
air
Outside
car air
intake used
Inside
car air
recirculated
Outside
car air
intake used
.Outside
car air
intake used
Fig. 114—Chevrolet—Four-Season Wiring Diagram
CHEVROLET CHASSIS SERVICE MANUAL
Page 102 of 659

HEATER
AND AIR CONDITIONING IA-79
BAT.
CABLE
ASM
A/C
wrg fwd of
dash
exc
bat.
cables,
ext
wire
&
compressor
grd
wire
is
part
of engine wiring harness.
"COMPRESSOR"
SW:
"OFF" POSN
"ON"
POSN
RELAY
ASM
/-DASH
/
PANEL
RESISTOR
ASM
LUTCH
COIL
:OMI
GRD
WIRE
ASM
MPRESSOR
BAT.
TERM
ON START
MTR SOL
EXTENSION WIRE ASM
._
J
J
^-CONTROL
SW
CONTACTS
B TO NONE
BTOL
BTOL&M
BTOL6H
•IGN SW ACCSY TERM.
A/C wrg
to
rear
of
dash
of
inst pnl harness.
Fig.
115—CheveIle—Four-Season Wiring Diagram
CHEVROLET
CHASSIS SERVICE MANUAL
Page 103 of 659

HEATER
AND AIR
CONDITIONING
1A-80
EVAPORATOR ASM.
Blower
Motor
INSIDE VALVE
(Normally closed
-spring held)
PLENUM VALVE
(Normally open
-spring held)
Actuator
(Vacuum
operated)
Inside car air (Recirc*
CONTROL ASM
TEMP CONTROL LEVER
•(Operates temp valve
cable
&
equipment in
hart shown below)
Temp valve
begins to
16DG
Fuse (In-line^
COMPRESSOR
Clutch Coil DASH-
PANEL
•Fan Speed Selector Switch
Switch
lever
position
Off
Low
"HeST
High
Contacts
B to
None
BtoL
B to L b U
BtoL&H
Fan
speed
Low
Low
Med
High
Resistance
in series with
Bio Motor
Rl
Rl
RlR2)/(Rl+R2)
None
•Blower switch contacts must be closed
before fan switch will be operable.
-To battery positive
(-0 terminal
•
Horn relay
terminal"
"Batf
To vacuum
tank
EXTENSION
WIRE
ASM
(Normally closed
contacts-*vac
operated)
7
*- Fan speed switch
(See chart at left)
•/-Wire is
\ part of
I inst panel
harness
Legend:
— Production wiring
————
Wire Is part of equip.
•mmmmmmmmmmmmmm*
AIT
Conditioning
WTg*
Temp
Control
Lever
Position
OFF
VENT
COLD
a.A.)
COLD
(O.A.)
HOT
Blower
(Master)
switch
contacts
Open
Closed
Closed
Closed
Closed
Vac switch
connects
vac source
to hose #
#2
&
#3
#2
#3
None
#2
Compressor
switch
contacts^
Open
Open
Closed
Closed
Open
Blower
intake air
Outside car air
intake used
Inside car air
recir culated
Outside car air
intake used
Outside car air
intake used
Fig.
116—Camaro—Four-Season Wiring Diagram
CHEVROLET CHASSIS SERVICE
Page 104 of 659

HEATER AND AIR CONDITIONING 1A-81
HORN RELAY
r
CONN.-
14 BROWN
(TO FUSE
PANEL)
BATTERY
1
—I ^ COMPR
ESSOR
DASH y
V-^ PANEL \
GROMMET—%
1 \
_ J~ ") "^
>14 BLACK/RED STRIPE-
FUSE .20 AMP.
•WIRE ASM. BLOWER-
MOTOR
14 BLACK 1
IGNITION SWITCH1
(ACCESSORY
TERMINAL)
CONTROL SWITCH
-RESISTOR
CONN.
•14 TAN
•16 BLACK
LIGHT BLUE STRIPE
•THERMOSTAT CONTROL
EVAPORATOR & BLOWER ASM.
Fig.
117—Universal System Wiring Diagram (Typical)
CHEVROLET CHASSI