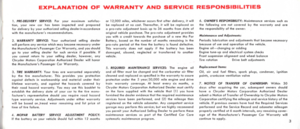
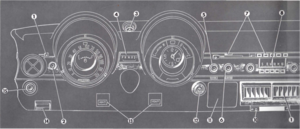
Page 25 of 46

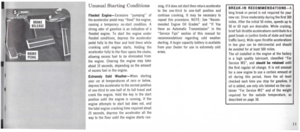
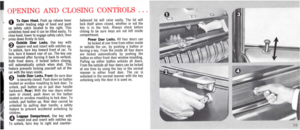
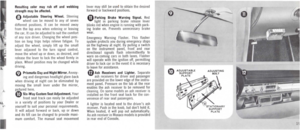
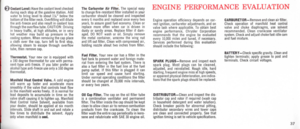
Coat Hookl. The metal hooks located above is felt. then take foot dff accelerator and speed the rear side windows are handy for hanging will be automatically maintained. To change coats or clothing to keep them wrinkle· free. cruising speed. move control ring to new Self-Adjusting Brakes. This feature eliminates setting. Automatic speed regulation can be manual adjustment of your brakes. Brake disengaged at any time by pushing in knob pedal application during normal "reverse" or by turning the ignition off. Application of driving will maintain your brakes at the the brake disengages speed control until specified adjustment. desired speed is regained. To slow down or stop push the brake pedal and car will stop' o Auto Pilot This device enables you to normally. To resume driving. accelerate until control yourdrivingspeed automatically. resistance is felt-then remove foot from The control is located on the instrument pedal. and speed will again be automatically panel. Speed indicator settings appear in the maintained. lens above the control. and can be set by . turning to the desired speed. For example. To Dlsen~ge A~ Pilot: Push In knob and 5 corresponds to about 50 mph. turn to extreme nght.
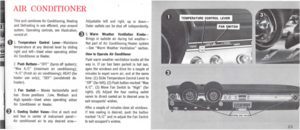
Speed Reminder reature: Turn the 6 Refuell"1-T~e gasoline ~lIer·tu.be on Sedan control ring to the desired speed (with ~nd Convertible mod~ls IS behind the ~e~r car parked or moving). When the pre-set license plate. On Stallon Wagon models I~ IS speed is reached. a pressure will be felt on on the I~ft rear fend~r .. The cap on Station your foot. reminding you the pre-selected Wagons IS vented. If It IS replaced. use only speed has been reached. To continue at this a vented cap. speed •• ~old accelera!or pedal down to "resis-" Cool-Air. " Air Conditioning (dealer tance level..T0 In~rease speed. push installed). Simple push-bullon control panel accelerator .agal~st resls~an~. NOTE: When and temperature lever is conveniently located pavement IS slippery. It .IS recommended in the center of the unit. at the driver's right that only the Speed Reminder feature be hand. Desi~ned to enable passengers to direct used. . cooled air In any direction. Before operating. Automatic Speed Rl9ulator reatur.: Adlust start engine and open windows to expel hot control ring to desired speed and pull out air. See page 23 for operating the combined knob in center. Increase speed until resistance heater-air conditioning unit.
20
Page 26 of 46

-
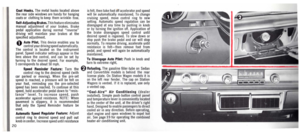
RADIO
&Ii. Push-Bullon "AM": Ignition sWitch ~ must be at "On" or "Acc" position to operate.
This transistorIZed radio plays the moment you turn the left-hand knob clockwise to "On" posItion. This same knob adjusts the volume. Tone control ring, behind left knob, provides selection of tone quality. Stations can be tuned by pressing the push-buttons fully in or by turning the knob at right.
NOTE: For best reception With this radiO adjust the antenna height to 40".
NOTE: Radios designed for Chrysler Corporation automobiles are Identified by the car name appearing on either the radio dial lens or the control panel.
To Set Push Bullons: Permit radio to warm up for at least 10 minutes with antenna fully extended to recommended height. Pull out a bullon and, using manual tuning knob, carefully tune In a desired station. Press bullon firmly into lock station. This same procedure is used for selling the remaining buttons.
"fM/ AM" Radio: ThiS transistorIZed radio plays the moment you turn the left-hand knob clockWise to "On" posItion. ThiS same knob adjusts the volume. Tone control ring, behind left knob, prOVides selection of tone quality. Stations can be tuned by preSSing the push·buttons fully In or by turning knob at right.
You can enjoy either FM or AM reception by rotating the selector SWitch ring, located behind the tUning' knob at right, to the deSired band of operation.
NOTE: For best FM reception adjust antenna height to 31"; adjust to 40" for AM reception. The FM/AM band indication appears on the radiO dial. When changing bands, the dual purpose of thiS radiO does not permit pushbuttons, already set for AM stations, to be set for FM stations or vice-versa. To obtain maximum pleasure With your FM AM radiO, refer to the booklet entitled "Facts About FM Reception" In the glove compartment.
Rear Seat Radio Speaker (dealer Installed): Equalized full sound reception IS available uSing both front and rear speakers, or either
In and turn the "On-Oft" knob. NOTE: The radio and Reverberator are separately con-
speaker indiVidually by turning the speaker trolled and powered units. Therefore, when fader control, located near the radiO on the the radio IS turned oft the Reverberator Instrument panel. Turning the knob fully to should also be turned oft by pushing the
the left selects front speaker only. Far right control knob "in" .
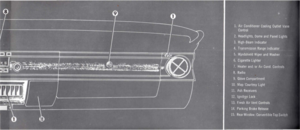
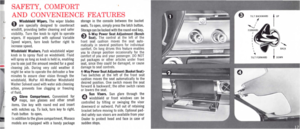
selects rear speaker. Proper balance"betwee~ 0 Remote-Control Outside Mirror. Mirror can front and rear can be achieved by mixing be adjusted from the driver's seat by a front and rear speakers. Rear speaker IS control located on the door panel just below located under the rear Window. the vent Window. To adjust the mirror, simply
Reverberator-Equipped Rear Seat Speaker: move the control in the direction you want Equalized, full·fidellty reception With "concert the mirror to move. hall" quality is available from your radiO With the use of the Reverberator -Equipped R ear Seat Speaker Unit. The reverberator mechanically delays radiO sound Signals to the rear seat speaker, creating the sound presence heard In large auditOriums.
To operate, pull " out" the "On·Oft" knob, located on the Instrument panel, near the radiO. Push knob "in" to turn off. Because the sound quality of some types of musIc IS Improved more by reverberation than others, the degree of reverberatron can be controlled by rotating the "On-Off" knob. Rotating to the right provides Increased reverberation. To operate the rear seat speaker only, push
Page 27 of 46
Page 28 of 46

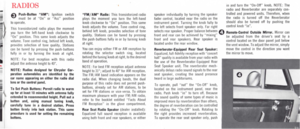
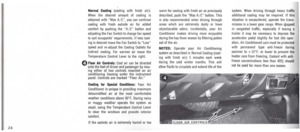
AIR CONDITIONER
This unit combines Air Conditioning, Heating Adjustable left and right, up or down-
and Defrosting in one efficient, year -around Outer outlets can be shut off independently. system. Operating controls, see illustration, ~ consist of: ~ 5 . WII1tI Weather Ventilition Knob.-
o 1. Temperltln Control Lever-Maintains temperature at any desired level by sliding
right and left-Used when operating either Air Conditioner or Heater.
2. Push Buttons-"OFF" (turns off system);
"Max A /C " (maximum air conditioning); "A/C" (fresh air air conditioning); HEAT (for
heater use only); "DEF" (windshield defroster).
3. Fan Switch -Moves horizontally and I
has three positions ; Low, Medium and
High speeds-Used when operating either
Air Conditioner or Heater.
6 4 . Cooling Outlet Vines-One at each end
nd two in center of instrument panelAir conditioned air to any desired area-
Brings in outside air during hot weatherNot part of Air Conditioning/Heater system
-See "Warm Weather Ventilation" section.
How to Operlte Air Conditioner
Push warm weather ventilation knobs all the
way in. If car has been parked in hot sun,
open the windows and drive for a couple of minutes to expel warm air, and at the same time: (1) Slide Temperature Control Lever to
"Off" (far left). (2) Push button mark.ed "Max
A /C". (3) Move Fan Switch to "High" (far right). (4) Adjust the four cooling outlet vanes to direct cooled air to desired area to
suit occupants' wishes.
After a couple of minutes close all windows. If less cooling is desired, push the button
marked "A/C" and re-adjust the Fan Switch to suit occupant's wishes.
23
Page 29 of 46
:
When the desired amount of cooling is obtained with \"Max A/C \", you can continue cooling with fresh outside air for added
comfort by pushing the \"A /C\" b")
24
Normal Cooling (cooling with fresh air):
When the desired amount of cooling is obtained with "Max A/C ", you can continue cooling with fresh outside air for added
comfort by pushing the "A /C" bullon and adjusting the Fan Switch to change fan speed to suit occupants' requirements. If less cool
ing is desired move the Fan Switch to "low "
speed and re-adjust the Cooling Oullets for indirect cooling. For warmer air move the Temperature Control lever to the right.
o Floor Air Controls: Cool air can be directed onto the feet of driver and passenger by moving either of two controls mounted on air conditioning housing under the instrument panel. Controls are marked "Floor Air."
Cooling for Special Conditions: Your Air Conditioner is unique in providing maximum dehumidified air at the most comfortable
weather conditions above sooF. During rainy or muggy weather operate the system as
usual, using the Temperature Control lever to clear the windows and provide interior
comfort.
If the outside air is extremely humid or too
warm for cooling with fresh air as previously
described, push the "Max A/C " bullon. This is also recommended when driving through areas which are extremely dusty or have
objectionable odors. Incidentally, your Air Conditioner makes driving more enjoyable dunng the hay fever season by filtering pollen
out of the air.
NOTES: Operate your Air Conditioning
system as described in Normal Cooling (cooling with fresh air) 5 minutes each week during the cold winter months. This will
allow fluids to circulate and extend life of the
system. When driving through heavy traffic additional cooling may be required. If this
situation is encountered, operate the transmission in a lower gear range. When slopped
in congested traffic, especially if towing a trailer it may be necessary to depress the accelerator pedal slighlly for fast idle oper
ation. Air Conditioned cars must be protected
with permanent type anti· freeze during
summer to 1-15°F. or lower to prevent the heater core from freezing. Coolant with antifreeze concentrations less than 40% should
not be used for mOre than one season.
Page 30 of 46

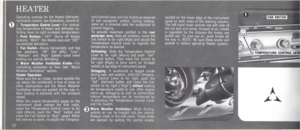
o Heater Operation
Make sure the air intake, located outside the car below the windshield is free of snow or
other obstructions and the Warm Weather
Ventilation knobs are pushed all the way in. Best heating is achieved. with the windows
closed.
When the engine temperature gauge on the
instrument panel reaches the first mark, move the Temperature Control lever to far right (Warm), push the "Heat" button and
move the Fan Switch to either "Medium" or
"High" speed. When the interior is warm,
re·adjust the Temperature Control lever and Fan Switch as required to suit occupants'
wishes. During heating, some air is directed
onto the windshield to prevent fogging.
Defrosting: Slide the Temperature Control
lever to far right (Warm) and push "Def" (Defrost) button. Then move Fan Switch to far right (High) to force warm air through
outlets at top edge of instrument panel.
<:) Warm Weather Ventilation: While driving, outside air can be brought into the Interior
through inlets in the side cowls. These inlets are opened by pulling the control knobs,
located on the lower edge of the instrument panel on both sides of the steering column.
The left·hand knob controls the left side of
the car and vice· versa. Amount of air intake
is regulated by the distance the knobs are pulled out. To shut out air, push knobs all the way in. NOTE: Be sure these knobs are
pushed in before operating Heater or Air
Conditioning System.
Page 31 of 46
Page 32 of 46
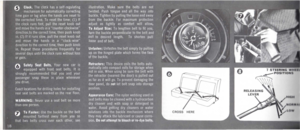
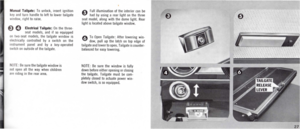
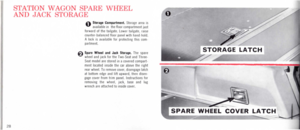
Manual Tailgate : To unlock, Insert ignition key and turn handle to left to lower tailgate window, nght to raise.
E) 0 Electrical Tailgate: On the three-seat models, and If so equipped on two seat models, the tailgate window IS electncally controlled by a switch on the mstrument panel and by a key·operated sWitch on outside of the tailgate.
NOTE: Be sure the tailgate window is not open all the way when children r ndmg in the rear area.
A Full illumination of the interior can be .::1 had by using a rear light on the three seat model, along with the dome light. Rear light is located above tailgate window.
o To Open Tailgate: After lowering window, pull up the latch on top edge of tailgate and lower to open. Tailgate is counterbalanced for easy lowering.
NOTE: Be sure the window is fully down before either opening or closing the tailgate. Tailgate must be completely closed to actuate power window switch, is so equipped.
--------------
2 7


 0 Electrical Tailgate: On the three-seat models, and If so equipped on two seat mo")