Page 17 of 46

AUTOMATIC TRANSMISSION '
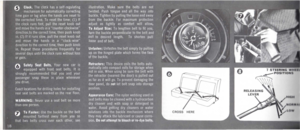
The pointer on the indicator in the instrument panel cluster indicates the gear range the
transmission is in. (With a Console the
indicator is on the Console panel, located on the floor at the driver's right.) The Selector Lever is mounted on the right side of the
steering column. Pull the lever toward you and move it to the desired gear range. Gear
ranges are as follows:
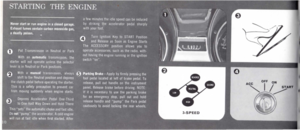
"P" Parking. Supplements parking brake by
locking the transmission. Engine' can be
started in this range. Never use " P " while
car is in motion. Always apply parking brake while in this range.
"R" Reverse. Place your foot on the brake
pedal before selecting this range. An auto· matic safety control makes it impossible to
shift into Reverse at forward speeds above 10 miles per hour.
"N " Neutral. Use when car is standing at idle for prolonged period with engine running.
12 Engine can be started in this range.
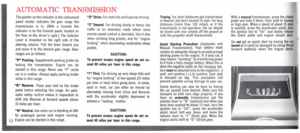
"0 " Drive. For most city and highway driving.
"2" Second. For driving slowly in heavy city
traffic or on mountain roads where more precise speed control is desirable. Use it also when climbing long grades, and for "engine
braking" when descending moderately steep grades.
CAUTION:
To prevent IICes s engine speed do not ex·
ceed 60 miles per hour In this range.
" 1" First. For driving up very steep hills and for "engine braking" at low speeds (25 miles
per hour or less) when going down. In snow,
sand or mud, car can often be moved by alternately moving from Drive and Reverse with the accelerator slightly depressed to
achieve a "rocking motion.
CAUTION:
To prevent excess engine speed do not ex
ceed 40 miles per hour In this range.
Towing. For short distances put transmission in Neutral, but don't exceed 35 mph. For long distances (more than 100 miles), or If the transmiSSion is not operative, the car should be towed with rear wheels off the ground or with the propeller shaft disconnected.
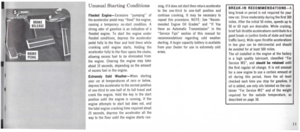
Assist Starting Procedure (Automatic and Manual Transmission). Your battery must contain an adequate charge to provide prompt starting power to the engine. If it does not, it may require "boosting" by transferring power t o it from a fully-charge battery. When this is done the negative cable on the charging battery must be attached only to the negative (- ) post, and positive (+ ) to positive. Each post IS stamped on top. This precaution will prevent possible wiring damage to your car.
Assist starting can also be done by having the car pushed from behind. Make sure the bumpers on both cars align properly. If you have an automatic transmission put the selector lever in "N" (neutral) and when you have been pushed to about 15 mph, turn the ignition key to "On", press the accelerator pedal about half-way down and move the selector lever to "I" (first) gear. When the engine starts shift to "0" (drive) gear.
With a m anual transmission, press the clutch pedal and hold it there; then shift to Second or High gear. When a speed of about 10 mph is reached, press the accelerator pedal, turn the ignition key to "On" and slowly release the clutch pedal and engine should start.
Do not get an assist start by having t h e cal towed as it could be damaged by being thrust forward suddenly when the engine starts.
Page 18 of 46

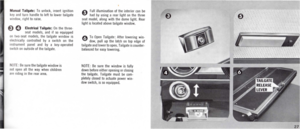
MANUAL TRANSMISSIONS ....
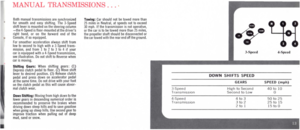
Both manual transmissions are synchronized for smooth and easy shifting. The 3·Speed shift lever is mounted on the steering column -the 4·Speed is floor-mounted at the driver's right hand, or on the forward end of the Console, if so equipped. For smoother acceleration always shift from low to second to high with a 3-Speed transmission, and from 1 to 2 to 3 to 4 if your car is equipped with a 4-Speed transmission, see illustration. Do not shift to Reverse when car is moving.
Shifting Gears: When shifting gears: (1) Depress clutch pedal to floor. (2) Move shift lever to desired position. (3) Release clutch pedal a nd press down on accelerator peda I at the same time. Do not drive with your foot on the clutch pedal as this will cause abnormal clutch wear.
Down Shifting: Moving from high down to the lower gears in descending numerical order is recommended to preserve the brakes when driving down steep hills and to save gasoline when going up steep hills. Use second gear to improve traction when pulling out o f deep mud, sand or snow.
Towing: Car should not be towed more than 25 miles in Neutral, at speeds not to exceed 30 mph. If the transmission is not operative, or the car is to be towed more than 25 miles, the propeller shaft should be disconnected or the car towed with the rear end off the ground.
3·Speed TransmiSSion
4 -Speed
TransmiSSion
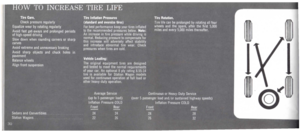
3-S pecd
DOWN SHIFTS SPEED
GEARS
High to Second Second to Low
4to 3
3 to 2
2 to 1
4-Spced
SPEED (mph)
40 to 10 o
50 to 25 25 to 15 15 to 0
Page 19 of 46
Page 20 of 46

,
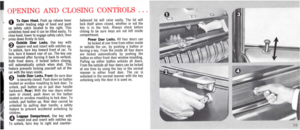
OPENING AND CLOSING CONTROLS
O To Open Hood. Push up release lever under leading edge of hood and push up safety catch located to the right This unlatches hood and it can be lifted easily. To close hood, lower to engage safety catch, then • press down firmly to lock. ~ Outs/de Door Locks. Use key with U square end and insert with notches up. To unlock, turn key toward front of car. To lock, turn it toward rear of car. The key can be removed after turning it back to vertical. Both front doors, if locked before closing, will automatically unlock when shut This feature prevents locking yourself out of the car with the keys inside. ~ Inside Door Locks. Front: Be sure door ~ is securely closed. Push down on button located on window moulding to lock door. To unlock, pull button up or pull door handle backward. Rear: With the rear doors either open or closed, push down on the button located on window moulding to lock door. To unlock, pull button up. Rear door cannot be unlocked by pulling door handle, a safety feature to prevent accidental unlocking by children. A LUIIPII' Compartment. Use key with ~ round end and insert with notches up. To unlock, turn key to right and counter-
balanced lid will raise easily. The lid will lock itself when closed, whether or not the key is in the lock. Always check before closing to be sure keys are not left inside compartment Power Door Locks. All four doors can be locked at one time from either inside or outside the car, by pushing a button or turning a key. From the inside all four doors are locked automatically by pushing the button on either front door window mOUlding. Pulling up either button unlocks all doors. From the outside all four doors can be locked at one time by using the key in the normal manner in either front door. The car is unlocked in the normal manner with the key unlocking only the door it is used on.
15
Page 21 of 46
16
(CONTI NUED)
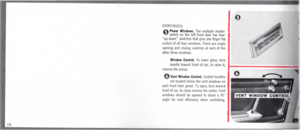
A Power Windows. The multiple master ~ switch on the left front door has four "up·down" switches that give you finger-tip control of all four windows. There are single
opening and closing switches at each of the other three windows.
Window Control. To lower glass, turn
handle toward front of car; to raise it, I--------------_i reverse the action.
G) Vent Window Control. Control handles
are located below the vent 'windows on
each front door panel. To open, turn toward front of car, to close reverse the action. Venl Windows should be opened to about a 450
angle for best efficiency when ventilating.
Page 22 of 46

SAFETY, COMFORT
AND CONVENIENCE FEATURES
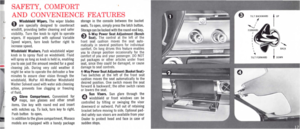
O Windshield Wipers. The wiper blades are specially designed to counteract windlift, providing better cleaning and safer visibility. Turn the knob to right to operate wipers. If equipped with optional Variable Speed wipers, turn knob further right to increase speed.
Windshield Washers. Push windshield wiper knob in to spray fluid on windshield. Fluid will spray as long as knob is held in, enabling you to use just the amount needed for a good cleaning job. During very cold weather it might be wise to operate the defroster a few minutes to assure clear vision through the windshield. MoPar All-Weather Windshield Washer Solvent used with water a ids cleaning action, prevents line clogging or freezing of fluid. ~ Glove Compartment. Convenient for ~ maps, sun glasses and other small items. Use key with round end and insert
with notches up_ To lock, turn key to right
Push button to open. In addition to the glove compartment, Monaco models are equipped with a handy package
storage in the console between the bucket seats. To open, simply press the latch button.
Storage can be locked with the round-end key. ~ 6-Way Power Seat Adjustment (Bench ~ Seat). The control at the left of the front seat cushion moves the seat auto· matically in several posit ions for indiviOual comfort. On long drives this feature enables you to change position occasionally for the comfort of you and your passenger. DO NOT put packages or other articles under front seat, since they could be damaged, or cause damage to seat controls. 4-Way Power Seat Adjustment (Bucket Seat) · Two switches at the left of the front seat cushion moves the seat automatically to the desired position. One switch moves the seat forward & backward; the other switch raises or lowers the seat. Sun Visors. Sun glare through the e windshield or front windows can be controlled by tilting or swinging the visor downward or outward. Pull out o f retaining bracket before moving to side. Optional padded safety sun visors are available from your Dealer to protect head and face in case of sudden stops.
Page 23 of 46
Page 24 of 46

Resulting color mav rub off and webbing strength may be affected.
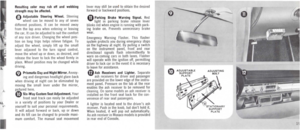
o Adjustable Steering Wheel. Steering wheel can be moved to any of seven different positions. It can be moved away from the lap area when entering or leaving the car. It can be adjusted to suit the comfort of any SIZe driver. Changing the wheel position on long trips helps relieve fatigue. To adjust the wheel, simply hft up the small lever adjacent to the turn signal control, move the wheel up or down, as desired, and release the lever to lock the wheel firmly in place. Wheel position may be changed while driving.
~ Prismatic Day and Night Mirror. Annoy-ing and dangerous headlight glare-back when driving at night can be elimmated by moving the small lever under the mirror, pictured here. o Six-Way Custom Seat Adjustment. Your front seat track can easily be adjusted In a variety of positions by your Dealer or yourself to suit your personal requirements. It will adjust forward or back, up or down and its tilt can be changed to provide maximum comfort. The manual seat movement
lever may still be used to obtain the desired forward or backward positions.
Q Parking Brake Warning S ignal. Red light in parking brake release lever blinks red when engine is running with parking brake on. Prevents unnecessary brake wear.
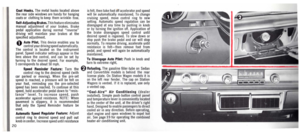
Emergency Warning Flasher. This flasher system protects you during emergency stops on the highway at night. By pu lIing a switch on the instrument panel, front' and rear directiona I signals flash intermittently to warn on-coming cars in both lanes. Flasher will operate with the ignition off, permitting driver \0 lock car in the event it is necessary to leave for assistance.
41) Ash Receivers and Lighter. Separate ash receivers for driver and passenger are provided on the lower edge of the instrument panel. Pressure on the tab at the rear enables the ash receiver to be removed for cleaning. On some models an ash receiver is Installed on the front seat back lor the convenience of rear seat passengers.
A lighter is located next to the driver's ash receiver. Push in the knob, but don't hold it. When heated, it will pop out automatically. An ash receiver in Monaco models is provided in rear end of Console.
AOJUSTING BOLT
1


A Power Windows. The multiple master ~ switch on the left front door has four \"up·down\" switches that give you finger-tip control of all four windows. There are single
opening and")
