1964 CHEVROLET CORVETTE check engine light
[x] Cancel search: check engine lightPage 40 of 52

HEADLAMP REPLACEMENT
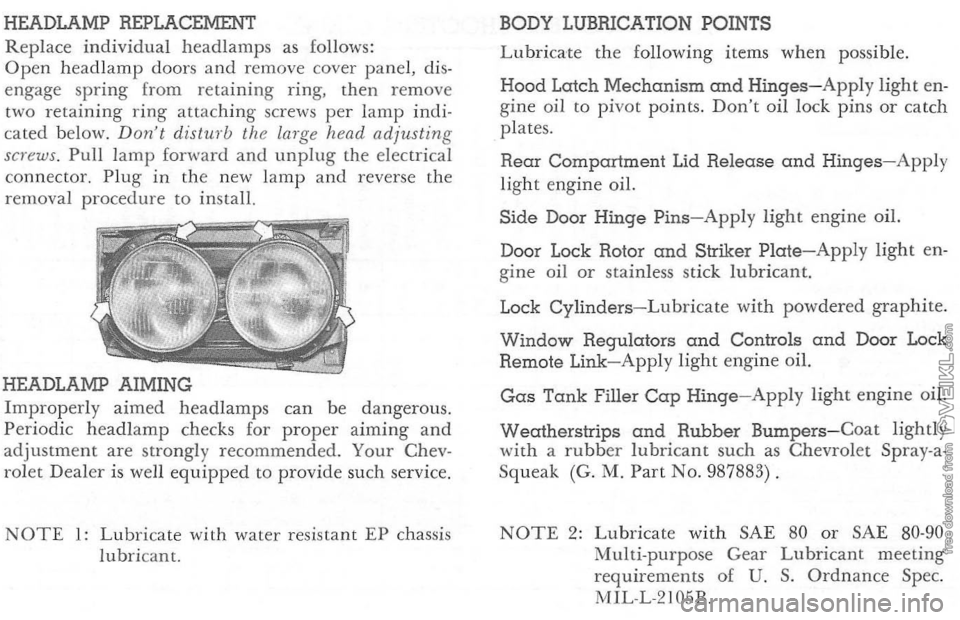
Replace individual head lamp s as follows:
Open head lamp doors and remove cover panel, dis
e n gage spring from retaining ring, then remove
two retai
ning ring attaching screws per lamp indi
cate d b elow. Don·t dist",·b the larg e head adjusting
screws . Pull lamp fanltard and unplug the electri cal
connector. Plug in the new l amp and reverse the
removal procedure to install.
HEADLAMP AIMING
Improperly aimed headlamps can be dangerous.
Periodic headlam p checks for proper aiming and adjustm en t are strongly recommend ed. Your Chev
rol et Dea l er is well equipped to provide such service.
NOTE 1: Lubricate with water resi stant EP chassis
lubri cant. BODY
LUBRICATION POINTS
L ubric ate the following items when possible.
Hood Latch Mechanism and Hinges-Apply light en
gine oil to pivot points. Don't oil lock pins or catch
plates.
Rear Compartment Lid Release and Hinges-Apply
light engine oil.
Side Door Hinge Pins-Apply light engine oil.
Door Lock Rotor
and Striker Plate-Apply light en
g ine oil or stai nles s stick lubric ant.
Lock
Cylinders-Lubricate wit h powdered graphite.
Window Regulators and Controls and Door Lock
Remote Link-Apply light engine oil.
Gas Tank Filler Cap Hinge-Apply light engine oil.
Wecdherstrips and Rubber Bumpers-Coat lightly
wit h a rubber lubricant such as Chevrolet Spray-a
Squeak (G. M. Part No. 987883) .
NOTE 2: Lubricate with SAE 80 or SAE 80-90 Multi-purp ose Gear Lubricant meeting
requirements of U. S. Ordnance Spec.
M1L-L-2105B.
Page 42 of 52

MINOR TROUBLE SHOOTING PROCEDURES
T h e chart on the p reviou s page, and the information on the pages which follow, contains information designed to
aid th e average drive r to d iscove r, and possibly correc t,
conditions resu ltin g i n m inor m echanica l difficulties i n his
c ar. The chart, des igned to point out poss ible solutions to
s evera l of the most cQ,mmon autom otive malfunctions and point out a log ica l checkin g seq uence, will lead step by step to the most lik el y causes and corrective proc edures.
H, afte r makin g the checks and adjustments suggeste d, the source of the trouble has not been found and corrected, it is stro ngly recommended that an Authorized Chevrolet Dealer inspect the vehicl e and make whatever r e pairs or adjust me nts are necessary.
FUEL SYSTEM AND ENGINE If the ignition switch will cause the e n gin e to "turn over" or "crank" but the car will not sta rt, check Steps A through D below.
a
TE: ,l Continuol "flooding" of the carburetor is ev;de by 0 carburefor wet with fuel o r blade exhaust smoke
perform the operation suggested in paragraph D only
(A) T h e first and most obv ious , and one of the most frequently overlooked, items to check when you have difficulty in starting your car is the amount of fuel in the
tank. Make it a habit to chec k the FUEL GAUGE reg - ularly
a n d m ost especia lly
at a time when the engine _ "turn over" but will not start. (B) If th e fue l tank is not empty, you may check fur.=c to see whether the fuel is reachin g the carburetor. Disc:o&r neet the fuel line at the carb uretor. Place a jar or c:r
under the open line and brieRy "crank" the ~~e ... mean s of the st arter. ]( fuel spurts from the fiuiog.
may assume that the FUEL LINES are clear and the FeIl.. PUMP is operating properly. If n o fuel leaves the :me. either the fuel lines, fuel pump or the in-lin e filter art' 1-fault. See your Authorized Chevrolet Dealer. (C) Befor e recolln ecting the fu el line to me carbu..~ r emove the FUEL FILTER from the carburetor inlet ux! check its co ndition. !{ it appears to be clean , replace i~ a=. reconnec t the fue l line. If the filter appears to be p1!:s--;rt!
clean it as we ll as possible by scraping out the foreigt!~. rial and cleaning in a solvent. Then reinst all the filter ~== a new one as soon as possible.
(D) If the fuel seems to be reaching the carburetor prop
erly , th e problem may be: a n EMPTY CA.RBL""RET O::" BO'VL caused by a "stuck shut" carburetor; a ROODE:> CARBURETOR caused by a "stuck open" condition 2r.C. ev idenced by gasoline flowing down the outside 0: :.2 carburetor ; or a stuck CHOKE valve. Remove the U:cleaner from the carburetor. Check that the choke ~~ moves free ly and is not stuck . (Don't mistake no~ sp~~ tens ion for a stuck valve.) Tap the side of the carb~..lX sharply seve ral times with a light tool such as a sc::::-ewdriver handle or plie rs. R e p lace the air cleaner and a~?,to start the engin e in the normal manner.
Page 43 of 52

(E) If the car will start but sta lls w h e n hot or has a roug h idle, you can sus pect a f aulty IDLE ADJUSTMENT, a malfunctioning AUTOMATIC CHOKE or an extremely
dirty and blocked AIR CLEANER ELEMENT. Clean
your air cleaner element if necessary. If the above Fuel Syste m checks and the checks suggested under the Electr ica l System followi ng do not corre ct the malfunction , i t is recommended that you turTI to your Authorized Chevrolet Dealer for further checks, adjust
ments or repairs.
ELECTRICAL SYSTEM If, when the ignition key is turned to "Star t," the engine
will not turn over, you have good reason to sus pec t elec
trical trouble.
(F) '
Vhen there is
no response at all to attempts to star t
the car , check the obv ious-your AUTOMATIC TRANS· M ISSION SELECTOR LEVER mus t be in Neutral or Park position befor e the engine can be started. Turning
the IGNITION SvVITCH rapidly back and forth several
times will sometimes correct a poor internal switch contact.
(G) The BATTER Y may be discha rged. If so, lights will
be dim and the horn will have a poor tone if it will blow a t
all. Usually a
garage recharge will be nece ssary to return the battery to operation. Occasiona lly, however, a p u sh start and long driv e will recharge the battery .
POOR BATTERY CONNECTIONS may be suspec ted if
th e car has operated prope rly a short time befor e and now not eve n the horn will operate. Check both ends o f both battery cables. If the connections are corroded, a car ma y
som etimes be restore d to operation by removing all cab le
e n ds, scraping all contacting surfaces clean with a pen
knife, and reassembling. If the cables a r e broken, they
must be replaced. The power supply should now b e restored
unless the battery is dead.
(H)
If, however, the lights and horn work properly but
th e starter will still not turn ove r , c heck the STARTER connections. A "click " from the starter soleno id indicates
th a t the wirin g to the starter is properly install ed. If the
wiring seems to be clean and tightly installed, the trouble
is proba bly in the starter itself and sho uld be referred to
your Authorized Chevr olet Dealer.
When the e ngine will "turn ove r " but will not start, [h e
foll owin g items may b e checked along with the Fuel Syst em
Checks listed previous ly.
(I) With a clean dry cloth wipe the ceramic portions o f
t he spark plugs dry. In particul arly damp or rainy weather dampness may be the cause of not starting, espec ially when the e ngin e is cold.
0) C heck the cables
at the top of the distributor and coil as well as eac h spark plug cable for tightness.
(K)
If the car w ill stilI not st art. ch eck for spark at the
spark plugs in th e foll owing manner:
Pull o n e of the spark plug wi res off its spark plug. Insert a
short piece of bare wir e (such as a bobby pin) between the