2024 FORD F650/750 brakes
[x] Cancel search: brakesPage 210 of 386

Protected ComponentRatingItem
USB power.5 A58
U-Haul parking lamps.10 A59
Dual fuel tank selectorswitch (diesel).10 A60
Not used.—61
Not used.—62
Driver seat compressor.20 A63
Passenger seat compressor.20 A64
Upfitter - run activate feed.10 A65
Four pack solenoid differen-tial lock.10 A66
Hydromax relay power.10 A67
Not used.—69
Inverter.40 A70
Anti-lock brake systemvalves.30 A71
Brake on-off switch(hydraulic brakes).10 A72
Stoplamp air pressureswitch 1 and 2 (air brakes).
Not used.—73
Heated mirror.15 A74
Not used.—75
Body control module batteryfeed.60 A76
Body control modulevoltage quality monitorpower feed.
30 A77
Not used.—78
Hydromax pump monitor.5 A79
Trailer tow backup signal.10 A80
206
2024 F-650/750 (TBC) , enUSA, Edition date: 202210, First-PrintingFuses
Page 219 of 386
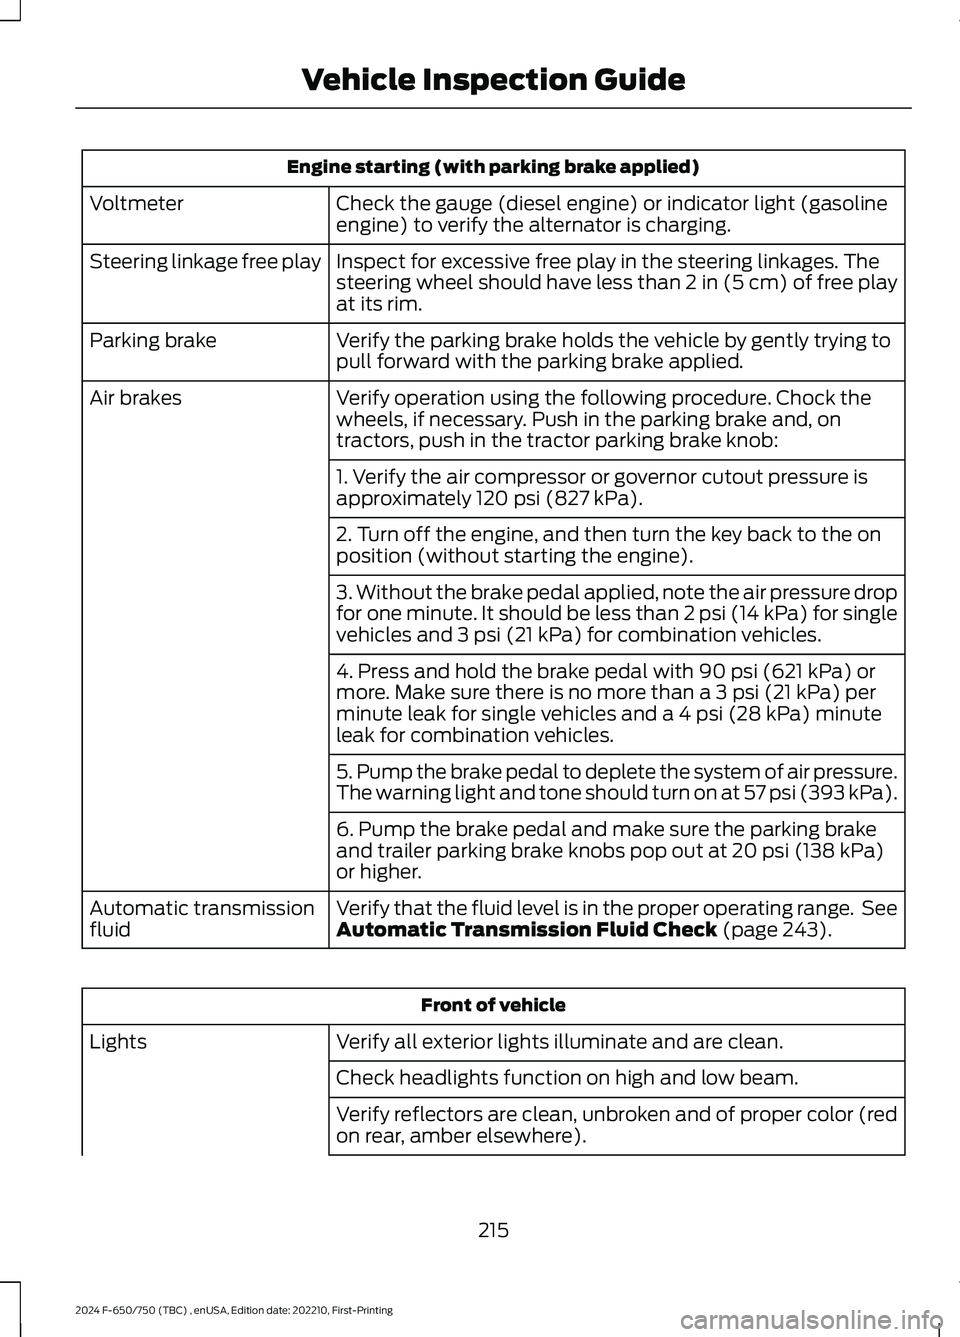
Engine starting (with parking brake applied)
Check the gauge (diesel engine) or indicator light (gasolineengine) to verify the alternator is charging.Voltmeter
Inspect for excessive free play in the steering linkages. Thesteering wheel should have less than 2 in (5 cm) of free playat its rim.
Steering linkage free play
Verify the parking brake holds the vehicle by gently trying topull forward with the parking brake applied.Parking brake
Verify operation using the following procedure. Chock thewheels, if necessary. Push in the parking brake and, ontractors, push in the tractor parking brake knob:
Air brakes
1. Verify the air compressor or governor cutout pressure isapproximately 120 psi (827 kPa).
2. Turn off the engine, and then turn the key back to the onposition (without starting the engine).
3. Without the brake pedal applied, note the air pressure dropfor one minute. It should be less than 2 psi (14 kPa) for singlevehicles and 3 psi (21 kPa) for combination vehicles.
4. Press and hold the brake pedal with 90 psi (621 kPa) ormore. Make sure there is no more than a 3 psi (21 kPa) perminute leak for single vehicles and a 4 psi (28 kPa) minuteleak for combination vehicles.
5. Pump the brake pedal to deplete the system of air pressure.The warning light and tone should turn on at 57 psi (393 kPa).
6. Pump the brake pedal and make sure the parking brakeand trailer parking brake knobs pop out at 20 psi (138 kPa)or higher.
Verify that the fluid level is in the proper operating range. SeeAutomatic Transmission Fluid Check (page 243).Automatic transmissionfluid
Front of vehicle
Verify all exterior lights illuminate and are clean.Lights
Check headlights function on high and low beam.
Verify reflectors are clean, unbroken and of proper color (redon rear, amber elsewhere).
215
2024 F-650/750 (TBC) , enUSA, Edition date: 202210, First-PrintingVehicle Inspection Guide
Page 221 of 386
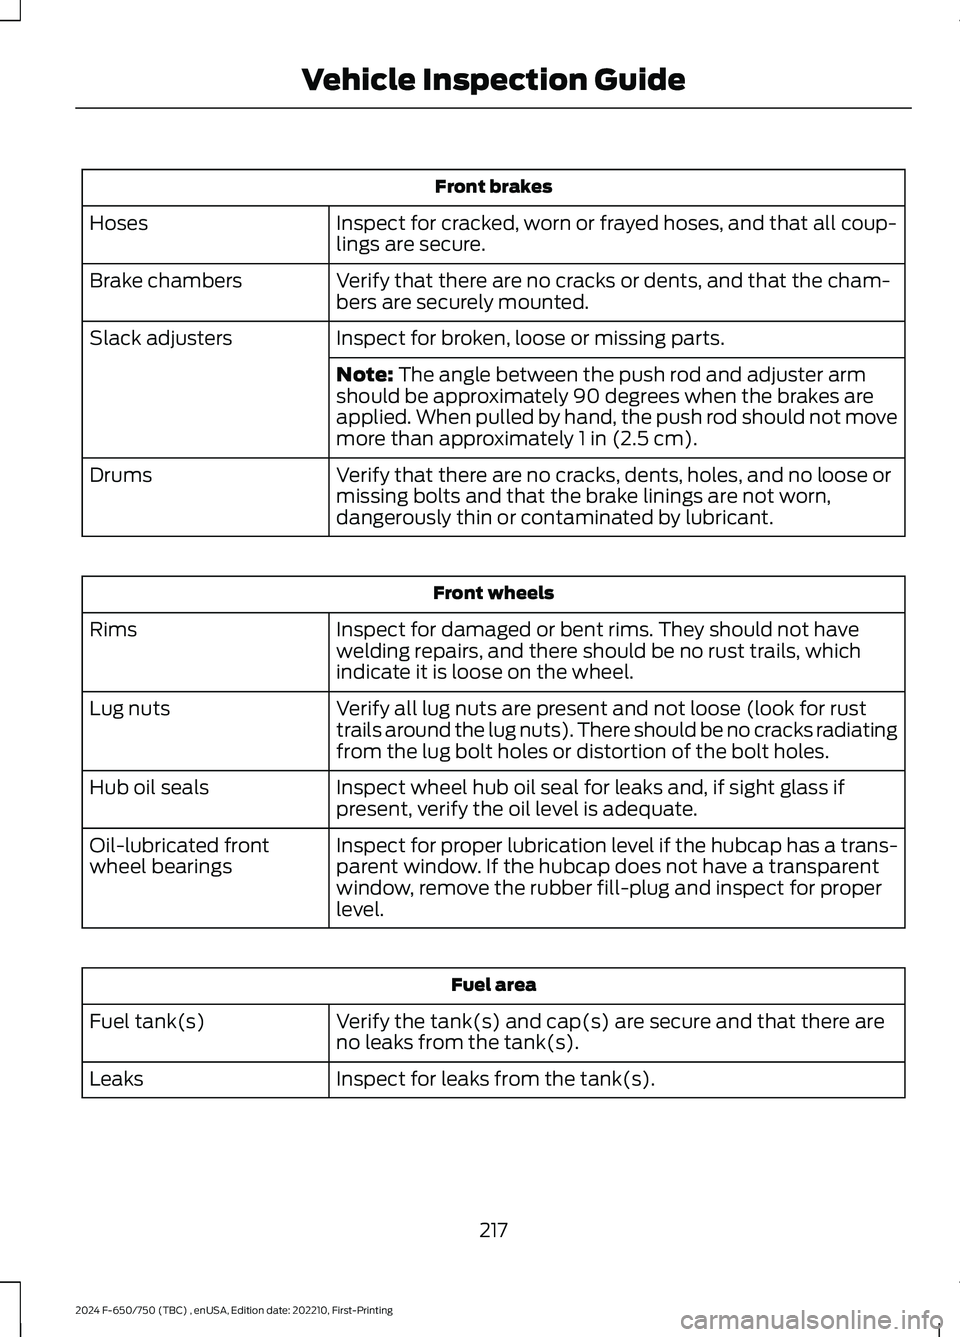
Front brakes
Inspect for cracked, worn or frayed hoses, and that all coup-lings are secure.Hoses
Verify that there are no cracks or dents, and that the cham-bers are securely mounted.Brake chambers
Inspect for broken, loose or missing parts.Slack adjusters
Note: The angle between the push rod and adjuster armshould be approximately 90 degrees when the brakes areapplied. When pulled by hand, the push rod should not movemore than approximately 1 in (2.5 cm).
Verify that there are no cracks, dents, holes, and no loose ormissing bolts and that the brake linings are not worn,dangerously thin or contaminated by lubricant.
Drums
Front wheels
Inspect for damaged or bent rims. They should not havewelding repairs, and there should be no rust trails, whichindicate it is loose on the wheel.
Rims
Verify all lug nuts are present and not loose (look for rusttrails around the lug nuts). There should be no cracks radiatingfrom the lug bolt holes or distortion of the bolt holes.
Lug nuts
Inspect wheel hub oil seal for leaks and, if sight glass ifpresent, verify the oil level is adequate.Hub oil seals
Inspect for proper lubrication level if the hubcap has a trans-parent window. If the hubcap does not have a transparentwindow, remove the rubber fill-plug and inspect for properlevel.
Oil-lubricated frontwheel bearings
Fuel area
Verify the tank(s) and cap(s) are secure and that there areno leaks from the tank(s).Fuel tank(s)
Inspect for leaks from the tank(s).Leaks
217
2024 F-650/750 (TBC) , enUSA, Edition date: 202210, First-PrintingVehicle Inspection Guide
Page 224 of 386
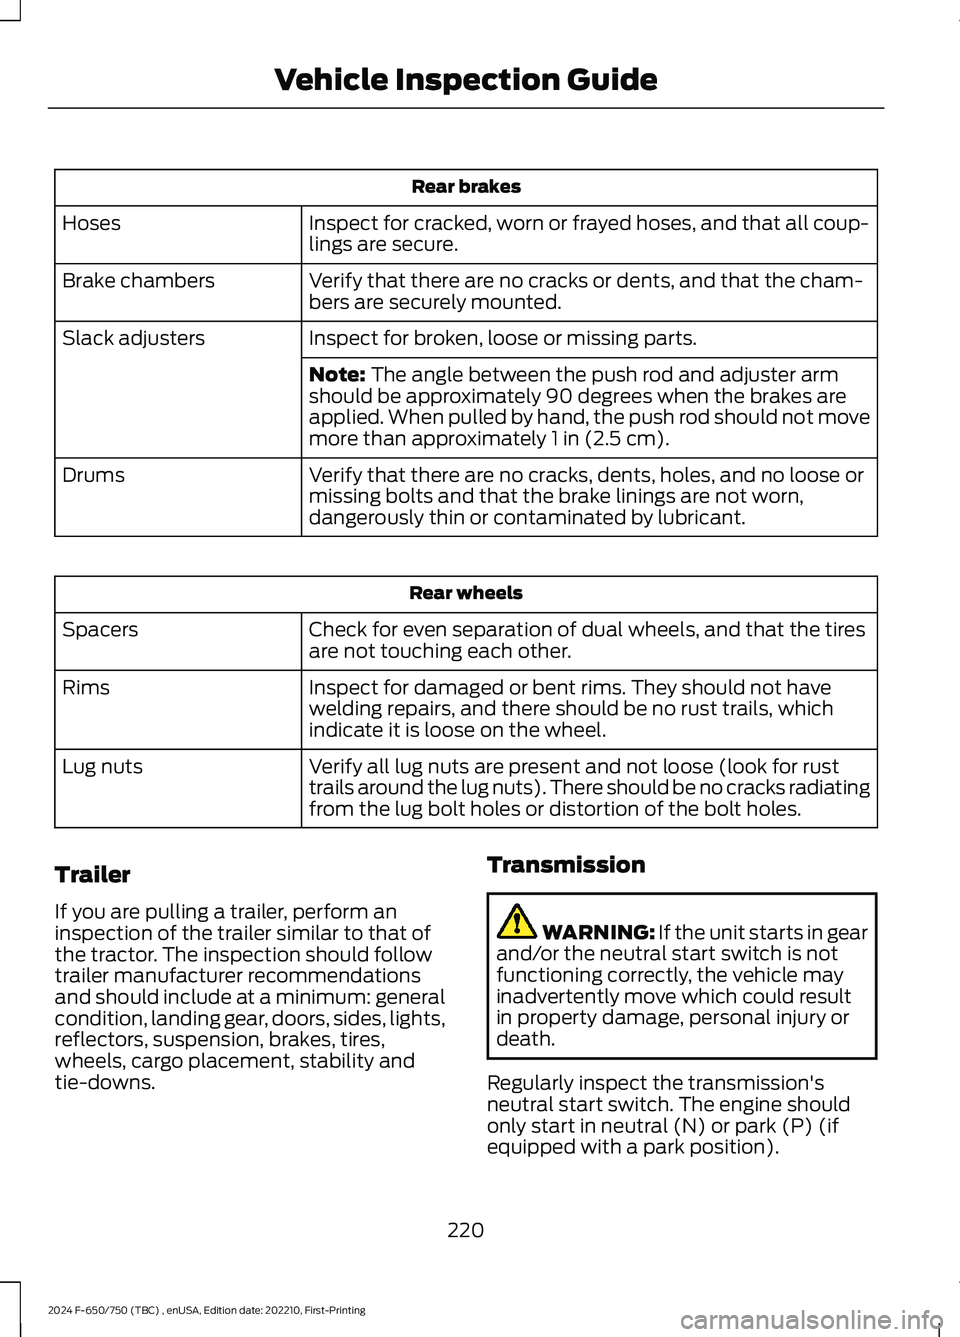
Rear brakes
Inspect for cracked, worn or frayed hoses, and that all coup-lings are secure.Hoses
Verify that there are no cracks or dents, and that the cham-bers are securely mounted.Brake chambers
Inspect for broken, loose or missing parts.Slack adjusters
Note: The angle between the push rod and adjuster armshould be approximately 90 degrees when the brakes areapplied. When pulled by hand, the push rod should not movemore than approximately 1 in (2.5 cm).
Verify that there are no cracks, dents, holes, and no loose ormissing bolts and that the brake linings are not worn,dangerously thin or contaminated by lubricant.
Drums
Rear wheels
Check for even separation of dual wheels, and that the tiresare not touching each other.Spacers
Inspect for damaged or bent rims. They should not havewelding repairs, and there should be no rust trails, whichindicate it is loose on the wheel.
Rims
Verify all lug nuts are present and not loose (look for rusttrails around the lug nuts). There should be no cracks radiatingfrom the lug bolt holes or distortion of the bolt holes.
Lug nuts
Trailer
If you are pulling a trailer, perform aninspection of the trailer similar to that ofthe tractor. The inspection should followtrailer manufacturer recommendationsand should include at a minimum: generalcondition, landing gear, doors, sides, lights,reflectors, suspension, brakes, tires,wheels, cargo placement, stability andtie-downs.
Transmission
WARNING: If the unit starts in gearand/or the neutral start switch is notfunctioning correctly, the vehicle mayinadvertently move which could resultin property damage, personal injury ordeath.
Regularly inspect the transmission'sneutral start switch. The engine shouldonly start in neutral (N) or park (P) (ifequipped with a park position).
220
2024 F-650/750 (TBC) , enUSA, Edition date: 202210, First-PrintingVehicle Inspection Guide
Page 226 of 386
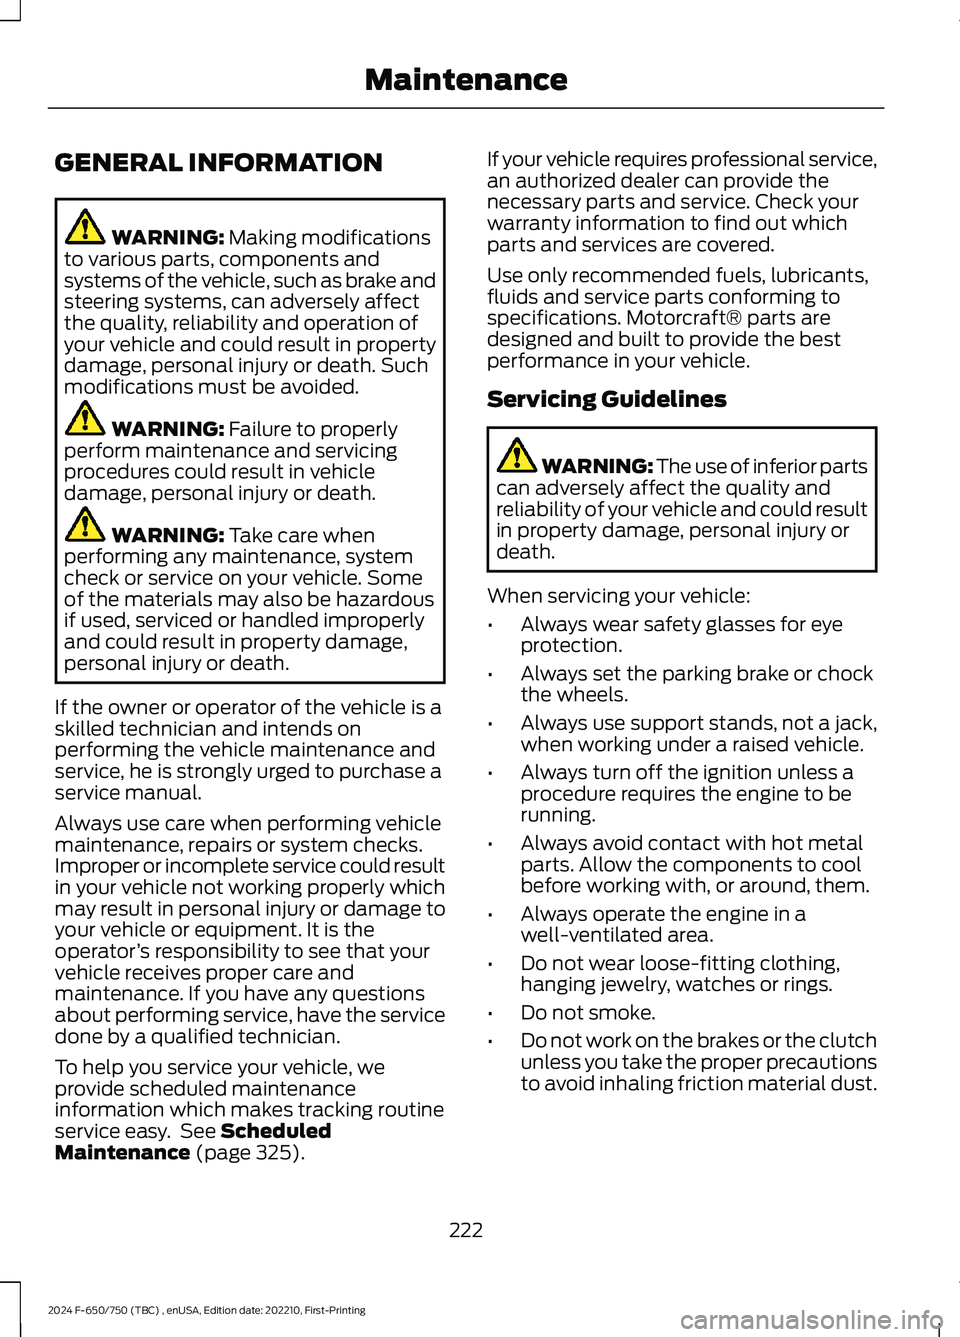
GENERAL INFORMATION
WARNING: Making modificationsto various parts, components andsystems of the vehicle, such as brake andsteering systems, can adversely affectthe quality, reliability and operation ofyour vehicle and could result in propertydamage, personal injury or death. Suchmodifications must be avoided.
WARNING: Failure to properlyperform maintenance and servicingprocedures could result in vehicledamage, personal injury or death.
WARNING: Take care whenperforming any maintenance, systemcheck or service on your vehicle. Someof the materials may also be hazardousif used, serviced or handled improperlyand could result in property damage,personal injury or death.
If the owner or operator of the vehicle is askilled technician and intends onperforming the vehicle maintenance andservice, he is strongly urged to purchase aservice manual.
Always use care when performing vehiclemaintenance, repairs or system checks.Improper or incomplete service could resultin your vehicle not working properly whichmay result in personal injury or damage toyour vehicle or equipment. It is theoperator’s responsibility to see that yourvehicle receives proper care andmaintenance. If you have any questionsabout performing service, have the servicedone by a qualified technician.
To help you service your vehicle, weprovide scheduled maintenanceinformation which makes tracking routineservice easy. See ScheduledMaintenance (page 325).
If your vehicle requires professional service,an authorized dealer can provide thenecessary parts and service. Check yourwarranty information to find out whichparts and services are covered.
Use only recommended fuels, lubricants,fluids and service parts conforming tospecifications. Motorcraft® parts aredesigned and built to provide the bestperformance in your vehicle.
Servicing Guidelines
WARNING: The use of inferior partscan adversely affect the quality andreliability of your vehicle and could resultin property damage, personal injury ordeath.
When servicing your vehicle:
•Always wear safety glasses for eyeprotection.
•Always set the parking brake or chockthe wheels.
•Always use support stands, not a jack,when working under a raised vehicle.
•Always turn off the ignition unless aprocedure requires the engine to berunning.
•Always avoid contact with hot metalparts. Allow the components to coolbefore working with, or around, them.
•Always operate the engine in awell-ventilated area.
•Do not wear loose-fitting clothing,hanging jewelry, watches or rings.
•Do not smoke.
•Do not work on the brakes or the clutchunless you take the proper precautionsto avoid inhaling friction material dust.
222
2024 F-650/750 (TBC) , enUSA, Edition date: 202210, First-PrintingMaintenance
Page 249 of 386
BRAKE FLUID CHECK
WARNING: Do not use any fluidother than the recommended brake fluidas this will reduce brake efficiency. Useof incorrect fluid could result in the lossof vehicle control, serious personal injuryor death.
WARNING: Only use brake fluidfrom a sealed container. Contaminationwith dirt, water, petroleum products orother materials may result in brakesystem damage or failure. Failure toadhere to this warning could result in theloss of vehicle control, serious personalinjury or death.
WARNING: Do not allow the fluidto touch your skin or eyes. If thishappens, rinse the affected areasimmediately with plenty of water andcontact your physician.
WARNING: The brake systemcould be affected if the brake fluid levelis below the MIN mark or above the MAXmark on the brake fluid reservoir.
1.Park your vehicle on a level surface.
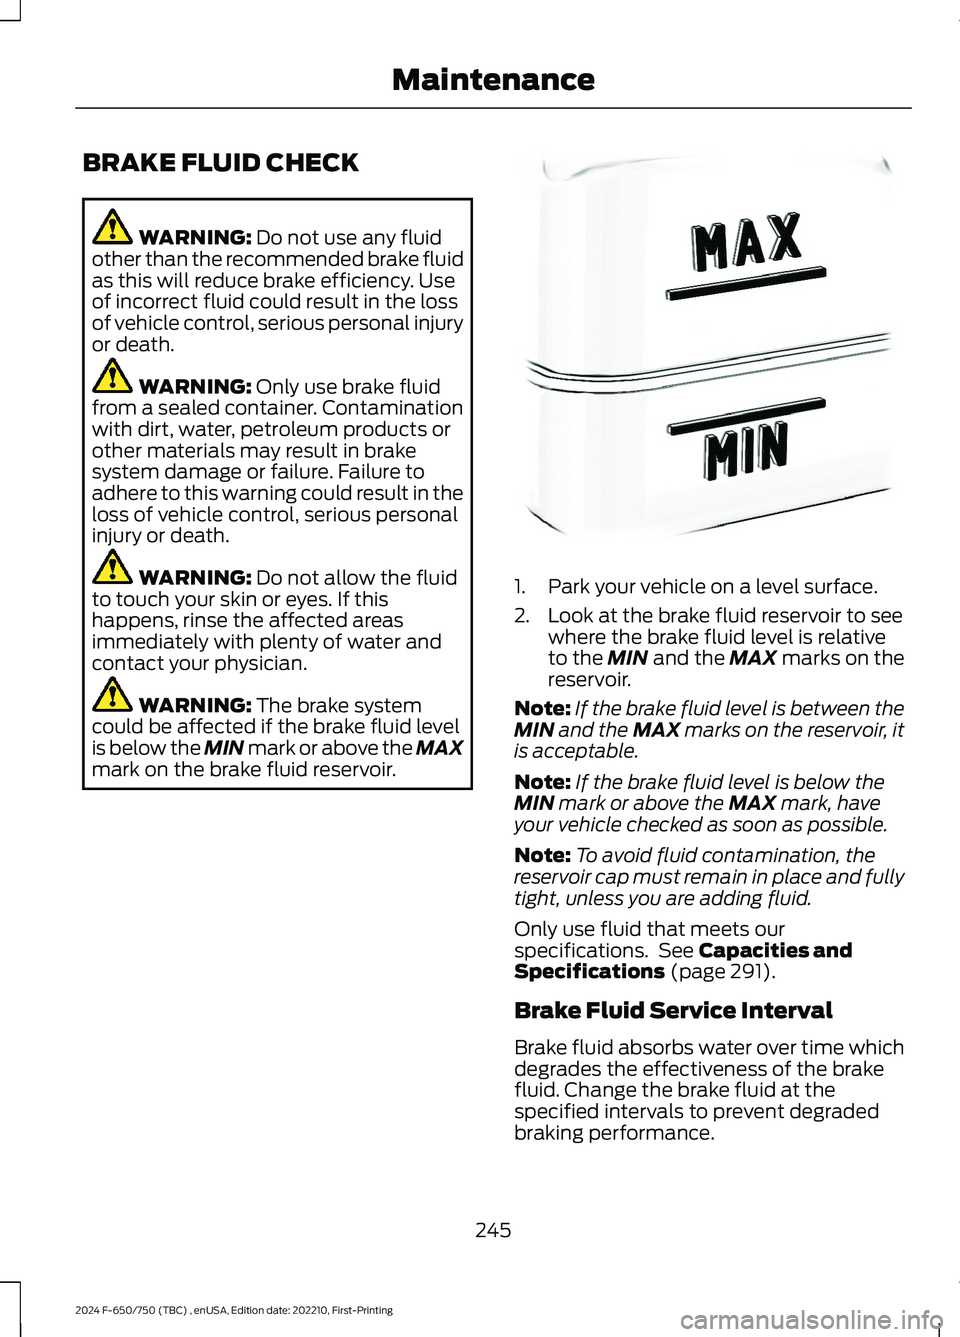
2.Look at the brake fluid reservoir to seewhere the brake fluid level is relativeto the MIN and the MAX marks on thereservoir.
Note:If the brake fluid level is between theMIN and the MAX marks on the reservoir, itis acceptable.
Note:If the brake fluid level is below theMIN mark or above the MAX mark, haveyour vehicle checked as soon as possible.
Note:To avoid fluid contamination, thereservoir cap must remain in place and fullytight, unless you are adding fluid.
Only use fluid that meets ourspecifications. See Capacities andSpecifications (page 291).
Brake Fluid Service Interval
Brake fluid absorbs water over time whichdegrades the effectiveness of the brakefluid. Change the brake fluid at thespecified intervals to prevent degradedbraking performance.
245
2024 F-650/750 (TBC) , enUSA, Edition date: 202210, First-PrintingMaintenanceE170684
Page 260 of 386
BRAKE SYSTEM INSPECTION
WARNING: Always wear arespirator approved by the NationalInstitute of Occupational Studies ofHealth (NIOSH) or Mine Safety andAppliance (MSA) during all brake serviceprocedures. Wear the respirator fromremoval of the wheels through assembly.Never use compressed air or dry brushingto clean brake parts or assemblies.Clean brake parts and assemblies inopen air. During assembly, carefullyplace all parts on the floor to avoidgetting dust in the air. Use an industrialvacuum cleaner with a HEPA filtersystem to clean dust from the brakedrums, backing plates and other brakeparts. After using the vacuum, removeany remaining dust with a rag soaked inwater and wrung until nearly dry.Never use compressed air or drysweeping to clean the work area. Use anindustrial vacuum cleaner with a HEPAfilter system and rags soaked in waterand wrung until nearly dry. Dispose ofused rags with care to avoid getting dustin the air. Use an approved respiratorwhen emptying vacuum cleaners andhandling used rags.Worker clean-up: Wash your handsbefore eating, drinking or smoking.Vacuum your work clothes after use andthen launder them separately, withoutshaking them, to prevent fiber dustgetting into the air.
Your vehicle is equipped withnon-asbestos brake linings. However,exposure to excessive amounts of brakematerial (whether asbestos ornon-asbestos, fiberglass, mineral wool,aramid or carbon) may be a serious healthhazard.
Air Brakes
WARNING: Do not manually adjustthe automatic slack adjusters to correctexcessive push rod stroke as it may resultin reduced brake effectiveness and avehicle crash. Excessive push rod strokeindicates that a problem exists with theautomatic adjuster, with the installationof the adjuster, or with foundation brakecomponents that manual adjustmentdoes not remedy. Seek service from aqualified facility for excessive push rodstroke.
Inspection and Adjustment
Establish a regular schedule for periodiccleaning, lubrication and adjustmentinspection based on vehicle use. Exactmaintenance intervals are difficult topredetermine due to vehicle applicationsand operating conditions. If you areuncertain of the proper schedule for yourvehicle, contact an authorized dealer.
Regular inspections should include:
•Periodic checking (every serviceinterval) of push rod travel or brakeadjustment. This is essential foreffective braking. Brake chamber pushrods on original equipment chambersnow incorporate an orange paintmarker near the base of the push rod
256
2024 F-650/750 (TBC) , enUSA, Edition date: 202210, First-PrintingMaintenance
Page 261 of 386
as a stroke indicator to aid inadjustment checks. If the push rod isclean and the brakes are out ofadjustment, you can see the orangemarker protruding from the chamberwhen the brakes are applied.
•Checking the brake lining (every serviceinterval). When brake linings or blockswear within 0.063 in (1.6 mm) theymust be replaced.
•Periodic checking (every serviceinterval) of the air compressor filter.Check the filter minder and when theindicator is near or on the red linemarked Service, replace the filter andreset the service filter minder.
Do not back off or disconnect the frontbrakes so that they are less effective,letting the rear brakes do all the stoppingof your vehicle. Do not overlook the brakeson the trailer either. Brake condition on thetrailer is just as important as the tractor.Proper brake balance on trucks andtractor-trailers is essential for effectivebraking.
Once a year, inspect the entire brakesystem:
•Rubber components for deterioration.A qualified technician should inspectthese components and replace themas necessary. Replacement intervalsvary according to the severity andlength of vehicle service.
•Condition of brake drums, brakechambers and slack adjusters.
•System for air leaks.
•Hose or pipes for rust, damage anddeterioration.
•Operation of service and parkingbrakes.
Periodically inspect parts such as air brakechamber diaphragm, air compressor andair cleaner. Replace any parts if you canconsider them unserviceable.
Air Dryer
Climactic conditions affect performanceof desiccant or after-cooler type air dryers.You must establish a maintenanceschedule for each specific operation.
The use of an air dryer on a vehicle doesnot eliminate the need to drain the airreservoirs periodically.
Inspect for moisture in the air system byopening reservoirs, draincocks or valvesand checking for presence of water. Thepresence of small amounts of water dueto condensation is normal and is not anindication that the dryer is not functioningproperly.
Replace or rebuild the desiccant cartridgewhen you determine that the desiccant iscontaminated and does not have adequatewater absorption capacity. The desiccantchange interval may vary. A generalrecommendation is to replace thedesiccant every 12 months (yearly). Ifexperience has shown that extended orshortened life has resulted for a particularinstallation, then the yearly interval can beincreased or decreased accordingly.
Draining the Air Brake Reservoir
WARNING: Failure to drain airbrake reservoirs can result in a reductionor loss of braking ability due to fluidaccumulation in the reservoir and/orpossible freeze-up during cold weather.
Completely drain all the air brake reservoirsdaily by opening the draincock at the endsof the tanks. (Where accessible.Pull-chains are used when the drains areundercab or otherwise inaccessible.) Closethe draincock after draining. Manually drain
257
2024 F-650/750 (TBC) , enUSA, Edition date: 202210, First-PrintingMaintenance