2024 CHEVROLET SILVERADO remote start
[x] Cancel search: remote startPage 32 of 433

Chevrolet Silverado 2500 HD/3500 HD Owner Manual (GMNA-Localizing-U.
S./Canada/Mexico-16908339) - 2024 - CRC - 12/5/22
30 Keys, Doors, and Windows
Disarming the Alarm System
To disarm the alarm system or turn off the
alarm if it has been activated:
.PressKon the remote key.
.Start the vehicle.
To avoid setting off the alarm by mistake:
.Lock the vehicle after all occupants have
exited.
.Always unlock a door with the
remote key.
Unlocking the driver door with the key
will not disarm the system or turn off the
alarm.
How to Detect a Tamper Condition
IfKis pressed on the remote key and the
horn chirps three times, an alarm occurred
previously while the alarm system was
armed.
If the alarm has been activated, a message
will appear on the DIC.
Steering Column Lock
If equipped, the steering column lock is a
theft-deterrent device. This feature locks the
steering column when the vehicle is turned
off and the driver door is opened, or when the driver door is opened and then the
vehicle is turned off. The steering column
unlocks when the vehicle is turned on.
The Driver Information Center (DIC) may
display one of these messages:
.A message to service the steering column
lock indicates that an issue has been
detected with the column lock feature
and the vehicle should be serviced.
.A message that the steering column is
locked indicates that the engine is
running, but the steering column is still
locked. It is normal for the column to be
locked during a remote start, but the
column should unlock after the brake
pedal is pressed and the vehicle is started.
No message will display during a remote
start.
.A message that the steering wheel must
be turned and the vehicle must be started
again indicates that the column lock
mechanism is bound, the column locking
device was unable to unlock the steering
column, and the vehicle did not start.
If this happens, immediately turn the
steering wheel from side to side to
unbind the column lock. If this does not
unlock the steering column, turn the
vehicle off and open the driver door to
reset the system. Then turn the vehicle
on and immediately turn the steering
wheel side to side for about 15 seconds.
In some cases, it may take significant
force to unbind the column.
To keep the steering column from binding,
straighten the front wheels before turning
off the vehicle.
Immobilizer
See Radio Frequency Statement 0407.
Immobilizer Operation
This vehicle has a passive theft-deterrent
system.
The system does not have to be manually
armed or disarmed.
The vehicle is automatically immobilized
when the vehicle is turned off.
The system is automatically disarmed when
the ignition is turned from off to on.
Page 33 of 433

Chevrolet Silverado 2500 HD/3500 HD Owner Manual (GMNA-Localizing-U.
S./Canada/Mexico-16908339) - 2024 - CRC - 12/5/22
Keys, Doors, and Windows 31
The security light, in the instrument cluster,
comes on if there is a problem with arming
or disarming the theft-deterrent system.
The system has one or more remote keys
matched to an immobilizer control unit in
your vehicle. Only a correctly matched
remote key will start the vehicle. If the
remote key is ever damaged, you may not
be able to start your vehicle.
When trying to start the vehicle, the
security light may come on briefly when the
ignition is turned on. If the engine does not
start and the security light stays on, there is
a problem with the system. Turn the
ignition off and try again.
If the vehicle will not change ignition modes
(accessory mode, on, off), and the remote
key appears to be undamaged, try another
remote key. Or, you may try placing the
remote key in the remote key pocket
located in the center console. SeeRemote
Key Operation 012.
If the ignition mode will not change with
the other remote key or with the remote
key in the remote key pocket, your vehicle
needs service. If the ignition does change
modes, the first remote key may be faulty. See your dealer who can service the
theft-deterrent system and have a new
remote key programmed to the vehicle.
It is possible for the immobilizer system to
learn new or replacement remote keys. Up
to eight remote keys can be programmed
for the vehicle. To program additional
remote keys, see "Programming Remote
Keys to the Vehicle" under
Remote Key
Operation 012.
Do not leave the remote key or device that
disarms or deactivates the vehicle theft
system in the vehicle.
Exterior Mirrors
Convex Mirrors
{Warning
A convex mirror can make things, like
other vehicles, look farther away than
they really are. If you cut too sharply
into the right lane, you could hit a
vehicle on the right. Check the inside
mirror or glance over your shoulder
before changing lanes. Standard Mirrors
If equipped, the passenger side mirror is
convex shaped. A convex mirror surface is
curved so more can be seen from the
driver seat.
Trailer-Tow Mirrors
The upper portion of both the driver and
passenger mirrors is flat.
The lower portion of both the driver and
passenger mirrors is convex. A convex mirror
surface is curved so more can be seen from
the driver seat. The lower portion is
adjusted manually.
Manual Mirrors
If equipped, adjust manual mirrors by
moving the mirror up and down or left to
right to see a little of the side of the vehicle
and to have a clear view behind the vehicle.
Using hood-mounted air deflectors and
add-on convex mirror attachments could
decrease mirror performance.
Page 36 of 433

Chevrolet Silverado 2500 HD/3500 HD Owner Manual (GMNA-Localizing-U.
S./Canada/Mexico-16908339) - 2024 - CRC - 12/5/22
34 Keys, Doors, and Windows
Fold and unfold the mirrors one time using
the mirror controls to reset them to their
normal position. A noise may be heard
during the resetting of the power folding
mirrors. This sound is normal after a manual
folding operation.
Remote Mirror Folding
If equipped, double press and holdQon the
remote key for approximately one second to
remotely fold the exterior mirrors. Double
press and hold
Kon the remote key for
approximately one second to unfold. See
Remote Key Operation 012.
This feature can be turned on or off. To
view available settings from the
infotainment screen, touch Settings >
Vehicle > Comfort and Convenience.
Heated Mirrors
1REAR : If equipped, the rear window
defogger also heats the outside mirrors.
W: If equipped, press to turn the heated
outside mirrors on or off.
See “Rear Window Defogger” underClimate
Control Systems 0185 or
Dual Automatic Climate Control System
0 187.
Automatic Dimming Mirror
If equipped, the driver and passenger
outside mirrors automatically adjust for the
glare of headlamps from behind. This
feature comes on when the vehicle is
started.
Blind Spot Mirrors
If equipped, there is a small convex mirror
built into the upper and outer corner of the
driver outside mirror. It can show objects
that may be in the vehicle's blind zone.
Driving with the Blind Spot Mirror
Actual Mirror View
Page 42 of 433

Chevrolet Silverado 2500 HD/3500 HD Owner Manual (GMNA-Localizing-U.
S./Canada/Mexico-16908339) - 2024 - CRC - 12/5/22
40 Keys, Doors, and Windows
If equipped, pull the window switch up fully
and quickly release to express close the
window.
Briefly press or pull the window switch in
the same direction to stop that window’s
express movement.
Express Window Down
L: If equipped, this button will be on the
center stack.
Press and hold
Lto open all windows.
Release
Lto stop all movement.
Use the power window switches to close
each window.
Window Automatic Reversal System
The express-close feature will reverse
window movement if it comes in contact
with an object. Extreme cold or ice could
cause the window to auto-reverse. The
window will operate normally after the
object or condition is removed.
Automatic Reversal System Override
{Warning
If automatic reversal system override is
active, the window will not reverse
automatically. You or others could be
injured and the window could be
damaged. Before using automatic reversal
system override, make sure that all
people and obstructions are clear of the
window path.
When the engine is on, override the
automatic reversal system by pulling and
holding the window switch if conditions
prevent it from closing.
Programming the Power Windows
Programming may be necessary if the
vehicle battery has been disconnected or
discharged. If the window is unable to
express-up, program each express-close
window: 1. Close all doors.
2. Turn the ignition on or to accessory mode. 3. Partially open the window to be
programmed. Then close it and continue
to pull the switch briefly after the
window has fully closed.
4. Open the window and continue to press the switch briefly after the window has
fully opened.
Remote Window Operation
If equipped, this feature allows the windows
to be opened remotely. If enabled in vehicle
settings, double press and hold
Kon the
remote key. To view available settings from
the infotainment screen, touch Settings >
Vehicle > Remote Lock, Unlock, Start.
Page 50 of 433

Chevrolet Silverado 2500 HD/3500 HD Owner Manual (GMNA-Localizing-U.
S./Canada/Mexico-16908339) - 2024 - CRC - 12/5/22
48 Seats and Restraints
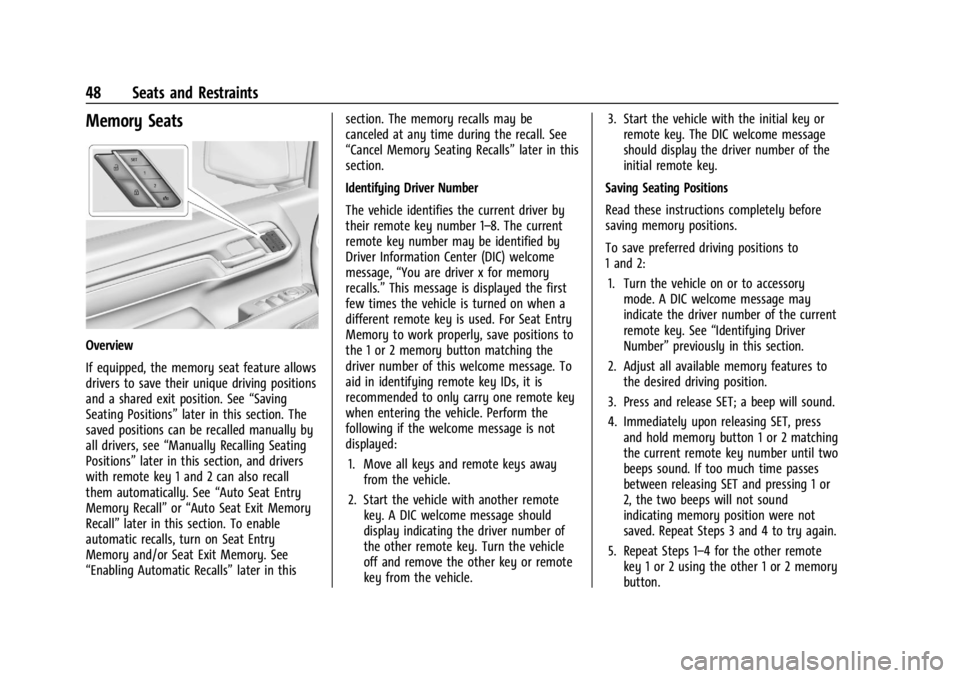
Memory Seats
Overview
If equipped, the memory seat feature allows
drivers to save their unique driving positions
and a shared exit position. See“Saving
Seating Positions” later in this section. The
saved positions can be recalled manually by
all drivers, see “Manually Recalling Seating
Positions” later in this section, and drivers
with remote key 1 and 2 can also recall
them automatically. See “Auto Seat Entry
Memory Recall” or“Auto Seat Exit Memory
Recall” later in this section. To enable
automatic recalls, turn on Seat Entry
Memory and/or Seat Exit Memory. See
“Enabling Automatic Recalls” later in thissection. The memory recalls may be
canceled at any time during the recall. See
“Cancel Memory Seating Recalls”
later in this
section.
Identifying Driver Number
The vehicle identifies the current driver by
their remote key number 1–8. The current
remote key number may be identified by
Driver Information Center (DIC) welcome
message, “You are driver x for memory
recalls.” This message is displayed the first
few times the vehicle is turned on when a
different remote key is used. For Seat Entry
Memory to work properly, save positions to
the 1 or 2 memory button matching the
driver number of this welcome message. To
aid in identifying remote key IDs, it is
recommended to only carry one remote key
when entering the vehicle. Perform the
following if the welcome message is not
displayed:
1. Move all keys and remote keys away from the vehicle.
2. Start the vehicle with another remote key. A DIC welcome message should
display indicating the driver number of
the other remote key. Turn the vehicle
off and remove the other key or remote
key from the vehicle. 3. Start the vehicle with the initial key or
remote key. The DIC welcome message
should display the driver number of the
initial remote key.
Saving Seating Positions
Read these instructions completely before
saving memory positions.
To save preferred driving positions to
1 and 2: 1. Turn the vehicle on or to accessory mode. A DIC welcome message may
indicate the driver number of the current
remote key. See “Identifying Driver
Number” previously in this section.
2. Adjust all available memory features to the desired driving position.
3. Press and release SET; a beep will sound.
4. Immediately upon releasing SET, press and hold memory button 1 or 2 matching
the current remote key number until two
beeps sound. If too much time passes
between releasing SET and pressing 1 or
2, the two beeps will not sound
indicating memory position were not
saved. Repeat Steps 3 and 4 to try again.
5. Repeat Steps 1–4 for the other remote key 1 or 2 using the other 1 or 2 memory
button.
Page 51 of 433

Chevrolet Silverado 2500 HD/3500 HD Owner Manual (GMNA-Localizing-U.
S./Canada/Mexico-16908339) - 2024 - CRC - 12/5/22
Seats and Restraints 49
It is recommended to save the preferred
driving positions to both 1 and 2 if you are
the only driver.
To save the common exit seating position to
Bthat is used by all drivers for Manually
Recalling Seating Positions and Auto Seat
Exit Memory Recall features, repeat Steps 1–
4 using
B, the exit button.
Manually Recalling Seating Positions
Press and hold 1, 2, or
Bbutton until the
recall is complete, to recall the positions
previously saved to that button.
Manual Memory recall movement for 1, 2 or
Bbuttons may be initiated and will
complete to the saved memory position if
the vehicle is in or out of P (Park).
Enabling Automatic Recalls
.Seat Entry Memory moves the driver seat
to the selected 1 or 2 position when the
vehicle is started. Select Settings > Vehicle
> Seating Position > Seat Entry Memory >
ON or OFF. See “Auto Seat Entry Memory
Recall” later in this section.
.Seat Exit Memory moves the driver seat
to the preferred exit position of the
B
button when the vehicle is turned off and
the door is opened. Select Settings > Vehicle > Seating Position > Seat Exit
Memory > Select ON or OFF. See
“Auto
Seat Exit Memory Recall” later in this
section.
Auto Seat Entry Memory Recall
Seat Entry Memory will automatically begin
movement to the seating positions of the 1
or 2 button corresponding to remote key
number 1 or 2 detected by the vehicle when:
.The vehicle is turned ON.
.Seating positions have been previously
saved to the same 1 or 2 button. See
“Saving Seating Positions” previously in
this section.
.Seat Entry Memory is enabled. See
“Enabling Automatic Recalls” previously in
this section.
.The vehicle is in P (Park).
Seat Entry Memory Recall will continue if
the vehicle is shifted out of P (Park) prior to
reaching the saved memory position.
If the saved memory seat position does not
automatically recall, verify the recall is
enabled. See “Enabling Automatic Recalls”
previously in this section. If the memory seat recalls to the wrong
position, remote key number 1 or 2 may not
match the memory button number positions
they were saved to. Try the other remote
key or try saving the positions to the other
1 or 2 memory button. See
“Saving Seating
Positions” previously in this section.
Automatic Seat Entry Memory recalls are
only available for remote key numbers 1 and
2. Remote keys 3–8 will not provide Seat
Entry Memory recalls.
Auto Seat Exit Memory Recall
Seat Exit Memory will begin movement to
the seating position of the
B
button when:
.The vehicle is turned off and the driver
door is open or opened within a
short time.
.A seating position has been previously
been saved to the
Bmemory button.
See “Saving Seating Positions” previously
in this section.
.Seat Exit Memory is enabled. See
“Enabling Automatic Recalls” previously in
this section.
.The vehicle is in P (Park).
Page 53 of 433

Chevrolet Silverado 2500 HD/3500 HD Owner Manual (GMNA-Localizing-U.
S./Canada/Mexico-16908339) - 2024 - CRC - 12/5/22
Seats and Restraints 51
Press the button once for the highest
setting. With each press of the button, the
seat will change to the next lower setting,
and then to the off setting. The indicator
lights next to the buttons indicate three for
the highest setting and one for the lowest.
If the heated seats are on high for
30 minutes, their level will automatically be
lowered.
Auto Heated and Ventilated Seats
When the vehicle is on, this feature,
if enabled, will automatically activate the
heated or ventilated seats at the level
required by the vehicle’s interior
temperature.
The active high, medium, low, or off heated
or ventilated seat level will be indicated by
the manual heated or ventilated seat
buttons on the center stack. Use the manual
heated or ventilated seat buttons on the
center stack to turn auto heated or
ventilated seats off. If the passenger seat is
unoccupied, the auto heated or ventilated
seats feature will not activate that seat.
If equipped with a heated steering wheel,
the auto heated steering wheel activation
will follow the heated seat auto activation
and the heated wheel indicator will follow
the state of the steering wheel heat.To enable or disable auto heated or
ventilated seats, select Settings > Vehicle >
Climate and Air Quality > Auto Cooled or
Auto Heated Seats > ON or OFF.
Remote Start Heated and Ventilated Seats
If equipped, the heated seats will turn on
automatically during a remote start if it is
cold outside and the ventilated seats will
turn on automatically if it is hot outside.
If equipped, the heated steering wheel will
turn on automatically during a remote start
if it is cold outside. The heated and
ventilated seat indicators and heated
steering wheel indicator may come on
during this operation.
The heated and ventilated seats and heated
steering wheel may cancel when the vehicle
is started. These features can be manually
selected after the vehicle is turned on.
The temperature performance of an
unoccupied seat may be reduced. This is
normal.
To enable or disable remote start heated or
ventilated seats, select Settings > Vehicle >
Remote Lock, Unlock, and Start > Remote
Start Auto Heat Seats or Remote Start Auto
Cool Seats > ON or OFF. See
Remote Vehicle
Start 018.Rear Seats
Rear Seat Reminder
If equipped, the message REAR SEAT
REMINDER LOOK IN REAR SEAT displays
under certain conditions indicating there
may be an item or passenger in the rear
seat. Check before exiting the vehicle.
This feature will activate when a second row
door is opened while the vehicle is on or up
to 10 minutes before the vehicle is turned
on. There will be an alert when the vehicle
is turned off. The alert does not directly
detect objects in the rear seat; instead,
under certain conditions, it detects when a
rear door is opened and closed, indicating
that there may be something in the
rear seat.
The feature is active only once each time
the vehicle is turned on and off, and will
require reactivation by opening and closing
the second row doors. There may be an
alert even when there is nothing in the rear
seat; for example, if a child entered the
vehicle through the rear door and left the
vehicle without the vehicle being shut off.
Page 55 of 433

Chevrolet Silverado 2500 HD/3500 HD Owner Manual (GMNA-Localizing-U.
S./Canada/Mexico-16908339) - 2024 - CRC - 12/5/22
Seats and Restraints 53
This feature turns on at the highest setting.
With each press of the button, the heated
seat changes to the next lower setting, and
then the off setting. Three lights indicate
the highest setting, and one light indicates
the lowest. If the heated seats are on high,
the level may automatically be lowered
after approximately 30 minutes.
Remote Start Heated Seats
If equipped, the heated seats will turn on
automatically during a remote start if it is
cold outside. The heated seat indicators may
come on during this operation. The heated
seats may cancel when the vehicle is
started. These features can be manually
selected with the heated seat buttons after
the vehicle is turned on.
The temperature performance of an
unoccupied seat may be reduced. This is
normal.
To enable or disable remote start heated
seats, select Settings > Vehicle > Remote
Lock, Unlock, and Start > Remote Start Auto
Heat Seats > ON or OFF. SeeRemote Vehicle
Start 018.Seat Belts
This section describes how to use seat belts
properly, and some things not to do.
{Warning
Do not let anyone ride where a seat belt
cannot be worn properly. In a crash,
if you or your passenger(s) are not
wearing seat belts, injuries can be much
worse than if you are wearing seat belts.
You can be seriously injured or killed by
hitting things inside the vehicle harder or
by being ejected from the vehicle. In
addition, anyone who is not buckled up
can strike other passengers in the vehicle.
It is extremely dangerous to ride in a
cargo area, inside or outside of a vehicle.
In a collision, passengers riding in these
areas are more likely to be seriously
injured or killed. Do not allow passengers
to ride in any area of the vehicle that is
not equipped with seats and seat belts.
Always wear a seat belt, and check that
all passenger(s) are restrained
properly too. This vehicle has indicators as a reminder to
buckle the seat belts. See
Seat Belt
Reminders 0115.
Why Seat Belts Work
When riding in a vehicle, you travel as fast
as the vehicle does. If the vehicle stops
suddenly, you keep going until something
stops you. It could be the windshield, the
instrument panel, or the seat belts!
When you wear a seat belt, you and the
vehicle slow down together. There is more
time to stop because you stop over a longer
distance and, when worn properly, your
strongest bones take the forces from the
seat belts. That is why wearing seat belts
makes such good sense.