2024 CHEVROLET SILVERADO ABS
[x] Cancel search: ABSPage 230 of 433
Chevrolet Silverado 2500 HD/3500 HD Owner Manual (GMNA-Localizing-U.
S./Canada/Mexico-16908339) - 2024 - CRC - 12/12/22
228 Driving and Operating
If there is a problem with ABS, this warning
light stays on. SeeAntilock Brake System
(ABS) Warning Light 0120.
ABS does not change the time needed to
get a foot on the brake pedal and does not
always decrease stopping distance. If you
get too close to the vehicle ahead, there will
not be enough time to apply the brakes if
that vehicle suddenly slows or stops. Always
leave enough room ahead to stop, even
with ABS.
Using ABS
Do not pump the brakes. Just hold the brake
pedal down firmly. Hearing or feeling ABS
operate is normal.
Braking in Emergencies
ABS allows steering and braking at the same
time. In many emergencies, steering can
help even more than braking.
Electric Parking Brake
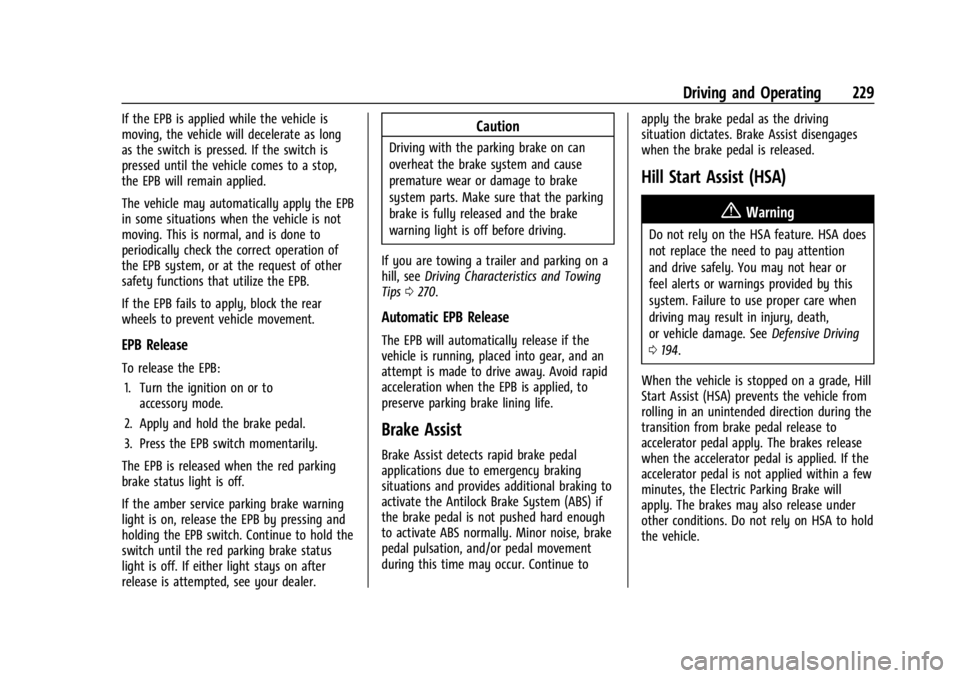
Work Truck Shown, Others Similar
The Electric Parking Brake (EPB) can always
be applied, even if the vehicle is off. In the
case of insufficient electrical power,
however, the EPB cannot be applied or
released. To prevent draining the battery,
avoid unnecessary repeated cycles of
the EPB.
The system has a red parking brake status
light and an amber service parking brake
warning light. See Electric Parking Brake
Light 0119 and Service Electric Parking Brake
Light 0119. There are also parking
brake-related Driver Information Center (DIC)
messages. Before leaving the vehicle, check the red
parking brake status light to ensure that the
parking brake is applied.
EPB Apply
To apply the EPB:
1. Be sure the vehicle is at a complete stop.
2. Press the EPB switch momentarily.
The red parking brake status light will flash
and then stay on once the EPB is fully
applied. If the red parking brake status light
flashes continuously, then the EPB is only
partially applied or there is a problem with
the EPB. A DIC message will display. Release
the EPB and try to apply it again. If the
light does not come on, or keeps flashing,
have the vehicle serviced. Do not drive the
vehicle if the red parking brake status light
is flashing. See your dealer.
If the amber service parking brake warning
light is on, press the EPB switch. Continue to
hold the switch until the red parking brake
status light remains on. If the amber service
parking brake warning light is on, see your
dealer.
Page 231 of 433
Chevrolet Silverado 2500 HD/3500 HD Owner Manual (GMNA-Localizing-U.
S./Canada/Mexico-16908339) - 2024 - CRC - 12/12/22
Driving and Operating 229
If the EPB is applied while the vehicle is
moving, the vehicle will decelerate as long
as the switch is pressed. If the switch is
pressed until the vehicle comes to a stop,
the EPB will remain applied.
The vehicle may automatically apply the EPB
in some situations when the vehicle is not
moving. This is normal, and is done to
periodically check the correct operation of
the EPB system, or at the request of other
safety functions that utilize the EPB.
If the EPB fails to apply, block the rear
wheels to prevent vehicle movement.
EPB Release
To release the EPB:1. Turn the ignition on or to accessory mode.
2. Apply and hold the brake pedal.
3. Press the EPB switch momentarily.
The EPB is released when the red parking
brake status light is off.
If the amber service parking brake warning
light is on, release the EPB by pressing and
holding the EPB switch. Continue to hold the
switch until the red parking brake status
light is off. If either light stays on after
release is attempted, see your dealer.
Caution
Driving with the parking brake on can
overheat the brake system and cause
premature wear or damage to brake
system parts. Make sure that the parking
brake is fully released and the brake
warning light is off before driving.
If you are towing a trailer and parking on a
hill, see Driving Characteristics and Towing
Tips 0270.
Automatic EPB Release
The EPB will automatically release if the
vehicle is running, placed into gear, and an
attempt is made to drive away. Avoid rapid
acceleration when the EPB is applied, to
preserve parking brake lining life.
Brake Assist
Brake Assist detects rapid brake pedal
applications due to emergency braking
situations and provides additional braking to
activate the Antilock Brake System (ABS) if
the brake pedal is not pushed hard enough
to activate ABS normally. Minor noise, brake
pedal pulsation, and/or pedal movement
during this time may occur. Continue to apply the brake pedal as the driving
situation dictates. Brake Assist disengages
when the brake pedal is released.
Hill Start Assist (HSA)
{Warning
Do not rely on the HSA feature. HSA does
not replace the need to pay attention
and drive safely. You may not hear or
feel alerts or warnings provided by this
system. Failure to use proper care when
driving may result in injury, death,
or vehicle damage. See
Defensive Driving
0 194.
When the vehicle is stopped on a grade, Hill
Start Assist (HSA) prevents the vehicle from
rolling in an unintended direction during the
transition from brake pedal release to
accelerator pedal apply. The brakes release
when the accelerator pedal is applied. If the
accelerator pedal is not applied within a few
minutes, the Electric Parking Brake will
apply. The brakes may also release under
other conditions. Do not rely on HSA to hold
the vehicle.
Page 235 of 433
Chevrolet Silverado 2500 HD/3500 HD Owner Manual (GMNA-Localizing-U.
S./Canada/Mexico-16908339) - 2024 - CRC - 12/12/22
Driving and Operating 233
default mode. There is no persistent
indicator in the instrument cluster for
this mode.
6Snow/Ice Mode :Snow/Ice Mode
improves vehicle acceleration on snow and
ice covered roads. When active, Snow/Ice
Mode will adjust acceleration to optimize
traction on slippery surfaces. This can
compromise the acceleration on dry asphalt.
This feature is not intended for use when
the vehicle is stuck in sand, mud, ice, snow,
or gravel. If the vehicle becomes stuck, see If
the Vehicle Is Stuck 0203.
7Off-Road Mode : Use this mode for
off-road recreational driving. Off-Road Mode
should be used to improve driving at
moderate speeds, on grass, gravel, dirt,
unpaved roads, or snow-covered roads. The
accelerator pedal is tuned for off-road use.
This mode modifies pedal mapping,
transmission shift pattern, Antilock Brake
System (ABS), StabiliTrak/Electronic Stability
Control (ESC), and Traction Control System
(TCS) performance.
For more information on off-road driving see
Off-Road Driving 0197.
_Tow/Haul Mode : Use this mode
when hauling heavy loads to provide
increased performance and vehicle control.
Tow/Haul Mode adjusts the transmission
shift pattern, trailer sway, and steering.
If the vehicle is turned off with Tow/Haul
Mode active and then restarted within four
hours or less, Tow/Haul will remain active.
Otherwise, the vehicle will start in
Normal Mode.
If the vehicle has a diesel engine, exhaust
braking is automatically activated when
Tow/Haul Mode is selected. It maintains
vehicle speed by automatically
implementing a shift pattern that uses the
engine and the transmission to slow the
vehicle. The system will command
downshifts and use the turbocharger on the
engine to reduce vehicle speed when the
brake is applied. The normal tow/haul shift
pattern will return once the vehicle is on a
low grade or when the accelerator pedal is
pressed.
While in the Electronic Range Select (ERS)
Mode, grade breaking is deactivated,
allowing the driver to select a range and
limiting the highest gear available. See
Manual Mode 0220. For more information on trailer weight
specifications, see
Towing Equipment 0278.
Locking Rear Axle
Vehicles with a locking rear axle can give
more traction on snow, mud, ice, sand,
or gravel. It works like a standard axle most
of the time, but when traction is low, this
feature will allow the rear wheel with the
most traction to move the vehicle.
Cruise Control
If equipped, cruise control allows the vehicle
to maintain a set speed of 40 km/h
(25 mph) or more without active
acceleration. Cruise control does not work at
speeds below about 40 km/h (25 mph).
{Warning
Cruise control can be dangerous where
you cannot drive safely at a steady
speed. Do not use cruise control on
winding roads or in heavy traffic.
Cruise control can be dangerous on
slippery roads. On such roads, fast
changes in tire traction can cause
(Continued)
Page 275 of 433
Chevrolet Silverado 2500 HD/3500 HD Owner Manual (GMNA-Localizing-U.
S./Canada/Mexico-16908339) - 2024 - CRC - 12/12/22
Driving and Operating 273
When parking your vehicle and your trailer
on a hill:1. Press and hold the brake pedal, but do not shift into P (Park). Turn the wheels
toward the curb if facing downhill or
into traffic if facing uphill.
2. Have someone place chocks under the trailer wheels.
3. Gradually release the brake pedal to allow the chocks to absorb the load of
the trailer.
4. Reapply the brake pedal. Then apply the parking brake and shift into P (Park).
5. Release the brake pedal.
Leaving After Parking on a Hill
1. Apply and hold the brake pedal.
.Start the engine.
.Shift into a gear.
.Release the parking brake.
2. Let up on the brake pedal.
3. Drive slowly until the trailer is clear of the chocks.
4. Stop and have someone pick up and store the chocks.
Launching and Retrieving a Boat
Backing the Trailer into the Water
{Warning
.Have all passengers get out of the
vehicle before backing onto the sloped
part of the ramp. Lower the driver and
passenger side windows before
backing onto the ramp. This will
provide a means of escape in the
unlikely event the vehicle slides into
the water.
.If the boat launch surface is slippery,
have the driver remain in the vehicle
with the brake pedal applied while the
boat is being launched. The boat
launch can be especially slippery at
low tide when part of the ramp was
previously submerged at high tide. Do
not back onto the ramp to launch the
boat if you are not sure the vehicle
can maintain traction.
.Do not move the vehicle if someone is
in the path of the trailer. Some parts
of the trailer might be underwater and
not visible to people who are assisting
in launching the boat. Disconnect the trailer wiring before backing
the trailer into the water to prevent damage
to the electrical circuits. Reconnect the
wiring to the trailer after removing the
trailer from the water. If the trailer has
electric brakes that can function when the
trailer is submerged, it might help to leave
the electrical trailer connector attached to
maintain trailer brake functionality while on
the boat ramp.
To back the trailer into the water:
1. If equipped, place the vehicle in Four-Wheel Drive High or Automatic
Four-Wheel Drive.
2. Slowly back down the boat ramp until the boat is floating, but no further than
necessary.
3. Press and hold the brake pedal, but do not shift into P (Park).
4. Have someone place chocks under the front wheels of the vehicle.
5. Gradually release the brake pedal to allow the chocks to absorb the load of
the trailer.
6. Reapply the brake pedal. Then, apply the parking brake and shift into P (Park).
7. Release the brake pedal.
Page 323 of 433
Chevrolet Silverado 2500 HD/3500 HD Owner Manual (GMNA-Localizing-U.
S./Canada/Mexico-16908339) - 2024 - CRC - 12/5/22
Vehicle Care 321
installed. Add or remove fluid, as necessary,
only when work is done on the brake
hydraulic system.
{Warning
If too much brake fluid is added, it can
spill on the engine and burn, if the
engine is hot enough. You or others could
be burned, and the vehicle could be
damaged. Add brake fluid only when
work is done on the brake hydraulic
system.
When the brake fluid falls to a low level,
the brake warning light comes on. See Brake
System Warning Light 0119.
Brake fluid absorbs water over time which
degrades the effectiveness of the brake fluid.
Replace brake fluid at the specified intervals
to prevent increased stopping distance. See
Maintenance Schedule 0388.
What to Add
Use only GM approved DOT 4 brake fluid
from a clean, sealed container. See
Recommended Fluids and Lubricants 0392.
{Warning
The wrong or contaminated brake fluid
could result in damage to the brake
system. This could result in the loss of
braking leading to a possible injury.
Always use the proper GM approved
brake fluid.
Caution
If brake fluid is spilled on the vehicle's
painted surfaces, the paint finish can be
damaged. Immediately wash off any
painted surface.
Battery - North America
The original equipment battery is
maintenance free. Do not remove the cap
and do not add fluid.
Refer to the replacement number shown on
the original battery label when a new
battery is needed. See Engine Compartment
Overview 0307 for battery location.
{Warning
WARNING: Battery posts, terminals and
related accessories can expose you to
chemicals including lead and lead
compounds, which are known to the
State of California to cause cancer and
birth defects or other reproductive harm.
Wash hands after handling. For more
information go to
www.P65Warnings.ca.gov.
See California Proposition 65 Warning 01.
Vehicle Storage
{Warning
Batteries have acid that can burn you and
gas that can explode. You can be badly
hurt if you are not careful. Always wear
eye protection. See Jump Starting - North
America 0370 for tips on working
around a battery without getting hurt.
Infrequent Usage: Remove the black,
negative (−) cable from the battery to keep
the battery from running down.
Page 366 of 433
Chevrolet Silverado 2500 HD/3500 HD Owner Manual (GMNA-Localizing-U.
S./Canada/Mexico-16908339) - 2024 - CRC - 12/5/22
364 Vehicle Care
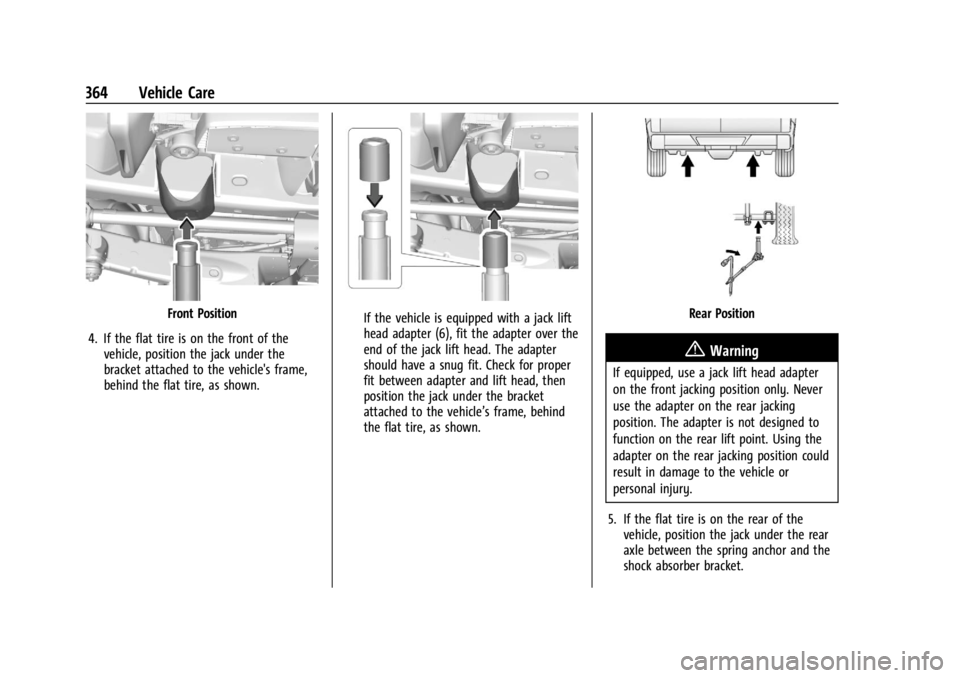
Front Position
4. If the flat tire is on the front of the vehicle, position the jack under the
bracket attached to the vehicle's frame,
behind the flat tire, as shown.If the vehicle is equipped with a jack lift
head adapter (6), fit the adapter over the
end of the jack lift head. The adapter
should have a snug fit. Check for proper
fit between adapter and lift head, then
position the jack under the bracket
attached to the vehicle’s frame, behind
the flat tire, as shown.Rear Position
{Warning
If equipped, use a jack lift head adapter
on the front jacking position only. Never
use the adapter on the rear jacking
position. The adapter is not designed to
function on the rear lift point. Using the
adapter on the rear jacking position could
result in damage to the vehicle or
personal injury.
5. If the flat tire is on the rear of the vehicle, position the jack under the rear
axle between the spring anchor and the
shock absorber bracket.
Page 379 of 433
Chevrolet Silverado 2500 HD/3500 HD Owner Manual (GMNA-Localizing-U.
S./Canada/Mexico-16908339) - 2024 - CRC - 12/5/22
Vehicle Care 377
8. Start the engine. Check that the vehicleis in 2
m(Two-Wheel Drive High) by
starting the engine and shifting the
transmission to D (Drive) and then to
R (Reverse). There should be movement
of the vehicle while shifting.
9. Shift the transmission to P (Park) and turn off the vehicle.
10. Release the parking brake and remove the wheel blocks.
11. Reset any lost presets. The outside temperature display will
default to 0 °C (32 °F) but will reset with
normal usage.
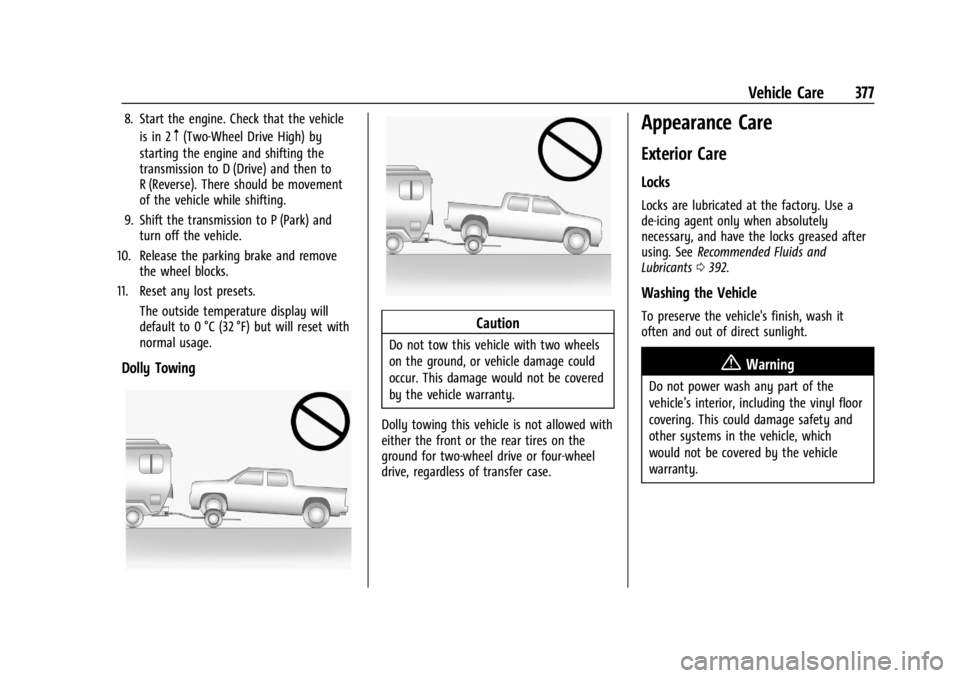
Dolly Towing
Caution
Do not tow this vehicle with two wheels
on the ground, or vehicle damage could
occur. This damage would not be covered
by the vehicle warranty.
Dolly towing this vehicle is not allowed with
either the front or the rear tires on the
ground for two-wheel drive or four-wheel
drive, regardless of transfer case.
Appearance Care
Exterior Care
Locks
Locks are lubricated at the factory. Use a
de-icing agent only when absolutely
necessary, and have the locks greased after
using. See Recommended Fluids and
Lubricants 0392.
Washing the Vehicle
To preserve the vehicle's finish, wash it
often and out of direct sunlight.
{Warning
Do not power wash any part of the
vehicle’s interior, including the vinyl floor
covering. This could damage safety and
other systems in the vehicle, which
would not be covered by the vehicle
warranty.
Page 420 of 433

Chevrolet Silverado 2500 HD/3500 HD Owner Manual (GMNA-Localizing-U.
S./Canada/Mexico-16908339) - 2024 - CRC - 12/5/22
418 Index
IndexA
Accessories and Modifications . . . . . . . . . . . 304
Accessory Power . . . . . . . . . . . . . . . . . . . . . . . . . .214
AdaptiveCruise Control . . . . . . . . . . . . . . . . . . . . . . . . . 235
Add-On Electrical Equipment . . . . . . . . . . . . . 300
Adding a Snow Plow or Similar Equipment . . . . . . . . . . . . . . . . . . . . . . . . . . . . . 300
Additional OnStar Information . . . . . . . . . . . . . . . . . . . . 412
Adjustments Lumbar, Front Seats . . . . . . . . . . . . . . . . . . . . 47
Advanced Driver Assistance Systems . . . . . . . . . . . . . 246
Agreements Trademarks and License . . . . . . . . . . . . . . . 182
Air Cleaner/Filter, Engine . . . . . . . . . . . . . . . . . . 312
Conditioning . . . . . . . . . . . . . . . . . . . . . . . . . . . 187
Filter Life System . . . . . . . . . . . . . . . . . . . . . . . 311
Filter, Passenger Compartment . . . . . . . . 190
Vents . . . . . . . . . . . . . . . . . . . . . . . . . . . . . . . . . . 190
Air Conditioning . . . . . . . . . . . . . . . . . . . . . . . . . .185
Airbag System . . . . . . . . . . . . . . . . . . . . . . . . . . . . 60 Check . . . . . . . . . . . . . . . . . . . . . . . . . . . . . . . . . . . 70
How Does an Airbag Restrain? . . . . . . . . . . 64
Passenger Sensing System . . . . . . . . . . . . . . 65
What Makes an Airbag Inflate? . . . . . . . . . 64 Airbag System (cont'd)
What Will You See after an Airbag
Inflates? . . . . . . . . . . . . . . . . . . . . . . . . . . . . . . 64
When Should an Airbag Inflate? . . . . . . . . 63
Where Are the Airbags? . . . . . . . . . . . . . . . . 62
Airbags Adding Equipment to the Vehicle . . . . . . . 69
Passenger Status Indicator . . . . . . . . . . . . . . 116
Readiness Light . . . . . . . . . . . . . . . . . . . . . . . . . 116
Replacing System Parts after a
Crash . . . . . . . . . . . . . . . . . . . . . . . . . . . . . . . . . 70
Servicing Airbag-Equipped Vehicles . . . . . . 69
Alarm Vehicle Security . . . . . . . . . . . . . . . . . . . . . . . . 29
Alert Lane Change (LCA) . . . . . . . . . . . . . . . . . . . . . 262
Rear Cross Traffic . . . . . . . . . . . . . . . . . . . . . . 257
All-Season Tires . . . . . . . . . . . . . . . . . . . . . . . . . . 340
All-Terrain Tires . . . . . . . . . . . . . . . . . . . . . . . . . . .341
AM-FM Radio . . . . . . . . . . . . . . . . . . . . . . . . 154, 156
Antenna Multi-band . . . . . . . . . . . . . . . . . . . . . . . . . . . . . 158
Antilock Brake System (ABS) . . . . . . . . . . . . . 227 Warning Light . . . . . . . . . . . . . . . . . . . . . . . . . 120
Appearance Care Exterior . . . . . . . . . . . . . . . . . . . . . . . . . . . . . . . . 377
Interior . . . . . . . . . . . . . . . . . . . . . . . . . . . . . . . . 382
Apple CarPlay and Android Auto . . . . . 172, 174