2024 CHEVROLET SILVERADO EV change wheel
[x] Cancel search: change wheelPage 255 of 429
Chevrolet Silverado EV Owner Manual (GMNA-Localizing-U.S./Canada-
16702912) - 2024 - CRC - 1/17/23
254 Driving and Operating
.Performance for Transparent Trailer and
Jack Knife Detection are optimized when
the entered value for trailer width reflects
the width of the box of the trailer. If total
width is entered:
.The inlayed camera view in
Transparent Trailer View may appear
wider than the trailer face.
.Jack Knife Detection alerts may
activate prematurely.
.Performance for Rear Trailer Guidance
Lines and Trailer Length Indicator Overlays
are optimized when the entered value for
trailer width reflects the total width of
the trailer including outboard wheels.
If the trailer box width is entered:
.The Rear Trailer Guidance Lines will
appear narrower than the actual path
of the trailer.
.The Trailer Length Indicator Overlays
will appear closer and possibly overlap
with the trailer.
Park Assist
With Front and Rear Park Assist, as the
vehicle moves at speeds of less than 8 km/h
(5 mph) the sensors on the bumpers may
detect objects up to 1.2 m (4 ft) in front and
1.8 m (6 ft) behind the vehicle within a zone
25 cm (10 in) high off the ground and below
bumper level. These detection distances may
be shorter during warmer or humid weather.
Blocked sensors will not detect objects and
can also cause false detections. Keep the
sensors clean of mud, dirt, snow, ice, and
slush; and clean sensors after a car wash in
freezing temperatures.
{Warning
The Park Assist system does not detect
children, pedestrians, bicyclists, animals,
or objects located below the bumper or
that are too close or too far from the
vehicle. It is not available at speeds
greater than 8 km/h (5 mph). To prevent
injury, death, or vehicle damage, even
with Park Assist, always check the area
around the vehicle and check all mirrors
before moving forward or backing.
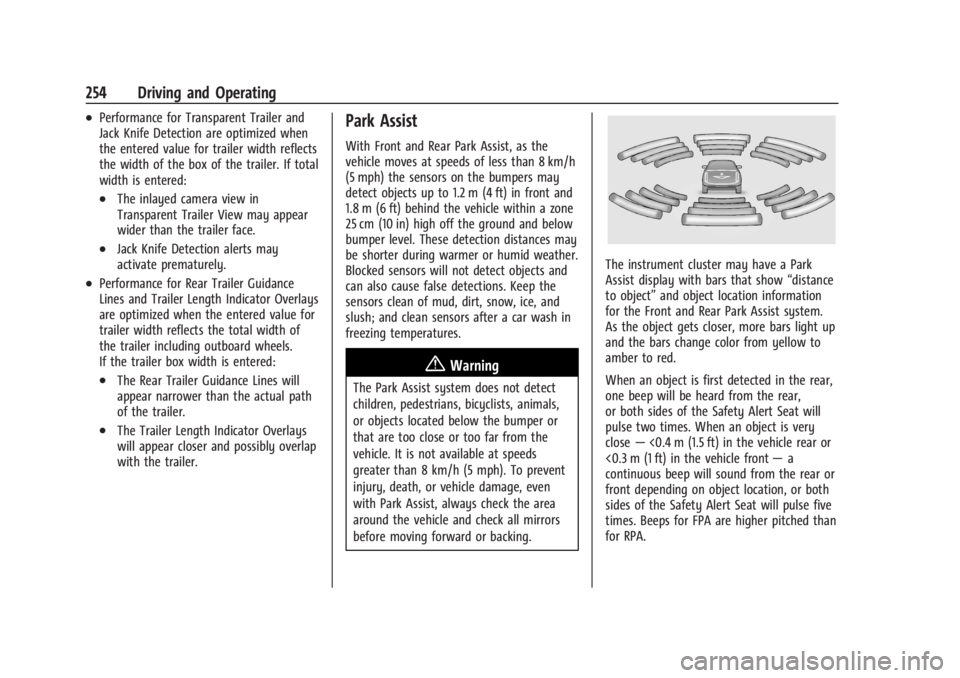
The instrument cluster may have a Park
Assist display with bars that show“distance
to object” and object location information
for the Front and Rear Park Assist system.
As the object gets closer, more bars light up
and the bars change color from yellow to
amber to red.
When an object is first detected in the rear,
one beep will be heard from the rear,
or both sides of the Safety Alert Seat will
pulse two times. When an object is very
close —<0.4 m (1.5 ft) in the vehicle rear or
<0.3 m (1 ft) in the vehicle front —a
continuous beep will sound from the rear or
front depending on object location, or both
sides of the Safety Alert Seat will pulse five
times. Beeps for FPA are higher pitched than
for RPA.
Page 263 of 429
Chevrolet Silverado EV Owner Manual (GMNA-Localizing-U.S./Canada-
16702912) - 2024 - CRC - 1/17/23
262 Driving and Operating
{Warning
FCA does not provide a warning to help
avoid a crash, unless it detects a vehicle.
FCA may not detect a vehicle ahead if
the FCA sensor is blocked by dirt, snow,
or ice, or if the windshield is damaged.
It may also not detect a vehicle on
winding or hilly roads, or in conditions
that can limit visibility such as fog, rain,
or snow, or if the headlamps or
windshield are not cleaned or in proper
condition. Keep the windshield,
headlamps, and FCA sensors clean and in
good repair.
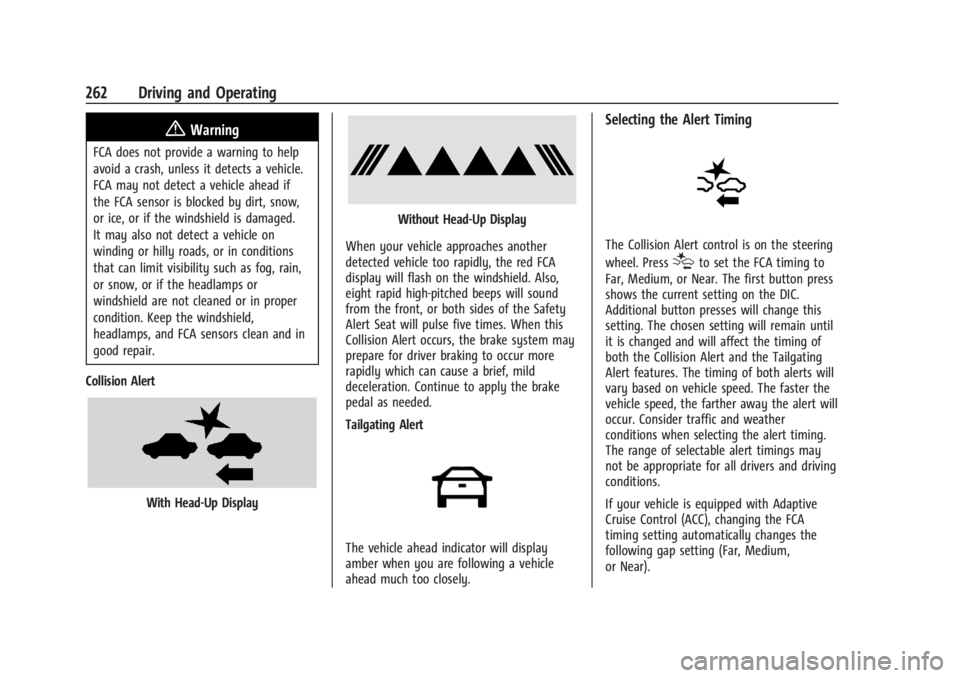
Collision Alert
With Head-Up Display
Without Head-Up Display
When your vehicle approaches another
detected vehicle too rapidly, the red FCA
display will flash on the windshield. Also,
eight rapid high-pitched beeps will sound
from the front, or both sides of the Safety
Alert Seat will pulse five times. When this
Collision Alert occurs, the brake system may
prepare for driver braking to occur more
rapidly which can cause a brief, mild
deceleration. Continue to apply the brake
pedal as needed.
Tailgating Alert
The vehicle ahead indicator will display
amber when you are following a vehicle
ahead much too closely.
Selecting the Alert Timing
The Collision Alert control is on the steering
wheel. Press
[to set the FCA timing to
Far, Medium, or Near. The first button press
shows the current setting on the DIC.
Additional button presses will change this
setting. The chosen setting will remain until
it is changed and will affect the timing of
both the Collision Alert and the Tailgating
Alert features. The timing of both alerts will
vary based on vehicle speed. The faster the
vehicle speed, the farther away the alert will
occur. Consider traffic and weather
conditions when selecting the alert timing.
The range of selectable alert timings may
not be appropriate for all drivers and driving
conditions.
If your vehicle is equipped with Adaptive
Cruise Control (ACC), changing the FCA
timing setting automatically changes the
following gap setting (Far, Medium,
or Near).
Page 274 of 429
Chevrolet Silverado EV Owner Manual (GMNA-Localizing-U.S./Canada-
16702912) - 2024 - CRC - 1/17/23
Driving and Operating 273
Navigation System Traffic Sign Detection
The currently displayed sign can either
originate from sign detection using the
camera, or from the navigation system map
data. If the currently displayed sign
originates from map data and the map
information changes, a new sign will be
displayed. This may lead to detection of a
new sign although no sign on the road may
have been passed. If the map data is
unavailable, Traffic Sign Assistant will turn
off automatically.
Limitations
Traffic sign memory may not operate
correctly if:
.The area of the windshield, where the
front camera is located, is not clean or is
affected by foreign objects, e.g. stickers,
window tinting, etc.
.Traffic signs are completely or partially
covered, are too low or high or difficult to
discern.
.Traffic signs are incorrectly mounted or
are damaged.
.Traffic signs do not comply with the
approved traffic sign standards.
.The speed limit is displayed by certain
types of electronic speed signs.
.There are adverse environmental
conditions, e.g. heavy rain, snow, direct
sunlight or shadows.
.The headlights are dirty or not correctly
aligned when driving at night.
.The navigation map data is out of date.
.The navigation map is unavailable.
Driver Attention Assist
If equipped, Driver Attention Assist alerts
the driver to pay closer attention to the
road ahead. Driver Attention Assist uses a
camera-based Driver Monitoring System. The
Driver Monitoring System on the steering
column continually monitors the driver's
head movements and eye gaze location to
determine if the driver is drowsy or
distracted. Depending on the level of the
driver’s distraction or drowsiness, Driver
Attention Assist will provide visual warnings,
chimes, and haptic movements to gently
guide the driver to look back at the road.
Sunglasses, hats, or other types of clothing
that change the shape of the head may
interfere with camera performance. To
improve camera performance, raise or lower
the steering wheel, or change the seat
position.
Driver Attention Assist does not record video
or audio. It is only active while driving with
the feature enabled.
How to Activate Driver Attention Assist
Driver Attention Assist turns on
automatically every time the vehicle is
started. The feature can be enabled or
disabled through vehicle settings. To view
Page 277 of 429
Chevrolet Silverado EV Owner Manual (GMNA-Localizing-U.S./Canada-
16702912) - 2024 - CRC - 1/17/23
276 Driving and Operating
To turn LKA on and off, pressAon the
instrument panel to the left of the steering
wheel. If equipped, the indicator light on the
button comes on when LKA is on and turns
off when LKA is disabled. In some vehicles,
you must press the button for more than
three seconds to turn LKA off.
LKA is not available when Terrain Mode,
Snow/Ice Mode, or Off-Road Mode is
selected.
See Driver Mode Control 0209. See
Four-Wheel Steering 0210.
When attempting to enable LKA in any of
the above conditions, LKA UNAVAILABLE will
display.
When on,
Ais white, if equipped,
indicating that the system is not ready to
assist.
Ais green if LKA is ready to
assist. LKA may assist by gently turning the
steering wheel if the vehicle approaches a
detected lane marking.
Ais amber when
assisting. It may also provide a Lane
Departure Warning (LDW) alert by flashing
Aamber if the vehicle crosses a
detected lane marking. Additionally, there
may be three beeps, or the driver seat may
pulse three times, on the right or left,
depending on the lane departure direction. Take Steering
The LKA system does not continuously steer
the vehicle. If LKA does not detect active
driver steering, an alert and chime may be
provided. Steer the vehicle to dismiss. LKA
may become temporarily unavailable after
repeated take steering alerts.
When the System Does Not Seem to
Work Properly
The system performance may be
affected by:
.Close vehicles ahead.
.Sudden lighting changes, such as when
driving through tunnels.
.Banked roads.
.Roads with poor lane markings, such as
two-lane roads.
If the LKA system is not functioning
properly when lane markings are clearly
visible, cleaning the windshield may help.
A camera blocked message may display if
the camera is blocked. Some driver
assistance systems may have reduced
performance or not work at all. An LKA or
LDW unavailable message may display if the
systems are temporarily unavailable. This
message could be due to a blocked camera. The LKA system does not need service. Clean
the outside of the windshield behind the
rearview mirror.
LKA assistance and/or LDW alerts may occur
due to tar marks, shadows, cracks in the
road, temporary or construction lane
markings, or other road imperfections. This
is normal system operation; the vehicle does
not need service. Turn LKA off if these
conditions continue.
Surround Vision Recorder
If equipped, this system records the 360°
camera views to an SD card. Only images
are recorded, no sound. An SD card will be
needed for this system. The minimum
recommended SD card specifications are at
least 64GB with FAT32 file system, Class V30
or greater.
Page 308 of 429
Chevrolet Silverado EV Owner Manual (GMNA-Localizing-U.S./Canada-
16702912) - 2024 - CRC - 1/17/23
Driving and Operating 307
TRAILER GAIN:
Press a Trailer Gain button to recall the
current Trailer Gain setting. Each press and
release of the gain buttons will change the
Trailer Gain setting. Press the Trailer
Gain (+) or (−) to adjust. Press and hold to
continuously adjust the Trailer Gain. To turn
the output to the trailer off, adjust the
Trailer Gain setting to 0.0. This setting can
be adjusted from 0.0 to 10.0 with a trailer
connected or disconnected.
TRAILER OUTPUT: This displays anytime a
trailer with electric brakes is connected.
Output to the trailer brakes is based on the
amount of vehicle braking present and
relative to the Trailer Gain setting. Output is
displayed from 0–100% for each gain
setting.
The Trailer Output will indicate“- - - - - -”on
the Trailer Brake Display Page whenever the
following occur:
.No trailer is connected
.A trailer without electric brakes is
connected, no DIC message will display
.A trailer with electric brakes has become
disconnected, a CHECK TRAILER WIRING
message displays on the DIC
.There is a fault present in the wiring to
the trailer brakes, a CHECK TRAILER
WIRING message displays on the DIC
.The ITBC system is not working due to a
fault, a SERVICE TRAILER BRAKE SYSTEM
message displays in the DIC
Manual Trailer Brake Apply Lever
Slide this lever right to apply the trailer’s
electric brakes independent of the vehicle’s
brakes. Use this lever to adjust Trailer Gain
to achieve the proper power output to the
trailer brakes. This lever may also be used
to request additional trailer braking at any
time. The trailer and vehicle brake lamps
will come on when either vehicle brakes or
manual trailer brakes are applied and
properly connected.
Trailer Gain Adjustment Procedure
Trailer Gain should be set for a specific
trailering condition and it must be
readjusted anytime vehicle loading, trailer
loading, or road surface conditions change.
{Warning
Trailer brakes that are over-gained or
under-gained may not stop the vehicle
and the trailer as intended and can result (Continued)
Warning (Continued)
in a crash. Always follow the instructions
to set the Trailer Gain for the proper
trailer stopping performance.
To adjust Trailer Gain for each towing
condition: 1. Drive the vehicle with the trailer attached on a level road surface
representative of the towing condition
and free of traffic at about 32–40 km/h
(20–25 mph) and fully apply the Manual
Trailer Brake apply lever. Adjusting
Trailer Gain at speeds lower than
32–40 km/h (20–25 mph) may result in
an incorrect gain setting.
2. Adjust the Trailer Gain, using the Trailer Gain adjustment buttons, to just below
the point of trailer wheel lockup,
indicated by trailer wheel squeal or tire
smoke when a trailer wheel locks. Trailer
wheel lockup may not occur if towing a
heavily loaded trailer. In this case, adjust
the Trailer Gain to the highest allowable
setting for the towing condition.
Page 309 of 429
Chevrolet Silverado EV Owner Manual (GMNA-Localizing-U.S./Canada-
16702912) - 2024 - CRC - 1/17/23
308 Driving and Operating
3. Readjust Trailer Gain any time vehicleloading, trailer loading, or road surface
conditions change or if trailer wheel
lockup is noticed at any time while
towing.
Other ITBC-Related DIC Messages
TRAILER BRAKES CONNECTED: This message
will briefly display when a trailer with
electric brakes is first connected to the
vehicle. This message will automatically turn
off in about 10 seconds. This message can
be acknowledged before it automatically
turns off.
CHECK TRAILER WIRING: This message will
display if:
.The ITBC system first determines
connection to a trailer with electric brakes
and then the trailer harness becomes
disconnected from the vehicle.
‐ If the disconnect occurs while the
vehicle is stationary, this message will
automatically turn off in about
30 seconds. This message will also turn
off if it is acknowledged or if the trailer
harness is reconnected.
‐ If the disconnect occurs while the
vehicle is moving, this message will
continue until the vehicle is turned off. This message will also turn off if it is
acknowledged or if the trailer harness
is reconnected.
.There is an electrical fault in the wiring to
the trailer brakes. This message will
continue as long as there is an electrical
fault in the trailer wiring. This message
will also turn off if it is acknowledged.
To determine whether the electrical fault is
on the vehicle side or trailer side of the
trailer wiring harness connection: 1. Disconnect the trailer wiring harness from the vehicle.
2. Turn the vehicle off.
3. Wait 10 seconds, then turn the vehicle back to RUN.
4. If the CHECK TRAILER WIRING message reappears, the electrical fault is on the
vehicle side.
If the CHECK TRAILER WIRING message
only reappears when connecting the
trailer wiring harness to the vehicle, the
electrical fault is on the trailer side.
SERVICE TRAILER BRAKES OR REDUCED
TRAILER BRAKING: This message will display
if the electric trailer brake performance is
either reduced or non-functional. HOLD LAST KNOWN GAIN: This message will
display if it is no longer possible to adjust
the trailer brake gain. Trailer brakes may or
may not still be functional, and it is not
possible to adjust brake gain based on road
conditions. The trailer brakes may remain
functional until the next time the vehicle is
turned off.
TRAILER BRAKES DISABLED SERVICE
REQUIRED: This message will display when
there is a problem with the ITBC system.
If this message continues over multiple
restarts, have the vehicle serviced.
If the CHECK TRAILER WIRING, TRAILER
BRAKES DISABLED SERVICE REQUIRED,
SERVICE TRAILER BRAKE SYSTEM, or REDUCED
TRAILER BRAKING message displays while
driving, the ITBC system may not be fully
functional or may not function at all. When
traffic conditions allow, carefully pull the
vehicle over to the side of the road and turn
the vehicle off. Check the wiring connection
to the trailer and turn the vehicle back on.
If either of these messages continue, either
the vehicle or trailer needs service.
Page 330 of 429
Chevrolet Silverado EV Owner Manual (GMNA-Localizing-U.S./Canada-
16702912) - 2024 - CRC - 1/13/23
Vehicle Care 329
Caution
Continuing to drive with worn-out brake
linings could result in costly brake
repairs.
Some driving conditions or climates can
cause a brake squeal when the brakes are
first applied, clearing up following several
applications. This does not mean something
is wrong with the brakes.
Properly torqued wheel nuts are necessary
to help prevent brake pulsation. When tires
are rotated, inspect brake linings for wear
and evenly tighten wheel nuts in the proper
sequence to torque specifications. See
Capacities and Specifications 0395.
Brake pads should be replaced as complete
axle sets.
Brake Pedal Travel
See your dealer if the brake pedal does not
return to normal height, or if there is a
rapid increase in pedal travel. This could be
a sign that brake service may be required.
Replacing Brake System Parts
Always replace brake system parts with
new, approved replacement parts. If this is
not done, the brakes may not work
properly. The braking performance can
change in many ways if the wrong brake
parts are installed or if parts are improperly
installed.
Brake Fluid
The brake master cylinder reservoir is filled
with GM approved DOT 4 brake fluid as
indicated on the reservoir cap. See
Underhood Compartment Overview 0325 for
the location of the reservoir.
Checking Brake Fluid
With the vehicle in P (Park) on a level
surface, the brake fluid level should be
between the minimum and maximum marks
on the brake fluid reservoir. There are only two reasons why the brake
fluid level in the reservoir may go down:
.Normal brake lining wear. When new
linings are installed, the fluid level goes
back up.
.A fluid leak in the brake hydraulic system.
Have the brake hydraulic system fixed.
With a leak, the brakes will not
work well.
Always clean the brake fluid reservoir cap
and the area around the cap before
removing it.
Do not top off the brake fluid. Adding fluid
does not correct a leak. If fluid is added
when the linings are worn, there will be too
much fluid when new brake linings are
installed. Add or remove fluid, as necessary,
only when work is done on the brake
hydraulic system.
When the brake fluid falls to a low level,
the brake warning light comes on. See Brake
System Warning Light 0115.
Brake fluid absorbs water over time which
degrades the effectiveness of the brake fluid.
Replace brake fluid at the specified intervals
to prevent increased stopping distance. See
Maintenance Schedule 0389.
Page 347 of 429
Chevrolet Silverado EV Owner Manual (GMNA-Localizing-U.S./Canada-
16702912) - 2024 - CRC - 1/13/23
346 Vehicle Care
With winter tires, there may be decreased
dry road traction, increased road noise, and
shorter tread life. After changing to winter
tires, be alert for changes in vehicle
handling and braking.
If using winter tires:
.Use tires of the same brand and tread
type on all four wheel positions.
.Use only radial ply tires of the same size,
load range, and speed rating as the
original equipment tires.
Winter tires with the same speed rating as
the original equipment tires may not be
available for H, V, W, Y, and ZR speed rated
tires. If winter tires with a lower speed
rating are chosen, never exceed the tire's
maximum speed capability.
Tire Sidewall Labeling
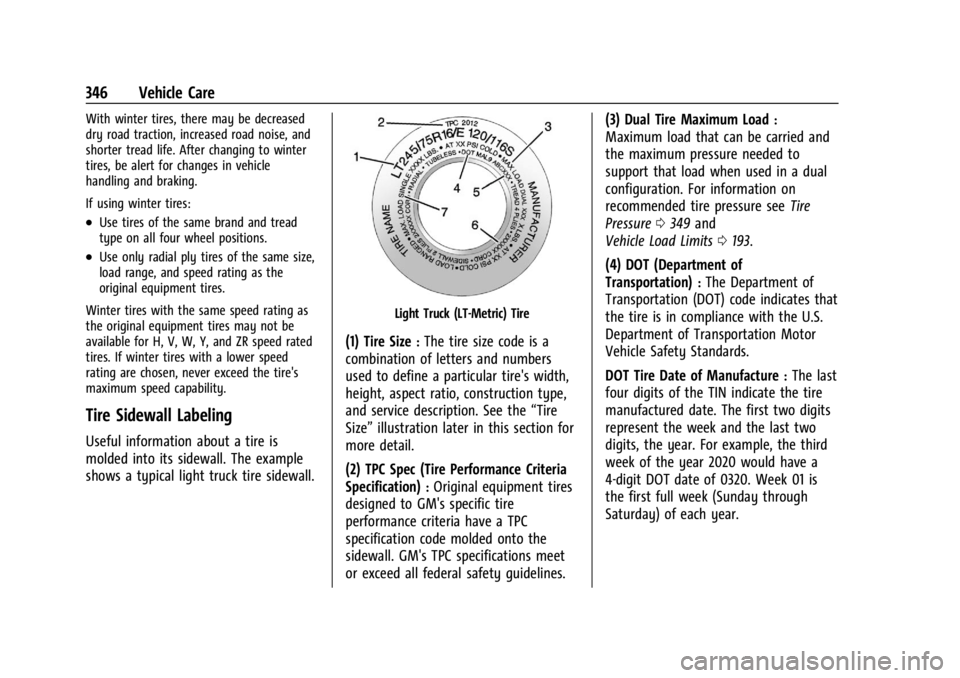
Useful information about a tire is
molded into its sidewall. The example
shows a typical light truck tire sidewall.
Light Truck (LT-Metric) Tire
(1) Tire Size:The tire size code is a
combination of letters and numbers
used to define a particular tire's width,
height, aspect ratio, construction type,
and service description. See the “Tire
Size” illustration later in this section for
more detail.
(2) TPC Spec (Tire Performance Criteria
Specification)
:Original equipment tires
designed to GM's specific tire
performance criteria have a TPC
specification code molded onto the
sidewall. GM's TPC specifications meet
or exceed all federal safety guidelines. (3) Dual Tire Maximum Load
:
Maximum load that can be carried and
the maximum pressure needed to
support that load when used in a dual
configuration. For information on
recommended tire pressure see
Tire
Pressure 0349 and
Vehicle Load Limits 0193.
(4) DOT (Department of
Transportation)
:The Department of
Transportation (DOT) code indicates that
the tire is in compliance with the U.S.
Department of Transportation Motor
Vehicle Safety Standards.
DOT Tire Date of Manufacture
:The last
four digits of the TIN indicate the tire
manufactured date. The first two digits
represent the week and the last two
digits, the year. For example, the third
week of the year 2020 would have a
4-digit DOT date of 0320. Week 01 is
the first full week (Sunday through
Saturday) of each year.