2024 CHEVROLET CORVETTE display
[x] Cancel search: displayPage 6 of 362

Chevrolet Corvette Owner Manual (GMNA-Localizing-U.S./Canada/Mexico-
17272984) - 2024 - CRC - 2/20/23
Introduction 5
1.Air Vents 0153.
2. Turn Signal Lever. See Turn and
Lane-Change Signals 0112.
Exterior Lamp Controls 0109.
3. Manual Shift Paddles. See Manual Mode
0 187.
4. Instrument Cluster 081.
5. Windshield Wiper/Washer 075.
6. Volume Control Knob and Infotainment Home Button. See Overview0117.
7. Infotainment Display. See Using the
System 0120.
8. Alarm System Indicator Light. See Vehicle
Alarm System 022.
Light Sensor. See Automatic Headlamp
System 0111.
9. Dual Automatic Climate Control System
0150.
Driver and Passenger Heated and
Ventilated Seat Controls (If Equipped).
See Heated and Ventilated Front Seats
0 44. 10.
Traction Control/Electronic Stability
Control 0194.
Curb View Camera (If Equipped). See
Assistance Systems for Parking or Backing
0 215.
Front Lift System Control (If Equipped).
See Front Lift System 0205.
11. Driver Mode Control 0196.
12. Shift Switches. See Dual Clutch
Transmission 0184.
13. Hybrid Battery Charging (Charge+). See Driver Mode Control 0196.
Auto Stop Disable Switch. See Stop/Start
System 0180.
14. Keyless Ignition. See Ignition Positions
0 178.
15. Driver Information Center (DIC) Controls. SeeDriver Information Center (DIC) 099.
16. Heated Steering Wheel 075 (If
Equipped).
17. Bluetooth Controls. See Steering Wheel
Controls 0119.
Voice Recognition Controls. See Steering
Wheel Controls 0119. 18. Volume Control Buttons. See
Steering
Wheel Controls 0119.
19. Horn 075.
20. Favorites Select Buttons. Steering Wheel
Controls 0119.
21. Z-Mode Control. See Driver Mode Control
0 196.
Forward Collision Alert (FCA) System
0 218.
22. Cruise Control 0212.
23. Electric Parking Brake 0192.
24. Data Link Connector (DLC) (Out of View). SeeMalfunction Indicator Lamp (Check
Engine Light) 090.
25. Instrument Panel Illumination Control
0113.
26. Head-Up Display Controls (If Equipped). SeeHead-Up Display (HUD) 0102.
Page 11 of 362

Chevrolet Corvette Owner Manual (GMNA-Localizing-U.S./Canada/Mexico-
17272984) - 2024 - CRC - 2/20/23
10 Keys, Doors, and Windows
re-enabled when the vehicle is started with
another known remote key, or when the
vehicle is unlocked.
To view available settings from the
infotainment screen, touch Settings >
Vehicle > Remote Lock, Unlock, Start.
If equipped with remote folding mirrors,
passive locking may fold and unfold the
mirrors. SeeFolding Mirrors 025.
Temporary Disable of Passive Locking
Temporarily disable passive locking by
pressing and holding
Ion the interior door
switch with a door open for at least
four seconds, or until three chimes are
heard. Passive locking will then remain
disabled until the vehicle is turned on.
Remote Left in Vehicle Alert
When the vehicle is turned off and a remote
key is left in the vehicle, the horn will chirp
three times after both doors are closed. To
view available settings from the
infotainment screen, touch Settings >
Vehicle > Remote Lock, Unlock, Start. Remote No Longer in Vehicle Alert
If the vehicle is on, with a door open, and
then all doors are closed, the vehicle will
check for remote keys inside. If a remote
key is not detected, the Driver Information
Center (DIC) will display NO KEY FOUND and
the horn will chirp three times. This occurs
only once each time the vehicle is driven. To
view available settings from the
infotainment screen, touch Settings >
Vehicle > Remote Lock, Unlock, Start.
Keyless Trunk Opening
Press the hatch/trunk release touchpad to
open the trunk if the remote key is within
1 m (3 ft).
Programming Remote Keys to the
Vehicle
Only remote keys programmed to this
vehicle will work. If a remote key is lost or
stolen, a replacement can be purchased and
programmed through your dealer. When the
replacement remote key is programmed to
this vehicle, all remaining remote keys must
also be reprogrammed. Any lost or stolen
remote keys will no longer work once the
new remote key is programmed.
Starting the Vehicle with a Low Remote
Key Battery
For improved vehicle security, the remote
key is equipped with a motion sensor. When
starting the vehicle, if the remote key has
been idle for a while, the DIC may display
KEY IN SLEEP MODE, MOVE KEY, THEN
START. Move the remote key slightly and
try starting the vehicle. If the remote key
battery is weak or if there is interference
with the signal, the DIC may display NO KEY
FOUND, REPLACE BATTERY IN KEY or NO
REMOTE KEY WAS DETECTED PLACE KEY IN
KEY POCKET, THEN START YOUR VEHICLE.
Page 12 of 362

Chevrolet Corvette Owner Manual (GMNA-Localizing-U.S./Canada/Mexico-
17272984) - 2024 - CRC - 2/20/23
Keys, Doors, and Windows 11
If this occurs, follow these steps:
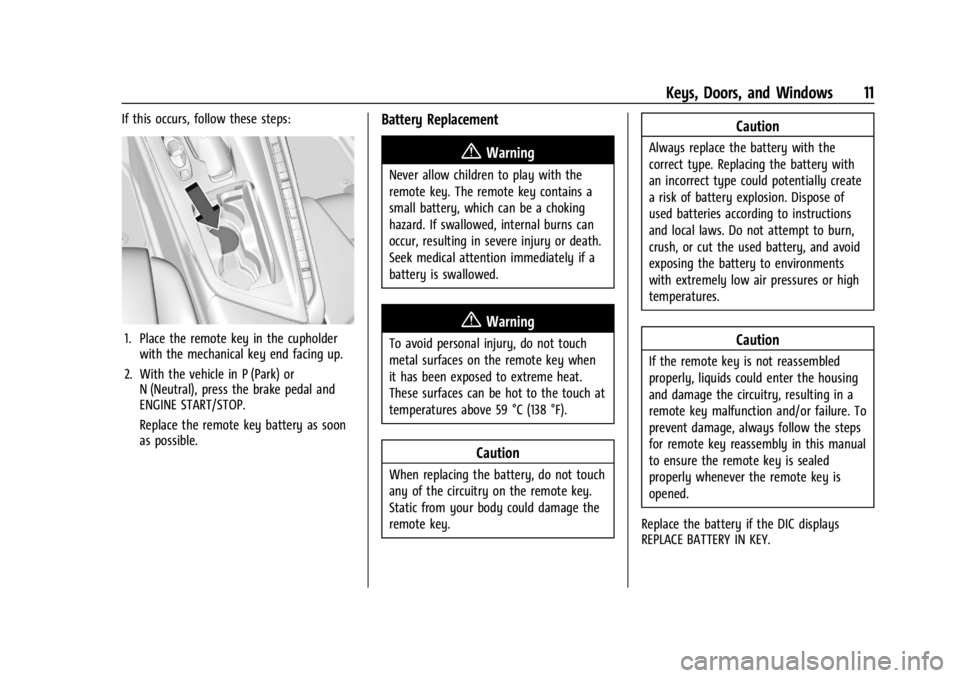
1. Place the remote key in the cupholderwith the mechanical key end facing up.
2. With the vehicle in P (Park) or N (Neutral), press the brake pedal and
ENGINE START/STOP.
Replace the remote key battery as soon
as possible.
Battery Replacement
{Warning
Never allow children to play with the
remote key. The remote key contains a
small battery, which can be a choking
hazard. If swallowed, internal burns can
occur, resulting in severe injury or death.
Seek medical attention immediately if a
battery is swallowed.
{Warning
To avoid personal injury, do not touch
metal surfaces on the remote key when
it has been exposed to extreme heat.
These surfaces can be hot to the touch at
temperatures above 59 °C (138 °F).
Caution
When replacing the battery, do not touch
any of the circuitry on the remote key.
Static from your body could damage the
remote key.
Caution
Always replace the battery with the
correct type. Replacing the battery with
an incorrect type could potentially create
a risk of battery explosion. Dispose of
used batteries according to instructions
and local laws. Do not attempt to burn,
crush, or cut the used battery, and avoid
exposing the battery to environments
with extremely low air pressures or high
temperatures.
Caution
If the remote key is not reassembled
properly, liquids could enter the housing
and damage the circuitry, resulting in a
remote key malfunction and/or failure. To
prevent damage, always follow the steps
for remote key reassembly in this manual
to ensure the remote key is sealed
properly whenever the remote key is
opened.
Replace the battery if the DIC displays
REPLACE BATTERY IN KEY.
Page 18 of 362

Chevrolet Corvette Owner Manual (GMNA-Localizing-U.S./Canada/Mexico-
17272984) - 2024 - CRC - 2/20/23
Keys, Doors, and Windows 17
number of remote keys inside has not
reduced, the driver door will unlock and the
horn will chirp three times.
Lockout Protection can be manually
overridden with the driver door open by
pressing and holding
Qon the power door
lock switch.
Doors
Hood
Hood Release
{Warning
Do not drive the vehicle if the hood is
not latched completely. The hood could
open fully, block your vision, and cause a
crash. You or others could be injured.
Always close the hood completely before
driving. When the hood is not closed, the
vehicle will not exceed 42 km/h
(26 mph). Close the hood to drive faster
than 42 km/h (26 mph).
{Warning
When closing the hood, keep hands out
of the opening between the body and
the trunk. The vehicle features a self
closing power latch. You or others could
be injured.
The hood compartment can be accessed in
several ways.
Ensure the hood is clear of any objects
before opening.
This vehicle prevents from shifting out of
P (Park) when the hood is not closed. Close
the hood to shift out of P (Park). Confirm
the hood is closed by checking that the
hood is flush with the surrounding
components.
If the hood is closed but the ajar message is
still present, then the transmission lockout
can be overridden by holding the brake for
20 seconds and then shifting into D (Drive).
In this case, the vehicle will not exceed
42 km/h (26 mph). See your dealer for
service. Driver Door Hood Latch Release Button
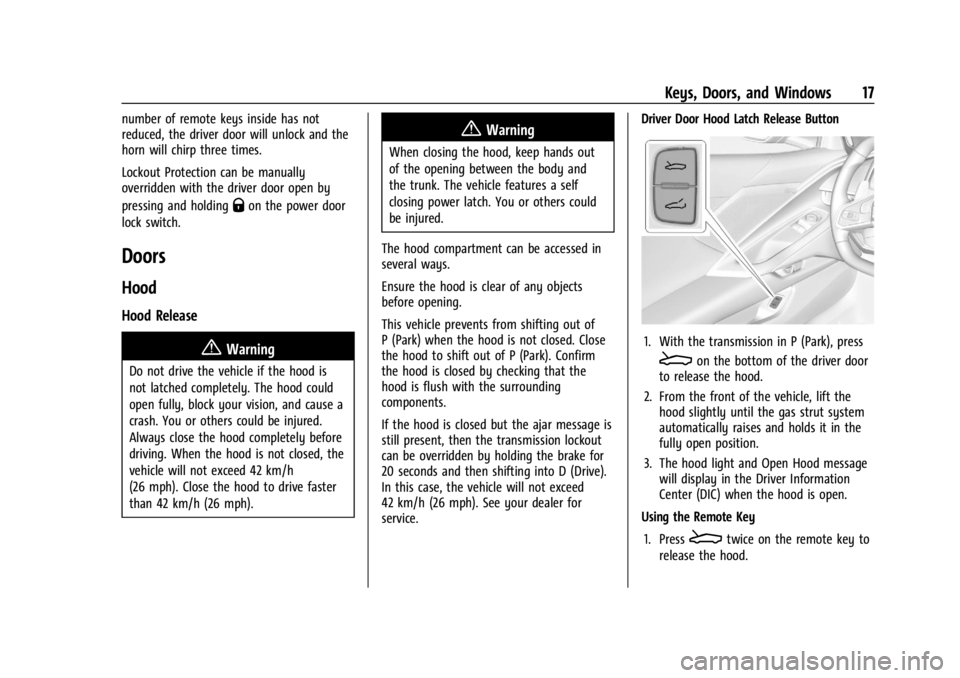
1. With the transmission in P (Park), press
Eon the bottom of the driver door
to release the hood.
2. From the front of the vehicle, lift the hood slightly until the gas strut system
automatically raises and holds it in the
fully open position.
3. The hood light and Open Hood message will display in the Driver Information
Center (DIC) when the hood is open.
Using the Remote Key
1. Press
Etwice on the remote key to
release the hood.
Page 19 of 362

Chevrolet Corvette Owner Manual (GMNA-Localizing-U.S./Canada/Mexico-
17272984) - 2024 - CRC - 2/20/23
18 Keys, Doors, and Windows
2. From the front of the vehicle, lift thehood slightly until the gas strut system
automatically raises and holds it in the
fully open position.
3. The hood light and Open Hood message will display in the Driver Information
Center (DIC) when the hood is open.
Front Fascia TouchPad
1. Locate the touchpad in the grill opening near the driver side headlamp.
2. Press the touchpad once to release the hood. The remote key must be within
1 m (3 ft) of the hood. 3. From the front of the vehicle, lift the
hood slightly until the gas strut system
automatically raises and holds it in the
fully open position.
4. The hood light and Open Hood message will display in the Driver Information
Center (DIC) when the hood is open.
Closing the Hood
{Warning
Do not drive the vehicle if the hood is
not latched completely. The hood could
open fully, block your vision, and cause a
crash. You or others could be injured.
Always close the hood completely before
driving. When the hood is not closed, the
vehicle will not exceed 42 km/h
(26 mph). Close the hood to drive faster
than 42 km/h (26 mph).
To close the hood, pull down on the hood
until the power assist engages to close the
rest of the way. A chime will sound to
indicate power assist activation. The power
assist will only activate when the hood is
above a minimum open position. Manually forcing the hood to open or close
can damage the vehicle. Always allow the
automatic operation to complete before
using the hood again.
Caution
Manually operating the hood during a
power open or close can damage the
hood system. Always wait for the power
operation to complete before manually
operating the hood.
Operating The Hood When There Is No
Electrical Power
The manual release cable should only be
used for service and/or emergency use, such
as a loss of vehicle electrical power.
To enter the vehicle in the event electrical
power has been lost, see “Loss of Vehicle
Electrical Power” underDoor Locks 013.
Page 24 of 362

Chevrolet Corvette Owner Manual (GMNA-Localizing-U.S./Canada/Mexico-
17272984) - 2024 - CRC - 2/20/23
Keys, Doors, and Windows 23
or the door is not unlocked by pressingK
on the remote key during the 10-second
pre-alarm, the alarm will be activated.
The alarm will also be activated if the
passenger door, the hatch/trunk, or the
hood is opened without first disarming the
system. When the alarm is activated, the
turn signals flash and the horn sounds for
about 30 seconds. The alarm system will
then re-arm to monitor for the next
unauthorized event.
Disarming the Alarm System
To disarm the alarm system or turn off the
alarm if it has been activated, do one of the
following:
.PressKon the remote key.
.Unlock the vehicle using the Keyless
Access system.
.Start the vehicle.
To avoid setting off the alarm by accident:
.Lock the vehicle after all occupants have
left the vehicle and both doors are closed.
.Always unlock a door with the remote
key or use the Keyless Access system.
Unlocking the driver door with the key will
not disarm the system or turn off the alarm.
How to Detect a Tamper Condition
IfKis pressed on the remote key and the
horn chirps and the lights flash three times,
a previous alarm occurred while the system
was armed.
If the alarm has been activated, a message
will appear on the DIC.
Inclination Sensor and Intrusion Sensor
In addition to the standard theft-deterrent
system features, this system may also have
an inclination sensor and intrusion sensor.
The inclination sensor can activate the alarm
if it senses movement of the vehicle, such
as a change in vehicle orientation.
The intrusion sensor monitors the vehicle
interior, and can activate the alarm if it
senses unauthorized entry into the vehicle’s
interior. Do not allow passengers or pets to
remain in the vehicle when the intrusion
sensor is activated.
Before arming the theft-deterrent system
and activating the intrusion sensor:
.Make sure both doors and windows are
completely closed.
.Secure any loose items such as
sunshades.
.Make sure there are no obstructions
blocking the sensors.
Intrusion and Inclination Sensors Disable
Switch
It is recommended that the intrusion and
inclination sensors be deactivated if pets are
left in the vehicle or if the vehicle is being
transported.
When the roof panel is off, or the
convertible top is down, the intrusion
system is turned off.
From the infotainment home screen, touch
Settings > Vehicle > Motion Sensor to turn
the system off. The indicator light will
display momentarily, indicating that these
sensors have been disabled until the next
time the alarm system is armed.
Immobilizer
See Radio Frequency Statement 0337.
Page 28 of 362

Chevrolet Corvette Owner Manual (GMNA-Localizing-U.S./Canada/Mexico-
17272984) - 2024 - CRC - 2/20/23
Keys, Doors, and Windows 27
Rear Camera Mirror
If equipped, this automatic dimming mirror
provides a wide angle camera view of the
area behind the vehicle.
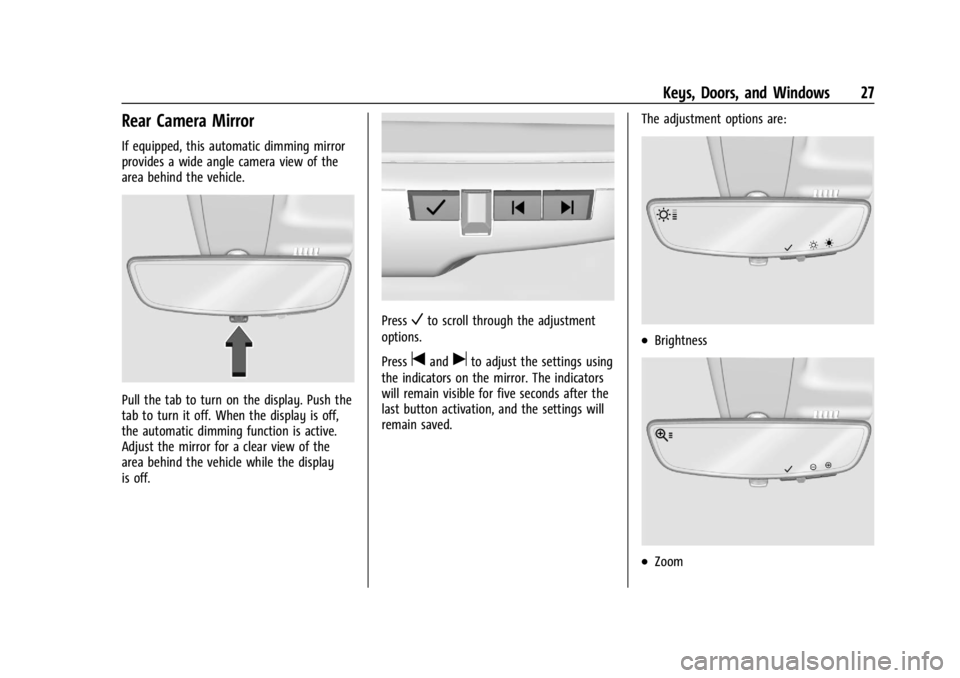
Pull the tab to turn on the display. Push the
tab to turn it off. When the display is off,
the automatic dimming function is active.
Adjust the mirror for a clear view of the
area behind the vehicle while the display
is off.
PressVto scroll through the adjustment
options.
Press
tanduto adjust the settings using
the indicators on the mirror. The indicators
will remain visible for five seconds after the
last button activation, and the settings will
remain saved. The adjustment options are:
.Brightness
.Zoom
Page 29 of 362

Chevrolet Corvette Owner Manual (GMNA-Localizing-U.S./Canada/Mexico-
17272984) - 2024 - CRC - 2/20/23
28 Keys, Doors, and Windows
.Tilt
{Warning
The Rear Camera Mirror (RCM) has a
limited view. Portions of the road,
vehicles, and other objects may not be
seen. Do not drive or park the vehicle
using only this camera. Objects may
appear closer than they are. Check the
outside mirrors or glance over your
shoulder when making lane changes or
merging. Failure to use proper care may
result in injury, death, or vehicle damage.
Troubleshooting
See your dealer for service if a blue screen
and
3are displayed in the mirror, and
the display shuts off. Also, push the tab as
indicated to return to the automatic
dimming mode.
The Rear Camera Mirror may not work
properly or display a clear image if:
.There is glare from the sun or headlamps.
This may obstruct objects from view.
If needed, push the tab to turn off the
display.
.Dirt, snow, or other debris blocks the
camera lens. Clean the lens with a soft
damp cloth.
Coupe Shown, Convertible Similar