2024 CHEVROLET CORVETTE display
[x] Cancel search: displayPage 76 of 362
Chevrolet Corvette Owner Manual (GMNA-Localizing-U.S./Canada/Mexico-
17272984) - 2024 - CRC - 2/20/23
Instruments and Controls 75
Controls
Steering Wheel Adjustment
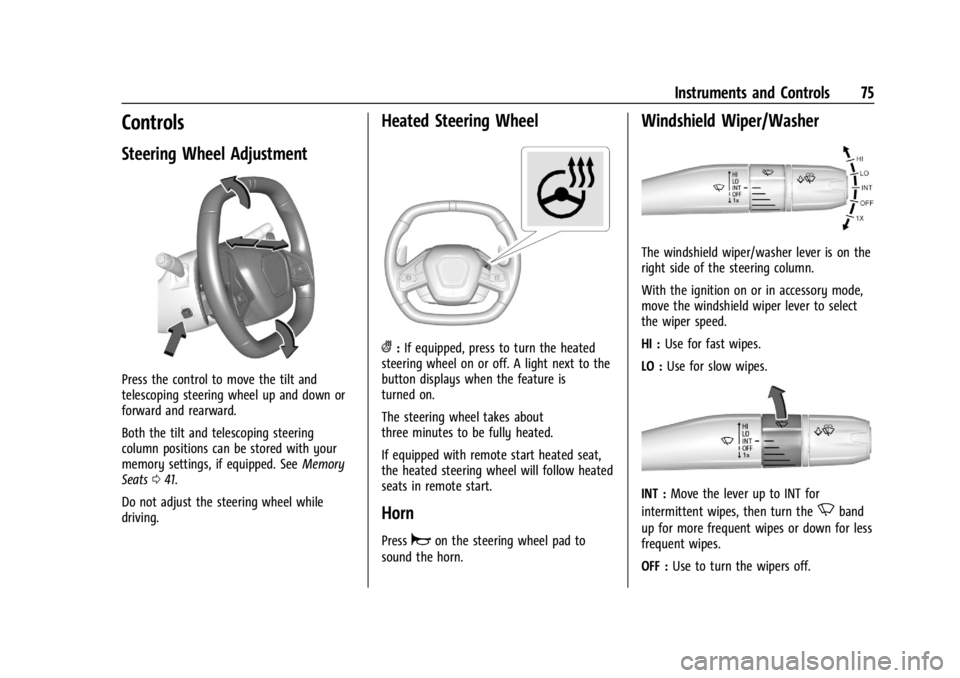
Press the control to move the tilt and
telescoping steering wheel up and down or
forward and rearward.
Both the tilt and telescoping steering
column positions can be stored with your
memory settings, if equipped. SeeMemory
Seats 041.
Do not adjust the steering wheel while
driving.
Heated Steering Wheel
(: If equipped, press to turn the heated
steering wheel on or off. A light next to the
button displays when the feature is
turned on.
The steering wheel takes about
three minutes to be fully heated.
If equipped with remote start heated seat,
the heated steering wheel will follow heated
seats in remote start.
Horn
Pressaon the steering wheel pad to
sound the horn.
Windshield Wiper/Washer
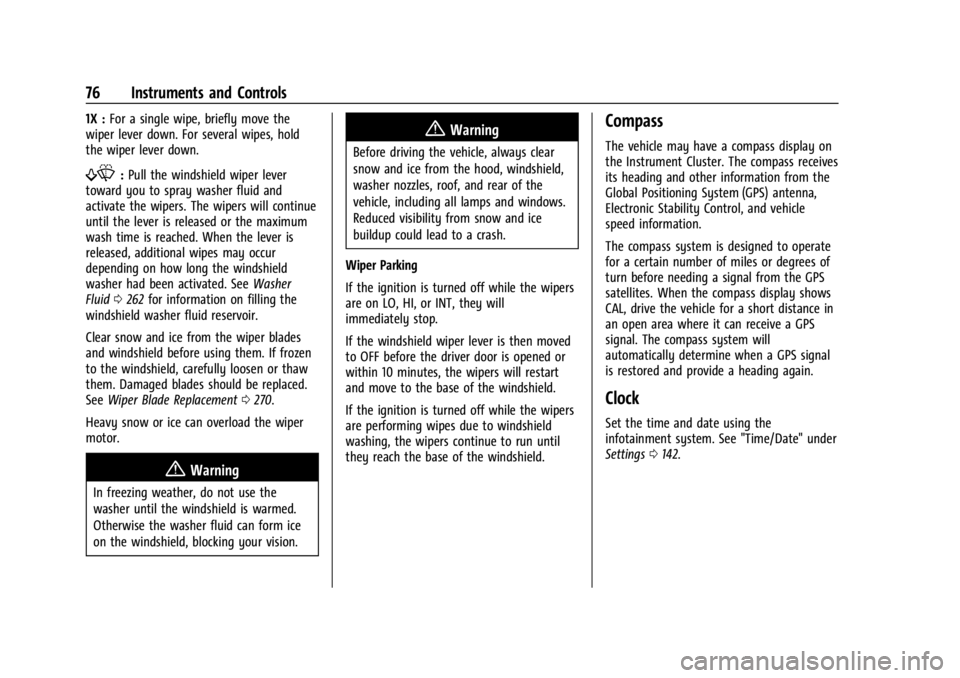
The windshield wiper/washer lever is on the
right side of the steering column.
With the ignition on or in accessory mode,
move the windshield wiper lever to select
the wiper speed.
HI : Use for fast wipes.
LO : Use for slow wipes.
INT : Move the lever up to INT for
intermittent wipes, then turn the
Nband
up for more frequent wipes or down for less
frequent wipes.
OFF : Use to turn the wipers off.
Page 77 of 362
Chevrolet Corvette Owner Manual (GMNA-Localizing-U.S./Canada/Mexico-
17272984) - 2024 - CRC - 2/20/23
76 Instruments and Controls
1X :For a single wipe, briefly move the
wiper lever down. For several wipes, hold
the wiper lever down.
f: Pull the windshield wiper lever
toward you to spray washer fluid and
activate the wipers. The wipers will continue
until the lever is released or the maximum
wash time is reached. When the lever is
released, additional wipes may occur
depending on how long the windshield
washer had been activated. See Washer
Fluid 0262 for information on filling the
windshield washer fluid reservoir.
Clear snow and ice from the wiper blades
and windshield before using them. If frozen
to the windshield, carefully loosen or thaw
them. Damaged blades should be replaced.
See Wiper Blade Replacement 0270.
Heavy snow or ice can overload the wiper
motor.
{Warning
In freezing weather, do not use the
washer until the windshield is warmed.
Otherwise the washer fluid can form ice
on the windshield, blocking your vision.
{Warning
Before driving the vehicle, always clear
snow and ice from the hood, windshield,
washer nozzles, roof, and rear of the
vehicle, including all lamps and windows.
Reduced visibility from snow and ice
buildup could lead to a crash.
Wiper Parking
If the ignition is turned off while the wipers
are on LO, HI, or INT, they will
immediately stop.
If the windshield wiper lever is then moved
to OFF before the driver door is opened or
within 10 minutes, the wipers will restart
and move to the base of the windshield.
If the ignition is turned off while the wipers
are performing wipes due to windshield
washing, the wipers continue to run until
they reach the base of the windshield.
Compass
The vehicle may have a compass display on
the Instrument Cluster. The compass receives
its heading and other information from the
Global Positioning System (GPS) antenna,
Electronic Stability Control, and vehicle
speed information.
The compass system is designed to operate
for a certain number of miles or degrees of
turn before needing a signal from the GPS
satellites. When the compass display shows
CAL, drive the vehicle for a short distance in
an open area where it can receive a GPS
signal. The compass system will
automatically determine when a GPS signal
is restored and provide a heading again.
Clock
Set the time and date using the
infotainment system. See "Time/Date" under
Settings 0142.
Page 79 of 362
Chevrolet Corvette Owner Manual (GMNA-Localizing-U.S./Canada/Mexico-
17272984) - 2024 - CRC - 2/20/23
78 Instruments and Controls
Caution
Hanging heavy equipment from the
power outlet can cause damage not
covered by the vehicle warranty. The
power outlets are designed for accessory
power plugs only, such as cell phone
charge cords.
Wireless Charging
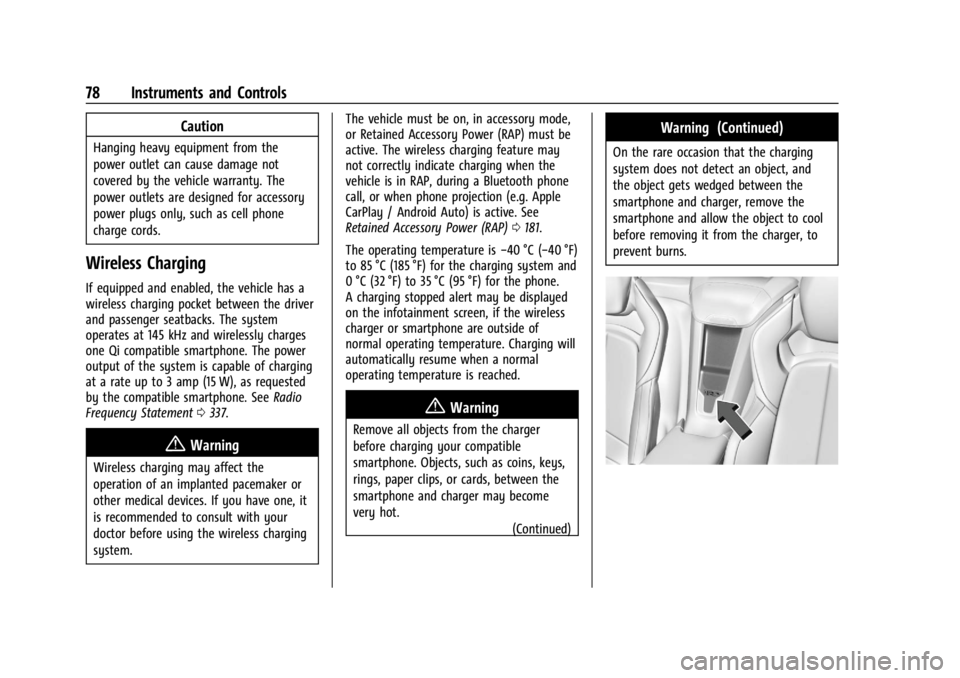
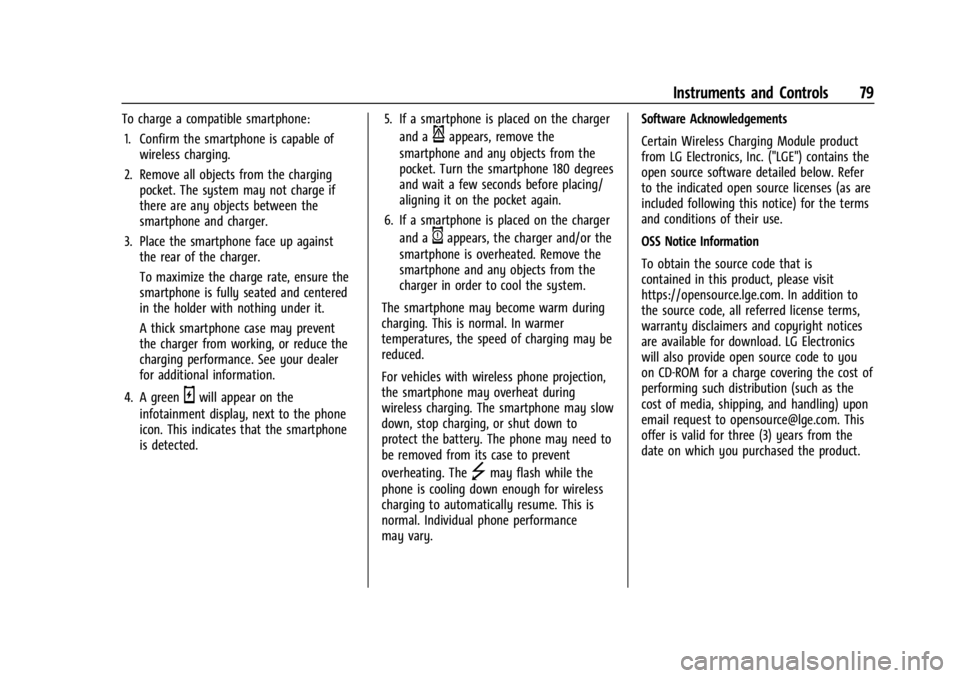
If equipped and enabled, the vehicle has a
wireless charging pocket between the driver
and passenger seatbacks. The system
operates at 145 kHz and wirelessly charges
one Qi compatible smartphone. The power
output of the system is capable of charging
at a rate up to 3 amp (15 W), as requested
by the compatible smartphone. SeeRadio
Frequency Statement 0337.
{Warning
Wireless charging may affect the
operation of an implanted pacemaker or
other medical devices. If you have one, it
is recommended to consult with your
doctor before using the wireless charging
system. The vehicle must be on, in accessory mode,
or Retained Accessory Power (RAP) must be
active. The wireless charging feature may
not correctly indicate charging when the
vehicle is in RAP, during a Bluetooth phone
call, or when phone projection (e.g. Apple
CarPlay / Android Auto) is active. See
Retained Accessory Power (RAP)
0181.
The operating temperature is −40 °C (−40 °F)
to 85 °C (185 °F) for the charging system and
0 °C (32 °F) to 35 °C (95 °F) for the phone.
A charging stopped alert may be displayed
on the infotainment screen, if the wireless
charger or smartphone are outside of
normal operating temperature. Charging will
automatically resume when a normal
operating temperature is reached.
{Warning
Remove all objects from the charger
before charging your compatible
smartphone. Objects, such as coins, keys,
rings, paper clips, or cards, between the
smartphone and charger may become
very hot.
(Continued)
Warning (Continued)
On the rare occasion that the charging
system does not detect an object, and
the object gets wedged between the
smartphone and charger, remove the
smartphone and allow the object to cool
before removing it from the charger, to
prevent burns.
Page 80 of 362
Chevrolet Corvette Owner Manual (GMNA-Localizing-U.S./Canada/Mexico-
17272984) - 2024 - CRC - 2/20/23
Instruments and Controls 79
To charge a compatible smartphone:1. Confirm the smartphone is capable of wireless charging.
2. Remove all objects from the charging pocket. The system may not charge if
there are any objects between the
smartphone and charger.
3. Place the smartphone face up against the rear of the charger.
To maximize the charge rate, ensure the
smartphone is fully seated and centered
in the holder with nothing under it.
A thick smartphone case may prevent
the charger from working, or reduce the
charging performance. See your dealer
for additional information.
4. A green
owill appear on the
infotainment display, next to the phone
icon. This indicates that the smartphone
is detected. 5. If a smartphone is placed on the charger
and a
pappears, remove the
smartphone and any objects from the
pocket. Turn the smartphone 180 degrees
and wait a few seconds before placing/
aligning it on the pocket again.
6. If a smartphone is placed on the charger and a
qappears, the charger and/or the
smartphone is overheated. Remove the
smartphone and any objects from the
charger in order to cool the system.
The smartphone may become warm during
charging. This is normal. In warmer
temperatures, the speed of charging may be
reduced.
For vehicles with wireless phone projection,
the smartphone may overheat during
wireless charging. The smartphone may slow
down, stop charging, or shut down to
protect the battery. The phone may need to
be removed from its case to prevent
overheating. The
]may flash while the
phone is cooling down enough for wireless
charging to automatically resume. This is
normal. Individual phone performance
may vary. Software Acknowledgements
Certain Wireless Charging Module product
from LG Electronics, Inc. ("LGE") contains the
open source software detailed below. Refer
to the indicated open source licenses (as are
included following this notice) for the terms
and conditions of their use.
OSS Notice Information
To obtain the source code that is
contained in this product, please visit
https://opensource.lge.com. In addition to
the source code, all referred license terms,
warranty disclaimers and copyright notices
are available for download. LG Electronics
will also provide open source code to you
on CD-ROM for a charge covering the cost of
performing such distribution (such as the
cost of media, shipping, and handling) upon
email request to [email protected]. This
offer is valid for three (3) years from the
date on which you purchased the product.
Page 82 of 362
Chevrolet Corvette Owner Manual (GMNA-Localizing-U.S./Canada/Mexico-
17272984) - 2024 - CRC - 2/20/23
Instruments and Controls 81
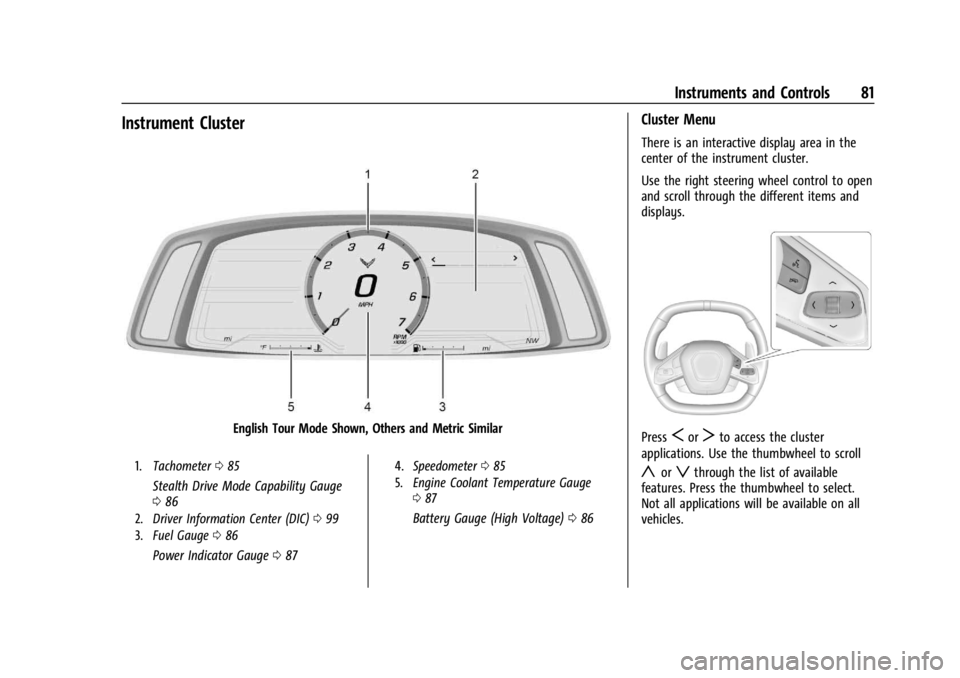
Instrument Cluster
English Tour Mode Shown, Others and Metric Similar
1.Tachometer 085
Stealth Drive Mode Capability Gauge
086
2. Driver Information Center (DIC) 099
3. Fuel Gauge 086
Power Indicator Gauge 087
4. Speedometer 085
5. Engine Coolant Temperature Gauge
087
Battery Gauge (High Voltage) 086
Cluster Menu
There is an interactive display area in the
center of the instrument cluster.
Use the right steering wheel control to open
and scroll through the different items and
displays.
PressSorTto access the cluster
applications. Use the thumbwheel to scroll
yorzthrough the list of available
features. Press the thumbwheel to select.
Not all applications will be available on all
vehicles.
Page 83 of 362
Chevrolet Corvette Owner Manual (GMNA-Localizing-U.S./Canada/Mexico-
17272984) - 2024 - CRC - 2/20/23
82 Instruments and Controls
.Trip Computer/Performance/Maintenance:
The selected Driver Information Center
(DIC) displays can be viewed. SeeDriver
Information Center (DIC) 099.
.Audio
.Options
.Simplify
Info Tiles
The following is the list of all possible info
tiles that is shown on the left side of the
speedometer. Depending on the vehicle,
some may not be available. Information
displayed here can be customized from the
Options menu. See “Options”below.
Time & Temperature : Displays the current
time and the current outside air
temperature.
Instant Fuel Economy/Economy Trend :
Displays the current fuel economy in liters
per 100 kilometers (L/100 km) or miles per
gallon (mpg). This number reflects only the
approximate fuel economy and changes
frequently as driving conditions change.
This display cannot be reset. Shows history of the Average Fuel Economy
from the last 100 km (62 mi). Each bar
represents about 5 km (3 mi) of driving.
When driving, the bars shift to reflect the
most recent distance on the right side.
G-force :
Gives the driver an indication of
the vehicle performance in cornering. The
G-force gauge will show as an info tile on
the left side of the cluster, if selected.
Oil Temperature : Shows the current oil
temperature in either degrees Celsius (°C) or
degrees Fahrenheit (°F).
Oil Pressure : Shows the current oil pressure
in either kilopascal (kPa) or in pounds per
square inch (psi).
Battery Voltage : Shows the current 12-Volt
battery voltage.
Transmission Fluid Temperature : Shows the
temperature of the transmission fluid in
either degrees Celsius (°C) or degrees
Fahrenheit (°F).
Tire Status : Shows individual tire pressures
and overall temperature as either Cold, Cool,
Normal, Warm, or Hot. Normal is typical for
normal driving while Warm is typical for
spirited driving. Unknown may be displayed
if tire temperature information is
unavailable. Tire Pressure shows the approximate
pressures of all four tires. Tire pressure is
displayed in either kilopascal (kPa) or in
pounds per square inch (psi). If the pressure
is low, the value for that tire is shown in
amber. See
Tire Pressure Monitor System
0 288 and
Tire Pressure Monitor Operation 0289.
eLSD : If equipped, displays the amount of
rear differential coupling when the Electronic
Limited-Slip Differential (eLSD) is active and
functioning during vehicle operation.
A reading of 1% is an open differential and
100% is locked. It is normal for the value to
make small or large changes due to driving
conditions and driver inputs. See Limited-Slip
Differential 0211.
Wheel Slip : Shows the wheel
slip percentage of the vehicle.
Front Lift : During a driver requested Front
Lift (if equipped), the driver may
"remember" using the
S, or dismiss the
display by pressing the thumbwheel. When
the Front Lift is Raised due to location, the
driver may delete that stored location using
the
S, or dismiss the display by pressing
the thumbwheel.
See Front Lift System 0205.
Page 84 of 362
Chevrolet Corvette Owner Manual (GMNA-Localizing-U.S./Canada/Mexico-
17272984) - 2024 - CRC - 2/20/23
Instruments and Controls 83
Brake Temperature :Shows overall
temperature as either Normal, Warm, Hot,
or Overheated. Normal is typical for normal
driving while Warm is typical for spirited
driving. Unknown may be displayed if tire
temperature information is unavailable.
Lifetime Fuel Economy : Shows the
instantaneous fuel economy over the
lifetime of the vehicle.
Follow Distance : Shows the current follow
time to the vehicle ahead is displayed as a
time value.
Hybrid Battery Temperature : If equipped,
displays the temperature of the high voltage
battery which assists performance of the
vehicle in either degrees Celsius (°C) or
degrees Fahrenheit (°F).
Electric Power : If equipped, shows the
power coming from the high voltage
battery. When the power indicator is green,
battery power is being charged. When the
indicator is amber, the vehicle is using
power to assist.
Hybrid Battery : If equipped, displays the
high voltage battery charge status of the
vehicle. Hybrid Battery states:
.Red
–No eAWD
.Yellow –Electric assist limited
.White –Normal state of charge range
.Blue –Maximum state of charge range
Audio
Use the thumbwheel to scroll through audio
presets.
Options
Use the thumbwheel to scroll through items
in the Options menu.
Display Options
Press the thumbwheel to enter the Display
menu. There are seven instrument cluster
display configurations to choose from. Sport,
Tour, Track, Weather, My Mode, Z-Mode,
and Night. The style of the cluster will
change depending on the theme selected.
Default is linked to Driver mode. Other
display themes can be set.
If in Z-Mode or My Mode then those
displays plus HUD (if equipped) can be set. Night Mode is enabled when the Instrument
Panel Illumination Control is set to the
minimum level. See
Instrument Panel
Illumination Control 0113.
Shuttle Mode and Stealth Mode are enabled
when either are selected in the Driver Mode
Control before the vehicle is turned on. See
Driver Mode Control 0196.
.Sport/Z-Mode: Displays Coolant
Temperature, Fuel Gauge, Compass, Drive
Mode Indicator, Odometer, Speed,
Tachometer, Electronic Transmission
Range, Current Gear, Active Fuel
Management (AFM), Peak Performance,
Performance Shift Lights, Speed Limit, Info
Area, and Interaction Area.
.Tour/Weather/My Mode: Displays Coolant
Temperature, Fuel Gauge, Compass, Drive
Mode Indicator, Odometer, Speed,
Tachometer, Electronic Transmission
Range, Current Gear, Active Fuel
Management (AFM), Peak Performance,
Speed Limit, Info Area, and
Interaction Area.
.Track: Displays Coolant Temperature, Fuel
Gauge, Performance Traction
Management, Drive Mode Indicator,
Page 85 of 362
Chevrolet Corvette Owner Manual (GMNA-Localizing-U.S./Canada/Mexico-
17272984) - 2024 - CRC - 2/20/23
84 Instruments and Controls
Speed, Tachometer, Electronic
Transmission Range, Current Gear, Info
Area, and Interactive Area.
.Night: Displays Coolant Temperature, Fuel
Gauge, and Digital Speed.
.Shuttle: If equipped, displays Battery
Gauge, Power Indicator Gauge, Odometer,
and Digital Speed.
.Stealth: If equipped, displays Battery
Gauge, Fuel Gauge, Electric Capability
Gauge, Odometer, Drive Mode Indicator,
and Digital Speed.
Preset info tiles shown on each layout:
Sport : G-Force, Oil Pressure
G-Force, Hybrid Battery
Track : Oil Pressure, Transmissions Fluid
Temperature, Tire Pressure & Tire
Temperature, Oil Temperature
Hybrid Battery Temperature, Hybrid Battery,
Oil Temperature, Tire Pressure & Tire
Temperature
Tour : Time & Outside Air Temperature, Tire
Pressure & Tire Temperature
Electric Power, Tire Pressure & Tire
Temperature Weather :
Tire Pressure & Tire Temperature,
Oil Temperature
Tire Pressure & Tire Temperature, Hybrid
Battery
Z-Mode : G-Force, Oil Temperature
Hybrid Battery, Electric Power
My Mode : Time & Outside Air
Temperature, Oil Pressure
Electric Power, Oil Pressure
Night : None
Shuttle : None
Stealth : None
Info Titles Selection
Use the thumbwheel to select the items to
be displayed in the display areas. See "Info
Tiles" previously in this section.
If the maximum amount of info tiles has
been selected, all deselected info tiles
appear in an disabled state. If maximum
amount of info tiles is not selected, all info
tiles appear in an normal state and can be
selected. In the default layout, the info tiles
will be inserted from top to bottom. In the
enhanced layout, the info tiles will be inserted from top left to top right to bottom
left to bottom right. Info tiles that are
already occupied will be skipped.
Tachometer
Available in some Drive Modes, press the
thumbwheel while Tachometer is displayed
to enter the Tachometer menu. Choose
Traditional or Numerical by pressing the
thumbwheel while the desired item is
highlighted. A selected mark will be
displayed next to the selected item.
Traditional tachometer shows a linear gauge,
and Numerical tachometer shows shift lights
with numerical RPM.
Units
Press the thumbwheel while Units is
displayed to enter the Units menu. Choose
US or metric units by pressing the
thumbwheel while the desired item is
highlighted. A selected mark will be
displayed next to the selected item.
Tire Pressure
Use the thumbwheel to select the tire
pressure warning thresholds. Choose Light,
Eco, or Max by pressing the thumbwheel