2024 CHEVROLET CORVETTE stop start
[x] Cancel search: stop startPage 157 of 362
Chevrolet Corvette Owner Manual (GMNA-Localizing-U.S./Canada/Mexico-
17272984) - 2024 - CRC - 2/20/23
156 Driving and Operating
Trailer Towing
General Towing Information . . . . . . . . . . . 230
Conversions and Add-Ons
Add-On Electrical Equipment . . . . . . . . . . 230
Driving Information
Driving for Better Fuel Economy
Driving habits can affect fuel mileage. Here
are some driving tips to get the best fuel
economy possible:
.Set the climate controls to the desired
temperature after the engine is started,
or turn them off when not required.
.Avoid fast starts and accelerate smoothly.
.Brake gradually and avoid abrupt stops.
.Avoid idling the engine for long periods
of time.
.When road and weather conditions are
appropriate, use cruise control.
.Always follow posted speed limits or
drive more slowly when conditions
require.
.Keep vehicle tires properly inflated.
.Combine several trips into a single trip.
.Replace the vehicle's tires with the same
TPC Spec number molded into the tire's
sidewall near the size.
.Follow recommended scheduled
maintenance.
.Using Tour mode rather than Sport or
Track modes, will result in better Active
Fuel Management operation. SeeActive
Fuel Management 0182.
.For recommended shift speeds, see Dual
Clutch Transmission 0184.
Premium Fuel
Use the recommended fuel. See
Recommended Fuel 0227.
Distracted Driving
Distraction comes in many forms and can
take your focus from the task of driving.
Exercise good judgment and do not let other
activities divert your attention away from
the road. Many local governments have
enacted laws regarding driver distraction.
Become familiar with the local laws in
your area.
To avoid distracted driving, keep your eyes
on the road, keep your hands on the
steering wheel, and focus your attention on
driving.
.Do not use a phone in demanding driving
situations. Use a hands-free method to
place or receive necessary phone calls.
Page 160 of 362
Chevrolet Corvette Owner Manual (GMNA-Localizing-U.S./Canada/Mexico-
17272984) - 2024 - CRC - 2/20/23
Driving and Operating 159
Steering in Emergencies
.There are some situations when steering
around an obstacle may be more effective
than braking.
.Holding both sides of the steering wheel
allows you to turn 180 degrees without
removing a hand.
.The Antilock Brake System (ABS) allows
steering while braking.
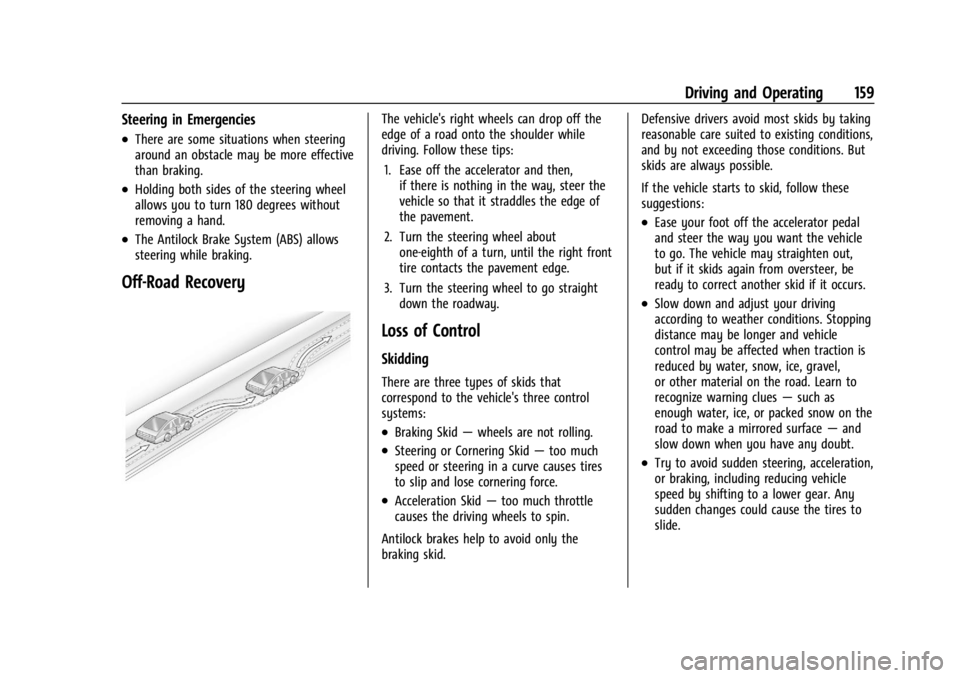
Off-Road Recovery
The vehicle's right wheels can drop off the
edge of a road onto the shoulder while
driving. Follow these tips:1. Ease off the accelerator and then, if there is nothing in the way, steer the
vehicle so that it straddles the edge of
the pavement.
2. Turn the steering wheel about one-eighth of a turn, until the right front
tire contacts the pavement edge.
3. Turn the steering wheel to go straight down the roadway.
Loss of Control
Skidding
There are three types of skids that
correspond to the vehicle's three control
systems:
.Braking Skid —wheels are not rolling.
.Steering or Cornering Skid —too much
speed or steering in a curve causes tires
to slip and lose cornering force.
.Acceleration Skid —too much throttle
causes the driving wheels to spin.
Antilock brakes help to avoid only the
braking skid. Defensive drivers avoid most skids by taking
reasonable care suited to existing conditions,
and by not exceeding those conditions. But
skids are always possible.
If the vehicle starts to skid, follow these
suggestions:
.Ease your foot off the accelerator pedal
and steer the way you want the vehicle
to go. The vehicle may straighten out,
but if it skids again from oversteer, be
ready to correct another skid if it occurs.
.Slow down and adjust your driving
according to weather conditions. Stopping
distance may be longer and vehicle
control may be affected when traction is
reduced by water, snow, ice, gravel,
or other material on the road. Learn to
recognize warning clues
—such as
enough water, ice, or packed snow on the
road to make a mirrored surface —and
slow down when you have any doubt.
.Try to avoid sudden steering, acceleration,
or braking, including reducing vehicle
speed by shifting to a lower gear. Any
sudden changes could cause the tires to
slide.
Page 164 of 362
Chevrolet Corvette Owner Manual (GMNA-Localizing-U.S./Canada/Mexico-
17272984) - 2024 - CRC - 2/20/23
Driving and Operating 163
to be replaced, use GM approved brake
pads. If this is not done, the brake fade
warning system may not function properly.
Stage 1 :The Driver Information Center (DIC)
displays a “Reduce Braking to Avoid
Overheating” message, a chime sounds and
brake pedal effort and travel is increased.
When the message displays, the driver
should back up braking points and reduce
brake usage in order to reduce brake
temperature. This will allow for continued
lapping with no speed limitations.
Stage 2 : The Driver Information Center
(DIC) displays a “Brakes Overheated Service
Now” message, a chime sounds, and brake
pedal effort and travel is further increased.
This code indicates that the brake fluid
temperature is excessive and is about to
boil. The system limits vehicle speed to
100KPH/62MPH. The driver should
immediately start a cool down lap if on the
track. If this message displays, the vehicle
needs to be serviced. The brake system
needs to cool down, and the brake fluid
must be immediately flushed with DOT4 for
street use, or to a qualified DOT4 race fluid
for track use. Boiled brake fluid is
compromised and must be replaced. Brake Burnishing
Caution
Performing the brake burnish procedure
on a base brake system can result in
brake damage.
Caution
The new vehicle break-in period should be
completed before performing the brake
burnish procedure, otherwise damage
may occur to the powertrain/engine. See
New Vehicle Break-In
0177.
Caution
Brake pedal fade will occur during any
track burnish procedure and can cause
brake pedal travel and force to increase.
This could extend stopping distance until
the brakes are fully burnished.
New brake pads must be burnished before
racing or other competitive driving.
When this procedure is performed as
instructed, it will not damage the brakes.
The brake pads will smoke and produce an odor. The braking force and pedal travel
may increase. After the procedure, the brake
pads may appear white at the rotor contact.
Perform this procedure only on dry
pavement, in a safe manner, and in
compliance with all local and state
ordinances/laws regarding motor vehicle
operation.
Brake Burnishing Procedure for J55 (Stingray
with Z51) and J56 (Z06 Standard) Brakes
This brake burnish procedure should only be
performed on vehicles with the Z06 with
J56, or Z51 with J55 factory equipped brake
systems.
1. Using the friction bubble in the Cluster Performance menu, apply the brakes 25
times starting at 100 km/h (60 mph) to
50 km/h (30 mph) while decelerating at
0.4 g. See Instrument Cluster 081. This is
a medium brake application. Drive for at
least 1 km (0.6 mi) between applying the
brakes. This first step may be skipped if
there are more than 320 km (200 mi) on
the brake pads.
2. Apply the brakes 25 times starting at 100 km/h (60 mph) to 25 km/h (15 mph)
while decelerating at 0.8 g. This is a hard
brake application without activating the
Page 165 of 362
Chevrolet Corvette Owner Manual (GMNA-Localizing-U.S./Canada/Mexico-
17272984) - 2024 - CRC - 2/20/23
164 Driving and Operating
Antilock Brake System (ABS). Drive for at
least 1 km (0.6 mi) between applications.
Depending on conditions, some increase
in brake pedal travel and brake pedal
force may be experienced.
3. Cool down: Drive at 100 km/h (60 mph) for approximately 15 km (10 mi) without
using the brakes.
4. Apply the brakes 25 times from 100 km/h (60 mph) to 50 km/h (30 mph)
while decelerating at 0.4 g. This is a
medium brake application. Drive for at
least 1 km (0.6 mi) between applications.
As with all high performance brake systems,
some amount of brake squeal is normal.
Brake Burnishing Procedure for Z06 and
E-Ray with Available J57 Carbon Ceramic
Brakes
This brake burnish procedure should only be
run on Z06 and E-Ray vehicles with J57
factory equipped brake systems.
Perform this procedure only on dry
pavement, in a safe manner, and in
compliance with all local and state
ordinances regarding motor vehicle
operation. 1. Using the friction bubble in the Cluster
Performance menu, apply the brakes 25
times starting at 100 km/h (60 mph) to
50 km/h (30 mph) while decelerating at
0.4 g. This is a medium brake
application. Drive for at least 1.6 km
(1.0 mi) between applications. This first
step may be skipped if there are more
than 320 km (200 mi) on the brake pads.
2. Apply the brakes 20 times starting at 100 km/h (60 mph) to 25 km/h (15 mph)
while decelerating at 0.8 g. This is a
hard brake application. Drive for at least
1.6 km (1.0 mi) between applications.
3. Apply the brakes 12 times starting at 100 km/h (60 mph) to 8 km/h (5 mph)
while decelerating at 0.8 g. This is a
hard brake application. Accelerate as
rapidly as possible without activating
traction control between applications.
4. Cool down: Drive at 100 km/h (60 mph) for approximately 15 km (10 mi) without
using the brakes.
As with all high performance brake systems,
some amount of brake squeal is normal. Alternative Closed Course Brake Burnishing
Procedure for J55 (Stingray with Z51), J56
(Z06 Standard), and J57 (Z06 and E-Ray
Carbon Ceramic) Brakes
This brake burnish procedure should be run
on vehicles with the Z51 with J55, Z06 with
J56, or Z06 and E-Ray with J57 factory
equipped brake systems.
This procedure should only be run on a
track and only on dry pavement. Brake
pedal fade will occur during this track
burnish procedure and can cause brake pedal
travel and force to increase. This could
extend stopping distance until the brakes
are fully burnished.
1. Start track lapping at lower speeds and lower braking efforts for three minutes
of driving. Allow for increased braking
distances due to reduced brake output.
2. After Step 1, increase speed and braking effort for the next six minutes of
lapping, gradually ending up at 90%
effort. Continue to allow for increased
braking distance due to reduced brake
output.
3. Cool the brakes by lapping with minimal light braking for six minutes.
Page 174 of 362
Chevrolet Corvette Owner Manual (GMNA-Localizing-U.S./Canada/Mexico-
17272984) - 2024 - CRC - 2/20/23
Driving and Operating 173
Blizzard Conditions
Stop the vehicle in a safe place and signal
for help. Stay with the vehicle unless there
is help nearby. If possible, use Roadside
Assistance. SeeRoadside Assistance Program
0 332. To get help and keep everyone in the
vehicle safe:
.Turn on the hazard warning flashers.
.Tie a red cloth to an outside mirror.
{Warning
Snow can trap engine exhaust under the
vehicle. This may cause exhaust gases to
get inside. Engine exhaust contains
carbon monoxide (CO), which cannot be
seen or smelled. It can cause
unconsciousness and even death.
If the vehicle is stuck in snow:
.Clear snow from the base of the
vehicle, especially any blocking the
exhaust pipe.
.Open a window about 5 cm (2 in) on
the vehicle side that is away from the
wind, to bring in fresh air.
.Fully open the air outlets on or under
the instrument panel.
(Continued)
Warning (Continued)
.Adjust the climate control system to
circulate the air inside the vehicle and
set the fan speed to the highest
setting. See“Climate Control Systems.”
For more information about CO, see
Engine Exhaust 0183.
To save fuel, run the engine for short
periods to warm the vehicle and then shut
the engine off and partially close the
window. Moving about to keep warm also
helps.
If it takes time for help to arrive, when
running the engine, push the accelerator
pedal slightly so the engine runs faster than
the idle speed. This keeps the battery
charged to restart the vehicle and to signal
for help with the headlamps. Do this as
little as possible, to save fuel.
If the Vehicle Is Stuck
Slowly and cautiously spin the wheels to
free the vehicle when stuck in sand, mud,
ice, or snow. If stuck too severely for the traction system
to free the vehicle, turn the traction system
off and use the rocking method. See
Traction Control/Electronic Stability Control
0
194.
{Warning
If the vehicle's tires spin at high speed,
they can explode, and you or others
could be injured. The vehicle can
overheat, causing an engine compartment
fire or other damage. Spin the wheels as
little as possible and avoid going above
56 km/h (35 mph).
Rocking the Vehicle to Get it Out
Turn the steering wheel left and right to
clear the area around the front wheels. Turn
off any traction system. Shift back and forth
between R (Reverse) and a low forward gear,
spinning the wheels as little as possible. To
prevent transmission wear, wait until the
wheels stop spinning before shifting gears.
Release the accelerator pedal while shifting,
and press lightly on the accelerator pedal
when the transmission is in gear. Slowly
spinning the wheels in the forward and
reverse directions causes a rocking motion
that could free the vehicle. If that does not
Page 178 of 362
Chevrolet Corvette Owner Manual (GMNA-Localizing-U.S./Canada/Mexico-
17272984) - 2024 - CRC - 2/20/23
Driving and Operating 177
Starting and Operating
New Vehicle Break-In
Follow these recommended guidelines
during the first 2 414 km (1,500 mi) of driving
this vehicle. Parts have a break-in period and
performance will be better in the long run.
During the first 800 km (500 mi), engine
torque will be limited in low gears.
To remove the engine torque limitation after
the initial 500-mile break-in period, turn the
vehicle off, and open and close the driver
door. Ensure all doors are closed for
15 minutes.
For the first 322 km (200 mi):
.To break in new tires, drive at moderate
speeds and avoid hard cornering.
.New brake linings also need a break-in
period. Avoid making hard stops. This is
recommended every time brake linings
are replaced.
For the first 800 km (500 mi):
.Avoid full throttle starts and abrupt stops.
.Do not exceed 4000 rpm.
.Avoid driving at any one constant speed,
fast or slow, including the use of cruise
control.
.Avoid downshifting to brake or slow the
vehicle when the engine speed will
exceed 4000 rpm.
.Do not let the engine labor. Never lug the
engine. This rule applies at all times, not
just during the break-in period.
For the first 2 414 km (1,500 mi):
.Do not participate in track events, sport
driving schools, or similar activities.
.Check engine oil with every refueling and
add if necessary. Oil and fuel
consumption may be higher than normal.
Front Air Dam (and Splitter)
If equipped, the front air dam and splitter
have minimal ground clearance.
Under normal operation, the components
will occasionally contact some road surfaces
(speed bumps, driveway ramps, etc.). This
can be heard inside the vehicle as a scraping
noise. This is normal and does not indicate a
problem.
Use care when approaching bumps or
objects on road surfaces and avoid them
when possible.
If equipped, the Front Lift System may be
used to increase front air dam or splitter
clearance. See Front Lift System 0205.
Composite Materials
This vehicle may be equipped with parts
containing carbon fiber, sheet-molding
compound, or other composite materials.
Dealer-installed accessories may also contain
composite materials. These parts and
accessories may include the splitter or rocker
extensions.
{Warning
Exposed edges of parts containing carbon
fiber and other composite materials can
be sharp. Contact with these parts could
result in injury. Use caution to avoid
contacting these parts, including when
washing the vehicle. If the parts are
damaged, replace the parts promptly
with replacements from your dealer.
{Warning
Rocker extensions may break under
pressure, resulting in property damage or
injury. Do not stand on the rocker
extension or use it as a step.
Page 179 of 362
Chevrolet Corvette Owner Manual (GMNA-Localizing-U.S./Canada/Mexico-
17272984) - 2024 - CRC - 2/20/23
178 Driving and Operating
Ignition Positions
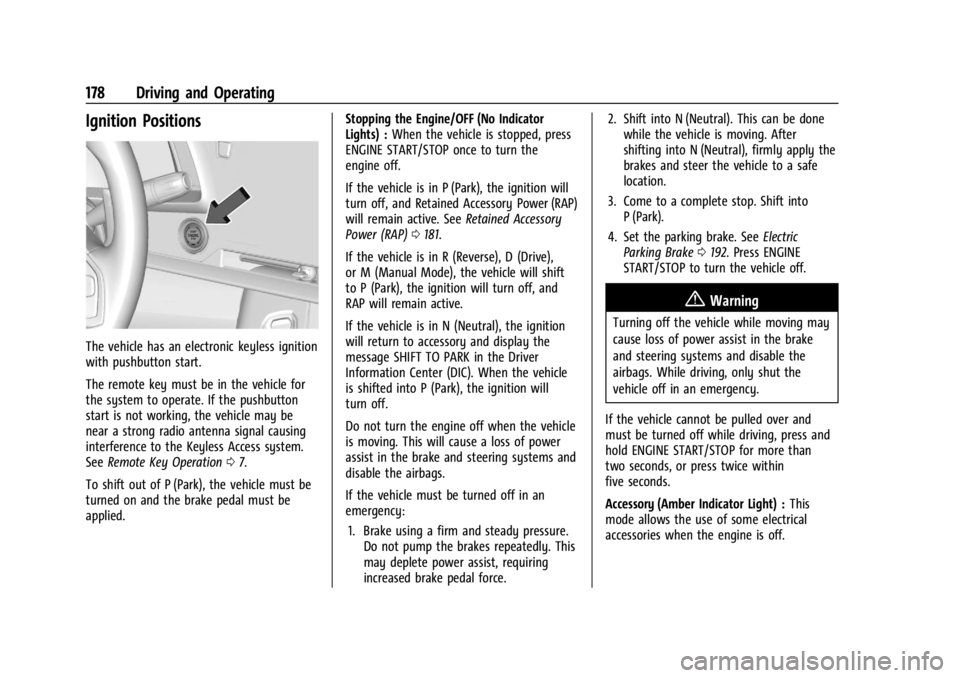
The vehicle has an electronic keyless ignition
with pushbutton start.
The remote key must be in the vehicle for
the system to operate. If the pushbutton
start is not working, the vehicle may be
near a strong radio antenna signal causing
interference to the Keyless Access system.
SeeRemote Key Operation 07.
To shift out of P (Park), the vehicle must be
turned on and the brake pedal must be
applied. Stopping the Engine/OFF (No Indicator
Lights) :
When the vehicle is stopped, press
ENGINE START/STOP once to turn the
engine off.
If the vehicle is in P (Park), the ignition will
turn off, and Retained Accessory Power (RAP)
will remain active. See Retained Accessory
Power (RAP) 0181.
If the vehicle is in R (Reverse), D (Drive),
or M (Manual Mode), the vehicle will shift
to P (Park), the ignition will turn off, and
RAP will remain active.
If the vehicle is in N (Neutral), the ignition
will return to accessory and display the
message SHIFT TO PARK in the Driver
Information Center (DIC). When the vehicle
is shifted into P (Park), the ignition will
turn off.
Do not turn the engine off when the vehicle
is moving. This will cause a loss of power
assist in the brake and steering systems and
disable the airbags.
If the vehicle must be turned off in an
emergency: 1. Brake using a firm and steady pressure. Do not pump the brakes repeatedly. This
may deplete power assist, requiring
increased brake pedal force. 2. Shift into N (Neutral). This can be done
while the vehicle is moving. After
shifting into N (Neutral), firmly apply the
brakes and steer the vehicle to a safe
location.
3. Come to a complete stop. Shift into P (Park).
4. Set the parking brake. See Electric
Parking Brake 0192. Press ENGINE
START/STOP to turn the vehicle off.
{Warning
Turning off the vehicle while moving may
cause loss of power assist in the brake
and steering systems and disable the
airbags. While driving, only shut the
vehicle off in an emergency.
If the vehicle cannot be pulled over and
must be turned off while driving, press and
hold ENGINE START/STOP for more than
two seconds, or press twice within
five seconds.
Accessory (Amber Indicator Light) : This
mode allows the use of some electrical
accessories when the engine is off.
Page 180 of 362
Chevrolet Corvette Owner Manual (GMNA-Localizing-U.S./Canada/Mexico-
17272984) - 2024 - CRC - 2/20/23
Driving and Operating 179
With the ignition off, pressing the button
one time without the brake pedal applied
will place the ignition system in accessory.
The ignition will switch from accessory to
OFF after five minutes to prevent battery
rundown.
ON/RUN/START (Green Indicator Light) :This
mode is for driving and starting. With the
ignition off and the brake pedal applied,
pressing the button once will place the
ignition in ON/RUN/START. Once engine
cranking begins, release the button. Engine
cranking will continue until the engine
starts. See Starting the Engine 0179. The
ignition will then remain in ON/RUN.
Service Mode
This power mode is available for service and
diagnostics, and to verify the proper
operation of the malfunction indicator lamp
as may be required for emission inspection
purposes. With the vehicle off and the brake
pedal not applied, pressing and holding
ENGINE START/STOP for more than
five seconds will place the vehicle in Service
Mode. The instruments and audio systems
will operate as they do in ON/RUN, but the
vehicle will not be able to be driven. The engine will not start in Service Mode. Press
ENGINE START/STOP again to turn the
vehicle off.
Starting the Engine
Caution
If you add electrical parts or accessories,
you could change the way the engine
operates. Any resulting damage would
not be covered by the vehicle warranty.
See
Add-On Electrical Equipment 0230.
Caution
Do not try to shift to P (Park) if the
vehicle is moving. If you do, you could
damage the transmission. Shift to P (Park)
only when the vehicle is stopped.
Place the transmission in P (Park) or
N (Neutral). To restart the vehicle when it is
already moving, use N (Neutral) only.
Starting the Vehicle
The remote key must be inside the vehicle
for the ignition to work. Cell phone chargers can interfere with the
operation of the Keyless Access system.
Battery chargers should not be plugged in
when starting or turning off the engine.
1. Press the brake pedal, then press ENGINE START/STOP on the instrument panel.
If there is no remote key in the vehicle
or if there is something causing
interference with it, the Driver
Information Center (DIC) will display a
message.
2. When the engine begins cranking, let go of the button and the engine cranks
automatically until it starts.
If the battery in the remote key is weak,
the DIC will display a message. The
vehicle can still be driven.
See “Starting the Vehicle with a Low
Remote Key Battery” underRemote Key
Operation 07. If the remote key battery
is dead, insert it into the cupholder
remote key pocket to enable engine
starting.
3. Do not race the engine immediately after starting it. Operate the engine and
transmission gently until the oil warms
up and lubricates all moving parts.