2024 CHEVROLET CORVETTE ESP
[x] Cancel search: ESPPage 225 of 362

Chevrolet Corvette Owner Manual (GMNA-Localizing-U.S./Canada/Mexico-
17272984) - 2024 - CRC - 2/20/23
224 Driving and Operating
SBZA Detection Zones
The SBZA sensor covers a zone
approximately one lane over from both
sides of the vehicle, or approximately
3.5 m (11 ft). The height of the zone is
approximately between 0.5 m (1.5 ft) and
2 m (6 ft) off the ground. This zone starts at
approximately the middle of the vehicle and
goes back 5 m (16 ft).
How the System Works
The SBZA symbol lights up in the side
mirrors when the system detects a moving
vehicle in the next lane over that is in the
side blind zone. This indicates it may be
unsafe to change lanes. Before making alane change, check the SBZA display, check
mirrors, glance over your shoulder, and use
the turn signals.
Left Side Mirror
DisplayRight Side Mirror Display
When the vehicle is started, both outside
mirror SBZA displays will briefly come on to
indicate the system is operating. When the
vehicle is in a forward gear, the left- or
right-side mirror display will light up if a
moving vehicle is detected in that blind
zone. If the turn signal is activated in the
same direction as a detected vehicle, this
display will flash as an extra warning not to
change lanes.
SBZA can be disabled through vehicle
personalization. To view available settings
from the infotainment screen, touch
Settings > Vehicle > Collision/Detection
Systems. If SBZA is disabled by the driver,
the SBZA mirror displays will not light up.
When the System Does Not Seem to
Work Properly
SBZA displays may not come on when
passing a vehicle quickly, for a stopped
vehicle. SBZA may alert to objects attached
to the vehicle, such as a bicycle, or object
extending out to either side of the vehicle.
This is normal system operation; the vehicle
does not need service.
SBZA may not always alert the driver to
vehicles in the side blind zone, especially in
wet conditions. The system does not need
to be serviced. The system may light up due
to guardrails, signs, trees, shrubs, and other
non-moving objects. This is normal system
operation; the vehicle does not need service.
SBZA may not operate when the SBZA
sensors in the left or right corners of the
rear bumper are covered with mud, dirt,
snow, ice, or slush, or in heavy rainstorms.
For cleaning instructions, see "Washing the
Vehicle" under Exterior Care0306. If the
DIC still displays the system unavailable
message after cleaning both sides of the
vehicle toward the rear corners of the
vehicle, see your dealer.
Page 247 of 362
Chevrolet Corvette Owner Manual (GMNA-Localizing-U.S./Canada/Mexico-
17272984) - 2024 - CRC - 2/20/23
246 Vehicle Care
Engine Oil (5.5L LT6 Engine)
To ensure proper engine performance and
long life, pay careful attention to engine oil.
Follow these important steps:
.Use engine oil approved to the proper
specification and of the proper viscosity
grade. See“Selecting the Right Engine
Oil” later in this section.
.Check the engine oil level regularly and
maintain the proper oil level. See
“Checking Engine Oil” and“When to Add
Engine Oil” later in this section.
.Change the engine oil at the appropriate
time. SeeEngine Oil Life System 0252.
.Always dispose of engine oil properly. See
“What to Do with Used Oil” in this
section.
Checking the Engine Oil
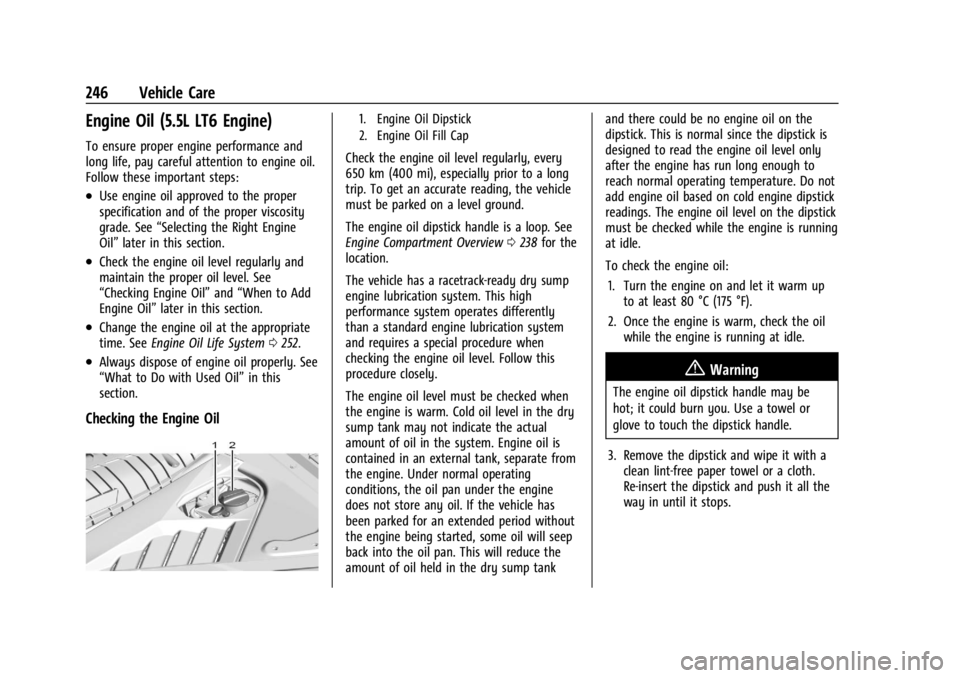
1. Engine Oil Dipstick
2. Engine Oil Fill Cap
Check the engine oil level regularly, every
650 km (400 mi), especially prior to a long
trip. To get an accurate reading, the vehicle
must be parked on a level ground.
The engine oil dipstick handle is a loop. See
Engine Compartment Overview 0238 for the
location.
The vehicle has a racetrack-ready dry sump
engine lubrication system. This high
performance system operates differently
than a standard engine lubrication system
and requires a special procedure when
checking the engine oil level. Follow this
procedure closely.
The engine oil level must be checked when
the engine is warm. Cold oil level in the dry
sump tank may not indicate the actual
amount of oil in the system. Engine oil is
contained in an external tank, separate from
the engine. Under normal operating
conditions, the oil pan under the engine
does not store any oil. If the vehicle has
been parked for an extended period without
the engine being started, some oil will seep
back into the oil pan. This will reduce the
amount of oil held in the dry sump tank and there could be no engine oil on the
dipstick. This is normal since the dipstick is
designed to read the engine oil level only
after the engine has run long enough to
reach normal operating temperature. Do not
add engine oil based on cold engine dipstick
readings. The engine oil level on the dipstick
must be checked while the engine is running
at idle.
To check the engine oil:
1. Turn the engine on and let it warm up to at least 80 °C (175 °F).
2. Once the engine is warm, check the oil while the engine is running at idle.
{Warning
The engine oil dipstick handle may be
hot; it could burn you. Use a towel or
glove to touch the dipstick handle.
3. Remove the dipstick and wipe it with a clean lint-free paper towel or a cloth.
Re-insert the dipstick and push it all the
way in until it stops.
Page 250 of 362
Chevrolet Corvette Owner Manual (GMNA-Localizing-U.S./Canada/Mexico-
17272984) - 2024 - CRC - 2/20/23
Vehicle Care 249
Engine Oil Additives/Engine Oil Flushes
Do not add anything to the oil. The
recommended oils meeting the dexos
specification are all that is needed for good
performance and engine protection.
Engine oil system flushes are not
recommended and could cause engine
damage not covered by the vehicle
warranty.
What to Do with Used Oil
Used engine oil contains certain elements
that can be unhealthy for your skin and
could even cause cancer. Do not let used oil
stay on your skin for very long. Clean your
skin and nails with soap and water, or a
good hand cleaner. Wash or properly
dispose of clothing or rags containing used
engine oil. See the manufacturer's warnings
about the use and disposal of oil products.
Used oil can be a threat to the environment.
If you change your own oil, drain all the oil
from the filter before disposal. Never dispose
of oil by putting it in the trash or pouring it
on the ground, into sewers, or into streams
or bodies of water. Recycle it by taking it to
a place that collects used oil.
Engine Oil (6.2L LT2 Engine)
To ensure proper engine performance and
long life, pay careful attention to engine oil.
Follow these important steps:
.Use engine oil approved to the proper
specification and of the proper viscosity
grade. See“Selecting the Right Engine
Oil” later in this section.
.Check the engine oil level regularly and
maintain the proper oil level. See
“Checking Engine Oil” and“When to Add
Engine Oil” later in this section.
.Change the engine oil at the appropriate
time. SeeEngine Oil Life System 0252.
.Always dispose of engine oil properly. See
“What to Do with Used Oil” in this
section.
Checking the Engine Oil
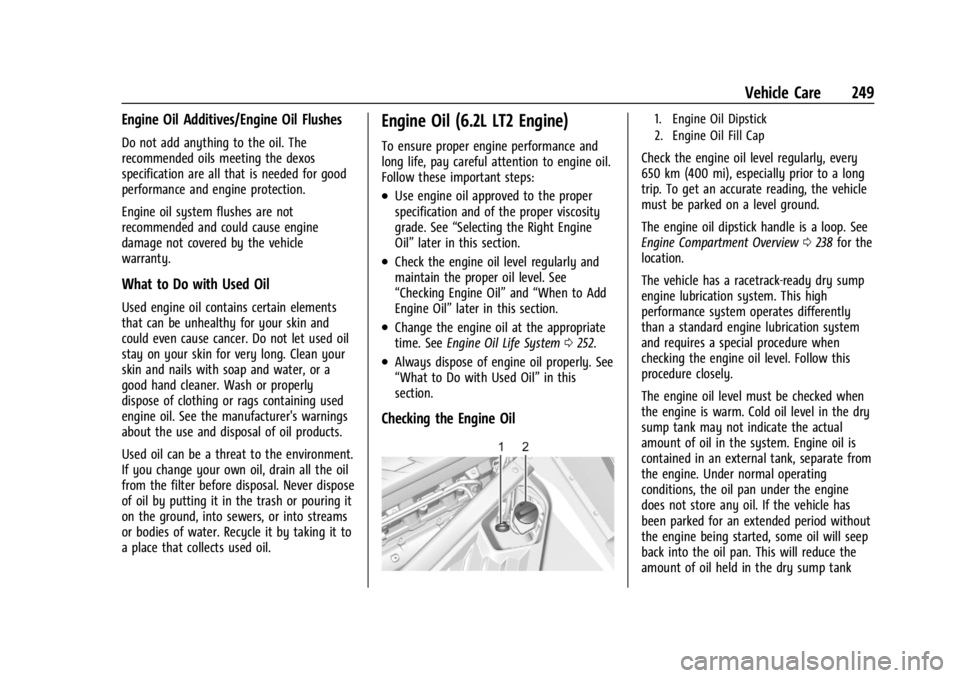
1. Engine Oil Dipstick
2. Engine Oil Fill Cap
Check the engine oil level regularly, every
650 km (400 mi), especially prior to a long
trip. To get an accurate reading, the vehicle
must be parked on a level ground.
The engine oil dipstick handle is a loop. See
Engine Compartment Overview 0238 for the
location.
The vehicle has a racetrack-ready dry sump
engine lubrication system. This high
performance system operates differently
than a standard engine lubrication system
and requires a special procedure when
checking the engine oil level. Follow this
procedure closely.
The engine oil level must be checked when
the engine is warm. Cold oil level in the dry
sump tank may not indicate the actual
amount of oil in the system. Engine oil is
contained in an external tank, separate from
the engine. Under normal operating
conditions, the oil pan under the engine
does not store any oil. If the vehicle has
been parked for an extended period without
the engine being started, some oil will seep
back into the oil pan. This will reduce the
amount of oil held in the dry sump tank
Page 255 of 362
Chevrolet Corvette Owner Manual (GMNA-Localizing-U.S./Canada/Mexico-
17272984) - 2024 - CRC - 2/20/23
254 Vehicle Care
When to Replace the Dual Clutch
Transmission Fluid Filter
This vehicle has a computer that indicates
when to change the transmission external
canister fluid filter. This is based on the
number of miles driven as outlined in the
Service and Maintenance section. For the
fluid filter life system to work properly, the
system must be reset every time the filter is
replaced. When the system has calculated
that the external canister filter is near the
mileage interval, a REPLACE TRANSMISSION
OIL FILTER SOON message comes on. Replace
the external canister filter before the
indicator reaches 0%.
Failure to replace the transmission filter at
required intervals could lead to suboptimal
transmission performance. Your dealer has
trained service technicians who will replace
the external canister filter and reset the
system. If the system is ever reset
accidentally, the filter should be replaced
according to the service intervals indicated
in the Service and Maintenance section until
the next filter change. If the next filter
change is the first, follow the service
interval until the second filter change,
resetting the filter life system at each filter
change.
How to Reset the Dual Clutch
Transmission Fluid and Filter Life System
Reset the respective system whenever the
transmission fluid or external canister filter
is replaced so that the system can calculate
the next service interval.
To reset:1. Place the vehicle in P (Park).
2. Select Transmission Fluid Life or Transmission Oil Filter Life on the DIC
menu. See Driver Information Center
(DIC) 099.
3. Press the thumbwheel to move to the Reset submenu. Select Reset
Transmission Fluid or Reset Transmission
Oil Filter. A confirmation page will be
displayed, press the thumbwheel again
to confirm the reset.
4. When the Transmission Fluid/Filter Life System is successfully reset, 100%
remaining life will be displayed.
Engine Air Filter Life System
If equipped, this feature provides the engine
air filter’s remaining life and best timing for
a change. The timing to change an engine
air filter depends on driving and
environmental conditions.
When to Change Engine Air Filter
When the Driver Information Center (DIC)
displays a message to replace the engine air
filter at the next oil change, follow this
timing.
When the DIC displays a message to replace
the engine air filter soon, replace the engine
air filter at the earliest convenience.
The system must be reset after the engine
air filter is changed.
If the DIC displays a message to check the
engine air filter system, see your dealer.
How to Reset Engine Air Filter Life
System
Reset the system whenever the engine air
filter is replaced so that the system can
calculate the next engine air filter change.
To reset:
1. Place the vehicle in P (Park).
2. Display the Air Filter Life on the DIC. See Driver Information Center (DIC) 099.
3. Press the thumbwheel on the steering wheel to move to the Reset/Disable
display area. Select Reset and press the
thumbwheel for several seconds.
4. Press the thumbwheel to confirm reset.
Page 265 of 362
Chevrolet Corvette Owner Manual (GMNA-Localizing-U.S./Canada/Mexico-
17272984) - 2024 - CRC - 2/20/23
264 Vehicle Care
the mass limit. Carbon ceramic brake rotors
inspection and weighing methods can be
found in the service manual.
Z51/Z06 Cast Iron Rotor System Brake
Burnish Procedure for Corrosion Cleanup
Corrosion spotting and grooving on the
brake rotor surface may appear after the
vehicle sits for an extended period of time,
especially in high humidity. This corrosion
may result in brake pulsation and noise. To
help restore optimal braking performance
and reduce noise, complete the following
procedure:
Caution
Performing the brake burnish procedure
on a base brake system can result in
brake damage.
Perform this procedure only on dry
pavement, in a safe manner, and in
compliance with all local and state
ordinances/laws regarding motor vehicle
operation.
Caution
The new vehicle break-in period should be
completed before performing the brake
burnishing procedure or damage may
occur to the powertrain/engine. See New
Vehicle Break-In 0177.
Caution
Brake fade can occur during this burnish
procedure and can cause brake pedal
travel and force to increase. This could
extend stopping distance until the brakes
are fully burnished.
Completing the following procedure as
instructed will not damage the brakes. The
brake pads may smoke and produce an
odor. The braking force and pedal travel
may increase. After the procedure, the brake
pads may appear white at the rotor contact. 1. Using the Friction Bubble gauge, apply the brakes 10 times starting at 100 km/h
(60 mph) to 50 km/h (30 mph) while
decelerating at 0.4g. This is a medium
brake application. Drive for at lest 0.5 km
(0.3 mi) between applying the brakes. 2. If further cleanup of the brake discs is
needed, repeat this procedure with 0.7g
applications.
As with all high performance brake systems,
some amount of brake squeal is normal.
Brake Pad Life System
(If Equipped)
When to Change Brake Pads
If equipped, this system estimates the
remaining life of the front and rear brake
pads. Brake Pad Life is displayed in the
Driver Information Center (DIC), along with
a percentage for each axle. The system must
be reset every time the brake pads are
changed.
When the system has determined that the
brake pads need to be replaced, a message
displays, which may include mileage
remaining.
Brake pads should always be replaced as
complete axle sets.
Page 286 of 362
Chevrolet Corvette Owner Manual (GMNA-Localizing-U.S./Canada/Mexico-
17272984) - 2024 - CRC - 2/20/23
Vehicle Care 285
GAWR RR:Gross Axle Weight Rating
for the rear axle. See Vehicle Load
Limits 0174.
Intended Outboard Sidewall
:The side
of an asymmetrical tire, that must
always face outward when mounted on
a vehicle.
Kilopascal (kPa)
:The metric unit for air
pressure.
Light Truck (LT-Metric) Tire
:A tire used
on light duty trucks and some
multipurpose passenger vehicles.
Load Index
:An assigned number
ranging from 1 to 279 that corresponds
to the load carrying capacity of a tire.
Maximum Inflation Pressure
:The
maximum air pressure to which a cold
tire can be inflated. The maximum air
pressure is molded onto the sidewall. Maximum Load Rating
:The load rating
for a tire at the maximum permissible
inflation pressure for that tire.
Occupant Distribution
:Designated
seating positions.
Outward Facing Sidewall
:The side of
an asymmetrical tire that has a
particular side that faces outward when
mounted on a vehicle. The side of the
tire that contains a whitewall, bears
white lettering, or bears manufacturer,
brand, and/or model name molding
that is higher or deeper than the same
moldings on the other sidewall of
the tire.
Passenger (P-Metric) Tire
:A tire used
on passenger cars and some light duty
trucks and multipurpose vehicles.
Recommended Inflation Pressure
:
Vehicle manufacturer's recommended
tire inflation pressure as shown on the
tire placard. See Tire Pressure0286 and
Vehicle Load Limits 0174. Radial Ply Tire
:A pneumatic tire in
which the ply cords that extend to the
beads are laid at 90 degrees to the
centerline of the tread.
Rim
:A metal support for a tire and
upon which the tire beads are seated.
Sidewall
:The portion of a tire between
the tread and the bead.
Speed Rating
:An alphanumeric code
assigned to a tire indicating the
maximum speed at which a tire can
operate.
Traction
:The friction between the tire
and the road surface. The amount of
grip provided.
Tread
:The portion of a tire that comes
into contact with the road.
Treadwear Indicators
:Narrow bands,
sometimes called wear bars, that show
across the tread of a tire when only
1.6 mm (1/16 in) of tread remains. See
When It Is Time for New Tires 0293.
Page 288 of 362

Chevrolet Corvette Owner Manual (GMNA-Localizing-U.S./Canada/Mexico-
17272984) - 2024 - CRC - 2/20/23
Vehicle Care 287
When to Check
Check the pressure of the tires once a
month or more.
How to Check
Use a good quality pocket-type gauge
to check tire pressure. Proper tire
inflation cannot be determined by
looking at the tire. Check the tire
inflation pressure when the tires are
cold, meaning the vehicle has not been
driven for at least three hours or no
more than 1.6 km (1 mi).
Remove the valve cap from the tire
valve stem. Press the tire gauge firmly
onto the valve to get a pressure
measurement. If the cold tire inflation
pressure matches the recommended
pressure on the Tire and Loading
Information label, no further adjustment
is necessary. If the inflation pressure is
low, add air until the recommended
pressure is reached. If the inflation
pressure is high, press on the metal
stem in the center of the tire valve to
release air.Recheck the tire pressure with the tire
gauge.
Put the valve caps back on the valve
stems to keep out dirt and moisture.
Use only valve caps designed for the
vehicle by GM. TPMS sensors could be
damaged and would not be covered by
the vehicle warranty.
Tire Pressure for High-Speed
Operation
{Warning
Driving at high speeds, 225 km/h
(140 mph) or higher, puts additional
strain on tires. Sustained high-speed
driving causes excessive heat buildup and
can cause sudden tire failure. This could
cause a crash, and you or others could be
killed. Some high-speed rated tires require
inflation pressure adjustment for
high-speed operation. When speed limits
and road conditions allow the vehicle to
be driven at high speeds, make sure the
tires are rated for high-speed operation,
(Continued)
Warning (Continued)
are in excellent condition, and are set to
the correct cold tire inflation pressure for
the vehicle load.
Vehicles with tire sizes listed in the High
Speed Operation Inflation Pressures table
require inflation pressure adjustment when
driving the vehicle at speeds of 225 km/h
(140 mph) or higher. Set the cold tire
inflation pressure to the corresponding value
in the table for the tire size on the vehicle.
Page 290 of 362

Chevrolet Corvette Owner Manual (GMNA-Localizing-U.S./Canada/Mexico-
17272984) - 2024 - CRC - 2/20/23
Vehicle Care 289
As an added safety feature, your vehicle has
been equipped with a tire pressure
monitoring system (TPMS) that illuminates a
low tire pressure telltale when one or more
of your tires is significantly under-inflated.
Accordingly, when the low tire pressure
telltale illuminates, you should stop and
check your tires as soon as possible, and
inflate them to the proper pressure. Driving
on a significantly under-inflated tire causes
the tire to overheat and can lead to tire
failure. Under-inflation also reduces energy
efficiency and tire tread life, and may affect
the vehicle's handling and stopping ability.
Please note that the TPMS is not a
substitute for proper tire maintenance, and
it is the driver's responsibility to maintain
correct tire pressure, even if under-inflation
has not reached the level to trigger
illumination of the TPMS low tire pressure
telltale.
Your vehicle has also been equipped with a
TPMS malfunction indicator to indicate when
the system is not operating properly. The
TPMS malfunction indicator is combined
with the low tire pressure telltale. When the
system detects a malfunction, the telltale
will flash for approximately one minute and
then remain continuously illuminated. Thissequence will continue upon subsequent
vehicle start-ups as long as the malfunction
exists.
When the malfunction indicator is
illuminated, the system may not be able to
detect or signal low tire pressure as
intended. TPMS malfunctions may occur for
a variety of reasons, including the
installation of replacement or alternate tires
or wheels on the vehicle that prevent the
TPMS from functioning properly. Always
check the TPMS malfunction telltale after
replacing one or more tires or wheels on
your vehicle to ensure that the replacement
or alternate tires and wheels allow the
TPMS to continue to function properly.
See
Tire Pressure Monitor Operation 0289.
See Radio Frequency Statement 0337.
Tire Pressure Monitor Operation
This vehicle may have a Tire Pressure
Monitor System (TPMS). The TPMS is
designed to warn the driver when a low tire
pressure condition exists. TPMS sensors are
mounted onto each tire and wheel
assembly, excluding the spare tire and
wheel assembly. The TPMS sensors monitor the air pressure in the tires and transmit the
tire pressure readings to a receiver located
in the vehicle.
When a low tire pressure condition is
detected, the TPMS illuminates the low tire
pressure warning light located on the
instrument cluster. If the warning light
comes on, stop as soon as possible and
inflate the tires to the recommended
pressure shown on the Tire and Loading
Information label. See
Vehicle Load Limits
0 174.
A message to check the pressure in a
specific tire displays in the Driver
Information Center (DIC). The low tire
pressure warning light and the DIC warning
message come on at each ignition cycle
until the tires are inflated to the correct
inflation pressure. If the vehicle has DIC
buttons, tire pressure levels can be viewed.
For additional information and details about
the DIC operation and displays, see Driver
Information Center (DIC) 099.