2023 TOYOTA YARIS CROSS brakes
[x] Cancel search: brakesPage 337 of 698

335
4
Owners Manual_Europe_M52N75_en
4-6. Driving tips
Driving
4-6.Driving tips
When using Eco drive mode, the
torque corresponding to the accel-
erator pedal depression amount
can be generated more smoothly
than it is in normal conditions. In
addition, the operation of the air
conditioning system (heating/cool-
ing) will be minimized, improving
the fuel economy. ( P. 3 2 2 )
The Eco-friendly driving is possible
by keeping the indicate of Hybrid
System Indicator within Eco area.
( P.96, 102)
Shift the shift lever to D when
stopped at a traffic light, or driving
in heavy traffic etc. Shift the shift
lever to P when parking. When
using the N, there is no positive
effect on fuel consumption. In the
N, the gasoline engine operates but
electricity cannot be generated.
Also, when using the air condition-
ing system, etc., the hybrid battery
(traction battery) power is con-
sumed.
Drive your vehicle smoothly.
Avoid abrupt acceleration and
deceleration. Gradual accelera-
tion and deceleration will make
more effective use of the electric
motor (traction motor) without
having to use gasoline engine
power.
Avoid repeated acceleration.
Repeated acceleration con-
sumes hybrid battery (traction
battery) power, resulting in poor
fuel consumption. Battery power
can be restored by driving with
the accelerator pedal slightly
released.
Make sure to operate the brakes
gently and in a timely manner. A
greater amount of electrical energy
can be regenerated when slowing
down.
Repeated acceleration and decel-
eration, as well as long waits at traf-
fic lights, will lead to bad fuel
economy. Check traffic reports
before leaving and avoid delays as
much as possible. When driving in
Hybrid electric vehicle
driving tips
For economical and ecological
driving, pay attention to the fol-
lowing points:
Using Eco drive mode
Use of Hybrid System Indi-
cator
Shift lever operation
Accelerator pedal/brake
pedal operation
When braking
Delays
Page 338 of 698

336
Owners Manual_Europe_M52N75_en
4-6. Driving tips
a traffic jam, gently release the
brake pedal to allow the vehicle to
move forward slightly while avoid-
ing overuse of the accelerator
pedal. Doing so can help control
excessive gasoline consumption.
Control and maintain the vehicle at
a constant speed. Before stopping
at a toll booth or similar, allow
plenty of time to release the accel-
erator and gently apply the brakes.
A greater amount of electrical
energy can be regenerated when
slowing down.
Use the air conditioning only when
necessary. Doing so can help
reduce excessive gasoline con-
sumption.
In summer: When the ambient tem-
perature is high, use the recircu-
lated air mode. Doing so will help to
reduce the burden on the air condi-
tioning system and reduce fuel con-
sumption as well.
In winter: Because the gasoline
engine will not automatically cut out
until it and the interior of the vehicle
are warm, it will consume fuel. Also,
fuel consumption can be improved
by avoiding overuse of the heater.
Make sure to check the tire inflation
pressure frequently. Improper tire
inflation pressure can cause poor
fuel economy.
Also, as snow tires can cause large
amounts of friction, their use on dry
roads can lead to poor fuel econ-
omy. Use tires that are appropriate
for the season.
Carrying heavy luggage will lead to
poor fuel economy. Avoid carrying
unnecessary luggage. Installing a
large roof rack will also cause poor
fuel economy.
Since the gasoline engine starts up
and cuts out automatically when
cold, warming up the engine is
unnecessary. Moreover, frequently
driving short distances will cause
the engine to repeatedly warm up,
which can lead to excess fuel con-
sumption.
Highway driving
Air conditioning
Checking tire inflation pres-
sure
Luggage
Warming up before driving
Page 340 of 698
338
Owners Manual_Europe_M52N75_en
4-6. Driving tips
the driving conditions:
Do not try to forcibly open a win-
dow or move a wiper that is fro-
zen. Pour warm water over the
frozen area to melt the ice. Wipe
away the water immediately to
prevent it from freezing.
To ensure proper operation of
the climate control system fan,
remove any snow that has accu-
mulated on the air inlet vents in
front of the windshield.
Check for and remove any
excess ice or snow that may
have accumulated on the exte-
rior lights, vehicle’s roof, chassis,
around the tires or on the brakes.
Remove any snow or mud from
the bottom of your shoes before
getting in the vehicle.
Accelerate the vehicle slowly, keep
a safe distance between you and
the vehicle ahead, and drive at a
reduced speed suitable to road
conditions.
Turn automatic mode of the park-
ing brake off. Otherwise, the
parking brake may freeze and
not be able to be released auto-
matically.
Also, avoid using the following as the
parking brake may operate automati-
cally, even if automatic mode is off.
• Brake hold system
Park the vehicle and shift the shift lever
to P without setting the parking brake.
The parking brake may freeze up, pre-
venting it from being released. If the
vehicle is parked without setting the
parking brake, make sure to block the
wheels. Failure to do so may be dan-
gerous because it may cause the vehi-
cle to move unexpectedly, possibly
leading to an accident.
When the parking brake is in automatic
mode, release the parking brake after
shifting the shift lever to P. ( P.201)
If the vehicle is parked without
setting the parking brake, con-
firm that the shift lever cannot be
moved out of P.
If the vehicle is left parked with
the brakes damp in cold tem-
peratures, there is a possibility of
the brakes freezing.
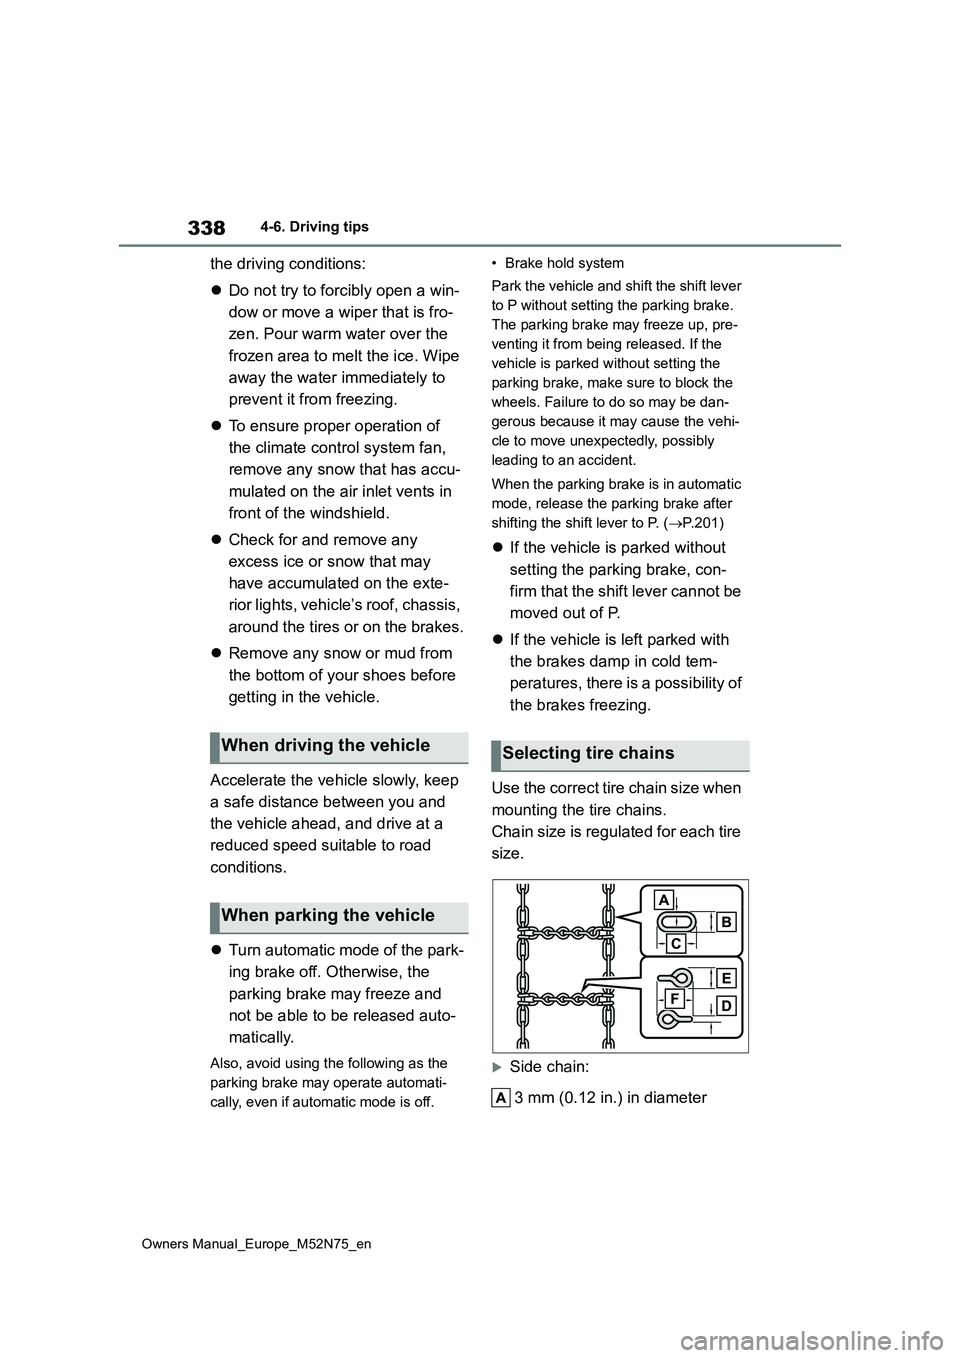
Use the correct tire chain size when
mounting the tire chains.
Chain size is regulated for each tire
size.
Side chain:
3 mm (0.12 in.) in diameter
When driving the vehicle
When parking the vehicle
Selecting tire chains
Page 371 of 698

369
6
Owners Manual_Europe_M52N75_en
6-1. Maintenance and care
Maintenance and care
■Brake pads and calipers
Rust may form if the vehicle is parked with wet brake pads or disc rotors, caus-ing them to stick. Before parking the
vehicle after it is washed, drive slowly and apply the brakes several times to dry the parts.
■Bumpers
Do not scrub with abrasive cleaners.
■Plated portions (if equipped)
If dirt cannot be removed, clean the parts as follows:
●Use a soft cloth dampened with an approximately 5% solution of neutral
detergent and water to clean the dirt off.
●Wipe the surface with a dry, soft cloth to remove any remaining moisture.
●To remove oily deposits, use alcohol wet wipes or a similar product.
WARNING
■When washing the vehicle
Do not apply water to the inside of the engine compartment. Doing so may cause the electrical components, etc.
to catch fire.
■When cleaning the windshield (vehicles with rain-sensing wind-shield wipers)
Set the wiper switch to off. If the wiper switch is in “AUTO”, the wipers may operate unexpectedly in the following
situations, and may result in hands being caught or other serious injuries and cause damage to the wiper
blades.
Off
AUTO
●When the upper part of the wind- shield where the raindrop sensor is located is touched by hand
●When a wet rag or similar is held close to the raindrop sensor
●If something bumps against the windshield
●If you directly touch the raindrop sensor body or if something bumps
into the raindrop sensor
■Precautions regarding the exhaust pipe
Exhaust gasses cause the exhaust
pipe to become quite hot. When washing the vehicle, be careful not to touch the pipe until it has
cooled sufficiently, as touching a hot exhaust pipe can cause burns.
Page 433 of 698
431
7
Owners Manual_Europe_M52N75_en
7-2. Steps to take in an emergency
When trouble arises
When using a flat-bed truck to
transport the vehicle, use tire strap-
ping belts. Refer to the owner’s
manual of the flat-bed truck for the
tire strapping method.
In order to suppress vehicle move-
ment during transportation, set the
parking brake and turn the power
switch off.
If a tow truck is not available in an
emergency, your vehicle may be
temporarily towed using cables or
chains secured to the emergency
towing eyelets. This should only be
attempted on hard surfaced roads
for short distances at under 30
km/h (18 mph).
A driver must be in the vehicle to
steer and operate the brakes. The
vehicle’s wheels, drivetrain, axles,
steering and brakes must be in
good condition.
To have your vehicle towed by
another vehicle, the towing eyelet
must be installed to your vehicle.
Install the towing eyelet using the
following procedure.
1 Take out the wheel nut wrench
and towing eyelet. ( P. 4 4 9 ,
460)
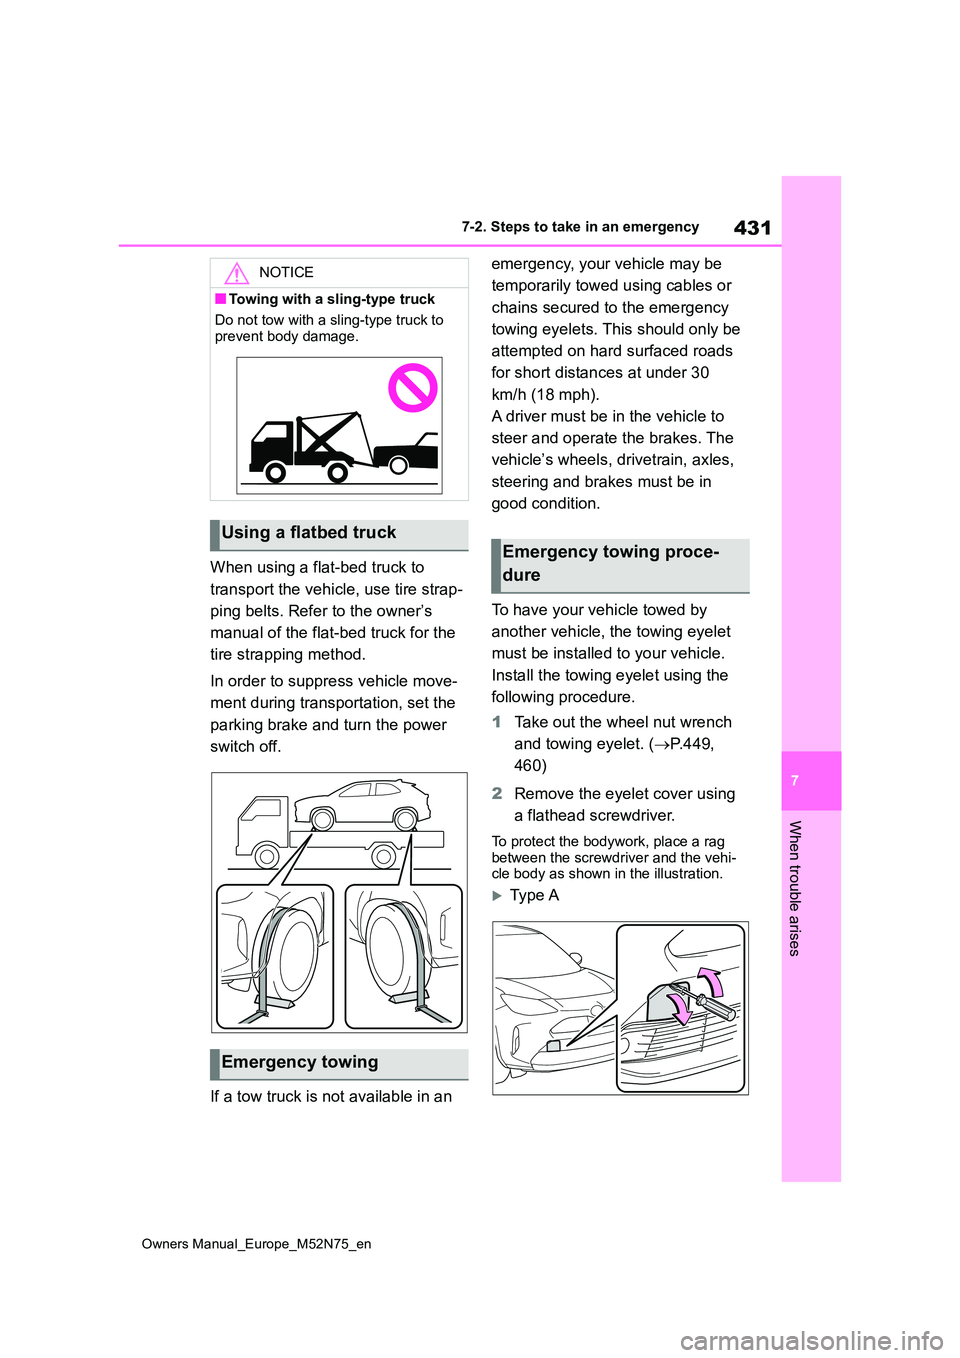
2 Remove the eyelet cover using
a flathead screwdriver.
To protect the bodywork, place a rag between the screwdriver and the vehi-cle body as shown in the illustration.
Typ e A
NOTICE
■Towing with a sling-type truck
Do not tow with a sling-type truck to
prevent body damage.
Using a flatbed truck
Emergency towing
Emergency towing proce-
dure
Page 435 of 698
433
7
Owners Manual_Europe_M52N75_en
7-2. Steps to take in an emergency
When trouble arises
■While towing
If the hybrid system is off, the power
assist for the brakes and steering will not function, making steering and brak-ing more difficult.
■Wheel nut wrench*1, 2
Wheel nut wrench is installed in luggage compartment. ( P.460)*1: If equipped
*2: If your vehicles does not provide a
wheel nut wrench, you can purchase
it from any authorized Toyota retailer
or Toyota authorized repairer, or any
reliable repairer.
WARNING
Observe the following precautions. Failure to do so may result in death or
serious injury.
■While towing
●When towing using cables or chains, avoid sudden starts, etc. which place excessive stress on the
towing eyelets, cables or chains. The towing eyelets, cables or chains may become damaged, bro-
ken debris may hit people, and cause serious damage.
●Do not turn the power switch off.There is a possibility that the steer-ing wheel is locked and cannot be
operated.
■Installing towing eyelets to the
vehicle
Make sure that towing eyelets are installed securely.
If not securely installed, towing eye- lets may come loose during towing.
NOTICE
■To prevent damage to the vehicle during emergency towing
Do not secure cables or chains to the suspension components.
Page 446 of 698
444
Owners Manual_Europe_M52N75_en
7-2. Steps to take in an emergency
WARNING
■When the electric power steer- ing system warning light comes
on
When the light comes on yellow, the assist to the power steering is
restricted. When the light comes on red, the assist to the power steering is lost and handling operations of the
steering wheel become extremely heavy.When steering wheel operations are
heavier than usual, grip the steering wheel firmly and operate it using more force than usual.
■If the tire pressure warning light comes on
Be sure to observe the following pre- cautions.Failure to do so could cause a loss of
vehicle control and result in death or serious injury.
●Stop your vehicle in a safe place as soon as possible. Adjust the tire inflation pressure immediately.
●Vehicles with a compact spare tire and full-size spare tire: If the tire
pressure warning light comes on even after tire inflation pressure adjustment, it is probable that you
have a flat tire. Check the tires. If a tire is flat, change it with the spare tire and have the flat tire repaired
by the nearest any authorized Toyota retailer or Toyota authorized repairer, or any reliable repairer.
●Vehicles with emergency tire punc-ture repair kit: If the tire pressure
warning light comes on even after tire inflation pressure adjustment, it is probable that you have a flat tire.
Check the tires. If a tire is flat, repair the flat tire by using emergency tire puncture repair kit.
●Avoid abrupt maneuvering and braking.If the vehicle tires deteriorate, you
could lose control of the steering wheel or the brakes.
■If a blowout or sudden air leak-age should occur
The tire pressure warning system
may not activate immediately.
NOTICE
■To ensure the tire pressure warn- ing system operates properly
Do not install tires with different speci- fications or makers, as the tire pres-sure warning system may not operate
properly.
Page 459 of 698
457
7
Owners Manual_Europe_M52N75_en
7-2. Steps to take in an emergency
When trouble arises
replaced, make sure to tell any autho-
rized Toyota retailer or Toyota autho- rized repairer, or any reliable repairer that the sealant is injected.
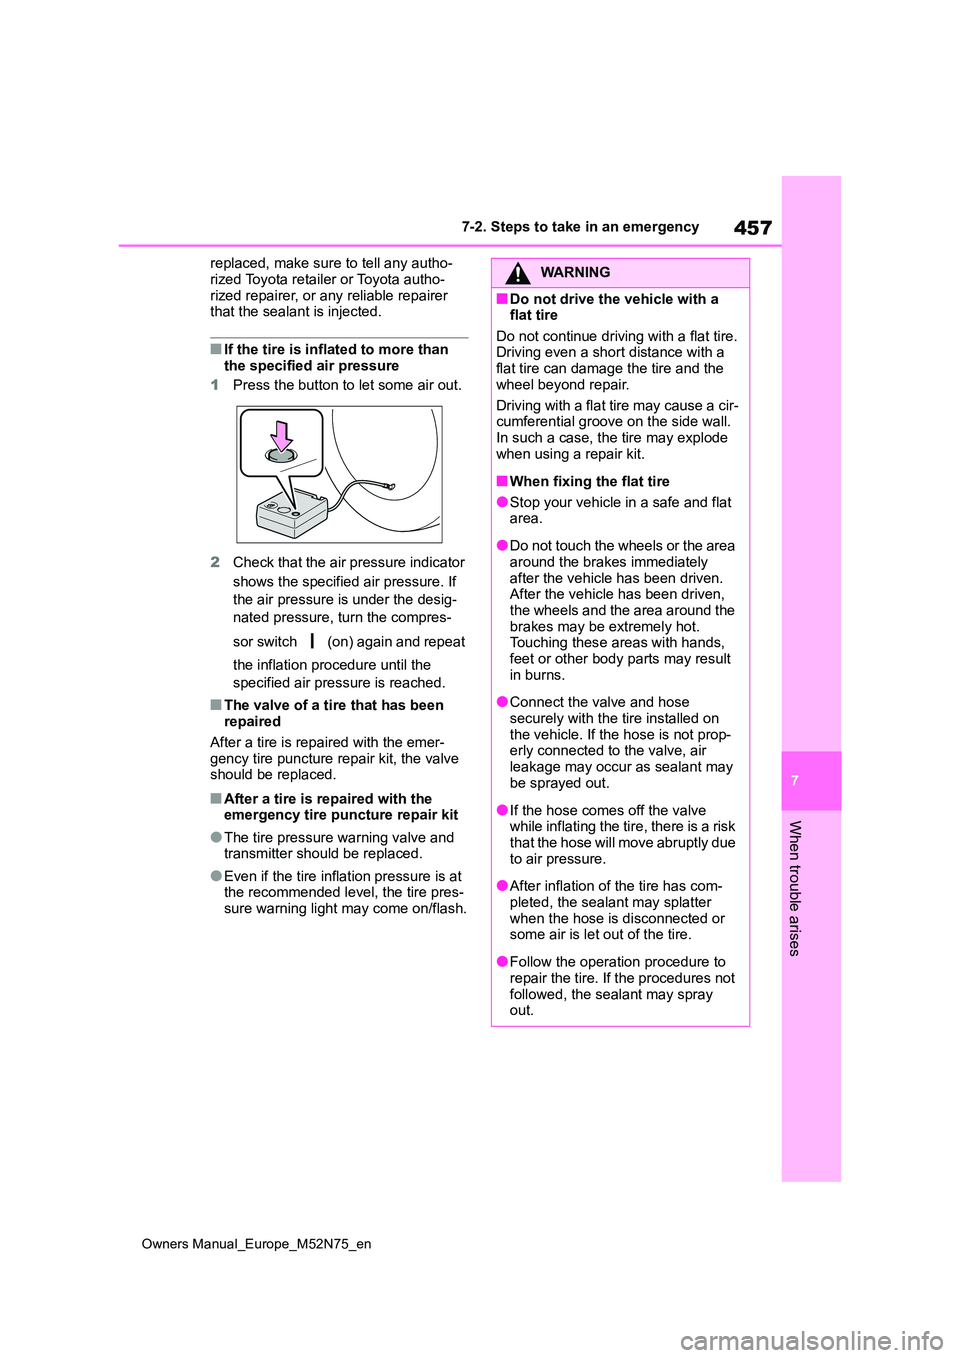
■If the tire is inflated to more than the specified air pressure
1 Press the button to let some air out.
2 Check that the air pressure indicator
shows the specified air pressure. If
the air pressure is under the desig-
nated pressure, turn the compres-
sor switch (on) again and repeat
the inflation procedure until the
specified air pressure is reached.
■The valve of a tire that has been repaired
After a tire is repaired with the emer-
gency tire puncture repair kit, the valve should be replaced.
■After a tire is repaired with the emergency tire puncture repair kit
●The tire pressure warning valve and transmitter should be replaced.
●Even if the tire inflation pressure is at the recommended level, the tire pres-
sure warning light may come on/flash.
WARNING
■Do not drive the vehicle with a flat tire
Do not continue driving with a flat tire. Driving even a short distance with a flat tire can damage the tire and the
wheel beyond repair.
Driving with a flat tire may cause a cir- cumferential groove on the side wall.
In such a case, the tire may explode when using a repair kit.
■When fixing the flat tire
●Stop your vehicle in a safe and flat area.
●Do not touch the wheels or the area around the brakes immediately
after the vehicle has been driven. After the vehicle has been driven, the wheels and the area around the
brakes may be extremely hot. Touching these areas with hands, feet or other body parts may result
in burns.
●Connect the valve and hose
securely with the tire installed on the vehicle. If the hose is not prop-erly connected to the valve, air
leakage may occur as sealant may be sprayed out.
●If the hose comes off the valve while inflating the tire, there is a risk that the hose will move abruptly due
to air pressure.
●After inflation of the tire has com-
pleted, the sealant may splatter when the hose is disconnected or some air is let out of the tire.
●Follow the operation procedure to repair the tire. If the procedures not
followed, the sealant may spray out.