Page 4 of 560
4TABLE OF CONTENTS
5-3. Using the storage featuresList of storage features . 343
Luggage compartment fea- tures ............................ 346
5-4. Using the other interior fea- tures
Panoramic fixed moon roof with one-touch frosted glass
control ......................... 350
Other interior features ... 353
Garage door opener...... 364
6-1. Maintenance and care Cleaning and protecting the vehicle exterior ............ 372
Cleaning and protecting the vehicle interior ............. 376
6-2. Maintenance Maintenance requirements.................................... 379
General maintenance.... 381
Emission inspection and maintenance (I/M) pro-
grams .......................... 383
6-3. Do-it-yourself maintenance Do-it-yourself service pre-cautions ....................... 385
Hood ............................. 387
Positioning a floor jack .. 388
Engine compartment ..... 390
12-volt battery ............... 397
Tires .............................. 400
Tire inflation pressure ... 412
Wheels ......... .................414
Air conditioning filter ...... 415Cleaning the hybrid battery
(traction battery) air intake
vent.............................. 417
Wiper insert replacement .................................... 421
Electronic key battery .... 424
Checking and replacing fuses ............................ 426
Headlight aim ................ 429
Exterior lights................. 430
7-1. Essential information Emergency flashers....... 432
If your vehicle has to be stopped in an emergency.................................... 433
If the vehicle is submerged or water on the road is rising.................................... 434
7-2. Steps to take in an emer- gency
If your vehicle needs to be towed ........................... 436
If you think something is wrong........................... 439
If a warning light turns on or a warning buzzer sounds
.................................... 441
If a warning message is dis- played .......................... 451
If you have a flat tire ...... 456
If the hybrid system will not start ............................. 463
If you lose your keys...... 46
5
If the fuel fille r door cannot
be opened .
..................465
6Maintenance and care
7When trouble arises
Page 354 of 560
3545-4. Using the other interior features
The USB Type-C charging ports
are used to supply 3 A of elec-
tricity at 5 V to external devices.
The USB Type-C charging ports
are for charging only. They are
not designed for data transfer or
other purposes.
Depending on the external
device, it may not charge prop-
erly. Refer to the manual
included with the device before
using a USB Type-C charging
port.
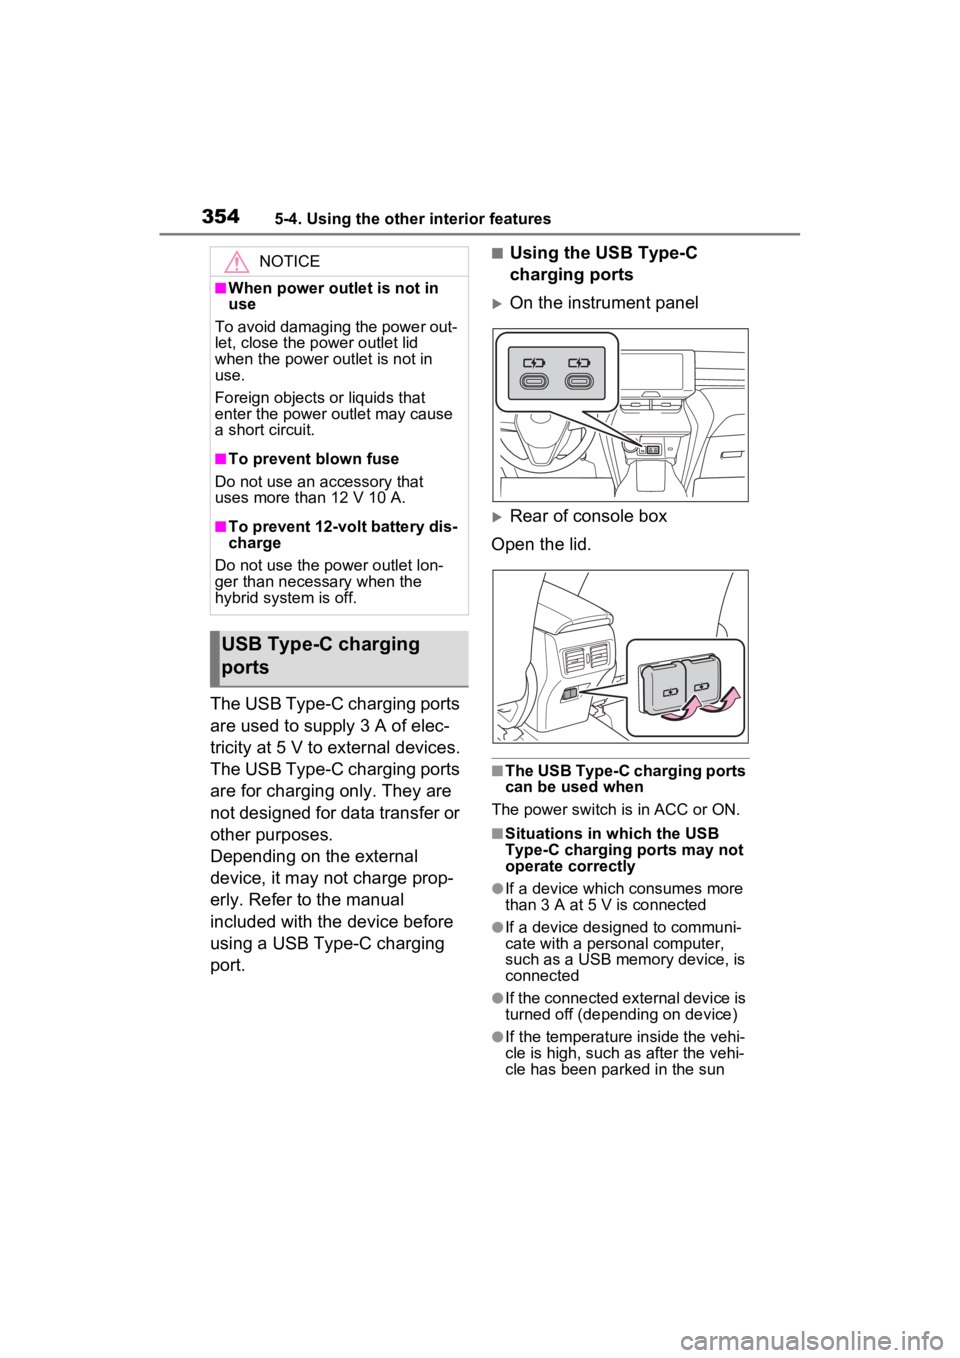
■Using the USB Type-C
charging ports
On the instrument panel
Rear of console box
Open the lid.
■The USB Type-C charging ports
can be used when
The power switch is in ACC or ON.
■Situations in which the USB
Type-C charging ports may not
operate correctly
●If a device which consumes more
than 3 A at 5 V is connected
●If a device designed to communi-
cate with a personal computer,
such as a USB memory device, is
connected
●If the connected external device is
turned off (depend ing on device)
●If the temperature inside the vehi-
cle is high, such as after the vehi-
cle has been parked in the sun
NOTICE
■When power outlet is not in
use
To avoid damaging the power out-
let, close the p ower outlet lid
when the power outlet is not in
use.
Foreign objects or liquids that
enter the power outlet may cause
a short circuit.
■To prevent blown fuse
Do not use an accessory that
uses more than 12 V 10 A.
■To prevent 12-volt battery dis-
charge
Do not use the power outlet lon-
ger than necessary when the
hybrid system is off.
USB Type-C charging
ports
Page 371 of 560
371
6
6
Maintenance and care
Maintenance and care
6-1. Maintenance and careCleaning and protecting the vehicle exterior .......... 372
Cleaning and protecting the vehicle interior ........... 376
6-2. Maintenance Maintenance requirements.................................. 379
General maintenance.. 381
Emission inspection and maintenance (I/M) pro-
grams ........................ 383
6-3. Do-it-yourself mainte- nance
Do-it-yourself service pre- cautions ..................... 385
Hood ........................... 387
Positioning a floor jack 388
Engine compartment ... 390
12-volt battery ............. 397
Tires ............................ 400
Tire inflation pressure . 412
Wheels ......... ...............414
Air conditioning filter .... 415
Cleaning the hybrid battery (traction battery) air intake
vent ........................... 417
Wiper insert replacement .................................. 421
Electronic key battery.. 424
Checking and replacing fuses.......................... 426Headlight aim ..............
429
Exterior lights .............. 430
Page 385 of 560
3856-3. Do-it-yourself maintenance
6
Maintenance and care
6-3.Do-it-yourself maintenance
Do-it-yourself service
precautions
If you perform maintenance
by yourself, be sure to fol-
low the correct procedure
as given in these sections.
Maintenance
ItemsParts and tools
12-volt bat-
tery condi-
tion
( P.397)•Grease
• Conventional
wrench (for termi-
nal clamp bolts)
Brake fluid
level
( P.394)
• FMVSS No.116
DOT 3 or SAE
J1703 brake fluid
• FMVSS No.116 DOT 4 or SAE
J1704 brake fluid
• Rag or paper towel
• Funnel (used only for adding brake
fluid)
Engine/power
control unit
coolant level
( P.393)
• “Toyota Super
Long Life Cool-
ant” or a similar
high quality eth-
ylene glycol-based
non-silicate, non-
amine, non-nitrite
and non-borate
coolant with long-
life hybrid organic
acid technology
For the U.S.A.:
“Toyota Super
Long Life Cool-
ant” is pre-mixed
with 50% coolant
and 50% deion-
ized water.
For Canada:
“Toyota Super
Long Life Cool-
ant” is pre-mixed
with 55% coolant
and 45% deion-
ized water.
• Funnel (used only for adding coolant)
Engine oil
level
( P.390)
• “Toyota Genuine
Motor Oil” or
equivalent
• Rag or paper towel
• Funnel (used only for adding engine
oil)
Fuses
( P.426)• Fuse with same
amperage rating
as original
Headlight aim
( P.429)• Phillips-head
screwdriver
ItemsParts and tools
Page 390 of 560
3906-3. Do-it-yourself maintenance
Fuse boxes (P.426)
Engine oil filler cap ( P.391)
Engine oil level dipstick ( P.390)
Brake fluid reservoir ( P.394)
Radiator ( P.394)
Electric cooling fan
Condenser ( P.394)
Power control unit coolant reservoir ( P.393)
Washer fluid tank ( P.396)
Engine coolant reservoir ( P.393)
■12-volt battery
P.397
With the engine at operating
temperature and turned off,
Engine compartment
Components
A
B
C
D
E
F
G
H
I
J
�&�K�H�F�N�L�Q�J���D�Q�G���D�G�G�L�Q�J���W�K�H��
�H�Q�J�L�Q�H���R�L�O
Page 426 of 560
4266-3. Do-it-yourself maintenance
1Turn the power switch off.
2 Open the fuse box cover.
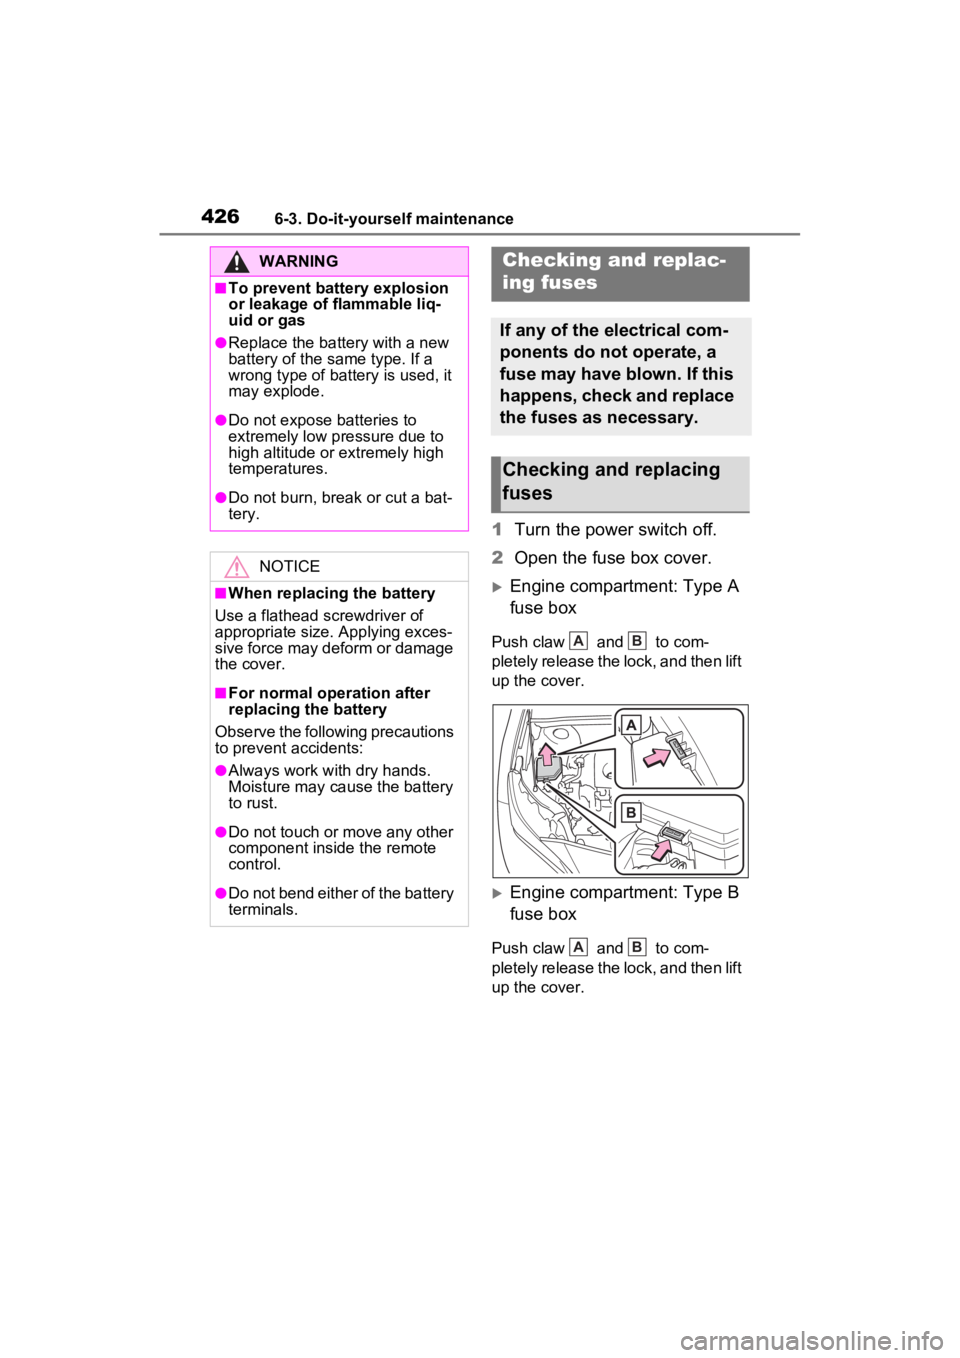
Engine compartment: Type A
fuse box
Push claw and to com-
pletely release the lock, and then lift
up the cover.
Engine compartment: Type B
fuse box
Push claw and to com-
pletely release the lock, and then lift
up the cover.
WARNING
■To prevent battery explosion
or leakage of flammable liq-
uid or gas
●Replace the battery with a new
battery of the same type. If a
wrong type of battery is used, it
may explode.
●Do not expose batteries to
extremely low pressure due to
high altitude or extremely high
temperatures.
●Do not burn, bre ak or cut a bat-
tery.
NOTICE
■When replacing the battery
Use a flathead screwdriver of
appropriate size. Applying exces-
sive force may deform or damage
the cover.
■For normal operation after
replacing the battery
Observe the following precautions
to prevent accidents:
●Always work with dry hands.
Moisture may cau se the battery
to rust.
●Do not touch or move any other
component inside the remote
control.
●Do not bend either of the battery
terminals.
Checking and replac-
ing fuses
If any of the electrical com-
ponents do not operate, a
fuse may have blown. If this
happens, check and replace
the fuses as necessary.
Checking and replacing
fuses
AB
AB
Page 427 of 560
4276-3. Do-it-yourself maintenance
6
Maintenance and care
Left side instrument panel
Remove the lid.
Right side luggage compart-
ment
Open the deck board. (P.346)
Disengage the 3 claws and pull the
deck side board to remove it.
Disengage the 6 claws and pull the
12-volt battery cover to remove it. Remove the cover
3
Remove the fuse.
Only type A fuse c an be removed
using the pullout tool.
4 Check if the fuse is blown.
Replace the blown fuse with a new
fuse of an appropriate amperage
rating. The amperage rating can be
found on the fuse box lid.
Page 428 of 560
4286-3. Do-it-yourself maintenance
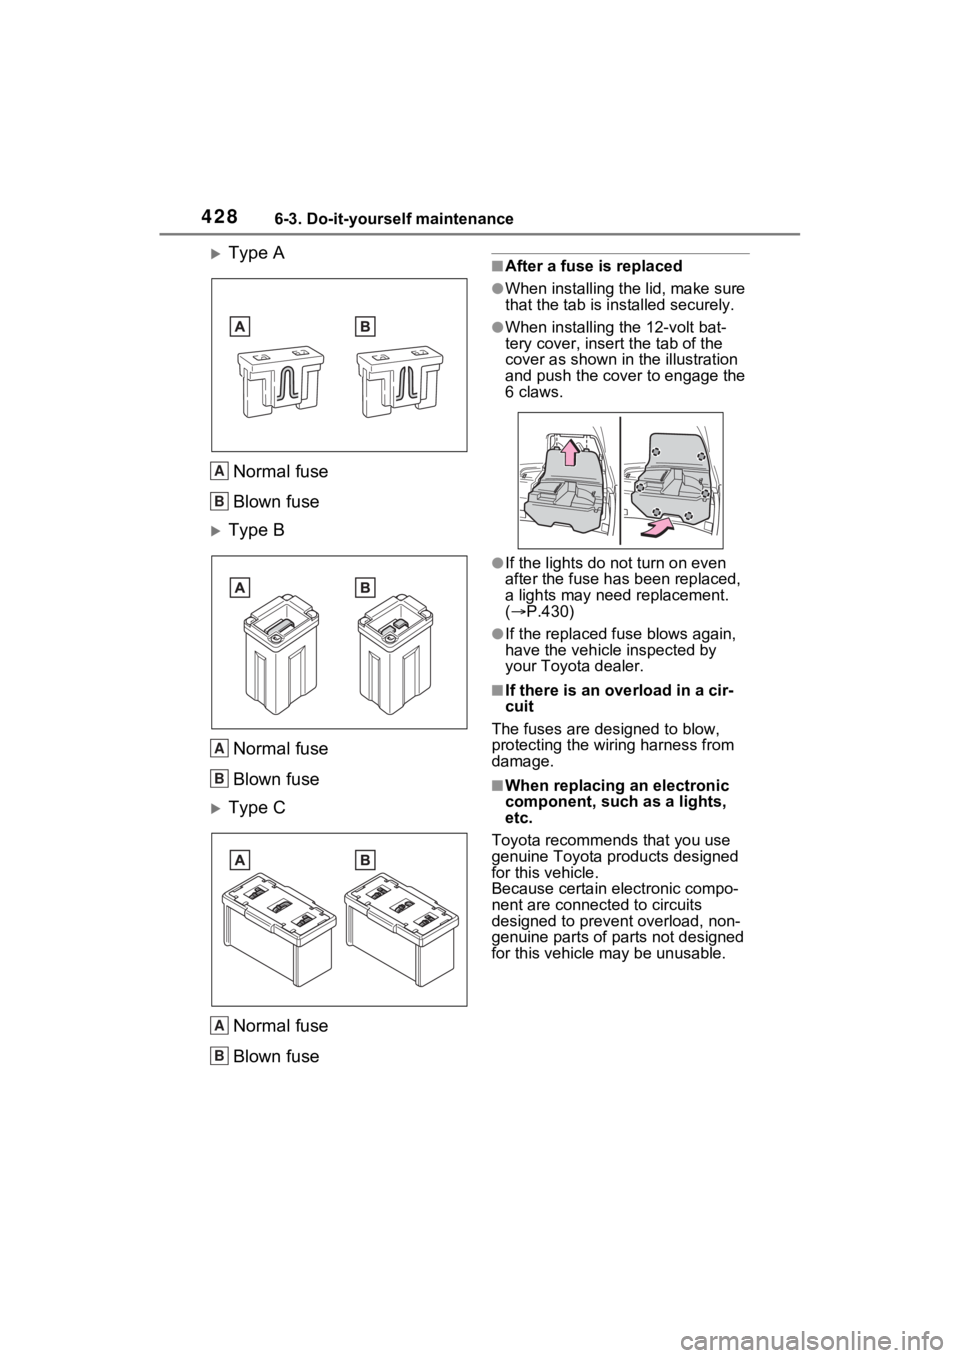
Type A
Normal fuse
Blown fuse
Type BNormal fuse
Blown fuse
Type CNormal fuse
Blown fuse
■After a fuse is replaced
●When installing the lid, make sure
that the tab is ins talled securely.
●When installing the 12-volt bat-
tery cover, insert the tab of the
cover as shown in the illustration
and push the cover to engage the
6 claws.
●If the lights do not turn on even
after the fuse has been replaced,
a lights may need replacement.
( P.430)
●If the replaced fuse blows again,
have the vehicle inspected by
your Toyota dealer.
■If there is an ove rload in a cir-
cuit
The fuses are designed to blow,
protecting the wiring harness from
damage.
■When replacing an electronic
component, such as a lights,
etc.
Toyota recommends that you use
genuine Toyota products designed
for this vehicle.
Because certain electronic compo-
nent are connected to circuits
designed to prevent overload, non-
genuine parts of parts not designed
for this vehicle may be unusable.
A
B
A
B
A
B