2023 TOYOTA VENZA HYBRID display
[x] Cancel search: displayPage 319 of 560
319
5
5
Interior features
Interior features
5-1. Using the air conditioning system and defogger
Automatic air conditioning system (vehicles with 8-
inch multimedia display)
.................................. 320
Automatic air conditioning system (vehicles with
12.3-inch multimedia dis-
play) .......................... 328
Heated steering wheel/seat heaters/seat ventilators.................................. 337
5-2. Using the interior lights Interior lights list .......... 339
5-3. Using the storage features
List of storage features 343
Luggage compartment fea- tures .......................... 346
5-4. Using the other interior features
Panoramic fixed moon roof with one-touch frosted
glass control .............. 350
Other interior features . 353
Garage door opener.... 364
Page 320 of 560
3205-1. Using the air conditioning system and defogger
5-1.Using the air conditioning system and defogger
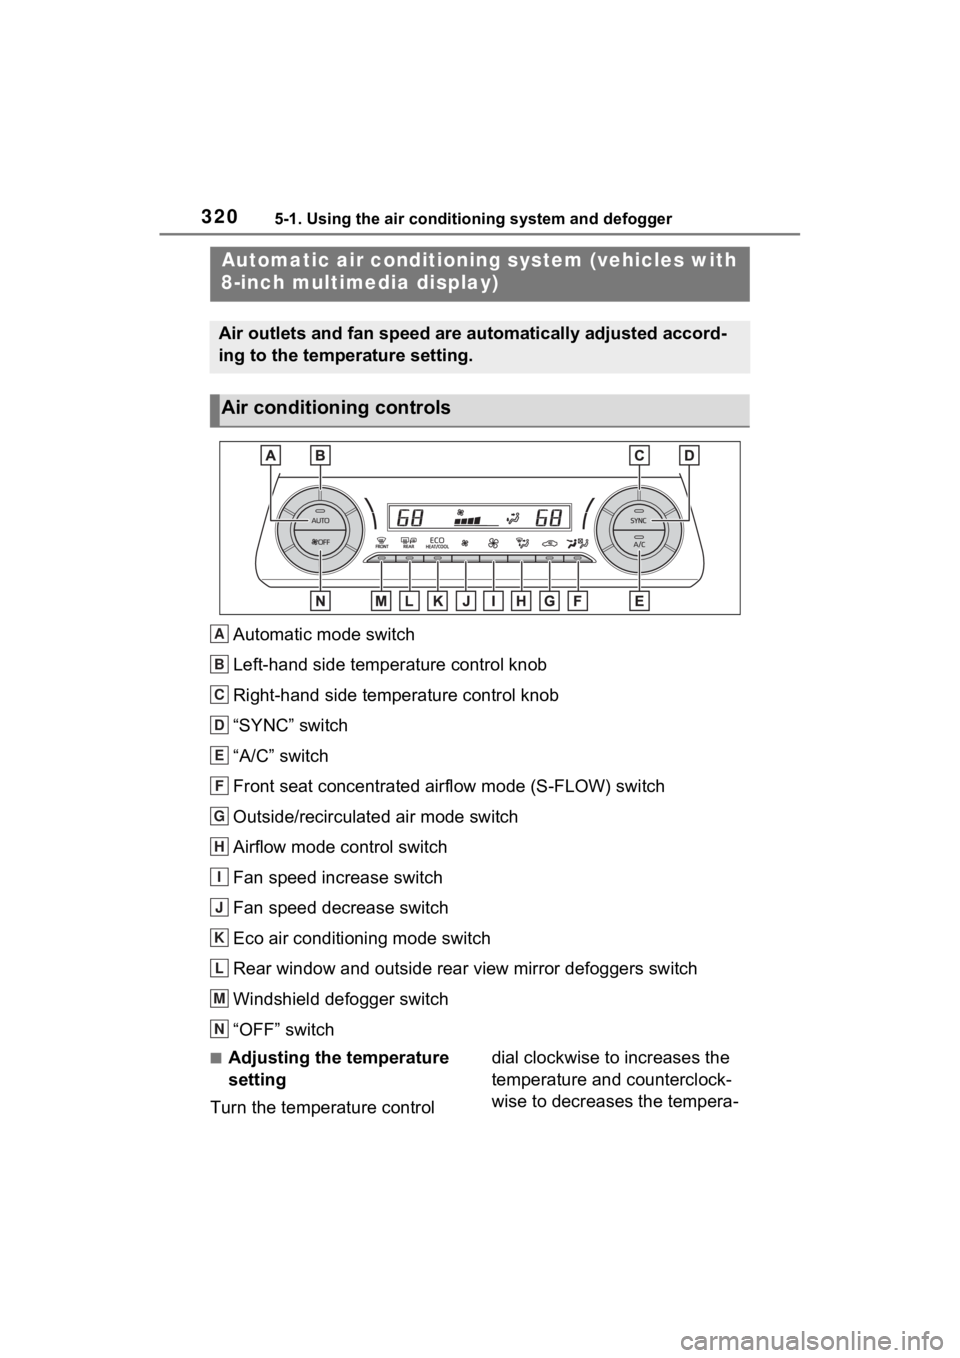
Automatic mode switch
Left-hand side temperature control knob
Right-hand side temperature control knob
“SYNC” switch
“A/C” switch
Front seat concentrated airflow mode (S-FLOW) switch
Outside/recirculated air mode switch
Airflow mode control switch
Fan speed increase switch
Fan speed decrease switch
Eco air conditioning mode switch
Rear window and outside rear view mirror defoggers switch
Windshield defogger switch
“OFF” switch
■Adjusting the temperature
setting
Turn the temperature control dial clockwise to increases the
temperature and counterclock-
wise to decreases the tempera-
Automatic air c
onditioning system (vehicles with
8-inch multimedia display)
Air outlets and fan speed are automatically adjusted accord-
ing to the temperature setting.
Air conditioning controls
A
B
C
D
E
F
G
H
I
J
K
L
M
N
Page 328 of 560
3285-1. Using the air conditioning system and defogger
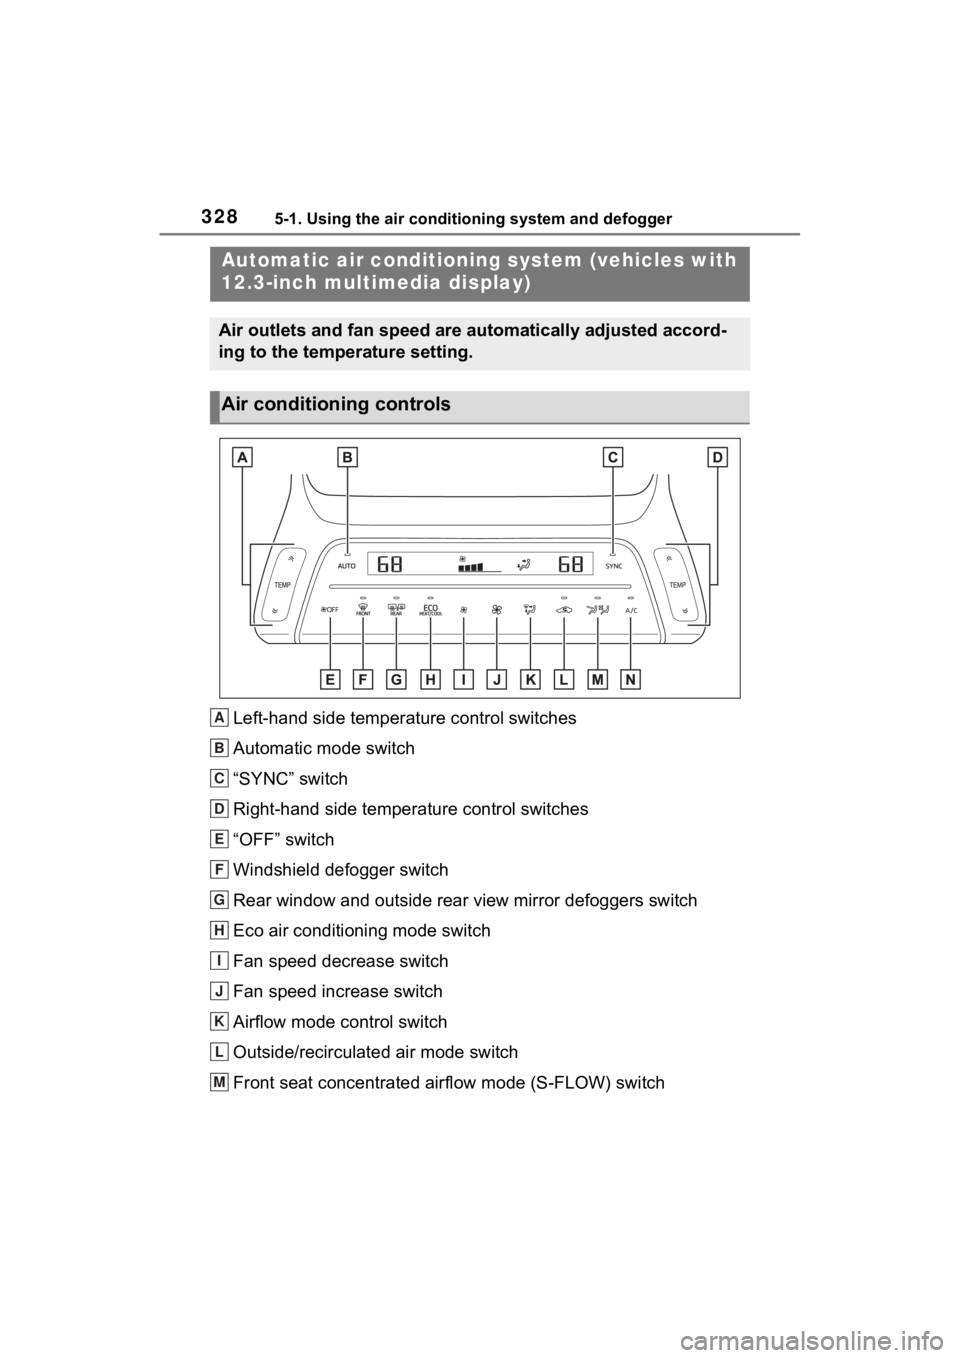
Left-hand side temperature control switches
Automatic mode switch
“SYNC” switch
Right-hand side temperature control switches
“OFF” switch
Windshield defogger switch
Rear window and outside rear view mirror defoggers switch
Eco air conditioning mode switch
Fan speed decrease switch
Fan speed increase switch
Airflow mode control switch
Outside/recirculated air mode switch
Front seat concentrated airflow mode (S-FLOW) switch
Automatic air conditioning system (vehicles with
12.3-inch multimedia display)
Air outlets and fan speed are automatically adjusted accord-
ing to the temperature setting.
Air conditioning controls
A
B
C
D
E
F
G
H
I
J
K
L
M
Page 331 of 560

3315-1. Using the air conditioning system and defogger
5
Interior features
and the fan speed to any setting
except off.
■Outside/recirculated air mode
●Setting to the recirculated air
mode temporarily is recom-
mended in preventing dirty air
from entering the vehicle interior
and helping to c ool the vehicle
when the outside air temperature
is high.
●Outside/recirculated air mode may
automatically switch depending on
the temperature setting or the
inside temperature.
■When the outside temperature
falls to nearly 32°F (0°C)
The dehumidification function may
not operate even when “A/C” switch
is selected.
■Operation of the air condition-
ing system in Eco drive mode
●In Eco drive mode, the air condi-
tioning system is controlled as fol-
lows to prioritize fuel efficiency:
• Engine speed and compressor operation controlled to restrict
heating/cooling capacity
• Fan speed restr icted when auto-
matic mode is selected
●To improve air conditioning perfor-
mance, perform the following
operations:
• Adjust the fan speed
• Turn off Eco drive mode ( P.304)
• Turn off Eco air conditioning mode
●When the driving mode is set to
Eco drive mode, the Eco air condi-
tioning mode will be turned on
automatically. Even in this case,
the Eco air conditioning mode can
be turned off by s electing the Eco
air conditioning mode switch.
■Notes on touch switch opera-
tion
●Operate using a finger (the pad of
the finger).
●If a coating, film, etc. is applied to
the surface of the air conditioning
control panel, non -response may occur.
●If a pen, etc. is used to operate
the system, the
system will not
respond.
●When performing a touch opera-
tion, make sure th at other fingers,
etc. do not touch the air condition-
ing control panel.
●When performing a series of touch
operations, withdraw the finger
completely before performing the
next operation.
●Do not forcefully press the air con-
ditioning control panel.
●If the air conditioning control panel
is dirty or has liqui d attached to it,
incorrect operation may occur.
Wipe the control panel clean
before performing any touch oper-
ations.
■Situations when non-response
may occur from normal touch
switch operation
●Gloves, etc. are worn.
●A coating, film, et c. is applied to
the surface of the air conditioning
control panel.
●The air conditioning control panel
is dirty or has liq uid attached to it.
●The vehicle is in an area where
strong electrical waves or noise
are emitted, such as near a televi-
sion tower, power plant, gasoline
station, broadcastin g station, large
display, airport, etc.
●Wireless devices such as radios,
cell phones, etc. are carried.
●The air conditioning control panel
is in contact with, or covered by, a
metallic object suc h as the follow-
ing:
• A card that has metal on it, such
as aluminum foil, etc.
• A pack of cigaret tes that use alu-
minum foil
• A wallet or bag that is made of metal
•Coins
• A heating pad
Page 333 of 560
3335-1. Using the air conditioning system and defogger
5
Interior features
■Changing the air conditioning
control panel touch switch
response
The amount of time takes for a
switch to respond can be changed
through the following operations:
The air conditioning system cannot
be operated while these operations
are performed.
1 Press and hold both the fan
speed decrease switch and auto-
matic mode switch at the same
time for approximately 3 sec-
onds.
A number from “01” to “05” will
be displayed on the driver’s side
temperature section in the
screen.
2 Each time rear window and out-
side rear view mirror defoggers
switch is pressed, the response
time changes as follows:
01 0203 04 05
The smaller the number the quicker
the response time becomes, and
the larger the number the slower the
response time becomes. If touch
operations are not performed for
approximately 5 seconds with the
desired setting displayed, the
screen returns to the normal driver’s
side temperature display and the
setting change completes. After the
setting change completes, all dis-
plays in the monitor section will illu-
minate for a short time. Do not turn
off the power switch during this time.
Setting contents will be erased.
■Turning the air conditioning
control panel touch switch
operation sounds on or off
Operation sounds produced when a
switch is touched can be turned on
or off through the following opera-
tions:
The air conditioning system cannot
be operated while these operations
are performed. 1
Press and hold both the fan
speed increase switch and
“OFF” switch at the same time
for approximately 3 seconds.
“On” or “OFF” will be displayed
on the driver’s side temperature
section in the screen.
2 Each time rear window and out-
side rear view mirror defoggers
switch is pressed, the function
switches between on and off.
If touch operations are not per-
formed for approximately 5 sec-
onds with “On” or “OFF” displayed,
the screen returns to the normal
driver’s side temperature display
and the setting change completes.
After the setting change completes,
all displays in the monitor section
will illuminate for a short time. Do
not turn off the power switch during
this time. Setti ng contents will be
erased.
■Customization
Some functions can be customized.
(Customizable features: P.513)
WARNING
■To prevent the windshield
from fogging up
Do not use the windshield defog-
ger switch during cool air opera-
tion in extremely humid weather.
The difference between the tem-
perature of the outside air and
that of the windshield can cause
the outer surface of the wind-
shield to fog up, blocking your
vision.
■When the outside rear view
mirror defoggers are operat-
ing
Do not touch the rear view mirror
surfaces when the outside rear
view mirror def oggers are on.
Page 334 of 560
3345-1. Using the air conditioning system and defogger
1Press the “AUTO” switch.
When automatic mode is on, the
switch operation indicator illumi-
nates and is displayed on the
air conditioner control screen.
2Adjust the temperature set-
ting.
3 To stop the operation, press
the “OFF” switch.
If the fan speed setting or air
flow modes are operated, the
automatic mode indicator goes
off. However, automatic mode
for functions other than that
operated is maintained.
■Using automatic mode
Fan speed is adjusted automati-
cally according to the temperature
setting and the ambient conditions.
Therefore, the fan may stop for a
while until warm or cool air is ready
to flow immediately after the auto-
matic mode switch is pressed.
To turn on the “SYNC” mode,
press the “SYNC” switch.
The driver’s side temperature con-
trol switches can b e used to adjust
the temperature for the driver’s and
passenger’s side. To enter individ-
ual mode, operate the passenger’s
side temperature co ntrol switches
or select the “SYNC” switch again.
When the “SYNC” mode is on, the
indicator illuminates on the “SYNC”
switch.
This function automatically con-
trols the air conditioning airflow
so that priority is given to the
front seats. When the front pas-
senger seat is not occupied, air-
flow may switch to only the
driver’s seat. Unnecessary air
conditioning is suppressed, con-
tributing to increased fuel effi-
ciency.
Front seat concentrated airflow
mode operates in the following
situations.
No passengers are detected
in the rear seats
The windshield defogger is
not operating
While operating, illumi-
nates.
■Manually turning front seat
concentrated airflow mode
on/off
In front seat concentrated air-
flow mode, directing airflow to
the front seats only and to the all
NOTICE
■To prevent 12-volt battery dis-
charge
Do not leave the air conditioning
system on longer than necessary
when the hybrid system is off.
Using automatic mode
Adjusting the temperature
for driver and passenger
seats simultaneously
(“SYNC” mode)
Front seat concentrated
airflow mode (S-FLOW)
Page 361 of 560
3615-4. Using the other interior features
5
Interior features
NOTICE
●The portable device is being
charged with a cable connected
●There is foreign matter between
the charge area and portable
device
●Charging has caused the porta-
ble device to heat up
●The temperature around the
charging tray is 95°F (35°C) or
higher, such as in extreme heat
●The portable device is placed
with its charging side facing up
●When the charging coil for the
portable device is misaligned
from the charge area (In particu-
lar, small portable devices such
as foldable devices may be mis-
aligned from the charging area
while driving)
●The portable device is larger
than the charging tray
●The camera lens protrudes 0.12
in. (3mm) or more from the sur-
face of the portable device
●The vehicle is in an area where
strong electrical waves or noise
are emitted, such as near a tele-
vision tower, power plant, gaso-
line station, broadcasting
station, large display, airport,
etc.
●Any of the following objects that
is 0.08 in (2mm) or thicker is
between the charging side of
the portable device and the
charge area
• Thick cases or covers
• Thick decorations
• Accessories, such as finger rings, straps, etc.
• A case or cover with a protrud- ing shape for the lens
●When the portable device is in
contact with, or is covered by
any of the following metallic
objects:
• A card that has metal on it, such as aluminum foil, etc.
• A pack of cigarettes that includes aluminum foil
• A wallet or bag that is made of metal
• Coins
• A heating pad
• CDs, DVDs or other media
• A metal accessory
• A case or cover made of metal
• Casing which has magnet in it on the charging side of the por-
table device
●Electric wave type wireless
remote controls are being used
nearby
●The electronic key is not inside
the vehicle
●2 or more portable devices are
placed on the charging tray at
the same time
If charging is abnormal or the
operation indicator light contin-
ues to flash for any other reason,
the wireless char ger may be mal-
functioning. Contact your Toyota
dealer.
Page 366 of 560
3665-4. Using the other interior features
other sturdy, safe device to
reach the “Learn” or “Smart”
button on the garage door
opener motor.
■Programming HomeLink®
Steps 2 through 4 must be per-
formed within 60 seconds, oth-
erwise the HomeLink
® indicator
light will stop flashing and pro-
gramming will not be success-
fully completed.
1 Vehicles with Digital Rear-
view Mirror: Press the
HomeLink
® button or menu
button
When the HomeLink® button is
pressed: Homelink® Training Tuto-
rial will be displayed to assist you
programming the HomeLink
®.
When Homelink
® Training Tutorial
is displayed, follow the instructions
displayed.
When the menu button is pressed:
Press the menu button and
select the “Set Up >”. Homelink
®
Training Tutorial will be displayed
to assist you programming the
HomeLink
®.
When Homelink
® Training Tutorial
is displayed, follow the instructions
displayed.
2 Press and release the
HomeLink
® button you want
to program and check that
the HomeLink
® indicator light
flashes (orange).
3 Point the remote control
transmitter for the device at
the rear view mirror, 1 to 3 in. (25 to 75 mm) from the
HomeLink
® buttons.
Keep the HomeLink® indicator light
in view while programming.
4 Program a device.
Programming a device other
than an entry gate (for U.S.A.
owners)
Press and hold the remote con-
trol transmitter button until the
HomeLink
® indicator light
changes from slowly flashing
orange to rapidly flashing green
(rolling code) or continuously lit
green (fixed code), then release
the button.
Programming an entry gate
(for U.S.A. owners)/Program-
ming a device in the Cana-
dian market
Press and release the remote