2023 TOYOTA TUNDRA HYBRID door lock
[x] Cancel search: door lockPage 223 of 618
2234-4. Refueling
Owners Manual_USA_M0C052_en
4
Driving
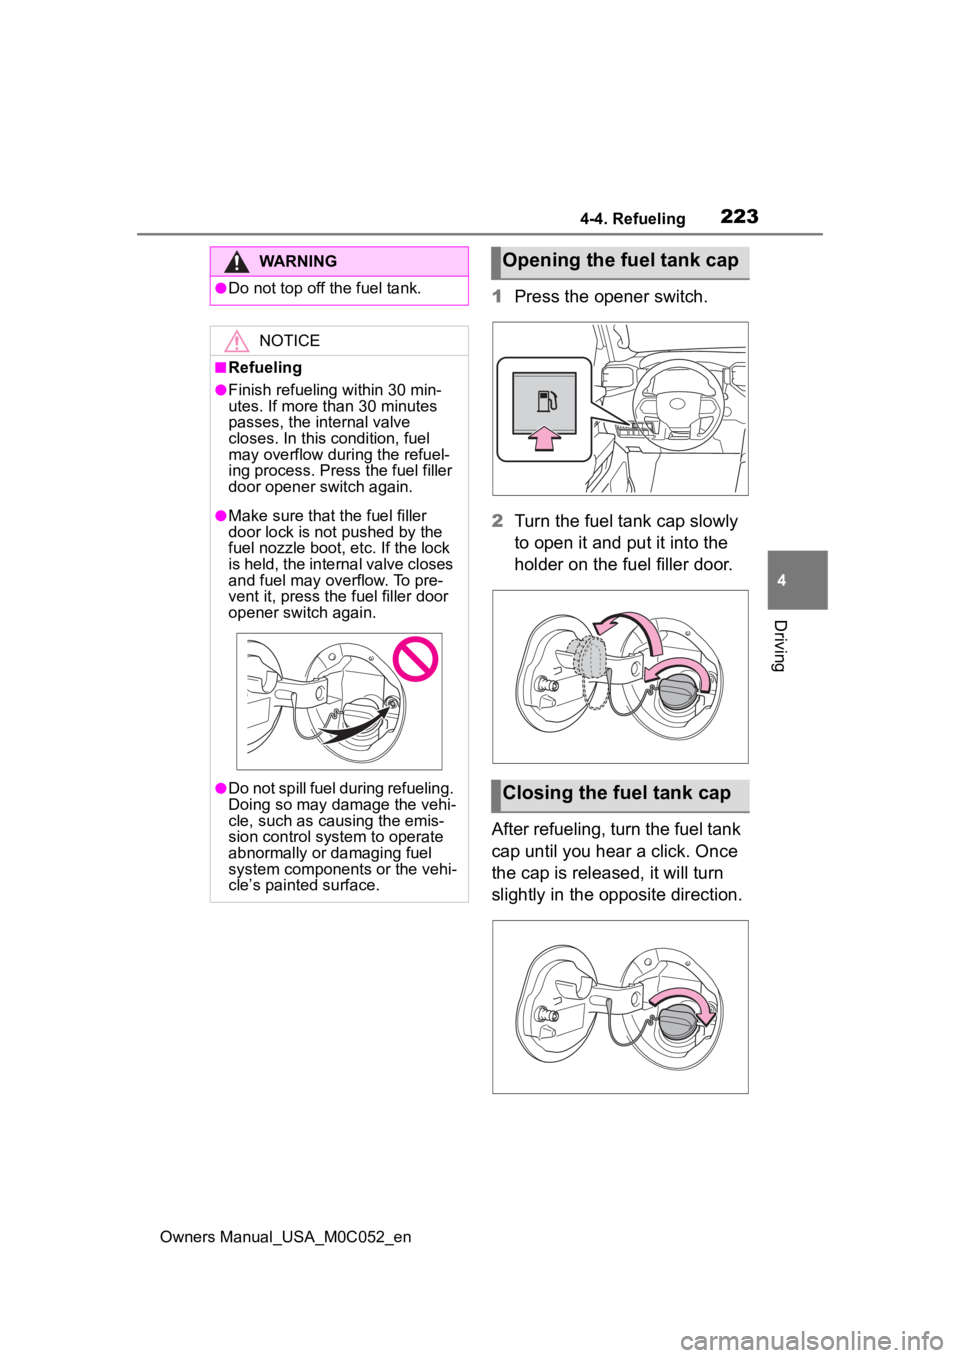
1 Press the opener switch.
2 Turn the fuel tank cap slowly
to open it and put it into the
holder on the fuel filler door.
After refueling, turn the fuel tank
cap until you hear a click. Once
the cap is released, it will turn
slightly in the opposite direction.
WARNING
●Do not top off the fuel tank.
NOTICE
■Refueling
●Finish refueling within 30 min-
utes. If more than 30 minutes
passes, the internal valve
closes. In this condition, fuel
may overflow during the refuel-
ing process. Press the fuel filler
door opener switch again.
●Make sure that the fuel filler
door lock is not pushed by the
fuel nozzle boot, etc. If the lock
is held, the internal valve closes
and fuel may overflow. To pre-
vent it, press the fuel filler door
opener switch again.
●Do not spill fuel during refueling.
Doing so may damage the vehi-
cle, such as causing the emis-
sion control system to operate
abnormally or damaging fuel
system components or the vehi-
cle’s painted surface.
Opening the fuel tank cap
Closing the fuel tank cap
Page 265 of 618

2654-5. Using the driving support systems
Owners Manual_USA_M0C052_en
4
Driving
■Automatic cancelation of vehi-
cle-to-vehicle d istance control
mode
Vehicle-to-vehicle distance control
mode is automatically canceled in
the following situations.
●VSC is activated.
●TRAC is activated for a period of
time.
●When the VSC or TRAC system is
turned off.
●The sensor cannot detect cor-
rectly because i t is covered in
some way.
●When the brake control or output
restriction control of a driving sup-
port system operates. (For exam-
ple: Pre-Collision System, Drive-
Start Control)
●The center differential lock/unlock
is not completed within 5 seconds
while the cruise con trol system is
on.
●The parking brake is operated.
●The vehicle is stopped by system
control on a steep incline.
●The following are detected when
the vehicle has been stopped by
system control:
• The driver is not wearing a seat belt.
• The driver’s door is opened.
• The vehicle has been stopped for
about 3 minutes.
If vehicle-to-vehicle distance control
mode is automatically canceled for
any reasons other than the above,
there may be a malfunction in the
system. Contact your Toyota dealer.
■Automatic cancelation of con-
stant speed control mode
Constant speed control mode is
automatically cance led in the follow-
ing situations:
●Actual vehicle speed is more than
approximately 10 mph (16 km/h)
below the set vehicle speed.
●Actual vehicle speed falls below approximately 20 mph (30 km/h).
●VSC is activated.
●TRAC is activated for a period of
time.
●When the VSC or TRAC system is
turned off.
●When the brake control or output
restriction control of a driving sup-
port system operates. (For exam-
ple: Pre-Collision System, Drive-
Start Control)
●The center differe
ntial lock/unlock
is not completed within 5 seconds
while the cruise control system is
on.
●The parking brake is operated.
If constant speed control mode is
automatically canceled for any rea-
sons other than the above, there
may be a malfunction in the system.
Contact your Toyota dealer.
■Brake operation
A brake operation sound may be
heard and the brake pedal response
may change, but these are not mal-
functions.
■Warning messages and buzzers
for dynamic radar cruise con-
trol with full-speed range
Warning messages and buzzers are
used to indicate a system malfunc-
tion or to inform the driver of the
need for caution while driving. If a
warning message is shown on the
multi-information display, read the
message and follow the instruc-
tions.( P.228, 511)
■When the sensor may not be
correctly detecting the vehicle
ahead
In the case of the following and
depending on the conditions, oper-
ate the brake pedal when decelera-
tion of the system is insufficient or
operate the accelerator pedal when
acceleration is required.
As the sensor may not be able to
correctly detect th ese types of vehi-
Page 366 of 618
3664-5. Using the driving support systems
Owners Manual_USA_M0C052_en
3“MID”
Suitable for driving on bumpy
inclines
4“HIGH 1”
Suitable for driving on bumpy
inclines, debris roads, snow-cov-
ered roads, muddy roads, gravel
roads and grass roads
5“HIGH 2”
Suitable for driving on bumpy
inclines, debris roads, snow-cov-
ered roads, muddy roads, gravel
roads and grass roads
When the “DAC/CRAWL”
switch indicator illuminates
Press the “DAC/CRAWL” switch
again.
When the “DAC/CRAWL”
switch indicator does not illu-
minate
Press the “DAC/CRAWL” switch
to turn the indicator on. Press
the “DAC/CRAWL” switch again
with the indicator turned on.
If Crawl Control is turned off, the
Crawl Control indicator and the
slip indicator will go off and a
message, stating that Crawl
Control has been turned off will
be displayed on the multi-infor-
mation display for several sec-
onds.
When turning off Crawl Control
while driving, drive extremely
carefully.
■Operating tips
Crawl Control can be used with
Multi-terrain Select (if equipped) ON
or OFF. ( P.369)
■Operation conditions of the
Crawl Control
●The hybrid system is operating.
●The shift lever is in any gear other
than P or N.
●The front-wheel drive control
switch is in “4L”.
●The driver’s door is closed.
■Automatic system cancelation
of Crawl Control
In the following si tuations, the
buzzer will sound in termittently and
the Crawl Contro l will be canceled
automatically. In this event, the
Crawl Control indica tor will flash and
then go off, and a message stating
that Crawl Control has been turned
off will be displayed on the multi-
information displa y for several sec-
onds.
●When the shift lever is moved to P
or N.
●When the front-wheel drive control
switch is in “4H”.
●When the driver’s door is opened.
■Function limitations of Crawl
Control
●On vehicles with rear differential
lock system, in the following situa-
tions, brake control can be used to
drive downhill at a constant
speed. However, hybrid system
control is not ava ilable when driv-
ing uphill at a c onstant speed.
• When the vehicle speed exceeds approximately 6 mph (10 km/h).
●In the following s ituation, hybrid
system control and brake control
will stop temporarily. In this event,
the Crawl Contro l indicator will
flash.
• With the rear differential is locked:
when the vehicle speed exceeds
Turning Crawl Control off
Page 410 of 618
4125-2. Using the interior lights
Owners Manual_USA_M0C052_enopened or closed while the shift
lever is in P, D or R.
The trailer hitch light turns on when
the door or tailgate is opened or
closed while the shift lever is in P or
R. trailer hitch light will turn off
when shift lever in D.
“ON”
The cargo lamp, bed lamp, trailer
hitch light turns o
n while the shift
lever is in P or R. Only cargo lamp
and bed lamp turns on while shift
lever is in D.
■Illuminated entry system
The lights automatically turn on/off
according to the power switch
mode, the presence of the elec-
tronic key, whether the doors are
locked/unlocked, and whether the
doors are open/closed.
■To prevent the 12-volt battery
from being discharged
If the follo wing lights remain on
when the door is not fully closed and
the main switch i s in the “DOOR”
position, the lights will go off auto-
matically after 20 minutes:
●Personal/interior lights
●Cargo lamp
●Bed lamp
●Trailer hitch light
■The personal/interior lights may
turn on automatically when
If any of the SRS airbags deploy
(inflate) or in the event of a strong
rear impact, the personal/interior
lights will turn on automatically.
The personal/interior lights will turn
off automatically after approximately
20minutes.
The personal/interior lights can be
turned off manually. However, in
order to help prev ent further colli-
sions, it is recommended that they be left on until safety can be
ensured.
(The personal/interior lights may not
turn on automatically depending on
the force of the impact and condi-
tions of the collision.)
■Customization
Some functions can be customized.
( P.561)
NOTICE
■To prevent 12-volt battery dis-
charge
Do not leave the lights on longer
than necessary when the hybrid
system is off.
■Removing light lenses
Never remove the lens for the
personal/interior lights. Otherwise,
the lights will be damaged. If a
lens needs to be removed, con-
tact your Toyota dealer.
Page 431 of 618
4335-4. Using the other interior features
Owners Manual_USA_M0C052_en
5
Interior features
■HomeLink® programming pro-
cedure
The programming procedures can
also be found at the following URL.
Website: www.homelink.com/toyota
For support, contact customer sup-
port at the following.
Help Line: 1-800-355-3515
The HomeLink® wireless control
system in your vehicle has 3
buttons which can be pro-
grammed to operate 3 different
devices. Refer to the program-
ming methods on the following
pages to determine the method
which is appropriate for the
device.
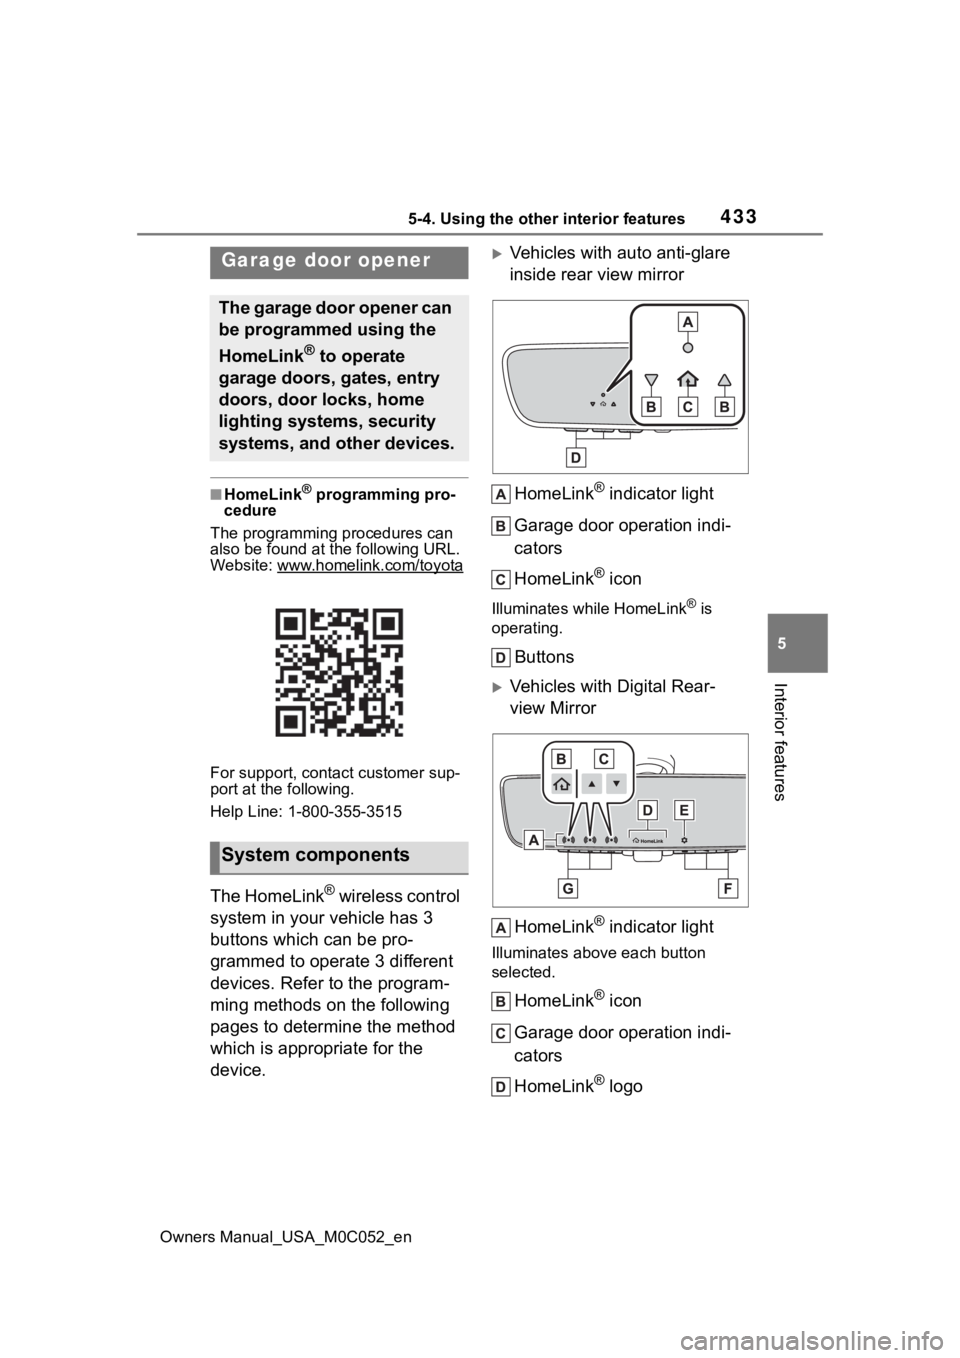
Vehicles with auto anti-glare
inside rear view mirror
HomeLink
® indicator light
Garage door operation indi-
cators
HomeLink
® icon
Illuminates while HomeLink® is
operating.
Buttons
Vehicles with Digital Rear-
view Mirror
HomeLink
® indicator light
Illuminates above each button
selected.
HomeLink® icon
Garage door operation indi-
cators
HomeLink
® logo
Garage door opener
The garage door opener can
be programmed using the
HomeLink
® to operate
garage doors, gates, entry
doors, door locks, home
lighting systems, security
systems, and other devices.
System components
Page 440 of 618
4426-1. Maintenance and care
Owners Manual_USA_M0C052_en
6-1.Maintenance and care
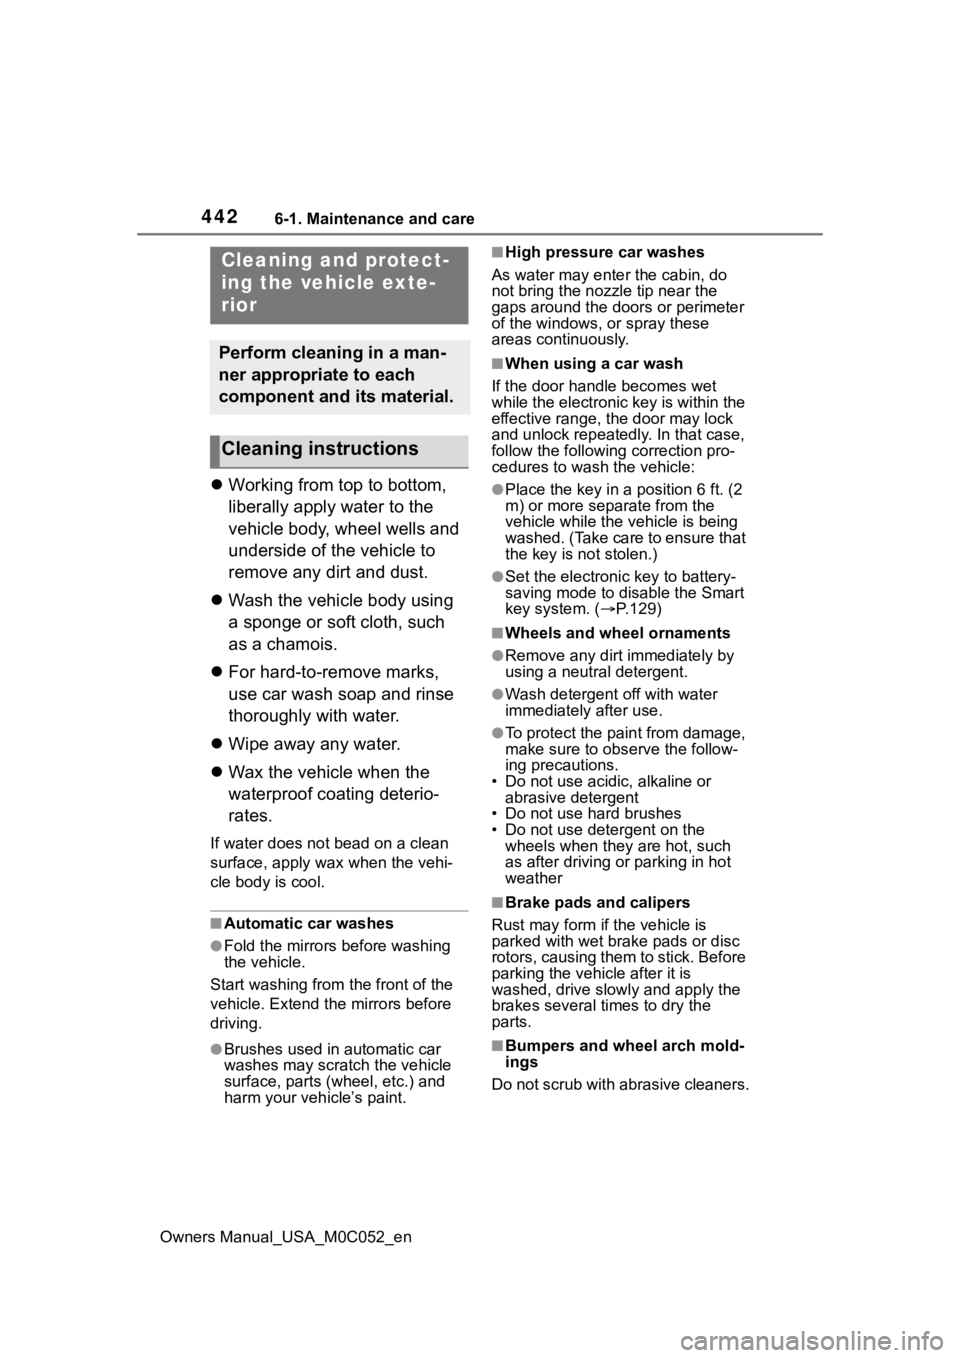
Working from top to bottom,
liberally apply water to the
vehicle body, wheel wells and
underside of the vehicle to
remove any dirt and dust.
Wash the vehicle body using
a sponge or soft cloth, such
as a chamois.
For hard-to-remove marks,
use car wash soap and rinse
thoroughly with water.
Wipe away any water.
Wax the vehicle when the
waterproof coating deterio-
rates.
If water does not bead on a clean
surface, apply wax when the vehi-
cle body is cool.
■Automatic car washes
●Fold the mirrors before washing
the vehicle.
Start washing from the front of the
vehicle. Extend the mirrors before
driving.
●Brushes used in automatic car
washes may scratch the vehicle
surface, parts (wheel, etc.) and
harm your vehicle’s paint.
■High pressure car washes
As water may enter the cabin, do
not bring the nozzle tip near the
gaps around the doors or perimeter
of the windows, or spray these
areas continuously.
■When using a car wash
If the door handle becomes wet
while the electronic key is within the
effective range, the door may lock
and unlock repeatedly. In that case,
follow the following correction pro-
cedures to wash the vehicle:
●Place the key in a position 6 ft. (2
m) or more separate from the
vehicle while the vehicle is being
washed. (Take care to ensure that
the key is not stolen.)
●Set the electronic key to battery-
saving mode to disable the Smart
key system. ( P.129)
■Wheels and wheel ornaments
●Remove any dirt immediately by
using a neutral detergent.
●Wash detergent off with water
immediately after use.
●To protect the paint from damage,
make sure to obs erve the follow-
ing precautions.
• Do not use acidic, alkaline or abrasive detergent
• Do not use hard brushes
• Do not use detergent on the wheels when they are hot, such
as after driving or parking in hot
weather
■Brake pads and calipers
Rust may form if the vehicle is
parked with wet brake pads or disc
rotors, causing them to stick. Before
parking the vehicle after it is
washed, drive slo wly and apply the
brakes several times to dry the
parts.
■Bumpers and wheel arch mold-
ings
Do not scrub with abrasive cleaners.
Cleaning and protect-
ing the vehicle exte-
rior
Perform cleaning in a man-
ner appropriate to each
component and its material.
Cleaning instructions
Page 449 of 618
4516-2. Maintenance
Owners Manual_USA_M0C052_en
6
Maintenance and care
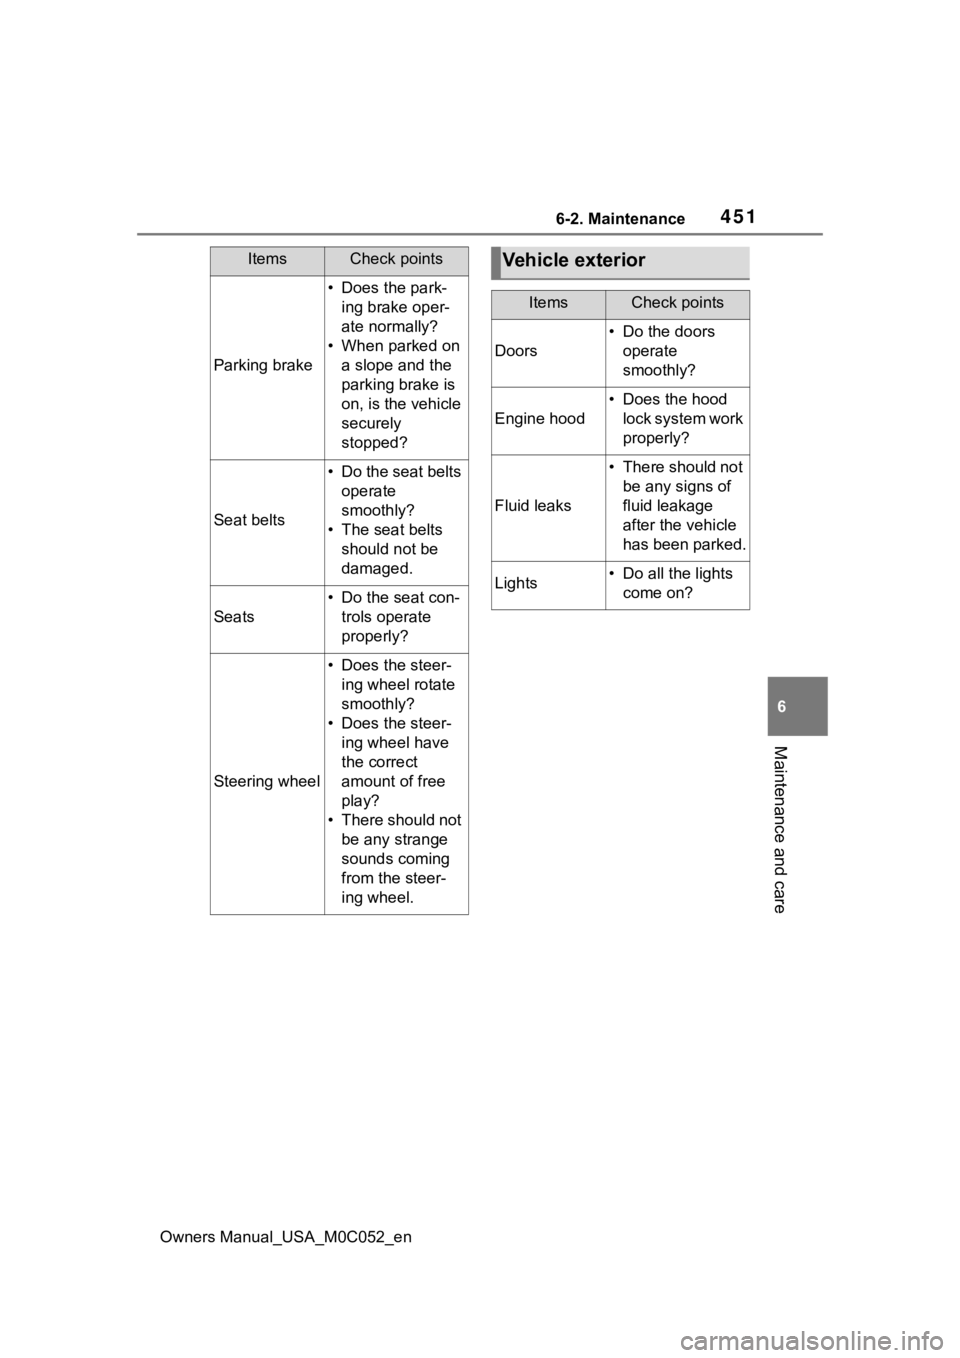
Parking brake
• Does the park- ing brake oper-
ate normally?
• When parked on a slope and the
parking brake is
on, is the vehicle
securely
stopped?
Seat belts
• Do the seat belts operate
smoothly?
• The seat belts should not be
damaged.
Seats
• Do the seat con-trols operate
properly?
Steering wheel
• Does the steer-ing wheel rotate
smoothly?
• Does the steer- ing wheel have
the correct
amount of free
play?
• There should not be any strange
sounds coming
from the steer-
ing wheel.
ItemsCheck pointsVehicle exterior
ItemsCheck points
Doors
• Do the doors operate
smoothly?
Engine hood
• Does the hood lock system work
properly?
Fluid leaks
• There should not be any signs of
fluid leakage
after the vehicle
has been parked.
Lights• Do all the lights come on?
Page 462 of 618

4646-3. Do-it-yourself maintenance
Owners Manual_USA_M0C052_entery installed on the vehicle, be
sure to disconnect the ground
cable.
●Make sure the power switch on
charger is off when connecting
and disconnecting the charger
cables to the 12-volt battery.
■After recharging/reconnecting
the 12-volt battery
●Unlocking the doors using the
smart key system may not be pos-
sible immediately after reconnect-
ing the 12-volt battery. If this
happens, use the wireless remote
control or the mechanical key to
lock/unlock the doors.
●Start the hybrid system with the
power switch in ACC. The hybrid
system may not start with the
power switch turned off. However,
the hybrid system will operate nor-
mally from the second attempt.
●The power switch mode is
recorded by the vehicle. If the 12-
volt battery is
reconnected, the
vehicle will return the power
switch mode to the status it was in
before the 12-volt battery was dis-
connected. Make sure to turn off
the power switch before discon-
necting the 12-volt battery. Take
extra care when connecting the
12-volt battery if the power switch
mode prior to discharge is
unknown.
●When the 12-volt b attery is recon-
nected, start the hybrid system,
depress the brake pedal, and con-
firm that it is possible to shift into
each shift position.
If the system will not start even after
multiple attempts, contact your Toy-
ota dealer.
WARNING
■Chemicals in the 12-volt bat-
tery
The 12-volt battery contains poi-
sonous and corrosive sulfuric acid
and may produce hydrogen gas
which is flammable and explosive.
To reduce the risk of death or seri-
ous injury, take the following pre-
cautions while working on or near
the 12-volt battery:
●Do not cause sparks by touch-
ing the 12-volt battery terminals
with tools.
●Do not smoke or light a match
near the 12-volt battery.
●Avoid contact with eyes, skin
and clothes.
●Never inhale or swallow electro-
lyte.
●Wear protective safety glasses
when working near the 12-volt
battery.
●Keep children away from the
12-volt battery.
■Where to safely charge the
12-volt battery
Always charge the 12-volt battery
in an open area. Do not charge
the 12-volt battery in a garage or
closed room where there is insuf-
ficient ventilation.
■Emergency measures regard-
ing electrolyte
●If electrolyte gets in your eyes
Flush your eyes with clean
water for at least 15 minutes
and get immediate medical
attention. If possible, continue
to apply water with a sponge or
cloth while traveling to the near-
est medical facility.