2023 TOYOTA TUNDRA HYBRID roof
[x] Cancel search: roofPage 57 of 618
571-2. Child safety
Owners Manual_USA_M0C052_en
1
For safety and security
WARNING
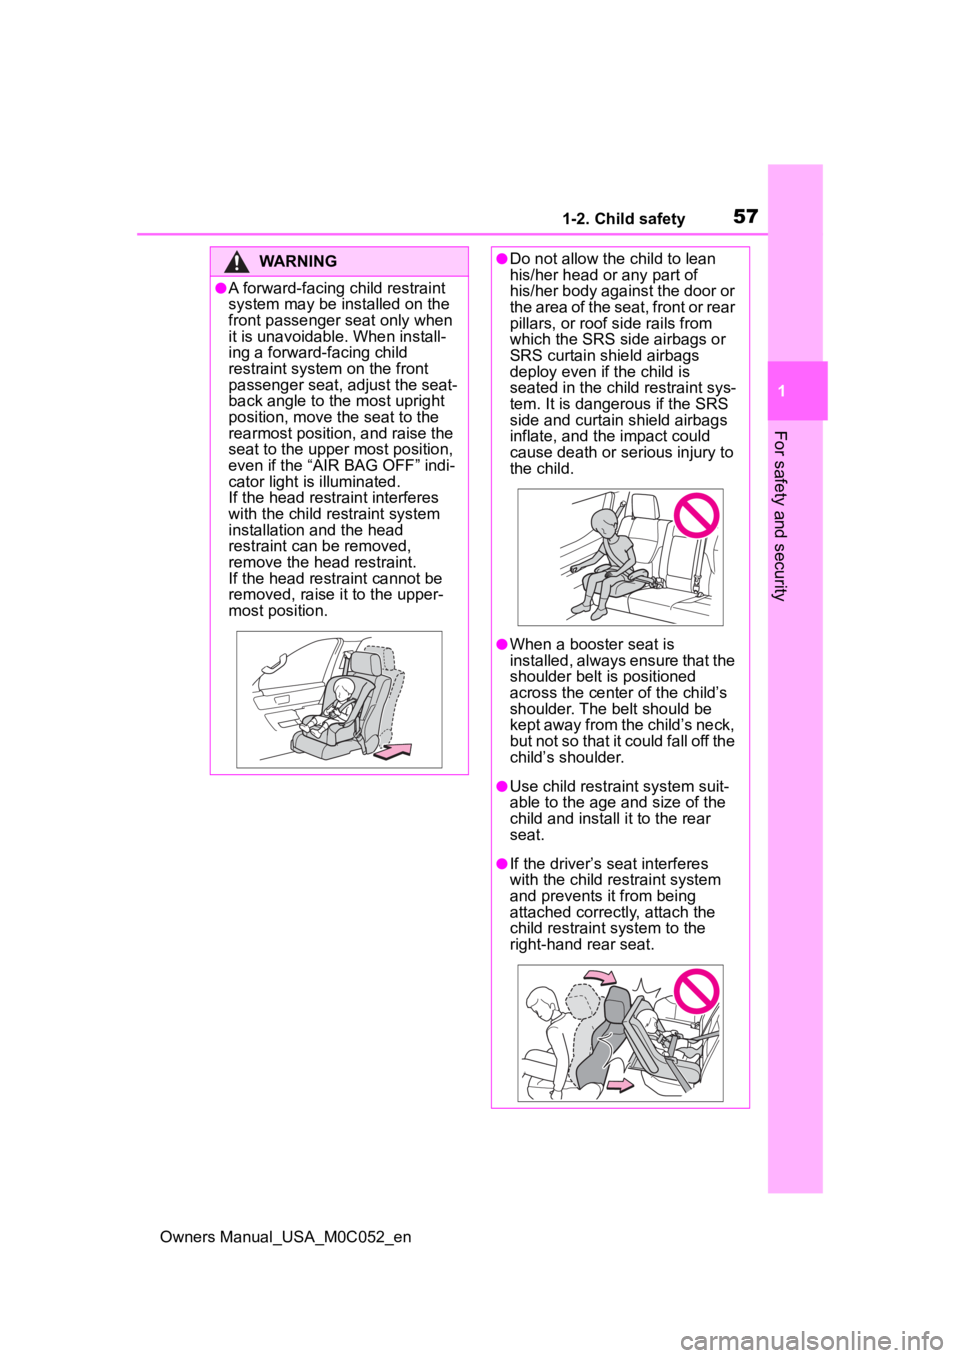
●A forward-facing child restraint
system may be installed on the
front passenger seat only when
it is unavoidable. When install-
ing a forward-facing child
restraint system on the front
passenger seat, adjust the seat-
back angle to the most upright
position, move the seat to the
rearmost position, and raise the
seat to the upper most position,
even if the “AIR BAG OFF” indi-
cator light is illuminated.
If the head restraint interferes
with the child restraint system
installation and the head
restraint can be removed,
remove the head restraint.
If the head restraint cannot be
removed, raise i t to the upper-
most position.
●Do not allow th e child to lean
his/her head or any part of
his/her body against the door or
the area of the seat, front or rear
pillars, or roof side rails from
which the SRS side airbags or
SRS curtain shield airbags
deploy even if the child is
seated in the child restraint sys-
tem. It is dangerous if the SRS
side and curtain shield airbags
inflate, and the impact could
cause death or serious injury to
the child.
●When a booster seat is
installed, always ensure that the
shoulder belt is positioned
across the center of the child’s
shoulder. The belt should be
kept away from the child’s neck,
but not so that it could fall off the
child’s shoulder.
●Use child restrai nt system suit-
able to the age and size of the
child and install it to the rear
seat.
●If the driver’s seat interferes
with the child restraint system
and prevents it from being
attached correct ly, attach the
child restraint system to the
right-hand rear seat.
Page 82 of 618

821-5. Theft deterrent system
Owners Manual_USA_M0C052_en
■Items to check before lock-
ing the vehicle
To prevent unexpected trigger-
ing of the alarm and vehicle
theft, make sure of the following:
Nobody is in the vehicle.
The windows and the pan-
oramic moon roof (if
equipped) are closed before
the alarm is set.
No valuables or other per-
sonal items are left in the
vehicle.
■Setting
Close the doors and hood, and
lock all the doors using the entry
function or wireless remote con- trol. The system will be set auto-
matically after 30 seconds.
The indicator light changes from
being on to flashing when the sys-
tem is set.
■Deactivating or stopping
Do one of the following to deac-
tivate or stop the alarms:
Unlock the doors and tailgate
using the entry function or
wireless remote control.
Turn the power switch to ACC
or ON, or start the hybrid sys-
tem. (The alarm will be deacti-
vated or stopped after a few
seconds.)
■System maintenance
The vehicle has a maintenance-free
type alarm system.
■Triggering of the alarm
The alarm may be triggered in the
following situations:
(Stopping the alarm deactivates the
alarm system.)
●The doors are unlocked using the
mechanical key.
Alarm
The alarm uses light and
sound to give an alert when
an intrusion is detected.
The alarm is triggered in the
following situations when
the alarm is set:
A locked door or tailgate is
unlocked or opened in any
way other than using the
entry function or wireless
remote control. (The doors
will lock again automati-
cally.)
The hood is opened.
Setting/deactivating/stop-
ping the alarm system
Page 109 of 618
109
Owners Manual_USA_M0C052_en
3
3
Before driving
Before driving
3-1. Key informationKeys ............................ 110
3-2. Opening, closing and locking the doors and
tailgate
Side doors ................... 113
Power running boards . 117
Tailgate........................ 120
Power bed step ........... 126
Smart key system ....... 128
3-3. Adjusting the seats Front seats .................. 133
Rear seats................... 134
Driving position memory .................................. 137
Head restraints............ 140
3-4. Adjusting the steering wheel and mirrors
Steering wheel ............ 143
Inside rear view mirror 145
Digital Rear-view Mirror 146
Outside rear view mirrors .................................. 155
3-5. Opening, closing the win- dows and moon roof
Power windows ........... 160
Power back window .... 163
Panoramic moon roof.. 164
Page 111 of 618
1113-1. Key information
Owners Manual_USA_M0C052_en
3
Before driving
approximately 10 days after a new
electronic key has been registered.
If this message is displayed but you
have not had a new electronic key
registered, ask your Toyota dealer to
check if an unknow n electronic key
(other than those in your posses-
sion) has been registered.
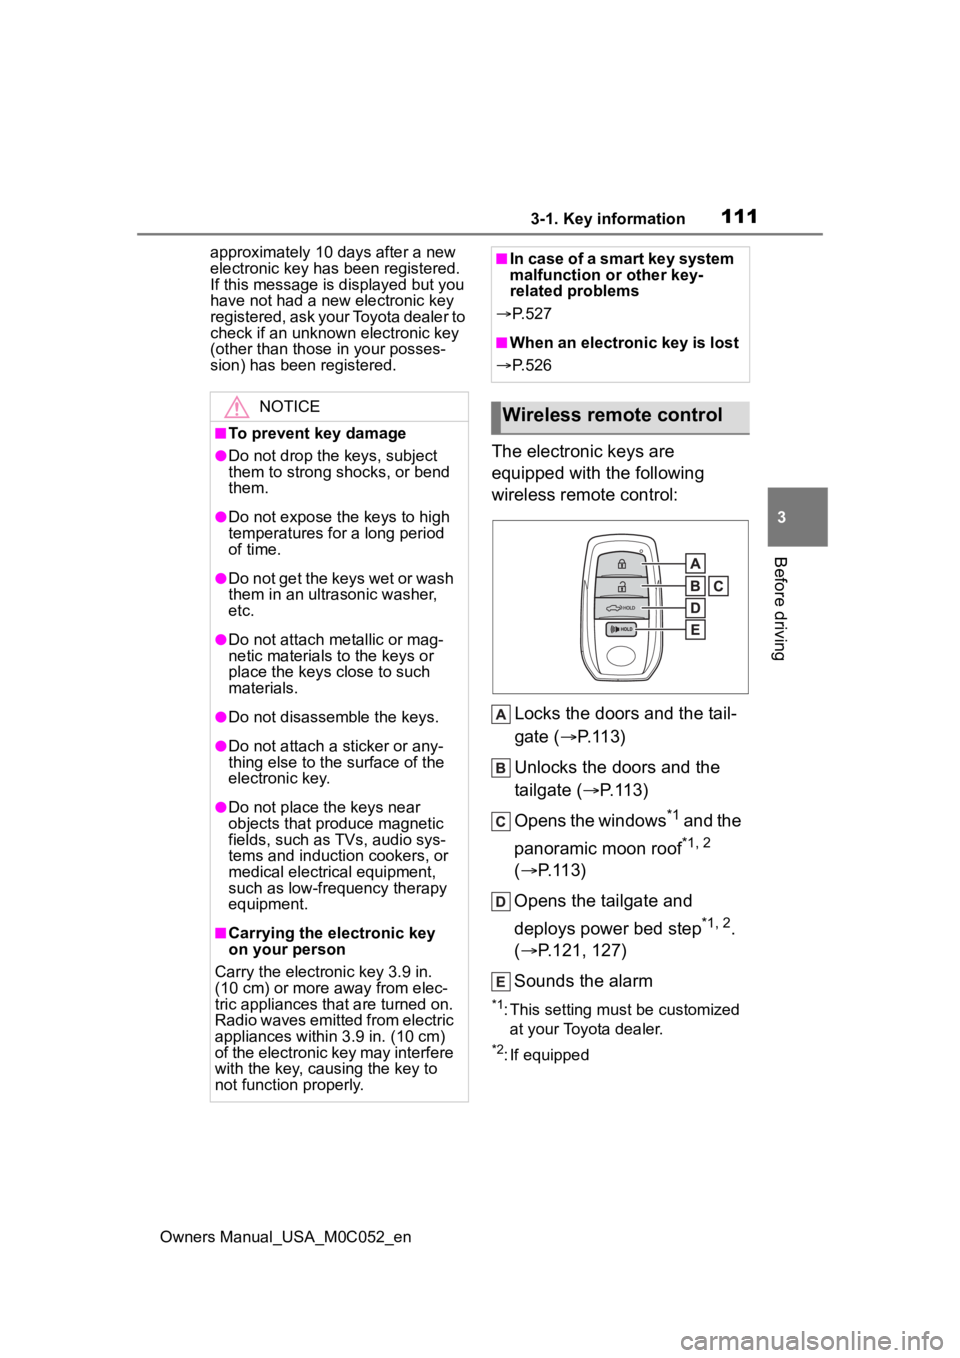
The electronic keys are
equipped with the following
wireless remote control:
Locks the doors and the tail-
gate ( P.113)
Unlocks the doors and the
tailgate ( P.113)
Opens the windows
*1 and the
panoramic moon roof
*1, 2
( P.113)
Opens the tailgate and
deploys power bed step
*1, 2.
( P.121, 127)
Sounds the alarm
*1: This setting must be customized at your Toyota dealer.
*2: If equipped
NOTICE
■To prevent key damage
●Do not drop the keys, subject
them to strong shocks, or bend
them.
●Do not expose the keys to high
temperatures for a long period
of time.
●Do not get the keys wet or wash
them in an ultrasonic washer,
etc.
●Do not attach metallic or mag-
netic materials to the keys or
place the keys close to such
materials.
●Do not disassemble the keys.
●Do not attach a sticker or any-
thing else to the surface of the
electronic key.
●Do not place th e keys near
objects that produce magnetic
fields, such as TVs, audio sys-
tems and induction cookers, or
medical electrical equipment,
such as low-frequency therapy
equipment.
■Carrying the electronic key
on your person
Carry the electronic key 3.9 in.
(10 cm) or more away from elec-
tric appliances that are turned on.
Radio waves emitted from electric
appliances within 3.9 in. (10 cm)
of the electronic key may interfere
with the key, causing the key to
not function properly.
■In case of a smart key system
malfunction or other key-
related problems
P. 5 2 7
■When an electronic key is lost
P. 5 2 6
Wireless remote control
Page 113 of 618

1133-2. Opening, closing and locking the doors and tailgate
Owners Manual_USA_M0C052_en
3
Before driving
3-2.Opening, closing and locking the doors and tailgate
■Smart key system (entry
function)
Carry the electronic key to
enable this function.
1 Grip the driver’s door handle
to unlock the door. Holding
the driver’s door handle for
approximately 2 seconds
unlocks all the doors. Grip
front passenger door handle
to unlock all the doors.
*
Make sure to touch the sensor on
the back of the handle.
The doors cannot be unlocked for 3
seconds after the doors are locked.
2Touch the lock sensor (inden-
tation on the upper part or
lower part of the handle) to
lock all the doors.
Check that the door is securely
locked.
*: The door unlock settings can be
changed.
■Wireless remote control
1 Locks all the doors and the
tailgate
Check that the doo rs and the tail-
gate are securely locked.
2 Unlocks all the doors and the
tailgate
Pressing the button unlocks the
driver’s door. Pressing the button
again within 5 seconds unlocks the
other door.
Press and hold to open the win-
dows
*1 and the panoramic moon
roof
*1, 2
*1
: This setting must be customized at your Toyota dealer.
*2: If equipped
■Switching the door unlock func-
tion
It is possible to set which doors the
entry function unlocks using the
wireless remote control.
1 Turn the power switch off.
2 When the indicator light on the
key surface is not on, press and
hold , or for
approximately 5 seconds while
pressing and holding .
The setting changes each time an
operation is per formed, as shown
below. (When changing the setting
Side doors
Unlocking and locking the
doors from the outside
Page 147 of 618
1473-4. Adjusting the steering wheel and mirrors
Owners Manual_USA_M0C052_en
3
Before driving
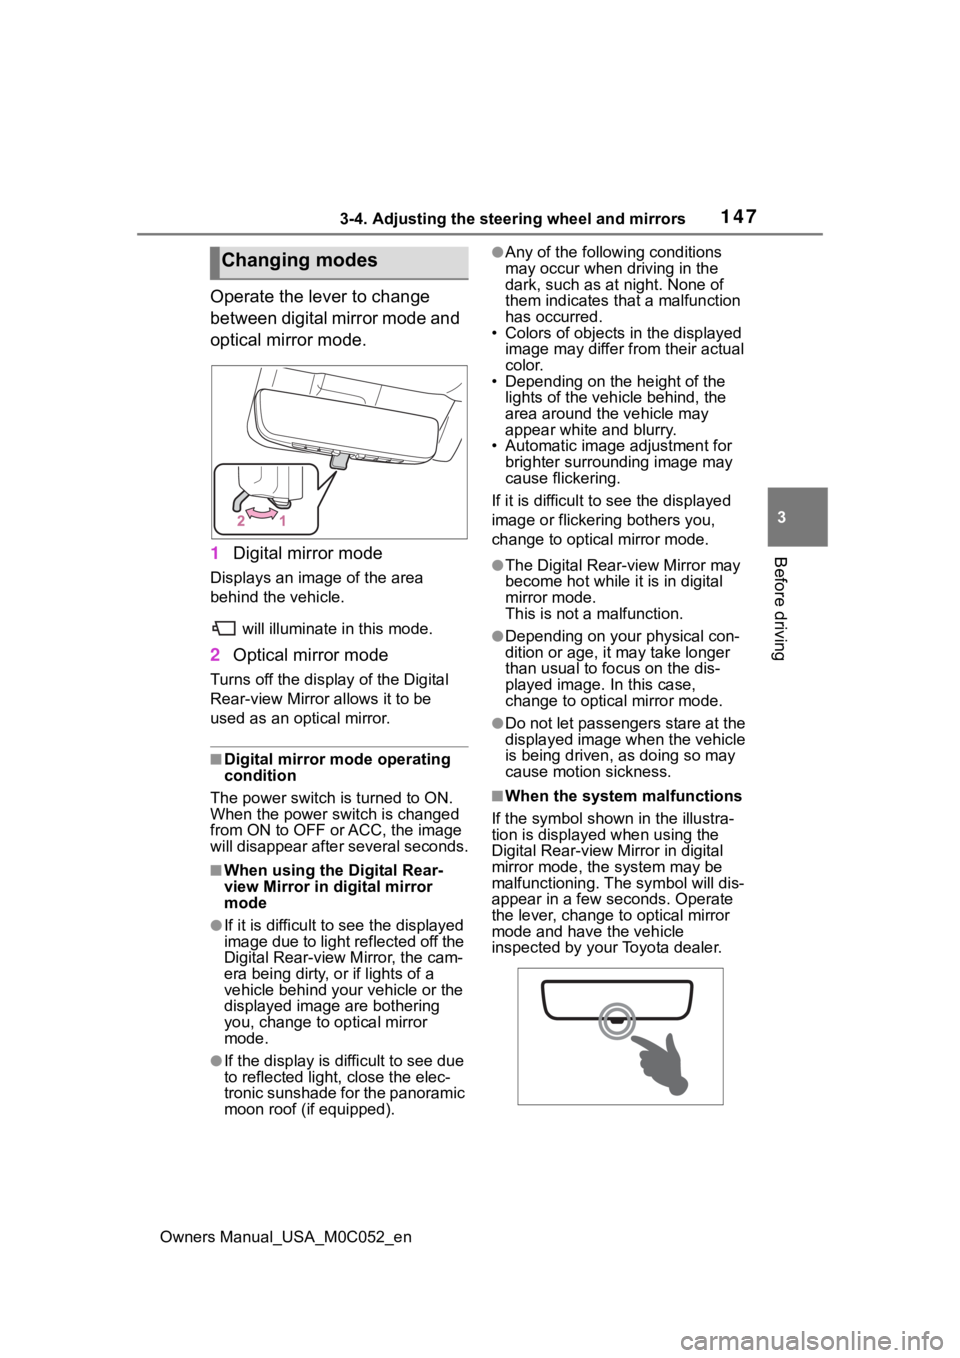
Operate the lever to change
between digital mirror mode and
optical mirror mode.
1 Digital mirror mode
Displays an image of the area
behind the vehicle.
will illuminate in this mode.
2Optical mirror mode
Turns off the display of the Digital
Rear-view Mirror allows it to be
used as an optical mirror.
■Digital mirror mode operating
condition
The power switch is turned to ON.
When the power switch is changed
from ON to OFF or ACC, the image
will disappear afte r several seconds.
■When using the Digital Rear-
view Mirror in digital mirror
mode
●If it is difficult to see the displayed
image due to light reflected off the
Digital Rear-view M irror, the cam-
era being dirty, or if lights of a
vehicle behind your vehicle or the
displayed image are bothering
you, change to optical mirror
mode.
●If the display is difficult to see due
to reflected light, close the elec-
tronic sunshade for the panoramic
moon roof (if equipped).
●Any of the following conditions
may occur when driving in the
dark, such as at night. None of
them indicates that a malfunction
has occurred.
• Colors of objects in the displayed
image may differ from their actual
color.
• Depending on the height of the
lights of the vehicle behind, the
area around the vehicle may
appear white and blurry.
• Automatic image adjustment for brighter surrounding image may
cause flickering.
If it is difficult to see the displayed
image or flickering bothers you,
change to optical mirror mode.
●The Digital Rear-view Mirror may
become hot while it is in digital
mirror mode.
This is not a malfunction.
●Depending on your physical con-
dition or age, it may take longer
than usual to fo cus on the dis-
played image. In this case,
change to optical mirror mode.
●Do not let passengers stare at the
displayed image when the vehicle
is being driven, as doing so may
cause motion sickness.
■When the system malfunctions
If the symbol shown in the illustra-
tion is displayed when using the
Digital Rear-view Mirror in digital
mirror mode, the system may be
malfunctioning. The symbol will dis-
appear in a few seconds. Operate
the lever, change to optical mirror
mode and have the vehicle
inspected by your Toyota dealer.
Changing modes
Page 152 of 618
1523-4. Adjusting the steering wheel and mirrors
Owners Manual_USA_M0C052_en
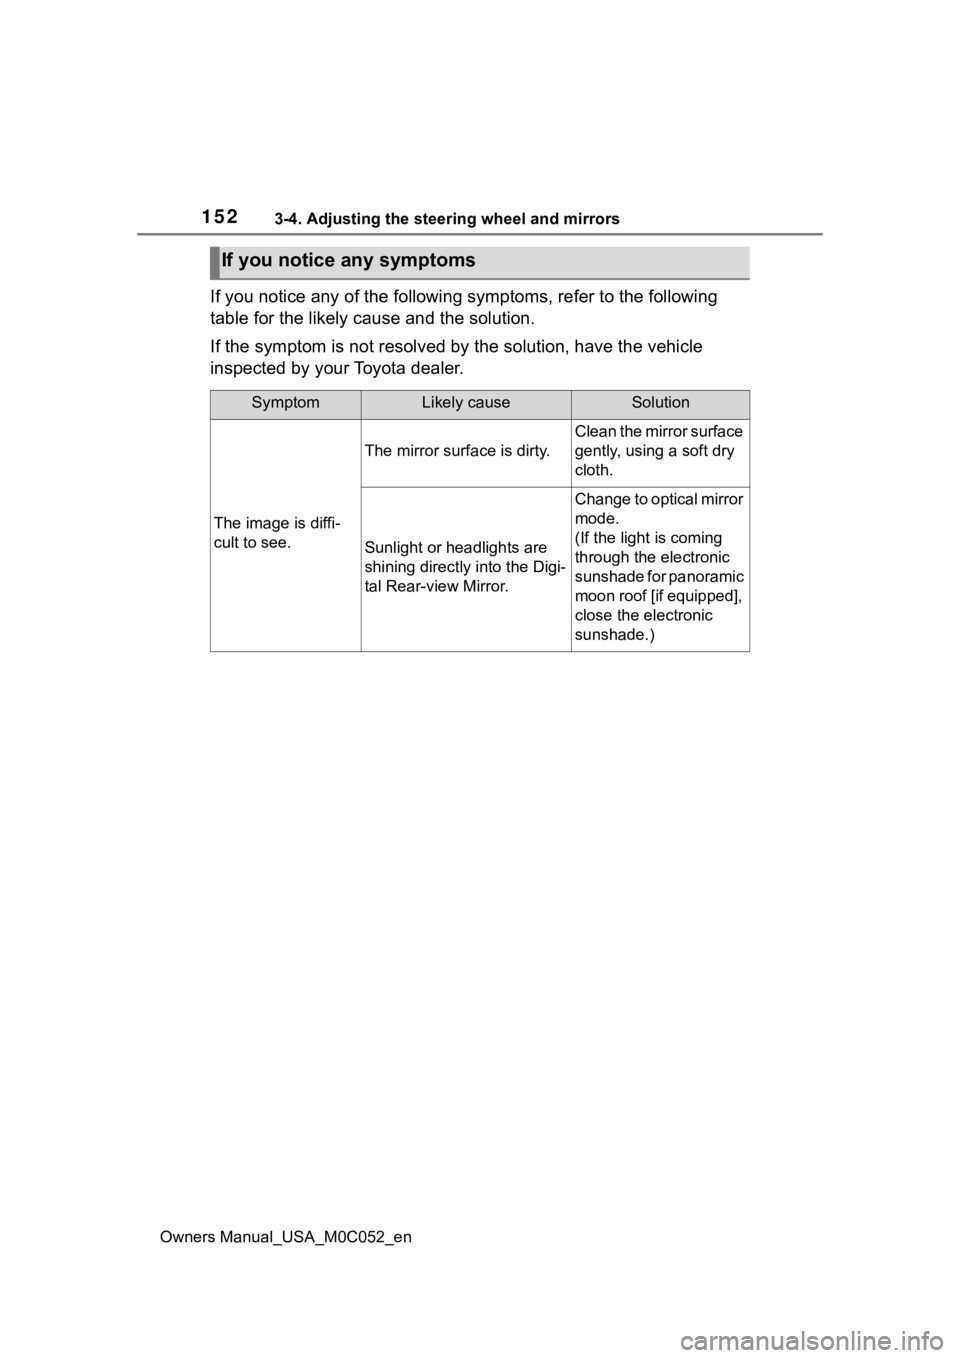
If you notice any of the following symptoms, refer to the following
table for the likely cause and the solution.
If the symptom is not resolved by the solution, have the vehicl e
inspected by your Toyota dealer.
If you notice any symptoms
SymptomLikely causeSolution
The image is diffi-
cult to see.
The mirror surface is dirty.
Clean the mirror surface
gently, using a soft dry
cloth.
Sunlight or headlights are
shining directly into the Digi-
tal Rear-view Mirror.
Change to optical mirror
mode.
(If the light is coming
through the electronic
sunshade for panoramic
moon roof [if equipped],
close the electronic
sunshade.)
Page 160 of 618
1603-5. Opening, closing the windows and moon roof
Owners Manual_USA_M0C052_en
3-5.Opening, closing the windows and moon roof
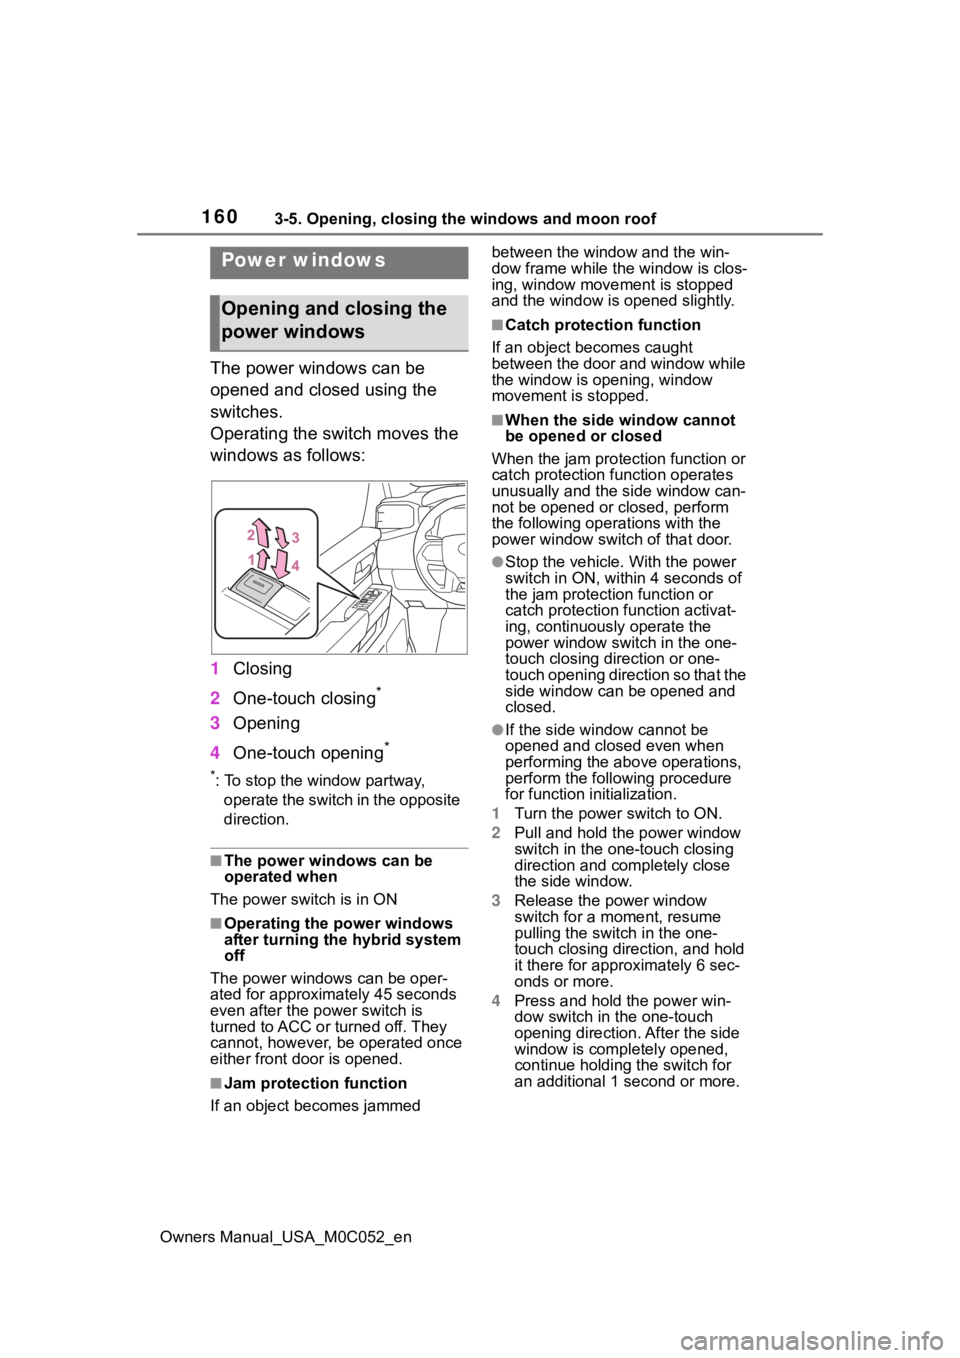
The power windows can be
opened and closed using the
switches.
Operating the switch moves the
windows as follows:
1Closing
2 One-touch closing
*
3Opening
4 One-touch opening
*
*: To stop the window partway,
operate the switch in the opposite
direction.
■The power windows can be
operated when
The power swit ch is in ON
■Operating the power windows
after turning th e hybrid system
off
The power windows can be oper-
ated for approximately 45 seconds
even after the power switch is
turned to ACC or turned off. They
cannot, however, be operated once
either front door is opened.
■Jam protection function
If an object becomes jammed between the window and the win-
dow frame while the
window is clos-
ing, window move ment is stopped
and the window is opened slightly.
■Catch protection function
If an object becomes caught
between the door and window while
the window is opening, window
movement is stopped.
■When the side window cannot
be opened or closed
When the jam protection function or
catch protection function operates
unusually and the side window can-
not be opened or closed, perform
the following operations with the
power window swit ch of that door.
●Stop the vehicle. With the power
switch in ON, within 4 seconds of
the jam protection function or
catch protection f unction activat-
ing, continuously operate the
power window switch in the one-
touch closing direction or one-
touch opening direction so that the
side window can be opened and
closed.
●If the side window cannot be
opened and closed even when
performing the above operations,
perform the follo wing procedure
for function initialization.
1 Turn the power switch to ON.
2 Pull and hold the power window
switch in the on e-touch closing
direction and completely close
the side window.
3 Release the power window
switch for a m oment, resume
pulling the switch in the one-
touch closing direction, and hold
it there for approximately 6 sec-
onds or more.
4 Press and hold the power win-
dow switch in the one-touch
opening direction. After the side
window is completely opened,
continue holding the switch for
an additional 1 second or more.
Power windows
Opening and closing the
power windows