2023 TOYOTA TUNDRA HYBRID roof
[x] Cancel search: roofPage 227 of 618
2274-5. Using the driving support systems
Owners Manual_USA_M0C052_en
4
Driving
■Certification
P.612
WARNING
●Do not attach objects, such as
stickers, transparent stickers,
etc., to the oute r side of the
windshield in fr ont of the front
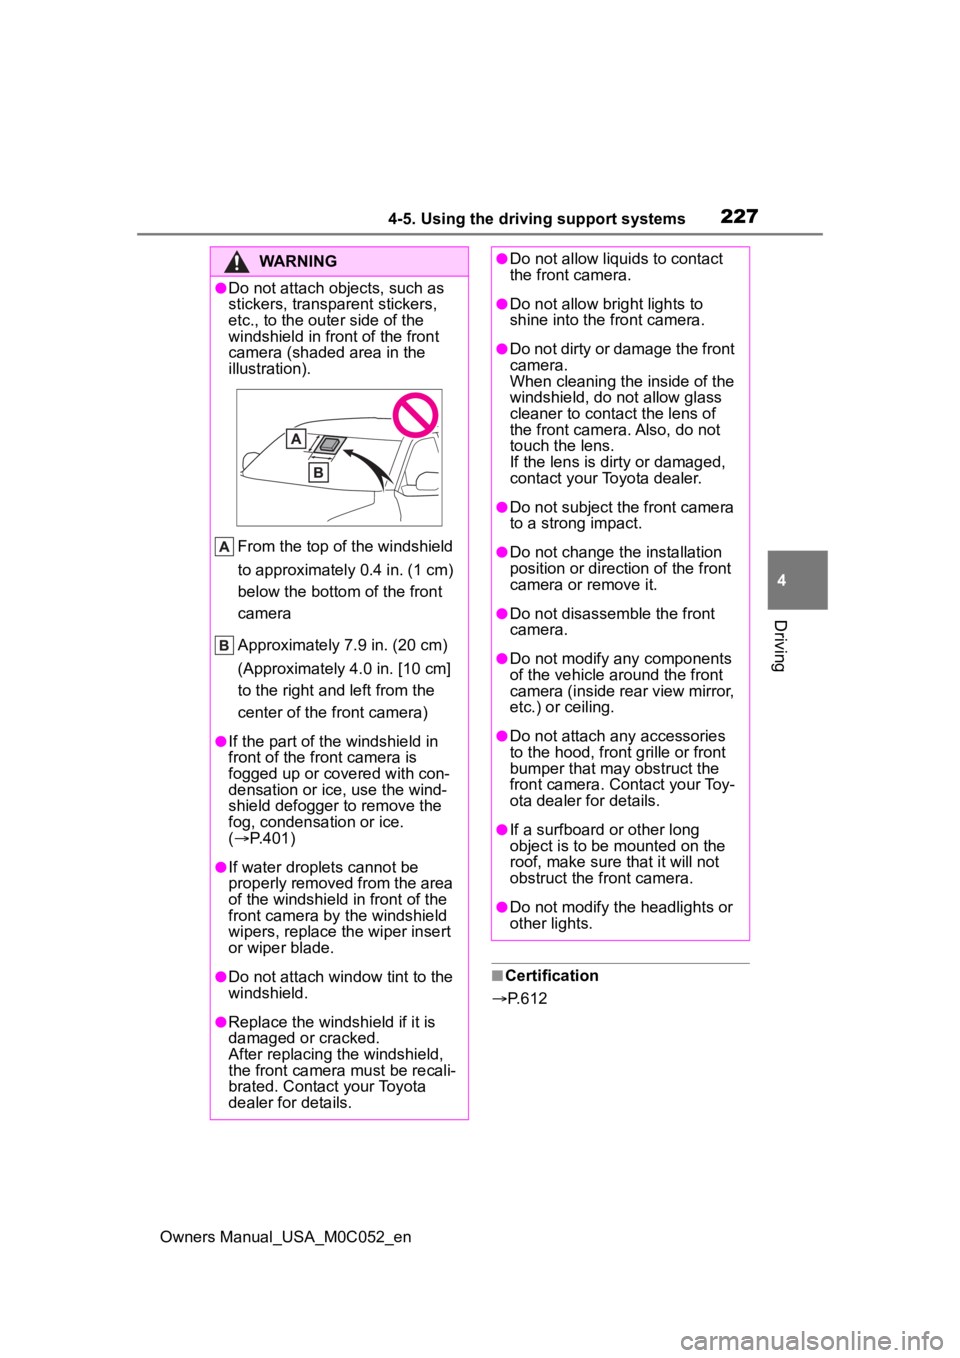
camera (shaded area in the
illustration).
From the top of the windshield
to approximately 0.4 in. (1 cm)
below the bottom of the front
camera
Approximately 7.9 in. (20 cm)
(Approximately 4.0 in. [10 cm]
to the right and left from the
center of the front camera)
●If the part of the windshield in
front of the front camera is
fogged up or covered with con-
densation or ice, use the wind-
shield defogger to remove the
fog, condensation or ice.
( P.401)
●If water droplets cannot be
properly removed from the area
of the windshield in front of the
front camera by the windshield
wipers, replace the wiper insert
or wiper blade.
●Do not attach win dow tint to the
windshield.
●Replace the windshield if it is
damaged or cracked.
After replacing the windshield,
the front camera must be recali-
brated. Contact your Toyota
dealer for details.
●Do not allow liquids to contact
the front camera.
●Do not allow bright lights to
shine into the front camera.
●Do not dirty or damage the front
camera.
When cleaning the inside of the
windshield, do not allow glass
cleaner to contact the lens of
the front camera. Also, do not
touch the lens.
If the lens is dirty or damaged,
contact your Toyota dealer.
●Do not subject the front camera
to a strong impact.
●Do not change the installation
position or direction of the front
camera or remove it.
●Do not disassemble the front
camera.
●Do not modify any components
of the vehicle around the front
camera (inside rear view mirror,
etc.) or ceiling.
●Do not attach any accessories
to the hood, front grille or front
bumper that may obstruct the
front camera. Contact your Toy-
ota dealer for details.
●If a surfboard or other long
object is to be mounted on the
roof, make sure that it will not
obstruct the front camera.
●Do not modify the headlights or
other lights.
Page 303 of 618
3034-5. Using the driving support systems
Owners Manual_USA_M0C052_en
4
Driving
• The area around both corners of the bumper will no t be displayed.
●The image adjustment procedure
for the parking assist monitor
screen is the same as the proce-
dure for adjusting the screen dis-
play. (Refer to the “MULTIMEDIA
OWNER’S MANUAL”.)
●The area displayed on the screen
may vary according to vehicle ori-
entation conditions.
●Objects which are close to either
corner of the bumper or under the
bumper cannot be displayed.
●The camera uses a special lens.
The distance of the image that
appears on the screen differs from
the actual distance.
●Items which are located higher
than the camera may not be dis-
played on the monitor.
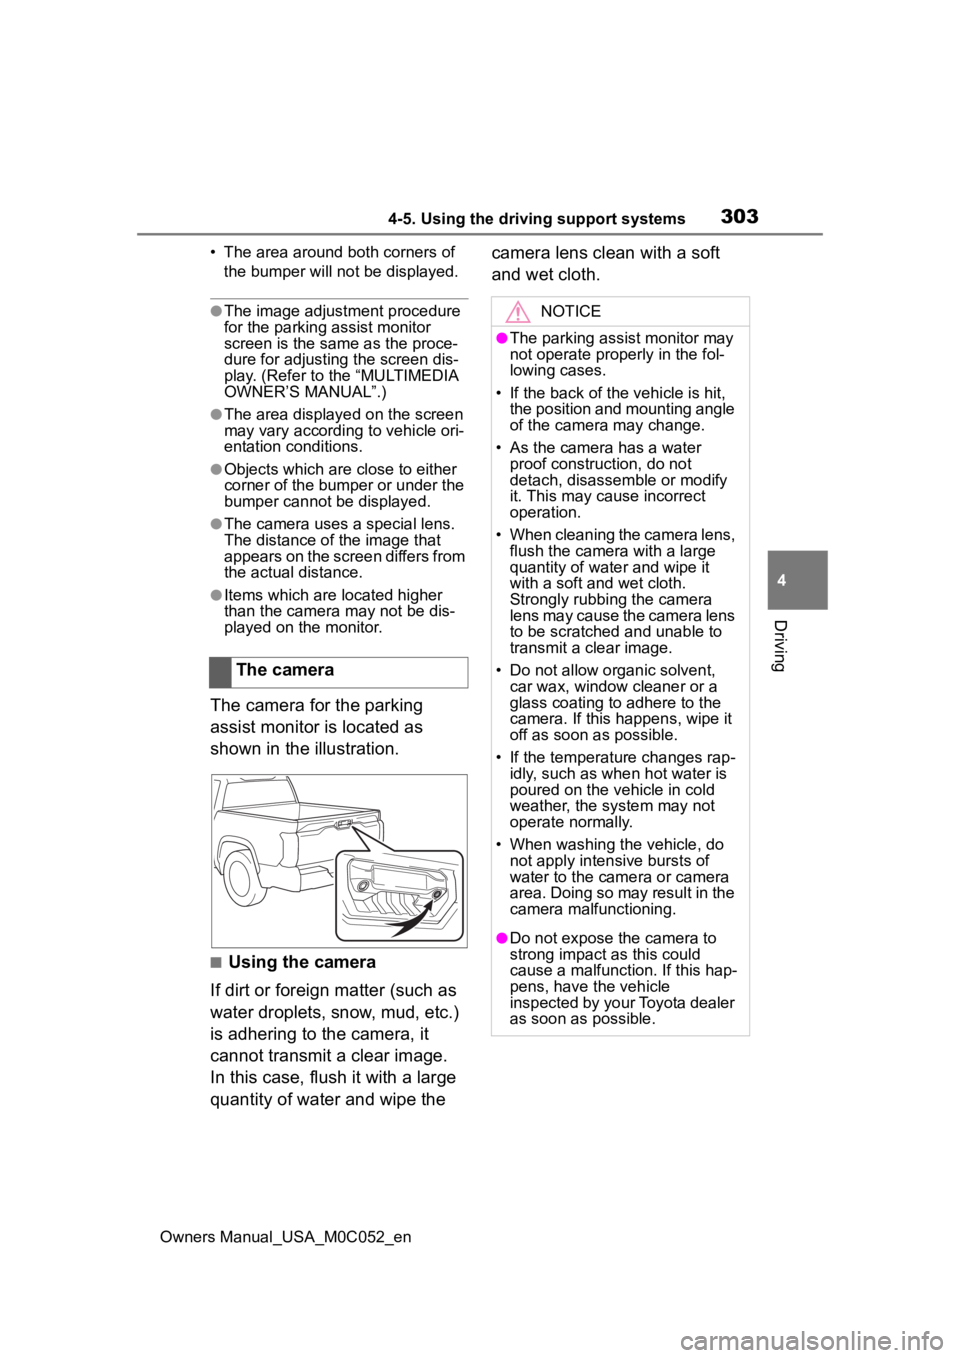
The camera for the parking
assist monitor is located as
shown in the illustration.
■Using the camera
If dirt or foreign matter (such as
water droplets, snow, mud, etc.)
is adhering to the camera, it
cannot transmit a clear image.
In this case, flush it with a large
quantity of water and wipe the camera lens clean with a soft
and wet cloth.
The camera
NOTICE
●The parking assist monitor may
not operate properly in the fol-
lowing cases.
• If the back of the vehicle is hit, the position and mounting angle
of the camera may change.
• As the camera has a water proof construction, do not
detach, disassemble or modify
it. This may cause incorrect
operation.
• When cleaning the camera lens, flush the camera with a large
quantity of water and wipe it
with a soft and wet cloth.
Strongly rubbing the camera
lens may cause the camera lens
to be scratched and unable to
transmit a clear image.
• Do not allow organic solvent, car wax, window cleaner or a
glass coating to adhere to the
camera. If this happens, wipe it
off as soon as possible.
• If the temperature changes rap- idly, such as when hot water is
poured on the vehicle in cold
weather, the system may not
operate normally.
• When washing the vehicle, do not apply intensive bursts of
water to the came ra or camera
area. Doing so may result in the
camera malfunctioning.
●Do not expose the camera to
strong impact as this could
cause a malfunction. If this hap-
pens, have the vehicle
inspected by your Toyota dealer
as soon as possible.
Page 334 of 618
3344-5. Using the driving support systems
Owners Manual_USA_M0C052_en
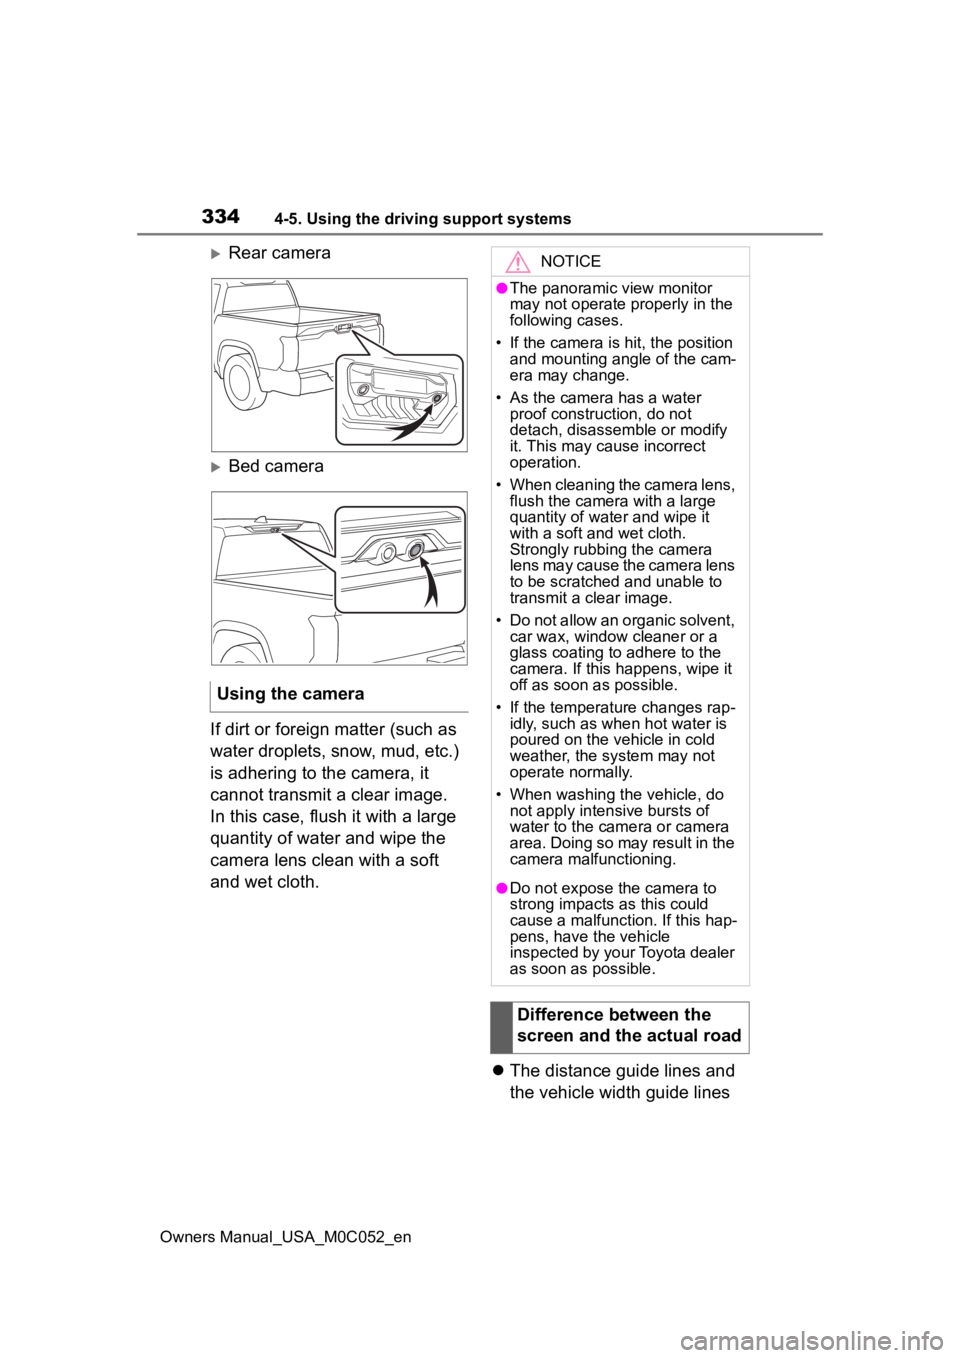
Rear camera
Bed camera
If dirt or foreign matter (such as
water droplets, snow, mud, etc.)
is adhering to the camera, it
cannot transmit a clear image.
In this case, flush it with a large
quantity of water and wipe the
camera lens clean with a soft
and wet cloth. The distance guide lines and
the vehicle width guide lines
Using the camera
NOTICE
●The panoramic view monitor
may not operate properly in the
following cases.
• If the camera is hit, the position and mounting angle of the cam-
era may change.
• As the camera has a water proof construction, do not
detach, disassemble or modify
it. This may cause incorrect
operation.
• When cleaning the camera lens, flush the camera with a large
quantity of water and wipe it
with a soft and wet cloth.
Strongly rubbing the camera
lens may cause the camera lens
to be scratched and unable to
transmit a clear image.
• Do not allow an organic solvent, car wax, window cleaner or a
glass coating to adhere to the
camera. If this happens, wipe it
off as soon as possible.
• If the temperature changes rap- idly, such as when hot water is
poured on the vehicle in cold
weather, the system may not
operate normally.
• When washing the vehicle, do not apply intensive bursts of
water to the came ra or camera
area. Doing so may result in the
camera malfunctioning.
●Do not expose the camera to
strong impacts as this could
cause a malfunction. If this hap-
pens, have the vehicle
inspected by your Toyota dealer
as soon as possible.
Difference between the
screen and the actual road
Page 356 of 618
3564-5. Using the driving support systems
Owners Manual_USA_M0C052_enbe displayed, have your vehicle
inspected by your Toyota dealer as
soon as possible.
■When the indicator turns on
Indicates a malfunction in the air
suspension system.
Have the vehicle inspected by your
Toyota dealer immediately. ( P.87,
508)
WARNING
■The electronically modulated
air suspension must be
turned off in the following cir-
cumstances:
Otherwise, the automatic leveling
function may cause the vehicle’s
height to change, and you may
catch part of yo ur body in the
vehicle, resulting in an unex-
pected accident or injury:
●When driving through water
such as shallow streams (Put
the vehicle height in “HI” mode
and turn off the electronically
modulated air suspension. Drive
at 18 mph [30 km/h] or slower.)
●When jacking up the vehicle,
installing tire chains or tying the
vehicle with chains/wires for
transportation via flat bed truck
(Turn the system to the manual
mode and stop the hybrid sys-
tem.)
●When the vehicle must be
towed (Put the vehicle height in
“N” mode and turn the system to
the manual mode.)
●When the vehicle gets stuck
(Turn the system to the manual
mode.)
●When disconnecting a trailer
(Put the vehicle height in “N”
mode and turn the system to the
manual mode.)
■Selecting the correct height
mode
Observe the following precautions
to prevent accidents or injury.
Failure to do so may cause dam-
age to parts of the vehicle, as well
as dangerous handling character-
istics, which may lead to fatal or
injury accidents.
●Before you lower the vehicle’s
height, check under the vehicle
to make sure that no one is
there.
●“HI” mode should only be used
when driving on rough roads, for
example when driving off-road.
Because the vehicle’s center of
gravity will become higher when
in the mode, the vehicle may
become unstable when turning
abruptly, resulting in an acci-
dent.
●Do not select “HI” mode when
you load cargo on the roof lug-
gage carrier.
Because the vehicle’s center of
gravity will become higher when
in the mode, the vehicle may
become unstable when turning
abruptly, resulting in an acci-
dent.
NOTICE
■Be careful in any place where
overhead space is limited.
When changing to a higher mode
or after unloading, the vehicle
height will rise. This may cause
damage to the vehicle.
■Do not select “LO” mode
when driving on bumpy
roads.
If the underbody of the vehicle
touches a rugged road surface,
the vehicle ma y be damaged.
Page 390 of 618
3904-6. Driving tips
Owners Manual_USA_M0C052_en
overuse of the accelerator
pedal. Doing so can help control
excessive gasoline consump-
tion.
Control and maintain the vehicle
at a constant speed. Before
stopping at a toll booth or simi-
lar, allow plenty of time to
release the accelerator and gen-
tly apply the brakes. A greater
amount of electrical energy can
be regenerated when slowing
down.
Use the air conditioning only
when necessary. Doing so can
help reduce excessive gasoline
consumption.
In summer: When the ambient
temperature is high, use the
recirculated air mode. Doing so
will help to reduce the burden on
the air conditioning system and
reduce fuel consumption as
well.
In winter: Because the gasoline
engine will not automatically cut
out until it and the interior of the
vehicle are warm, it will con-
sume fuel. Also, fuel consump-
tion can be improved by
avoiding overuse of the heater.Make sure to check the tire infla-
tion pressure frequently.
Improper tire inflation pressure
can cause poor fuel economy.
Also, as snow tires can cause
large amounts of friction, their
use on dry roads can lead to
poor fuel economy. Use tires
that are appropriate for the sea-
son.
Carrying heavy luggage will lead
to poor fuel economy. Avoid car-
rying unnecessary luggage.
Installing a large roof rack will
also cause poor fuel economy.
Since the gasoline engine starts
up and cuts out automatically
when cold, warming up the
engine is unnecessary. More-
over, frequently driving short
distances will cause the engine
to repeatedly warm up, which
can lead to excess fuel con-
sumption.
Highway driving
Air conditioning
Checking tire inflation
pressure
Luggage
Warming up before driv-
ing
Page 391 of 618
3914-6. Driving tips
Owners Manual_USA_M0C052_en
4
Driving
Specific design characteris-
tics give it a higher center of
gravity than ordinary passen-
ger cars. This vehicle design
feature causes this type of
vehicle to be more likely to
rollover. And, utility vehicles
have a significantly higher
rollover rate than other types
of vehicles.
An advantage of the higher
ground clearance is a better
view of the road allowing you
to anticipate problems.
It is not designed for corner-
ing at the same speeds as
ordinary passenger cars any
more than low-slung sports
cars are designed to perform
satisfactorily under off-road
conditions. Therefore, sharp
turns at excessive speeds
may cause the vehicle to roll-
over. When driving your vehicle off-
road, please observe the follow-
ing precautions to ensure your
driving enjoyment and to help
prevent the closure of areas to
Off-road precautions
This vehicle belongs to the
utility vehicle class, which
has higher ground clear-
ance and narrower tread in
relation to the height of its
center of gravity to make it
capable of performing in a
wide variety of off-road
applications.
Off-road vehicle features
WARNING
■Off-road vehicle precautions
Always observe t he following pre-
cautions to minim ize the risk of
death, serious injury or damage to
your vehicle:
●In a rollover crash, an unbelted
person is significantly more
likely to die than a person wear-
ing a seat belt. Therefore, the
driver and all passengers
should always fasten their seat
belts.
●Avoid sharp turns or abrupt
maneuvers, if at all possible.
Failure to operat e this vehicle
correctly may result in loss of
control or vehicle rollover caus-
ing death or serious injury.
●Avoid loading any items on the
roof that will raise the vehicle’s
center of gravity.
●Always slow down in gusty
crosswinds. Because of its pro-
file and higher ce nter of gravity,
your vehicle is more sensitive to
side winds than an ordinary
passenger car.
Slowing down will allow you to
have better control.
●Do not drive horizontally across
steep slopes. Driving straight up
or straight down is preferred.
Your vehicle (or any similar off-
road vehicle) can tip over side-
ways much more easily than
forward or backward.
Off-road driving
Page 395 of 618

3954-6. Driving tips
Owners Manual_USA_M0C052_en
4
Driving
Perform the following according
to the driving conditions:
Do not try to forcibly open a
window or move a wiper that
is frozen. Pour warm water
over the frozen area to melt
the ice. Wipe away the water
immediately to prevent it from
freezing.
To ensure proper operation of
the climate control system
fan, remove any snow that
has accumulated on the air
inlet vents in front of the wind-
shield.
Check for and remove any
excess ice or snow that may
have accumulated on the
exterior lights, vehicle’s roof,
chassis, around the tires or on
the brakes.
Remove any snow or mud
from the bottom of your shoes
before getting in the vehicle. Accelerate the vehicle slowly,
keep a safe distance between
you and the vehicle ahead, and
drive at a reduced speed suit-
able to road conditions.
Park the vehicle and move
the shift lever to P without set-
ting the parking brake. The
parking brake may freeze up,
preventing it from being
released. If the vehicle is
parked without setting the
parking brake, make sure to
block the wheels.
Failure to do so may be dan-
gerous because it may cause
the vehicle to move unexpect-
edly, possibly leading to an
accident.
When the parking brake is in auto-
matic mode, release the parking
brake after shifting the shift lever to
P. ( P.206)
If the vehicle is parked without
setting the parking brake,
confirm that the shift lever
cannot be moved out of P
*.
*: The shift lever will be locked if it is
attempted to be shifted from P to
any other position without
depressing the brake pedal. If the
shift lever can be shifted from P,
there may be a problem with the
shift lock system. Have the vehi-
cle inspected by your Toyota
NOTICE
■Repairing or replacing snow
tires
Request repairs or replacement of
snow tires from Toyota dealers or
legitimate tire retailers.
This is because the removal and
attachment of snow tires affects
the operation of the tire pressure
warning valves and transmitters.
Before driving the vehicle
When driving the vehicle
When parking the vehicle
Page 429 of 618
4315-4. Using the other interior features
Owners Manual_USA_M0C052_en
5
Interior features
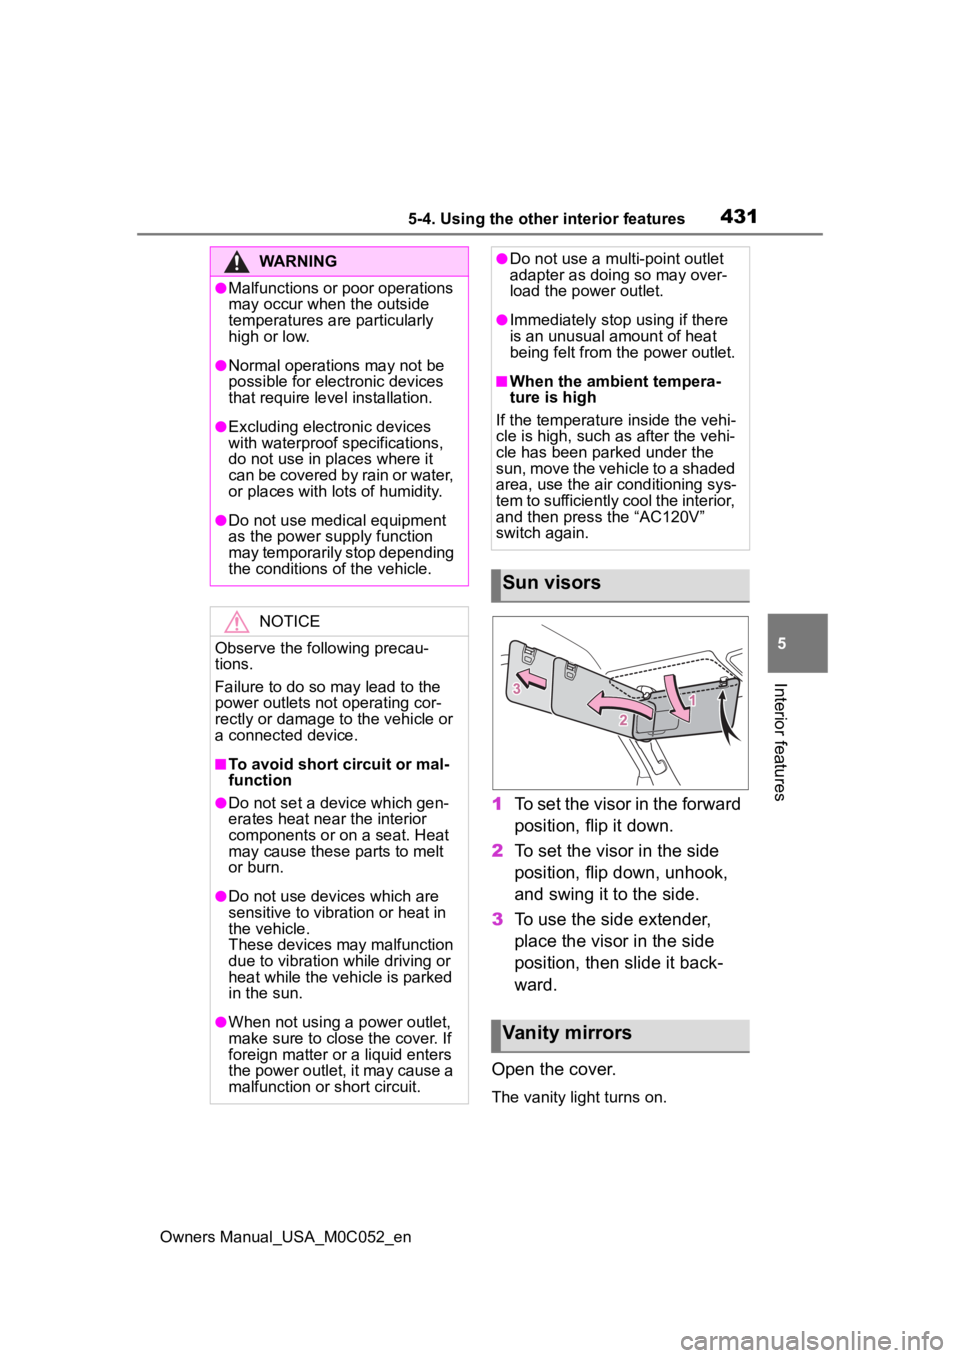
1 To set the visor in the forward
position, flip it down.
2 To set the visor in the side
position, flip down, unhook,
and swing it to the side.
3 To use the side extender,
place the visor in the side
position, then slide it back-
ward.
Open the cover.
The vanity lig ht turns on.
WARNING
●Malfunctions or poor operations
may occur when the outside
temperatures are particularly
high or low.
●Normal operations may not be
possible for electronic devices
that require level installation.
●Excluding electronic devices
with waterproof specifications,
do not use in places where it
can be covered by rain or water,
or places with lots of humidity.
●Do not use medical equipment
as the power s upply function
may temporarily stop depending
the conditions of the vehicle.
NOTICE
Observe the following precau-
tions.
Failure to do so m ay lead to the
power outlets not operating cor-
rectly or damage to the vehicle or
a connected device.
■To avoid short circuit or mal-
function
●Do not set a device which gen-
erates heat near the interior
components or on a seat. Heat
may cause these parts to melt
or burn.
●Do not use devices which are
sensitive to vibration or heat in
the vehicle.
These devices may malfunction
due to vibration while driving or
heat while the vehicle is parked
in the sun.
●When not using a power outlet,
make sure to close the cover. If
foreign matter or a liquid enters
the power outlet, it may cause a
malfunction or short circuit.
●Do not use a mul ti-point outlet
adapter as doing so may over-
load the power outlet.
●Immediately stop using if there
is an unusual amount of heat
being felt from th e power outlet.
■When the ambient tempera-
ture is high
If the temperature inside the vehi-
cle is high, such as after the vehi-
cle has been parked under the
sun, move the vehicle to a shaded
area, use the air conditioning sys-
tem to sufficiently cool the interior,
and then press the “AC120V”
switch again.
Sun visors
Vanity mirrors