2023 TOYOTA SUPRA ECU
[x] Cancel search: ECUPage 131 of 372

1313-1. CONTROLS
3
CONTROLS
The Automatic transmission
combines the functions of man-
ual shifting, if needed.
Selector lever position for nor-
mal vehicle operation. All gears
for forward travel are activated
automatically.
Engage selector lever position R
only when the vehicle is station-ary.
The vehicle may be pushed or
roll without power, for instance
in vehicle washes, refer to page
133, in selector lever position N.
Selector lever position, for
instance for parking the vehicle.
The transmission blocks the
drive wheels in selector lever
position P.
Engage selector lever position P
only when the vehicle is station-
ary.
■P is engaged automatically
Selector lever position P is
engaged automatically in situa-
tions such as the following:
After the drive-ready state is
switched off and selector
lever position R, D or M is
engaged.
After the standby state has
been switched off when selec-
tor lever position N is
engaged.
If the driver's safety belt is
unbuckled, the driver's door is
opened, and the brake pedal
is not pressed while the vehi-
cle is stationary and selector
lever position D, M or R is
engaged.
Automatic transmission
Concept
Safety information
WARNING
An unsecured vehicle can begin
to move and possibly roll away.
There is a risk of an accident.
Before exiting, secure the vehicle
against rolling.
In order to ensure that the vehicle
is secured against rolling away,
follow the following:
●Set the parking brake.
●On uphill grades or on a down-
hill slope, turn the front wheels
in the direction of the curb.
●On uphill grades or on a down-
hill slope, also secure the vehi-
cle, for instance with a wheel
chock.
Selector lever positions
Drive mode D
Reverse R
Neutral N
Parking position P
Page 135 of 372

1353-1. CONTROLS
3
CONTROLSElectronically unlock the trans-
mission lock to maneuver vehi-
cle from a danger area.
Unlocking is possible, if the
starter can spin the engine.
Before unlocking the transmis-
sion lock, set the parking brake
to prevent the vehicle from roll-
ing away.
1Press and hold down brake
pedal.
2 Press the Start/Stop button.
The starter must audibly
start. Hold the Start/Stop but-
ton pressed.
3 With your free hand, press
the button on the selector
lever, arrow 1, and press the
selector lever into selector
lever position N and hold,
arrow N, until selector lever position N is displayed in the
instrument cluster.
A vehicle messag
e is displayed.
4Release Start/Stop button
and selector lever.
5 Release brake, as soon as
the starter stops.
6 Maneuver the vehicle from
the danger area and secure it
against moving on its own.
For additional information, see
the chapter on tow-starting and
towing, refer to page 326.
Launch Control enables opti-
mum acceleration on surfaces
with good traction under dry sur-
rounding conditions.
The use of Launch Control
causes premature component
wear since this function rep-
resents a very heavy load for
the vehicle.
Displays in the instrument
cluster
The selector lever posi-
tion is displayed, for
example P.
Electronic unlocking of
the transmission lock
General information
Engaging selector lever
position N
Launch Control
Concept
General information
1
R
N
Page 139 of 372

1393-1. CONTROLS
3
CONTROLS
In some areas of the instrument
cluster, various assistance sys-
tems, for example the cruise
control, can be displayed. The
displays may vary depending on
the equipment version and
country variant.
The display can be changed for
sport mode.
The driving mode will change to
sport mode.
The vehicle messages system
monitors functions in the vehicle
and notifies you of malfunctions
in the monitored systems.
A vehicle messages message is
displayed as a combination of
indicator or warning lights and SMS text messages in the
instrument cluster and, if appli-
cable, in the Head-up Display.
In addition, an acoustic signal
may sound and an SMS text
message may appear on the
Control Display.
Press and hold the button on the
turn signal lever.
Some vehicle messages are
displayed continuously and are
not cleared until the malfunction
is eliminated. If s
everal malfunc-
tions occur at once, the mes-
sages are displayed
consecutively.
The messages can be hidden
for approx. 8 seconds. After this
time, they are displayed again
automatically.
Some vehicle messages are
hidden automatically after
Variable displays
Sport mode display
Concept
Changing the display
Push the sport mode
switch until SPORT is
displayed.
Vehicle messages
Concept
General information
Hiding vehicle messages
Continuous display
Temporary display
Page 166 of 372

1663-1. CONTROLS
Do not hang pieces of cloth-
ing, such as jackets, over the
backrests.
Never modify either the indi-
vidual components or the wir-
ing in the airbag system. This
also applies to steering wheel
covers, the dashboard, and
the seats.
Do not remove the airbag sys-
tem.
Even when you follow all
instructions very closely, injury
from contact with the airbags
cannot be fully ruled out in cer-
tain situations.
The ignition and inflation noise
may lead to short-term and, in
most cases, temporary hearing
impairment in sensitive occu-
pants.
Vehicle modifications for a per-
son with disabilities may affect
the air bag system; contact the
Toyota dealer for further infor-
mation.
Warnings and information on the
airbags are also found on the
sun visors. Functional readiness of
the airbag system
Safety information
WARNING
Individual components can be hot
after triggering of the airbag sys-
tem. There is a risk of injury. Do
not touch individual components.
WARNING
Improperly executed work can
lead to failure, malfunction or
unintentional triggering of the air-
bag system. In the case of a mal-
function, the airbag system might
not trigger as intended despite the
accident severity. There is a risk
of injuries or danger to life. Have
the airbag system checked,
repaired, dismantled and
scrapped by your Toyota dealer.
Display in the instrument
cluster
When drive-ready state is
switched on, the warning
light in the instrument
cluster lights up briefly and
thereby indicates the func-
tion readiness of the entire
airbag system and the belt
tensioners.
Malfunction
Warning light does not
come on when
drive-ready state is
switched on.
The warning light lights
up continuously.
Page 210 of 372

2103-1. CONTROLS
to detect this within the given
system limits.Safety information
WARNING
The system cannot serve as a
substitute for the driver’s personal
judgment in assessing the traffic
situation. Based on the limits of
the system, it cannot inde-
pendently react to all traffic situa-
tions. There is a risk of accident.
Adjust driving style to traffic condi-
tions. Watch the surrounding traf-
fic situation closely, be ready to
take over steering and braking at
any time, and actively intervene
where appropriate.
WARNING
An unsecured vehicle can begin
to move and possibly roll away.
There is a risk of an accident.
Before exiting, secure the vehicle
against rolling.
In order to ensure that the vehicle
is secured against rolling away,
follow the following:
●Set the parking brake.
●On uphill grades or on a down-
hill slope, turn the front wheels
in the direction of the curb.
●On uphill grades or on a down-
hill slope, also secure the vehi-
cle, for instance with a wheel
chock.
WARNING
The desired speed can be incor-
rectly adjusted or called up by
mistake. There is a risk of an acci-
dent. Adjust the desired speed to
the traffic conditions. Watch traf-
fic closely and actively intervene
where appropriate.
WARNING
Risk of accident due to too high
speed differences to other vehi-
cles, for instance in the following
situations:
●When fast approaching a slowly
moving vehicle.
There is a risk of injuries or dan-
ger to life. Watch t raffic closely
and actively intervene where
appropriate.
●Vehicle suddenly swerving into
own lane.
●When fast approaching stand-
ing vehicles.
WARNING
When towing with Toyota Supra
Safety enabled or Cruise Control
switched on, individual functions
may not work correctly. There is a
risk of accident. Switch off all Toy-
ota Supra Safety and Cruise Con-
trol before towing.
Page 242 of 372

2423-1. CONTROLS
desired functions. The
hand-held transmitter for the
particular system is required in
order to program the remote
control.
Before selling the vehicle, delete
the stored functions for the sake
of security.
If possible, do not install the
antenna of the remote-con-
trolled system, e.g. the garage
door drive, near metal objects to
ensure the best possible opera-
tion.Additional questions are
answered by:
Your Toyota dealer.
www.homelink.com on the
Internet.
HomeLink is a registered trade-
mark of Gentex Corporation.
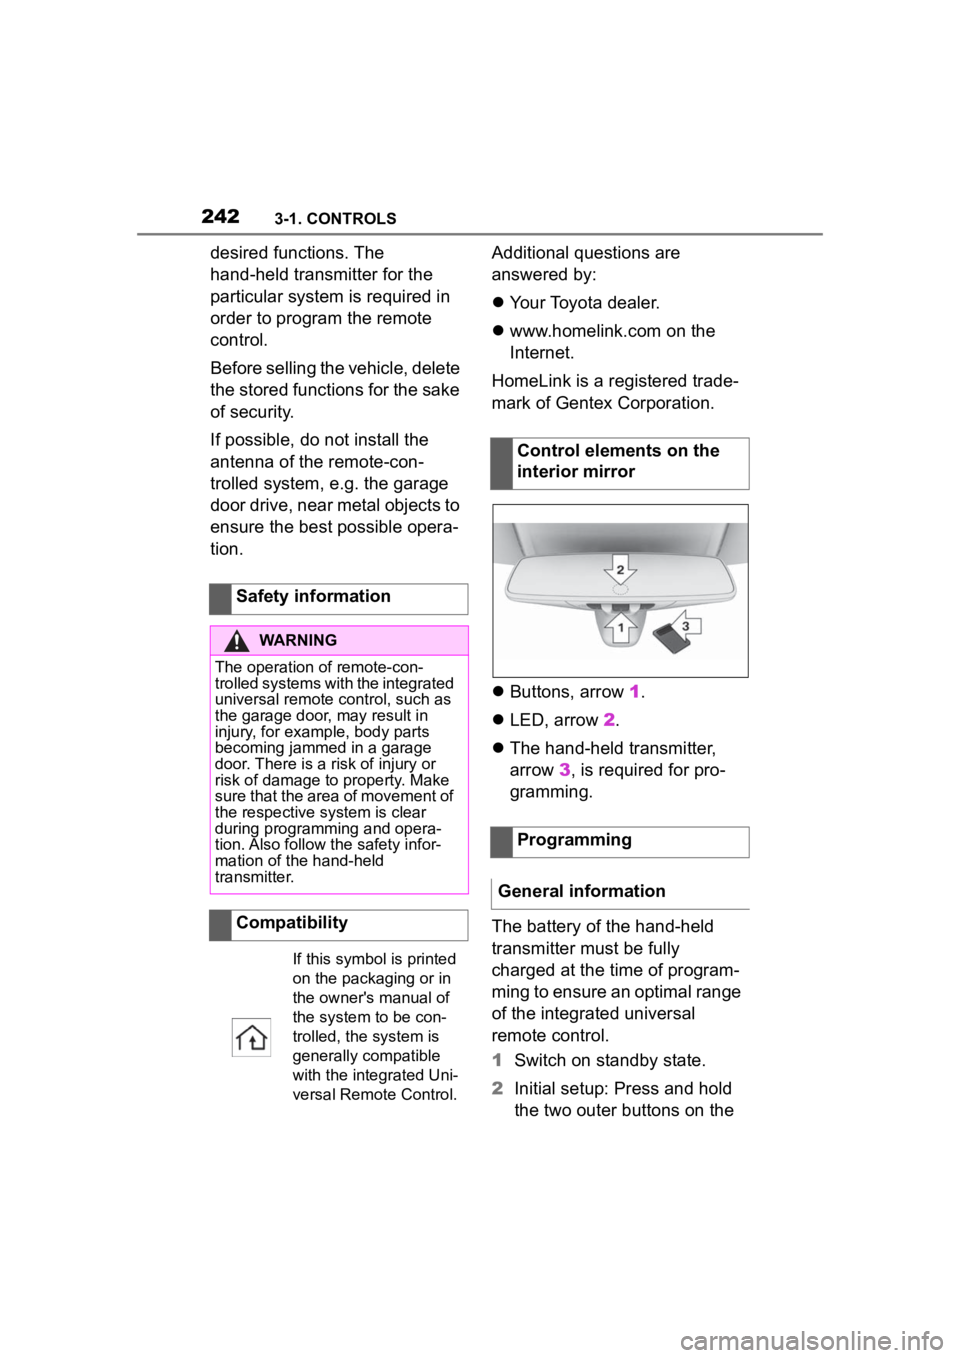
Buttons, arrow 1.
LED, arrow 2.
The hand-held transmitter,
arrow 3, is required for pro-
gramming.
The battery of the hand-held
transmitter must be fully
charged at the time of program-
ming to ensure an optimal range
of the integrated universal
remote control.
1 Switch on standby state.
2 Initial setup: Press and hold
the two outer buttons on the
Safety information
WARNING
The operation of remote-con-
trolled systems with the integrated
universal remote c
ontrol, such as
the garage door, may result in
injury, for example, body parts
becoming jammed in a garage
door. There is a risk of injury or
risk of damage to property. Make
sure that the area of movement of
the respective system is clear
during programming and opera-
tion. Also follow the safety infor-
mation of the hand-held
transmitter.
Compatibility
If this symbol is printed
on the packaging or in
the owner's manual of
the system to be con-
trolled, the system is
generally compatible
with the integrated Uni-
versal Remote Control.
Control elements on the
interior mirror
Programming
General information
Page 250 of 372

2503-1. CONTROLS
Verizon’s online registration
link: (http://www.verizonwire-
less.com/wcms/con-
sumer/register-signal-booster.
html).
AT&T online registration link
(https://secu-
rec45.securewebses-
sion.com/attsignal-booster.co
m/).
U.S.Cellular online registra-
tion link (http://www.uscellu-
lar.com/uscellular/support/fcc-
booster-registration.jsp).
Before use you must register
your booster device with your
wireless provider.
If you should be requested by
the FCC to cease operating your
booster you are not allowed to
insert your mobile phone in the
charging tray anymore unless
the booster is permanently
deactivated by your Toyota
dealer.
You must not remove the
booster from the car nor use it
with any other than the prein-
stalled coupling device or
antenna. Any modification of the
existing antenna or coupling
device as well as the use of
other antennas or coupling
devices will cause the cease of
the booster’s operating license.
The booster device fulfills the
network protections tandards as
required by the FCC, such as intermodulation limits, oscillation
detection and gainlimits.
Booster Manufacturer: Kathrein
Automotive
Model Number: LTECOMPB0
Part Number: 6803145-01
FCC-ID: 2ACC7LTECOMPB0
Page 251 of 372

2513-1. CONTROLS
3
CONTROLS
This chapter describes all stan-
dard, country-specific and
optional features offered with
the series. It also describes fea-
tures and functions that are not
necessarily available in your
vehicle, e.g., due to the selected
options or country versions. This
also applies to safety-related
functions and systems. When
using these functions and sys-
tems, the applicable laws and
regulations must be observed.The vehicle interior contains
multiple storage compartments
for stowing objects.
Pull the handle.
The light in the glove compart-
ment switches on.
Fold cover closed.
Storage compar t-
ments
Vehicle features and
options
Safety information
WARNING
Loose objects or devices with a
cable connection to the vehicle,
for instance mobile phones, can
be thrown into the car’s interior
while driving, for
instance in the
event of an accident or during
braking and evasive maneuvers.
There is a risk of injury. Secure
loose objects or devices with a
cable connection to the vehicle in
the car’s interior.
NOTICE
Anti-slip pads such as anti-slip
mats can damage the dashboard.
There is a risk of damage to prop-
erty. Do not use anti-slip pads.
Storage compartments
Glove compartment
Safety information
WARNING
Folded open, the glove compart-
ment protrudes in the car's inte-
rior. Objects in the glove
compartment can be thrown into
the car's interior w hile driving, for
instance in the event of an acci-
dent or during braking and eva-
sive maneuvers. There is a risk of
injury. Always close the glove
compartment immediately after
using it.
Opening
Closing