2023 TOYOTA RAV4 PRIME air filter
[x] Cancel search: air filterPage 4 of 662

4TABLE OF CONTENTS
Parking Support Brake func-tion (rear-crossing vehicles).................................... 402
Driving mode select switch .................................... 404
Trail Mode ..................... 405
Driving assist systems .. 407
5-6. Driving tips Winter driving tips ......... 413
Utility vehicle precautions .................................... 416
6-1. Using the air conditioning
system and defogger
Automatic air conditioning
system ......................... 422
Remote Air Conditioning System ........................ 431
Heated steering wheel/Front seat heaters/Front seat
heaters and ventila-
tors/Rear seat heaters. 433
6-2. Using the interior lights Interior lights list ............ 436
6-3. Using the storage features List of storage features . 438
Luggage compartment fea- tures ............................ 442
6-4. Using the other interior fea- tures
Other interior features ... 445
Power outlet (AC 120 V/1500 W)................................ 455
When the power outlet (AC 120 V 1500 W) cannot be
used properly .............. 461Garage door opener ......
463
7-1. Maintenance and care Cleaning and protecting the vehicle exterior ............ 472
Cleaning and protecting the vehicle interior ............. 475
7-2. Maintenance Maintenance requirements.................................... 478
General maintenance .... 480
Emission inspection and maintenance (I/M) pro-
grams .......................... 482
7-3. Do-it-yourself maintenance Do-it-yourself service pre-cautions ....................... 484
Hood .............................. 486
Positioning a floor jack .. 487
Engine compartment ..... 489
12-volt battery................ 495
Tires .............................. 497
Tire inflation pressure .... 509
Wheels .......................... 511
Air conditioning filter ...... 513
Cleaning the DC/DC Con- verter air intake vent and fil-
ter ................................ 515
Wiper insert replacement .................................... 519
Electronic key battery .... 522
Checking and replacing fuses ............................ 524
Headlight aim ................ 527
Light bulb
s ..................... 528
6Interior features
7Maintenance and care
Page 89 of 662
892-1. Plug-in hybrid system
2
Plug-in hybrid system
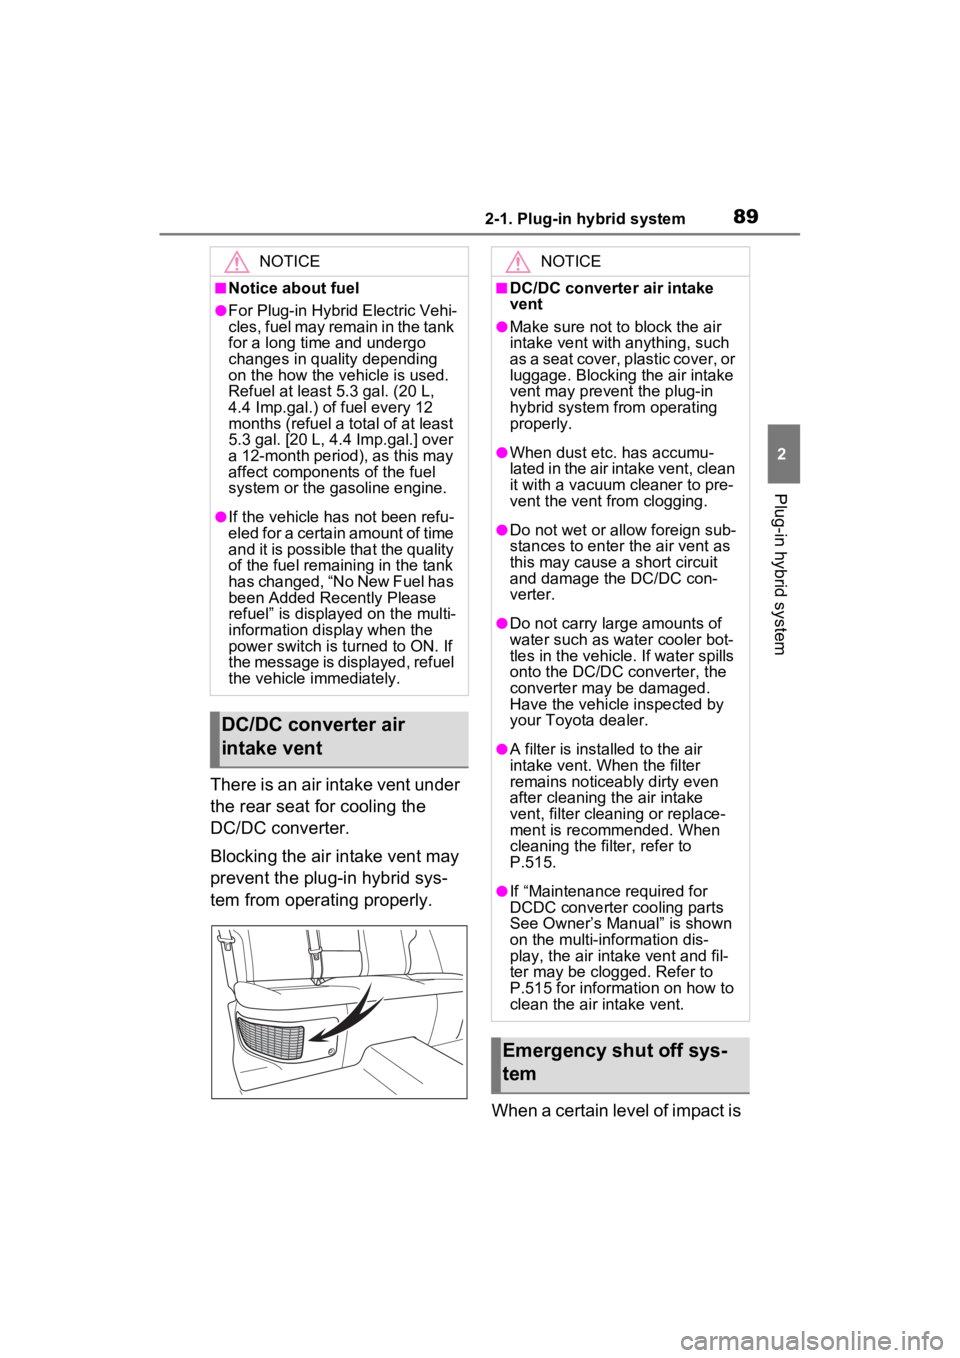
There is an air intake vent under
the rear seat for cooling the
DC/DC converter.
Blocking the air intake vent may
prevent the plug-in hybrid sys-
tem from operating properly.When a certain level of impact is
NOTICE
■Notice about fuel
●For Plug-in Hybrid Electric Vehi-
cles, fuel may remain in the tank
for a long time and undergo
changes in quality depending
on the how the vehicle is used.
Refuel at least 5.3 gal. (20 L,
4.4 Imp.gal.) of fuel every 12
months (refuel a total of at least
5.3 gal. [20 L, 4.4 Imp.gal.] over
a 12-month period), as this may
affect components of the fuel
system or the gasoline engine.
●If the vehicle has not been refu-
eled for a certain amount of time
and it is possible that the quality
of the fuel remaining in the tank
has changed, “No New Fuel has
been Added Recently Please
refuel” is displayed on the multi-
information display when the
power switch is turned to ON. If
the message is displayed, refuel
the vehicle immediately.
DC/DC converter air
intake vent
NOTICE
■DC/DC converter air intake
vent
●Make sure not to block the air
intake vent with anything, such
as a seat cover, plastic cover, or
luggage. Blocking the air intake
vent may prevent the plug-in
hybrid system from operating
properly.
●When dust etc. has accumu-
lated in the air intake vent, clean
it with a vacuum cleaner to pre-
vent the vent from clogging.
●Do not wet or allow foreign sub-
stances to enter the air vent as
this may cause a short circuit
and damage the DC/DC con-
verter.
●Do not carry large amounts of
water such as water cooler bot-
tles in the vehicle. If water spills
onto the DC/DC converter, the
converter may be damaged.
Have the vehicle inspected by
your Toyota dealer.
●A filter is installed to the air
intake vent. When the filter
remains noticeably dirty even
after cleaning the air intake
vent, filter cleaning or replace-
ment is recommended. When
cleaning the filter, refer to
P.515.
●If “Maintenance required for
DCDC converter cooling parts
See Owner’s Manual” is shown
on the multi-information dis-
play, the air intake vent and fil-
ter may be clogged. Refer to
P.515 for information on how to
clean the air intake vent.
Emergency shut off sys-
tem
Page 424 of 662

4266-1. Using the air conditioning system and defogger
from entering the vehicle interior
and helping to cool the vehicle
when the outside air temperature
is high.
●Outside/recirculated air mode may
automatically switch depending on
the temperature setting or the
inside temperature.
■When the outside temperature
exceeds 75°F (24°C) and the air
conditioning system is on
●In order to reduce the air condi-
tioning power consumption, the air
conditioning system may switch to
recirculated air mode automati-
cally. This may a lso reduce fuel
consumption.
●Recirculated air mode is selected
as a default mode when the power
switch is turned to ON.
●It is possible to switch to outside
air mode at any time by pressing
the outside/recirculated air mode
switch.
■Operation of the air condition-
ing system in Eco drive mode
●In Eco drive mode, the air condi-
tioning system is controlled as fol-
lows to prioritize fuel efficiency:
• Engine speed and compressor
operation controlled to restrict
heating/cooling capacity
• Fan speed restr icted when auto-
matic mode is selected
●To improve air conditioning perfor-
mance, perform the following
operations:
• Turn off Eco drive mode ( P.404)
• Turn off Eco air conditioning mode
●When the driving mode is set to
Eco driving mode, the Eco air con-
ditioning mode will be turned on
automatically. Even in this case,
the Eco air conditioning mode can
be turned off by pressing the Eco
air conditioning mode switch.
■When the outside temperature
falls to nearly 32°F (0°C)
The dehumidification function may not operate even when “A/C” switch
is pressed.
■Ventilation and air conditioning
odors
●To let fresh air in, set the air condi-
tioning system to the outside air
mode.
●During use, various odors from
inside and outside the vehicle may
enter into and accumulate in the
air conditioning system. This may
then cause odor
to be emitted
from the vents.
●To reduce potential odors from
occurring:
• It is recommended that the air
conditioning system be set to out-
side air mode prior to turning the
vehicle off.
• The start timing of the blower may be delayed for a short period of
time immediately after the air con-
ditioning system is started in auto-
matic mode.
●When parking, the system auto-
matically switches to outside air
mode to encourage better air cir-
culation throughout the vehicle,
helping to reduce odors that occur
when starting the vehicle.
■Using the Intelligent Assistant
(if equipped)
Air conditioning system can be
operated using the Intelligent Assis-
tant.
For details regarding the Intelligent
Assistant, refer to the “MULTIME-
DIA OWNER’S MANUAL”.
■Air conditioning filter
P.513
■Air conditioning system refrig-
erant
●A label regarding the refrigerant of
the air conditioning system is
attached to the h ood at the loca-
tion shown in the following illustra-
tion.
Page 469 of 662

471
7
7
Maintenance and care
Maintenance and care
7-1. Maintenance and careCleaning and protecting the vehicle exterior .......... 472
Cleaning and protecting the vehicle interior ........... 475
7-2. Maintenance Maintenance requirements.................................. 478
General maintenance.. 480
Emission inspection and maintenance (I/M) pro-
grams ........................ 482
7-3. Do-it-yourself mainte- nance
Do-it-yourself service pre- cautions ..................... 484
Hood ........................... 486
Positioning a floor jack 487
Engine compartment ... 489
12-volt battery ............. 495
Tires ............................ 497
Tire inflation pressure . 509
Wheels ......... ...............511
Air conditioning filter .... 513
Cleaning the DC/DC Con- verter air intake vent and
filter ........................... 515
Wiper insert replacement .................................. 519
Electronic key battery.. 522
Checking and replacing fuses.......................... 524Headlight aim ..............
527
Light bulbs ................... 528
Page 483 of 662
4857-3. Do-it-yourself maintenance
7
Maintenance and care
DC/DC Con-
verter air
intake vent
( P.515)• Vacuum cleaner,
etc,
• Phillips screw- driver
Light bulbs
( P.528)
• Bulb with same
number and watt-
age rating as origi-
nal
• Phillips-head screwdriver
• Flathead screw- driver
• Wrench
Headlight aim
( P.527)Phillips-head
screwdriver
Radiator and
condenser
( P.492)
Tire inflation
pressure
( P.509)• Tire pressure
gauge
• Compressed air source
Washer fluid
( P.494)
• Water or washer
fluid containing
antifreeze (for win-
ter use)
• Funnel (used only for adding water or
washer fluid)
WARNING
The engine compartment contains
many mechanisms and fluids that
may move suddenly, become hot,
or become electrically energized.
To avoid death or serious injury,
observe the following precautions.
ItemsParts and tools■When working on the engine
compartment
●Make sure that “IGNITION ON”
on the multi-information display
and the “READY” indicator are
both off.
●Keep hands, clothing and tools
away from the moving fan.
●Do not leave anything that may
burn easily, such as paper and
rags, in the engine compart-
ment.
●Do not smoke, cause sparks or
expose an open flame to fuel.
Fuel fumes are flammable.
■When working near the elec-
tric cooling fan or radiator
grille
Be sure the power switch is OFF.
With the power switch in ON, the
electric cooling fa n may automati-
cally start to run if the air condi-
tioning is on and/or the coolant
temperature is high. ( P.492)
■Safety glasses
Wear safety gla sses to prevent
flying or falling material, fluid
spray, etc., from getting in your
eyes.
NOTICE
■If you remove the air cleaner
filter
Driving with the air cleaner filter
removed may cause excessive
engine wear due to dirt in the air.
Page 511 of 662
5137-3. Do-it-yourself maintenance
7
Maintenance and care
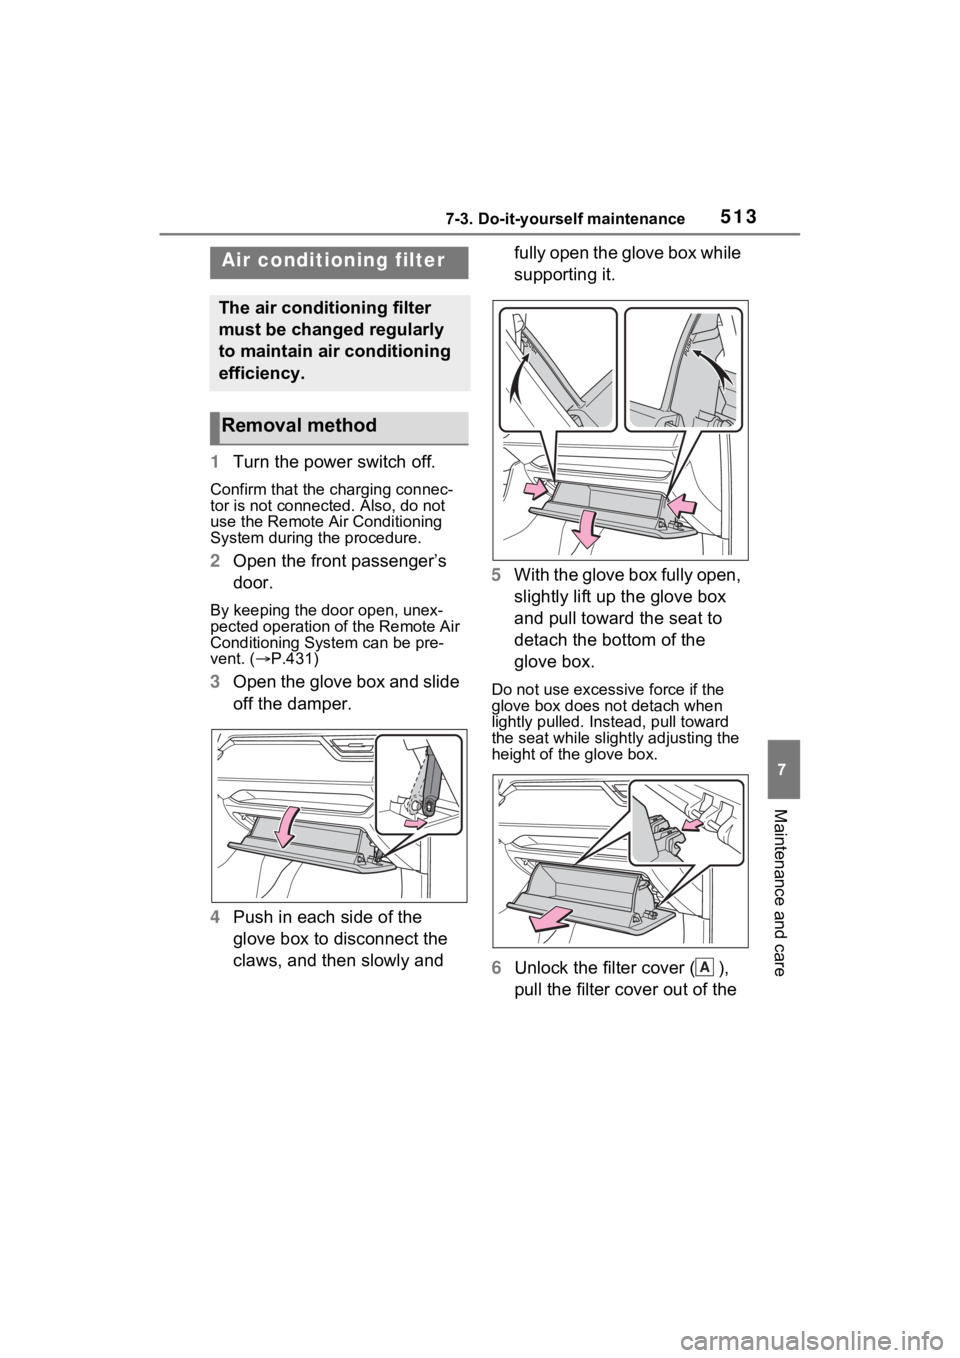
1Turn the power switch off.
Confirm that the charging connec-
tor is not connect ed. Also, do not
use the Remote Air Conditioning
System during the procedure.
2 Open the front passenger’s
door.
By keeping the door open, unex-
pected operation of the Remote Air
Conditioning System can be pre-
vent. ( P.431)
3 Open the glove box and slide
off the damper.
4 Push in each side of the
glove box to disconnect the
claws, and then slowly and fully open the glove box while
supporting it.
5 With the glove box fully open,
slightly lift up the glove box
and pull toward the seat to
detach the bottom of the
glove box.Do not use excessi ve force if the
glove box does not detach when
lightly pulled. Ins tead, pull toward
the seat while slightly adjusting the
height of the glove box.
6 Unlock the filter cover ( ),
pull the filter cover out of the
Air condition ing filter
The air conditioning filter
must be changed regularly
to maintain air conditioning
efficiency.
Removal method
A
Page 512 of 662
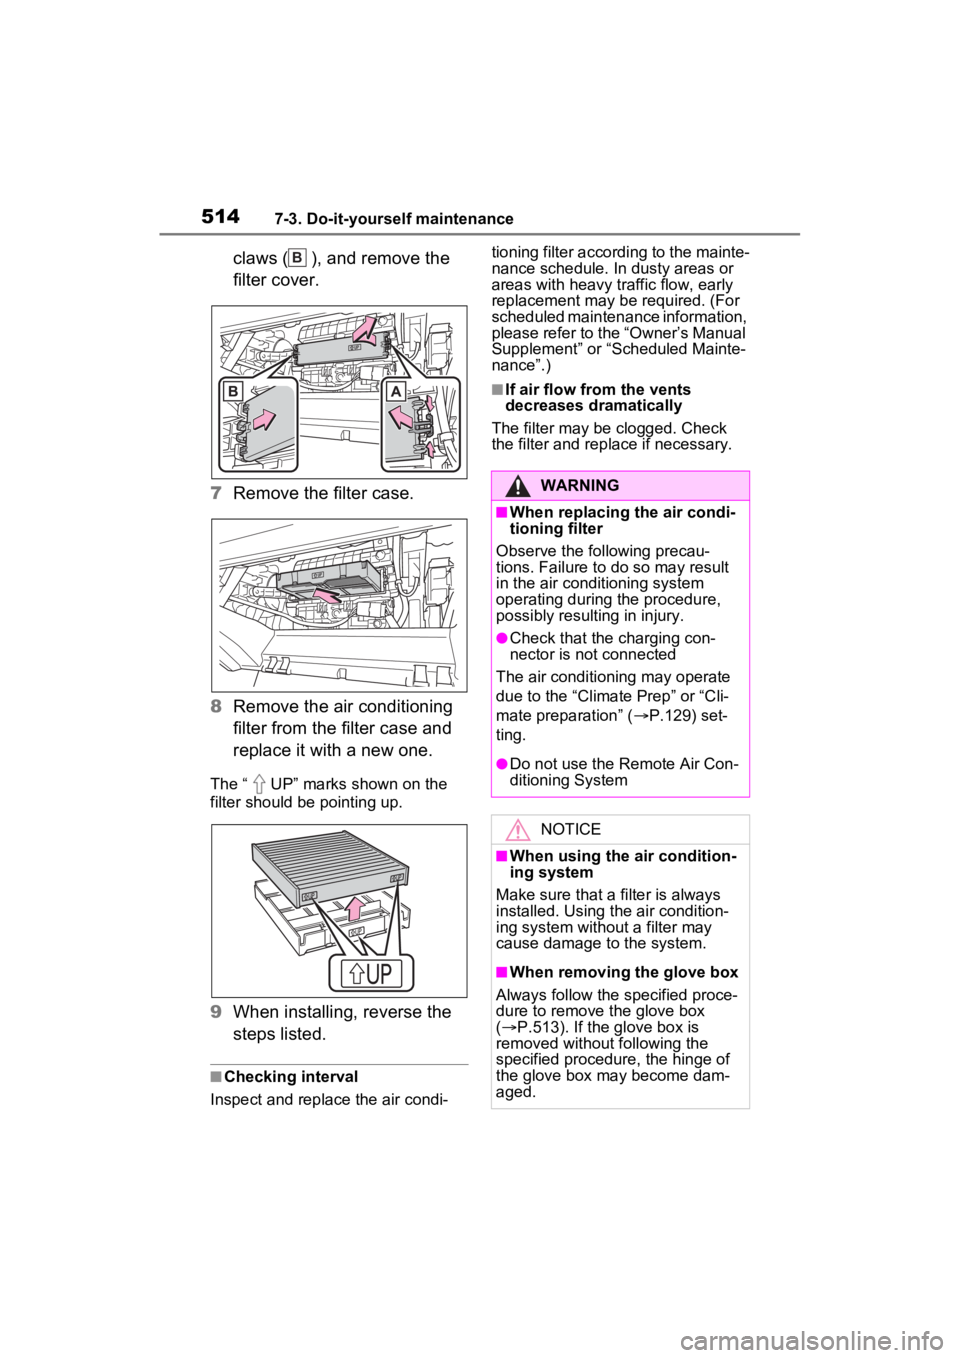
5147-3. Do-it-yourself maintenance
claws ( ), and remove the
filter cover.
7 Remove the filter case.
8 Remove the air conditioning
filter from the filter case and
replace it with a new one.
The “ UP” marks shown on the
filter should be pointing up.
9When installing, reverse the
steps listed.
■Checking interval
Inspect and replace the air condi- tioning filter according to the mainte-
nance schedule. In dusty areas or
areas with heavy traffic flow, early
replacement may be required. (For
scheduled maintenance information,
please refer to the “Owner’s Manual
Supplement” or “Scheduled Mainte-
nance”.)
■If air flow from the vents
decreases dramatically
The filter may be clogged. Check
the filter and rep lace if necessary.
B
WARNING
■When replacing the air condi-
tioning filter
Observe the following precau-
tions. Failure to do so may result
in the air conditioning system
operating during the procedure,
possibly resulting in injury.
●Check that the charging con-
nector is not connected
The air conditioning may operate
due to the “Climat e Prep” or “Cli-
mate preparation” ( P.129) set-
ting.
●Do not use the Remote Air Con-
ditioning System
NOTICE
■When using the air condition-
ing system
Make sure that a filter is always
installed. Using the air condition-
ing system without a filter may
cause damage to the system.
■When removing the glove box
Always follow the specified proce-
dure to remove the glove box
( P.513). If the glove box is
removed without following the
specified procedure, the hinge of
the glove box may become dam-
aged.
Page 513 of 662
5157-3. Do-it-yourself maintenance
7
Maintenance and care
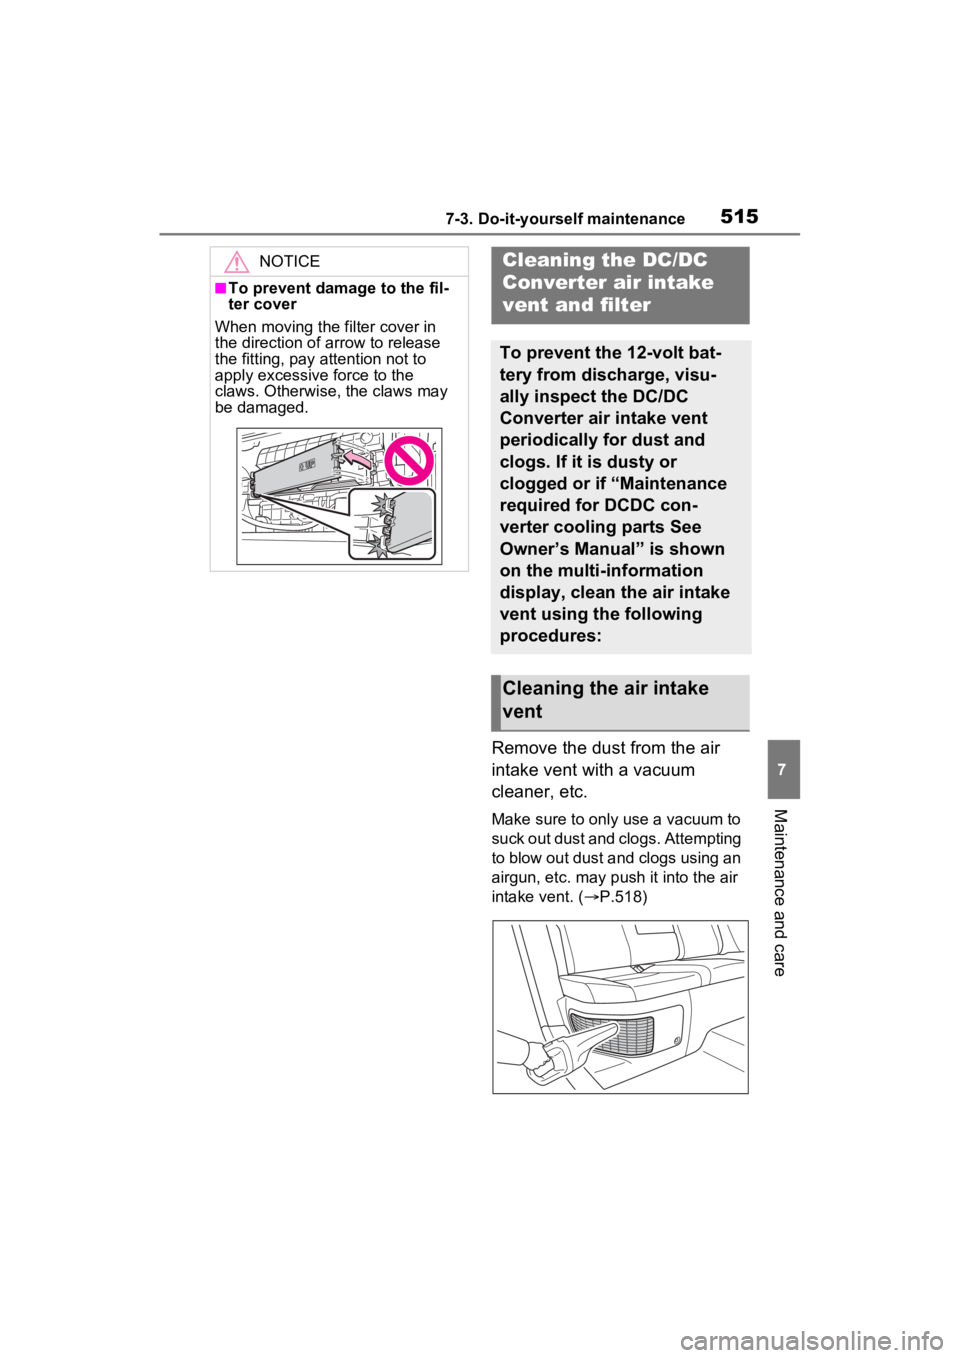
Remove the dust from the air
intake vent with a vacuum
cleaner, etc.
Make sure to only use a vacuum to
suck out dust and clogs. Attempting
to blow out dust and clogs using an
airgun, etc. may push it into the air
intake vent. (P.518)
NOTICE
■To prevent damage to the fil-
ter cover
When moving the filter cover in
the direction of arrow to release
the fitting, pay attention not to
apply excessive force to the
claws. Otherwise, the claws may
be damaged.
Cleaning the DC/DC
Converter air intake
vent and filter
To prevent the 12-volt bat-
tery from discharge, visu-
ally inspect the DC/DC
Converter air intake vent
periodically for dust and
clogs. If it is dusty or
clogged or if “Maintenance
required for DCDC con-
verter cooling parts See
Owner’s Manual” is shown
on the multi-information
display, clean the air intake
vent using the following
procedures:
Cleaning the air intake
vent