2023 TOYOTA RAV4 HYBRID towed
[x] Cancel search: towedPage 4 of 586

4TABLE OF CONTENTS
5-1. Using the air conditioning
system and defogger
Automatic air conditioning
system ......................... 342
Heated steering wheel/seat heaters/seat ventilators 349
5-2. Using the interior lights Interior lights list ............ 352
5-3. Using the storage features List of storage features . 355
Luggage compartment fea- tures ............................ 359
5-4. Using the other interior fea- tures
Other interior features ... 364
Garage door opener...... 375
6-1. Maintenance and care Cleaning and protecting the vehicle exterior ............ 384
Cleaning and protecting the vehicle interior ............. 387
6-2. Maintenance Maintenance requirements.................................... 390
General maintenance.... 392
Emission inspection and maintenance (I/M) pro-
grams .......................... 394
6-3. Do-it-yourself maintenance Do-it-yourself service pre-cautions ....................... 396Hood ..............................
398
Positioning a floor jack .. 399
Engine compartment ..... 401
12-volt battery................ 407
Tires .............................. 409
Tire inflation pressure .... 420
Wheels .......................... 422
Air conditioning filter ...... 424
Cleaning the hybrid battery (traction battery) air intake
vent.............................. 426
Wiper insert replacement .................................... 429
Wireless remote control/elec- tronic key battery ......... 433
Checking and replacing fuses ............................ 436
Headlight aim ................ 438
Light bulbs ..................... 439
7-1. Essential information Emergency flashers....... 448
If your vehicle has to be stopped in an emergency.................................... 449
If the vehicle is submerged or water on the road is rising.................................... 450
7-2. Steps to take in an emer- gency
If your vehicle needs to be towed ........................... 451
If you think something is wrong........................... 455
5Interior features
6Maintenance and care7When trouble arises
Page 77 of 586

771-4. Hybrid system
1
For safety and security
WARNING
●If electric wires are exposed
inside or outside your vehicle,
an electric shock may occur.
Never touch exposed electric
wires.
●If a fire occurs in the Hybrid
Electric Vehicle, leave the vehi-
cle as soon as possible. Never
use a fire extinguisher that is
not meant for electric fires.
Using even a small amount of
water may be dangerous.
●If your vehicle needs to be
towed, do so with four wheels
raised. If the wheels connected
to the electric motor (traction
motor) are on the ground when
towing, the motor may continue
to generate electricity. This may
cause a fire. (P.451)
●Carefully inspect the ground
under the vehicle. If you find
that liquid has leaked onto the
ground, the fuel system may
have been damaged. Leave the
vehicle as soon as possible.
AXAH54L models*
●If a fluid leak occurs, do not
touch the fluid as it may be
strong alkaline electrolyte from
the hybrid battery (traction bat-
tery). If it comes into contact
with your skin or eyes, wash it
off immediately with a large
amount of water or, if possible,
boric acid solution. Seek imme-
diate medical attention.
*: The model code is indicated on
the Certification Regulation
Label. ( P.496)
AXAL54L models*
●Do not touch the battery if liquid
is leaking from or adhering to it.
If electrolyte (carbonic-based
organic electrolyte) from the
hybrid battery (traction battery)
comes into contact with the
eyes or skin, it could cause
blindness or skin wounds. In the
unlikely event that it comes into
contact with the eyes or skin,
wash it off immediately with a
large amount of water, and seek
immediate medical attention.
●If electrolyte is leaking from the
hybrid battery (traction battery),
do not approac h the vehicle.
Even in the unlikely event that
the hybrid battery (traction bat-
tery) is damaged, the internal
construction of the battery will
prevent a large amount of elec-
trolyte from leaking out. How-
ever, any electrolyte that does
leak out will give off a vapor.
This vapor is an irritant to skin
and eyes and could cause acute
poisoning if inhaled.
●Do not bring burning or high-
temperature items close to the
electrolyte.
The electrolyte may ignite and
cause a fire.
*: The model code is indicated on
the Certificatio n Regulation
Label. ( P.496)
■Hybrid battery (traction bat-
tery)
●AXAL54L models*: Your vehi-
cle contains a sealed lithium-ion
battery.
*: The model code is indicated on
the Certificatio n Regulation
Label. ( P.496)
Page 136 of 586
1343-1. Key information
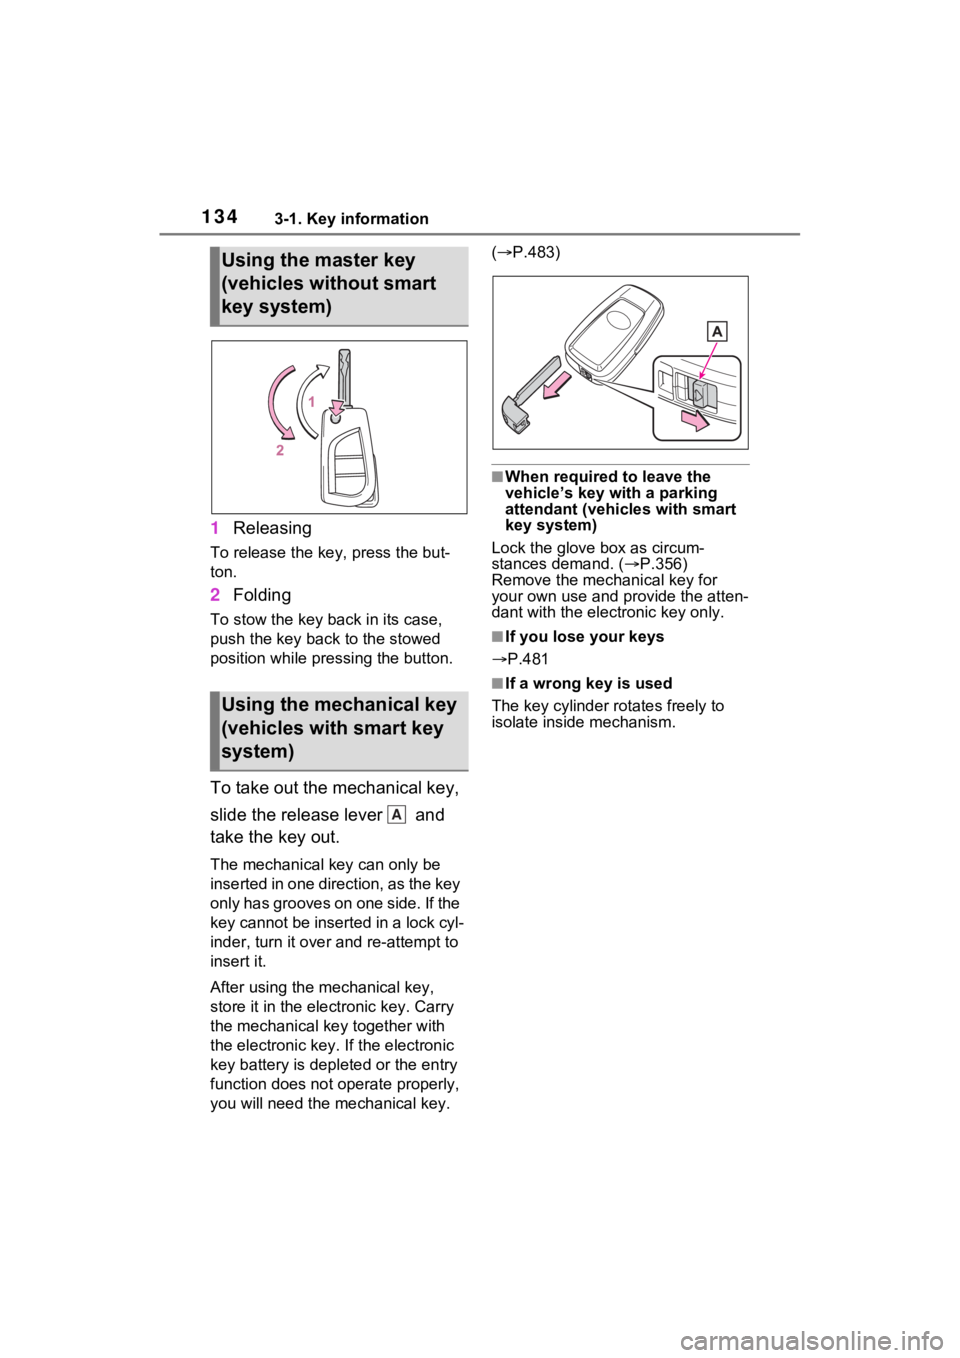
1Releasing
To release the key, press the but-
ton.
2Folding
To stow the key back in its case,
push the key back to the stowed
position while pre ssing the button.
To take out the mechanical key,
slide the release lever and
take the key out.
The mechanical key can only be
inserted in one direction, as the key
only has grooves on one side. If the
key cannot be inserted in a lock cyl-
inder, turn it over and re-attempt to
insert it.
After using the mechanical key,
store it in the electronic key. Carry
the mechanical key together with
the electronic key. If the electronic
key battery is dep leted or the entry
function does not operate properly,
you will need the m echanical key. (
P.483)
■When required to leave the
vehicle’s key wi th a parking
attendant (vehicles with smart
key system)
Lock the glove box as circum-
stances demand. ( P.356)
Remove the mechanical key for
your own use and p rovide the atten-
dant with the elec tronic key only.
■If you lose your keys
P.481
■If a wrong key is used
The key cylinder rotates freely to
isolate inside mechanism.
Using the master key
(vehicles without smart
key system)
Using the mechanical key
(vehicles with smart key
system)
A
Page 152 of 586
1503-2. Opening, closing and locking the doors
Door operation setting off.
■Preventing unintentional opera-
tion of the Hands Free Power
Back Door (vehicles with Hands
Free Power Back Door)
When an electronic key is in the
operation range, the Hands Free
Power Back Door may operate unin-
tentionally, so be careful in the fol-
lowing situations.
●When a large amount of water is
applied to the rear bumper, such
as when the vehicle is being
washed or in heavy rain
●When dirt is wiped off the rear
bumper
●When a small animal or small
object, such as a ball, moves
under the rear bumper
●When an object is moved from
under the rear bumper
●If someone is swinging their legs
while sitting on the rear bumper
●If the legs or another part of some-
one’s body contacts the rear
bumper while passi ng by the vehi-
cle
●When the vehicle is parked near
an electrical noise source which
affects the sensitivity of the Hands
Free Power Back Door, such as a
pay parking spot , gas station,
electrically heated road, or fluo-
rescent light
●When the vehicle is near a TV
tower, electric power plant, radio
station, large display, airport or
other facility that generates strong
radio waves or electrical noise
●When the vehicle is parked in a
place where objects such as
plants are near the rear bumper
●If luggage, etc. is s et near the rear
bumper
●If accessories or a vehicle cover is
installed/removed near the rear
bumper
●When the vehicle is being towed To prevent unintentional operation,
turn the Hands F
ree Power Back
Door operation setting off. ( P.110)
■When reconnecting the 12-volt
battery
To enable the power back door to
operate properly, close the back
door manually.
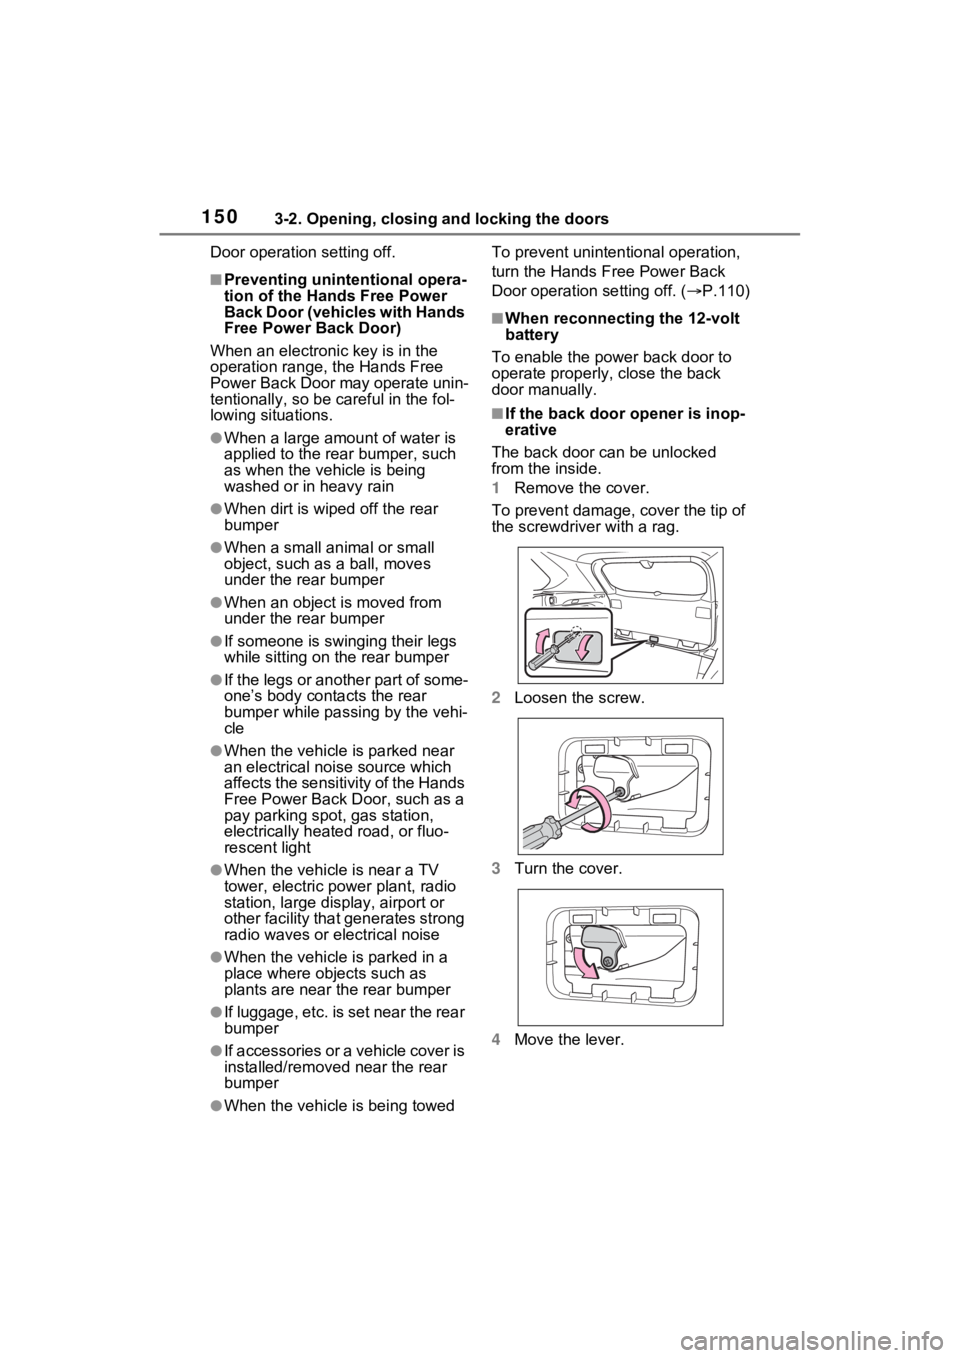
■If the back door opener is inop-
erative
The back door can be unlocked
from the inside.
1 Remove the cover.
To prevent damage, cover the tip of
the screwdriver with a rag.
2 Loosen the screw.
3 Turn the cover.
4 Move the lever.
Page 169 of 586
1673-3. Adjusting the seats
3
Before driving
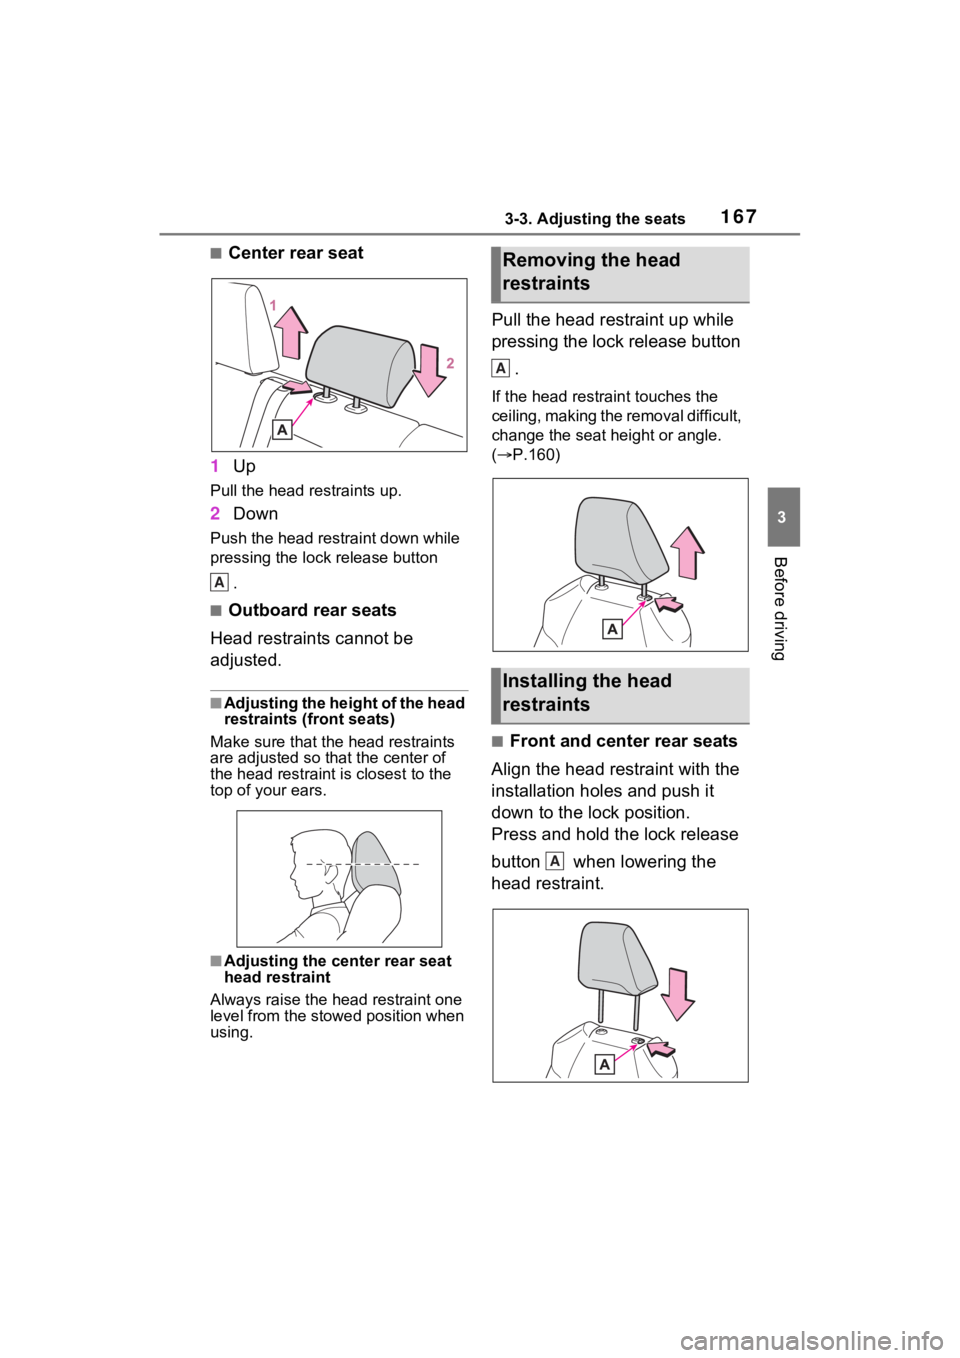
■Center rear seat
1 Up
Pull the head restraints up.
2Down
Push the head restraint down while
pressing the lock release button
.
■Outboard rear seats
Head restraints cannot be
adjusted.
■Adjusting the height of the head
restraints (front seats)
Make sure that the head restraints
are adjusted so that the center of
the head restraint is closest to the
top of your ears.
■Adjusting the center rear seat
head restraint
Always raise the head restraint one
level from the stowed position when
using.
Pull the head restraint up while
pressing the lock release button
.
If the head restrai nt touches the
ceiling, making the removal difficult,
change the seat height or angle.
( P.160)
■Front and center rear seats
Align the head restraint with the
installation holes and push it
down to the lock position.
Press and hold the lock release
button when lowering the
head restraint.
A
Removing the head
restraints
Installing the head
restraints
A
A
Page 210 of 586
2084-1. Before driving
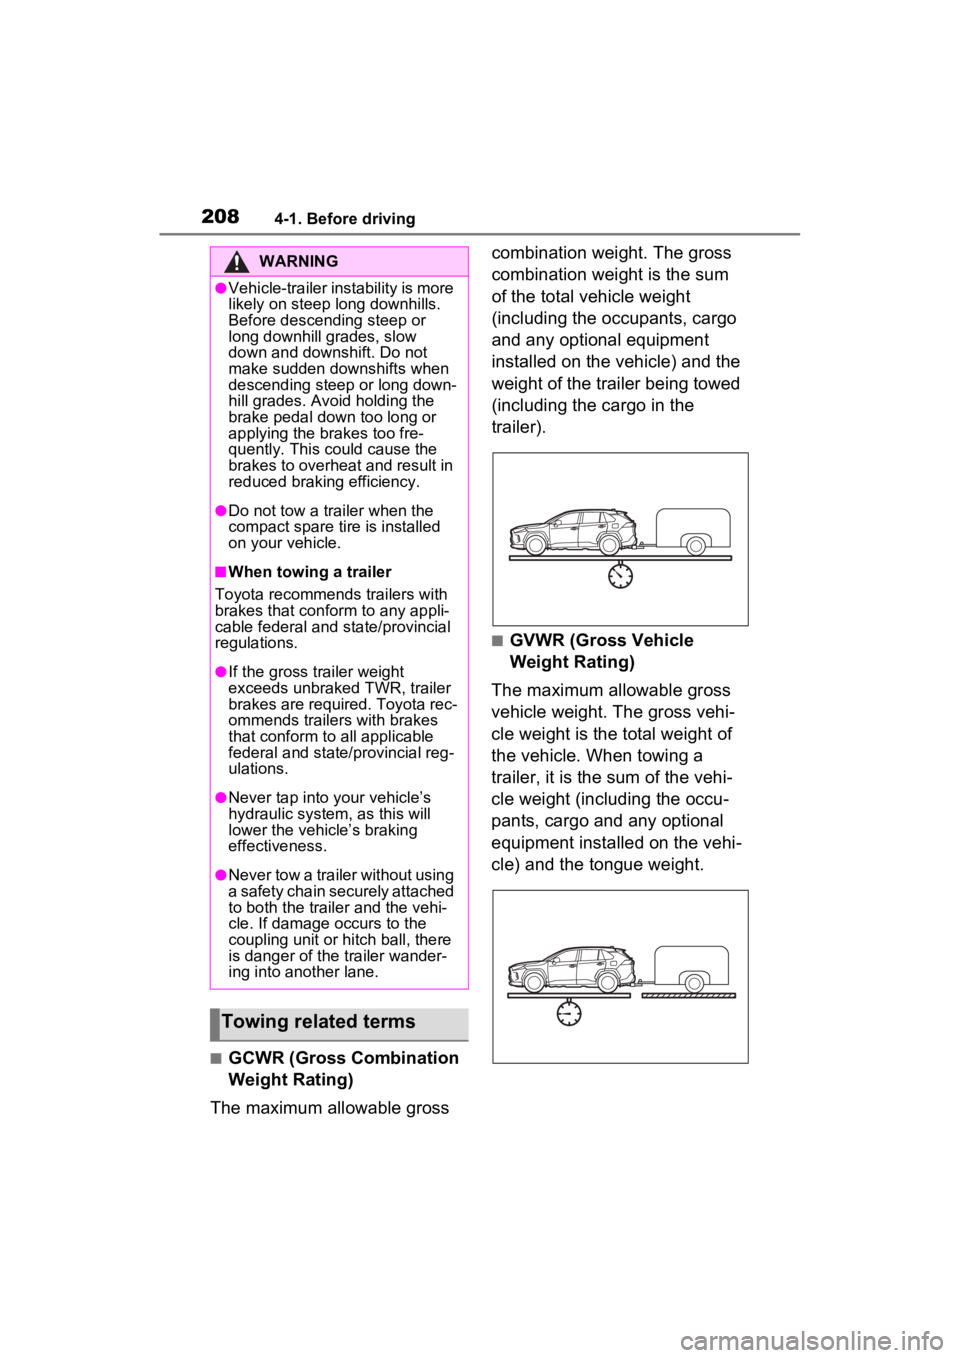
■GCWR (Gross Combination
Weight Rating)
The maximum allowable gross combination weight. The gross
combination weight is the sum
of the total vehicle weight
(including the occupants, cargo
and any optional equipment
installed on the vehicle) and the
weight of the trailer being towed
(including the cargo in the
trailer).
■GVWR (Gross Vehicle
Weight Rating)
The maximum allowable gross
vehicle weight. The gross vehi-
cle weight is the total weight of
the vehicle. When towing a
trailer, it is the sum of the vehi-
cle weight (including the occu-
pants, cargo and any optional
equipment installed on the vehi-
cle) and the tongue weight.
WARNING
●Vehicle-trailer instability is more
likely on steep long downhills.
Before descending steep or
long downhill grades, slow
down and downshift. Do not
make sudden downshifts when
descending steep or long down-
hill grades. Avoid holding the
brake pedal down too long or
applying the brakes too fre-
quently. This could cause the
brakes to overheat and result in
reduced braking efficiency.
●Do not tow a trailer when the
compact spare tire is installed
on your vehicle.
■When towing a trailer
Toyota recommends trailers with
brakes that confor m to any appli-
cable federal and state/provincial
regulations.
●If the gross trailer weight
exceeds unbraked TWR, trailer
brakes are required. Toyota rec-
ommends trailers with brakes
that conform to all applicable
federal and state/provincial reg-
ulations.
●Never tap into y our vehicle’s
hydraulic system, as this will
lower the vehicle’s braking
effectiveness.
●Never tow a trailer without using
a safety chain securely attached
to both the traile r and the vehi-
cle. If damage occurs to the
coupling unit or hitch ball, there
is danger of the trailer wander-
ing into another lane.
Towing related terms
Page 218 of 586
2164-1. Before driving
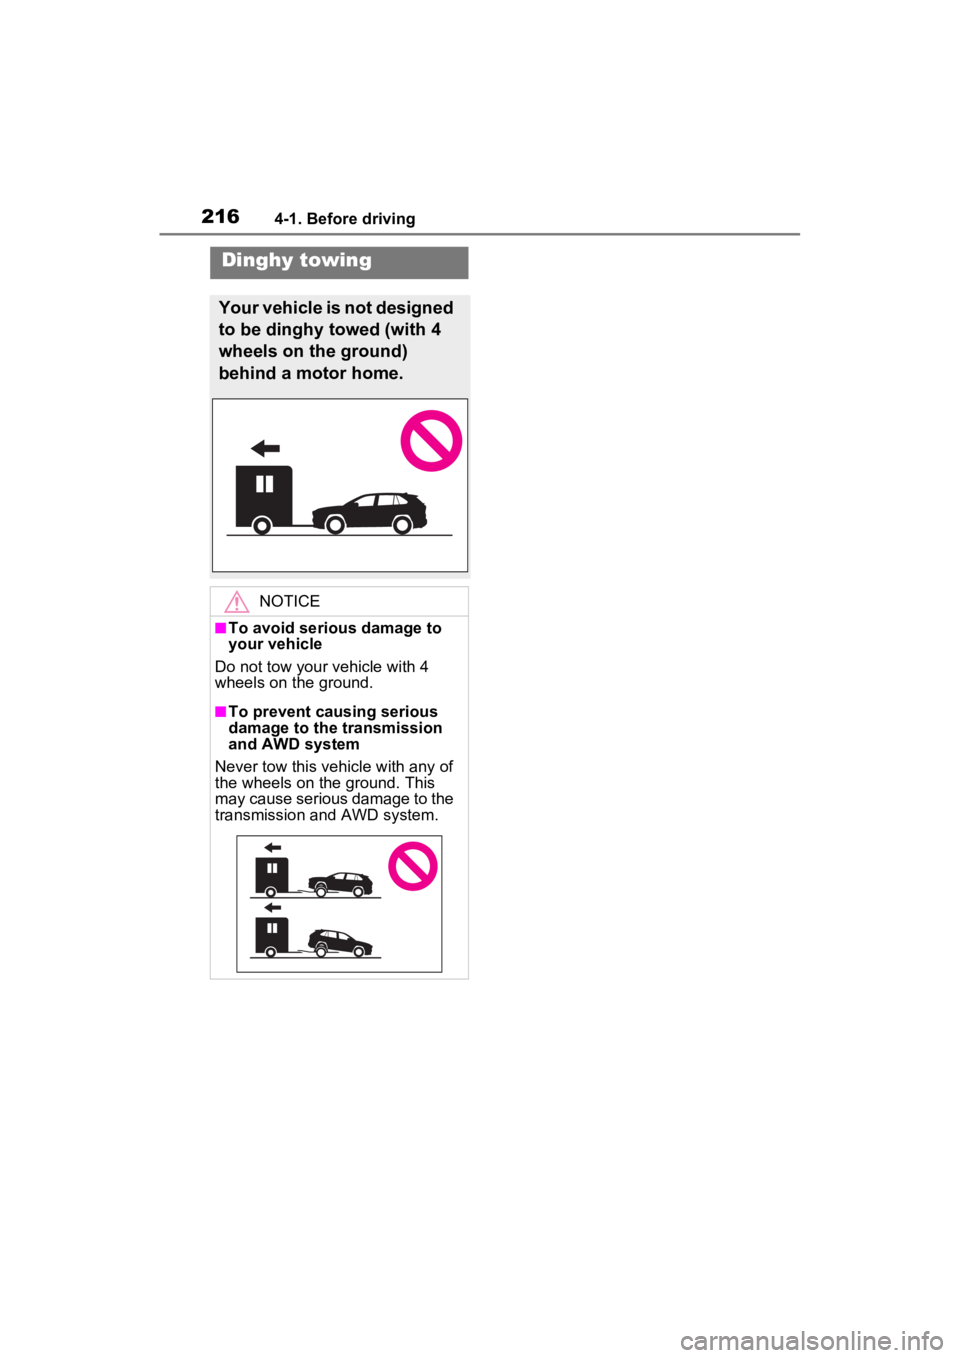
Dinghy towing
Your vehicle is not designed
to be dinghy towed (with 4
wheels on the ground)
behind a motor home.
NOTICE
■To avoid serious damage to
your vehicle
Do not tow your vehicle with 4
wheels on the ground.
■To prevent causing serious
damage to the transmission
and AWD system
Never tow this vehicle with any of
the wheels on the ground. This
may cause serious damage to the
transmission and AWD system.
Page 244 of 586

2424-3. Operating the lights and wipers
fog, mist, ice, dirt, etc.
• The windshield is cracked or dam- aged
• The front camera is deformed or
dirty
• When the temperature of the front
camera is extremely high
• Surrounding brightness levels are equal to those of h eadlights, tail
lights or fog lights
• When headlights or tail lights of vehicles ahead are turned off,
dirty, changing color, or not aimed
properly
• When the vehicle is hit by water,
snow, dust, etc. fr om a preceding
vehicle
• When driving thr ough an area of
intermittently changing brightness
and darkness
• When frequently and repeatedly
driving ascending/descending
roads, or roads with rough, bumpy
or uneven surfaces (such as
stone-paved roads, gravel roads,
etc.)
• When frequently and repeatedly
taking curves or driving on a wind-
ing road
• There is a highly reflective object
ahead of the vehicle, such as a
sign or mirror
• The back of a vehicle ahead is
highly reflective, such as a con-
tainer on a truck
• The vehicle’s headlights are dam-
aged or dirty, or are not aimed
properly
• The vehicle is listing or tilting due
to a flat tire, a trailer being towed,
etc.
• The high beams and low beams
are repeatedly being switched
between in an abnormal manner
• The driver believes that the high
beams may be causing problems
or distress to other drivers or
pedestrians nearby
■If “Headlight System Malfunc-
tion Visit Your D ealer” is dis-
played on the multi-information
display
The system may be malfunctioning. Have the vehicle inspected by your
Toyota dealer.
■Temporarily lowering sensor
sensitivity
The sensitivity of the sensor can be
temporarily lowered.
1 Turn the power switch to OFF
while the following conditions are
met.
●The headlight switch is in or
position.
●The headlight switch lever is in
high beam position.
●Automatic High Beam switch is
on.
2 Turn the power switch to ON.
3 Within 60 seconds after step 2,
repeat pulling the headlight
switch lever to the original posi-
tion then pushing it to the high
beam position qui ckly 10 times,
then leave the lever in the origi-
nal position.
4 If the sensitivity is changed, the
Automatic High Beam indicator
is turn on and off 3 times.
Automatic High Beam (headlights)
may turn on even when the vehicle
is stopped.
■Switching to the high
beams
Push the lever away from you.
The Automatic High Beam indicator
will turn off and the headlight high
beam indicator will turn on.
Pull the lever to its original position
to activate Automatic High Beam
system again.
Turning the high beams
on/off manually