2023 TOYOTA RAV4 HYBRID air filter
[x] Cancel search: air filterPage 4 of 586

4TABLE OF CONTENTS
5-1. Using the air conditioning
system and defogger
Automatic air conditioning
system ......................... 342
Heated steering wheel/seat heaters/seat ventilators 349
5-2. Using the interior lights Interior lights list ............ 352
5-3. Using the storage features List of storage features . 355
Luggage compartment fea- tures ............................ 359
5-4. Using the other interior fea- tures
Other interior features ... 364
Garage door opener...... 375
6-1. Maintenance and care Cleaning and protecting the vehicle exterior ............ 384
Cleaning and protecting the vehicle interior ............. 387
6-2. Maintenance Maintenance requirements.................................... 390
General maintenance.... 392
Emission inspection and maintenance (I/M) pro-
grams .......................... 394
6-3. Do-it-yourself maintenance Do-it-yourself service pre-cautions ....................... 396Hood ..............................
398
Positioning a floor jack .. 399
Engine compartment ..... 401
12-volt battery................ 407
Tires .............................. 409
Tire inflation pressure .... 420
Wheels .......................... 422
Air conditioning filter ...... 424
Cleaning the hybrid battery (traction battery) air intake
vent.............................. 426
Wiper insert replacement .................................... 429
Wireless remote control/elec- tronic key battery ......... 433
Checking and replacing fuses ............................ 436
Headlight aim ................ 438
Light bulbs ..................... 439
7-1. Essential information Emergency flashers....... 448
If your vehicle has to be stopped in an emergency.................................... 449
If the vehicle is submerged or water on the road is rising.................................... 450
7-2. Steps to take in an emer- gency
If your vehicle needs to be towed ........................... 451
If you think something is wrong........................... 455
5Interior features
6Maintenance and care7When trouble arises
Page 347 of 586
3455-1. Using the air conditioning system and defogger
5
Interior features
cally. This may also reduce fuel
consumption.
●Recirculated air mode is selected
as a default mode when the power
switch is turned to ON.
●It is possible to switch to outside
air mode at any time by pressing
the outside/recirculated air mode
switch.
■Operation of the air condition-
ing system in Eco drive mode
●In Eco drive mode, the air condi-
tioning system is controlled as fol-
lows to prioritize fuel efficiency:
• Engine speed and compressor operation controlled to restrict
heating/cooling capacity
• Fan speed restr icted when auto-
matic mode is selected
●To improve air conditioning perfor-
mance, perform the following
operations:
• Adjust the fan speed
• Turn off Eco drive mode ( P.323)
• Turn off Eco air conditioning mode
●When the driving mode is set to
Eco driving mode, the Eco air con-
ditioning mode will be turned on
automatically. Even in this case,
the Eco air conditioning mode can
be turned off by pressing the Eco
air conditioning mode switch.
■When the outside temperature
falls to nearly 32°F (0°C)
The dehumidification function may
not operate even when “A/C” switch
is pressed.
■Ventilation and air conditioning
odors
●To let fresh air in, set the air condi-
tioning system to the outside air
mode.
●During use, various odors from
inside and outside the vehicle may
enter into and a ccumulate in the
air conditioning system. This may
then cause odor to be emitted
from the vents.
●To reduce potential odors from occurring:
• It is recommended that the air conditioning system be set to out-
side air mode prior to turning the
vehicle off.
• The start timing of the blower may
be delayed for a short period of
time immediately after the air con-
ditioning system is started in auto-
matic mode.
●When parking, the system auto-
matically switches to outside air
mode to encourage better air cir-
culation throughout the vehicle,
helping to reduce odors that occur
when starting the vehicle.
■Using the Intelligent Assistant
(if equipped)
Air conditioning system can be
operated using the Intelligent Assis-
tant.
For details regarding the Intelligent
Assistant, refer to the “MULTIME-
DIA OWNER’S MANUAL”.
■Air conditioning filter
P.424
■Air conditioning system refrig-
erant
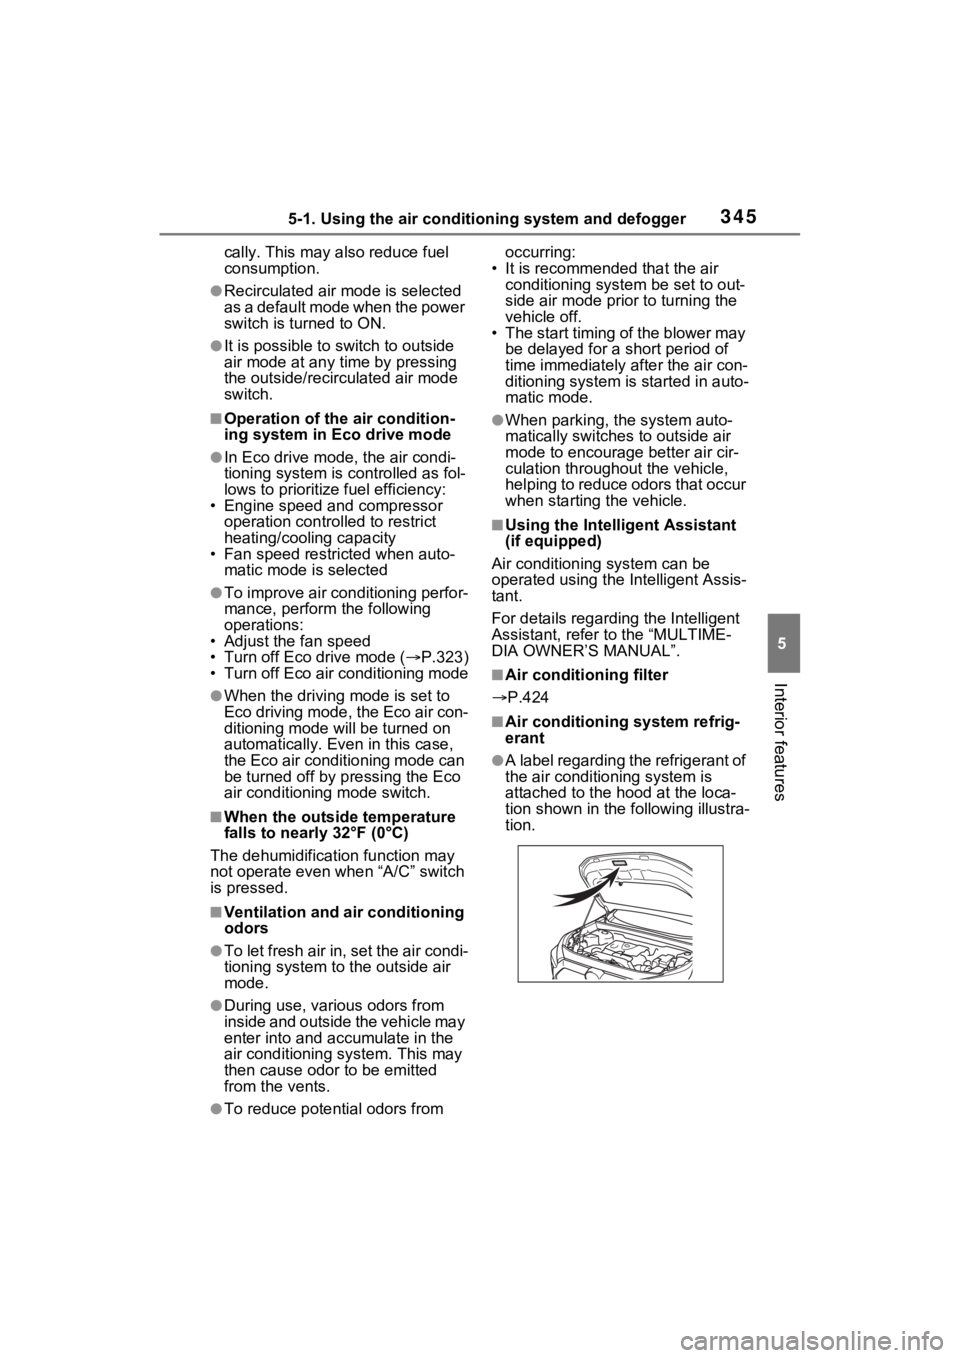
●A label regarding the refrigerant of
the air conditioning system is
attached to the h ood at the loca-
tion shown in the following illustra-
tion.
Page 385 of 586

383
6
6
Maintenance and care
Maintenance and care
6-1. Maintenance and careCleaning and protecting the vehicle exterior .......... 384
Cleaning and protecting the vehicle interior ........... 387
6-2. Maintenance Maintenance requirements.................................. 390
General maintenance.. 392
Emission inspection and maintenance (I/M) pro-
grams ........................ 394
6-3. Do-it-yourself mainte- nance
Do-it-yourself service pre- cautions ..................... 396
Hood ........................... 398
Positioning a floor jack 399
Engine compartment ... 401
12-volt battery ............. 407
Tires ............................ 409
Tire inflation pressure . 420
Wheels ......... ...............422
Air conditioning filter .... 424
Cleaning the hybrid battery (traction battery) air intake
vent ........................... 426
Wiper insert replacement .................................. 429
Wireless remote con- trol/electronic key battery
.................................. 433Checking and replacing
fuses .......................... 436
Headlight aim .............. 438
Light bulbs ................... 439
Page 399 of 586
3976-3. Do-it-yourself maintenance
6
Maintenance and care
Hybrid bat-
tery (traction
battery) air
intake vent
( P.426)• Vacuum cleaner,
etc,
• Phillips screw- driver
Light bulbs
( P.439)
• Bulb with same
number and watt-
age rating as origi-
nal
• Phillips-head screwdriver
• Flathead screw- driver
• Wrench
Headlight aim
( P.438)• Phillips-head
screwdriver
Radiator and
condenser
( P.404)
Tire inflation
pressure
( P.420)• Tire pressure
gauge
• Compressed air source
Washer fluid
( P.406)
• Water or washer
fluid containing
antifreeze (for win-
ter use)
• Funnel (used only for adding water or
washer fluid)
WARNING
The engine compartment contains
many mechanisms and fluids that
may move suddenly, become hot,
or become electrically energized.
To avoid death or serious injury,
observe the following precautions.
ItemsParts and tools■When working on the engine
compartment
●Make sure that “IGNITION ON”
on the multi-information display
and the “READY” indicator are
both off.
●Keep hands, clothing and tools
away from the moving fan.
●Be careful not to touch the
engine, power control unit, radi-
ator, exhaust manifold, etc. right
after driving as they may be hot.
Oil and other fluids may also be
hot.
●Do not leave anything that may
burn easily, such as paper and
rags, in the engine compart-
ment.
●Do not smoke, cause sparks or
expose an open flame to fuel.
Fuel fumes are flammable.
■When working near the elec-
tric cooling fan or radiator
grille
Be sure the power switch is OFF.
With the power switch in ON, the
electric cooling fa n may automati-
cally start to run if the air condi-
tioning is on and/or the coolant
temperature is high. ( P.404)
■Safety glasses
Wear safety gla sses to prevent
flying or falling material, fluid
spray, etc., from getting in your
eyes.
NOTICE
■If you remove the air cleaner
filter
Driving with the air cleaner filter
removed may cause excessive
engine wear due to dirt in the air.
Page 426 of 586
4246-3. Do-it-yourself maintenance
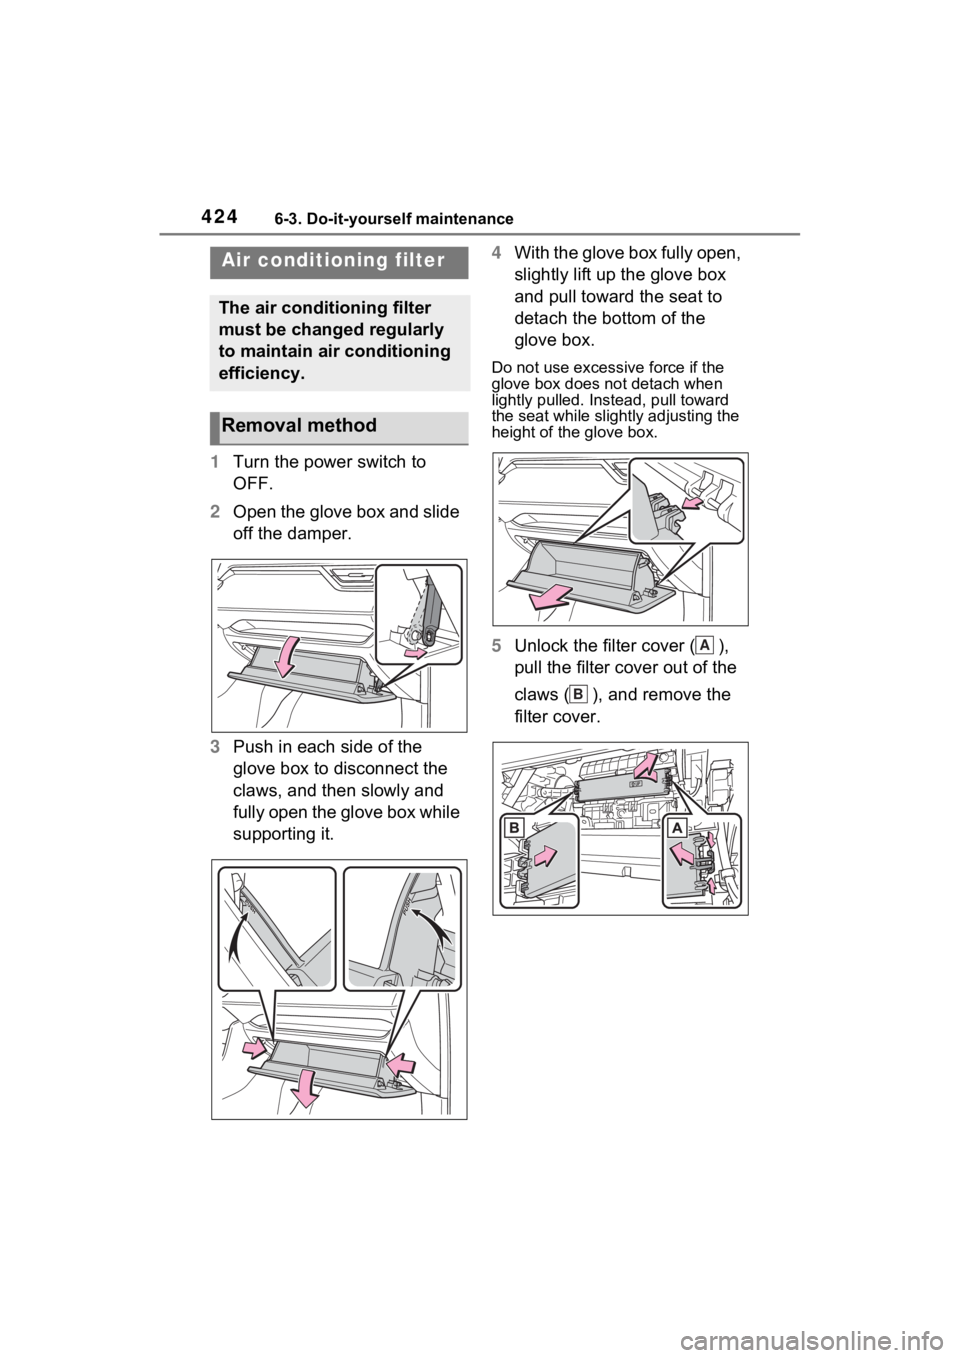
1Turn the power switch to
OFF.
2 Open the glove box and slide
off the damper.
3 Push in each side of the
glove box to disconnect the
claws, and then slowly and
fully open the glove box while
supporting it. 4
With the glove box fully open,
slightly lift up the glove box
and pull toward the seat to
detach the bottom of the
glove box.
Do not use excessi ve force if the
glove box does not detach when
lightly pulled. Ins tead, pull toward
the seat while slightly adjusting the
height of the glove box.
5 Unlock the filter cover ( ),
pull the filter cover out of the
claws ( ), and remove the
filter cover.
Air condition ing filter
The air conditioning filter
must be changed regularly
to maintain air conditioning
efficiency.
Removal method
A
B
Page 427 of 586
4256-3. Do-it-yourself maintenance
6
Maintenance and care
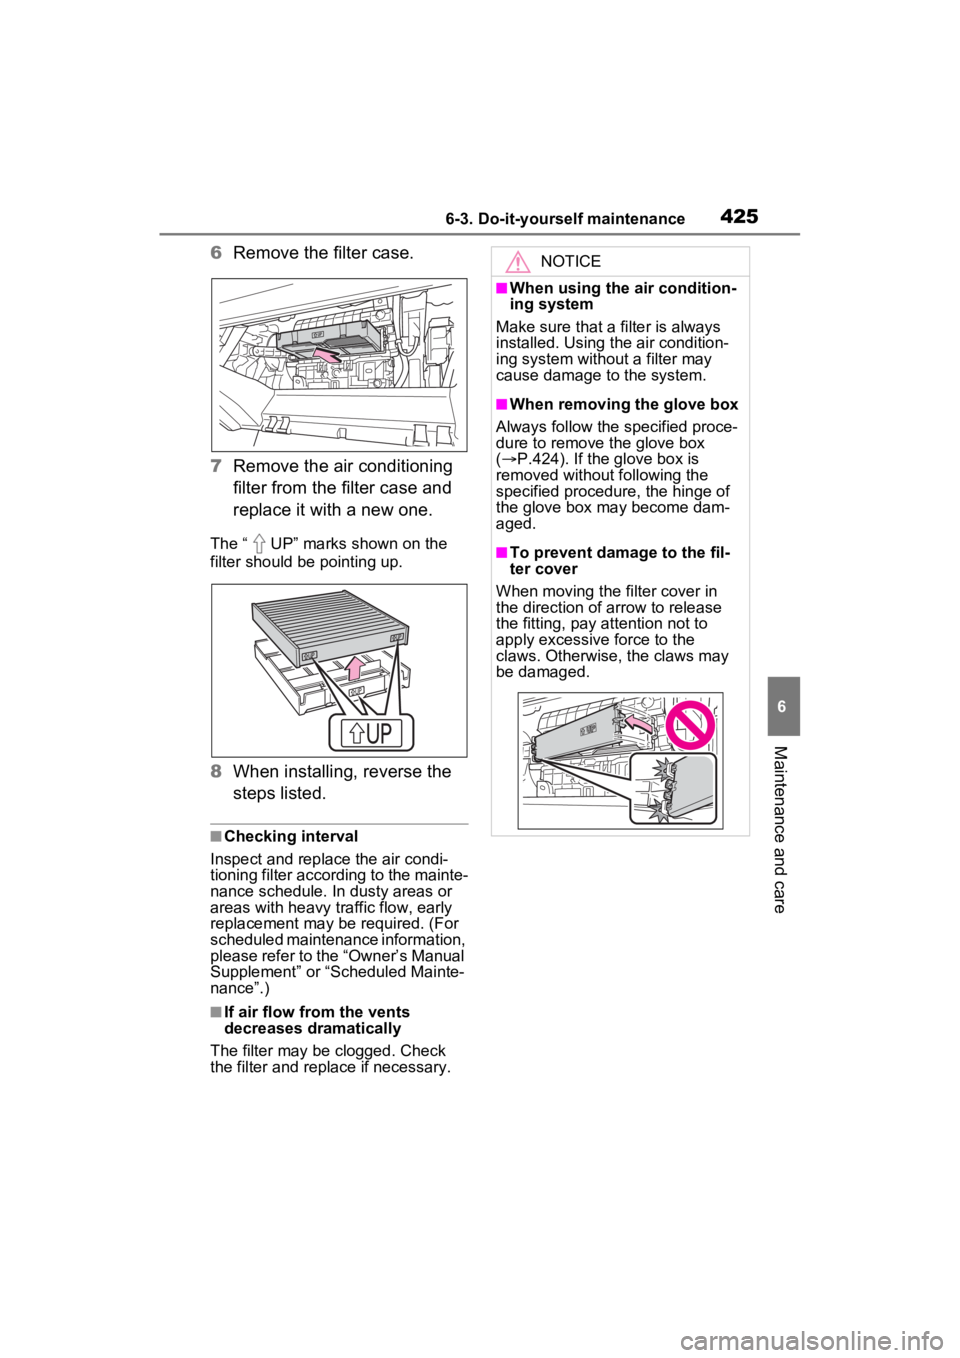
6Remove the filter case.
7 Remove the air conditioning
filter from the filter case and
replace it with a new one.
The “ UP” marks shown on the
filter should be pointing up.
8When installing, reverse the
steps listed.
■Checking interval
Inspect and replace the air condi-
tioning filter according to the mainte-
nance schedule. In dusty areas or
areas with heavy traffic flow, early
replacement may be required. (For
scheduled maintenance information,
please refer to the “Owner’s Manual
Supplement” or “Scheduled Mainte-
nance”.)
■If air flow from the vents
decreases dramatically
The filter may be clogged. Check
the filter and replace if necessary.
NOTICE
■When using the air condition-
ing system
Make sure that a filter is always
installed. Using the air condition-
ing system without a filter may
cause damage to the system.
■When removing the glove box
Always follow the specified proce-
dure to remove the glove box
( P.424). If the glove box is
removed without following the
specified procedure, the hinge of
the glove box may become dam-
aged.
■To prevent damage to the fil-
ter cover
When moving the filter cover in
the direction of arrow to release
the fitting, pay attention not to
apply excessive force to the
claws. Otherwise, the claws may
be damaged.
Page 428 of 586
4266-3. Do-it-yourself maintenance
■Scheduled maintenance of the
air intake vent is necessary
when
In some situations such as when the
vehicle is used frequently or in
heavy traffic or dusty areas, the air
intake vent may need to be cleaned
more regularly. For details, refer to
“Owner’s Warranty Information
Booklet” or “Owner’s Manual Sup-
plement”.
■Cleaning the air intake vent
Improper handling of the air intake
vent cover and filter may result in
damage to them. If you have any
concerns about cleaning the filter,
contact your Toyota dealer.
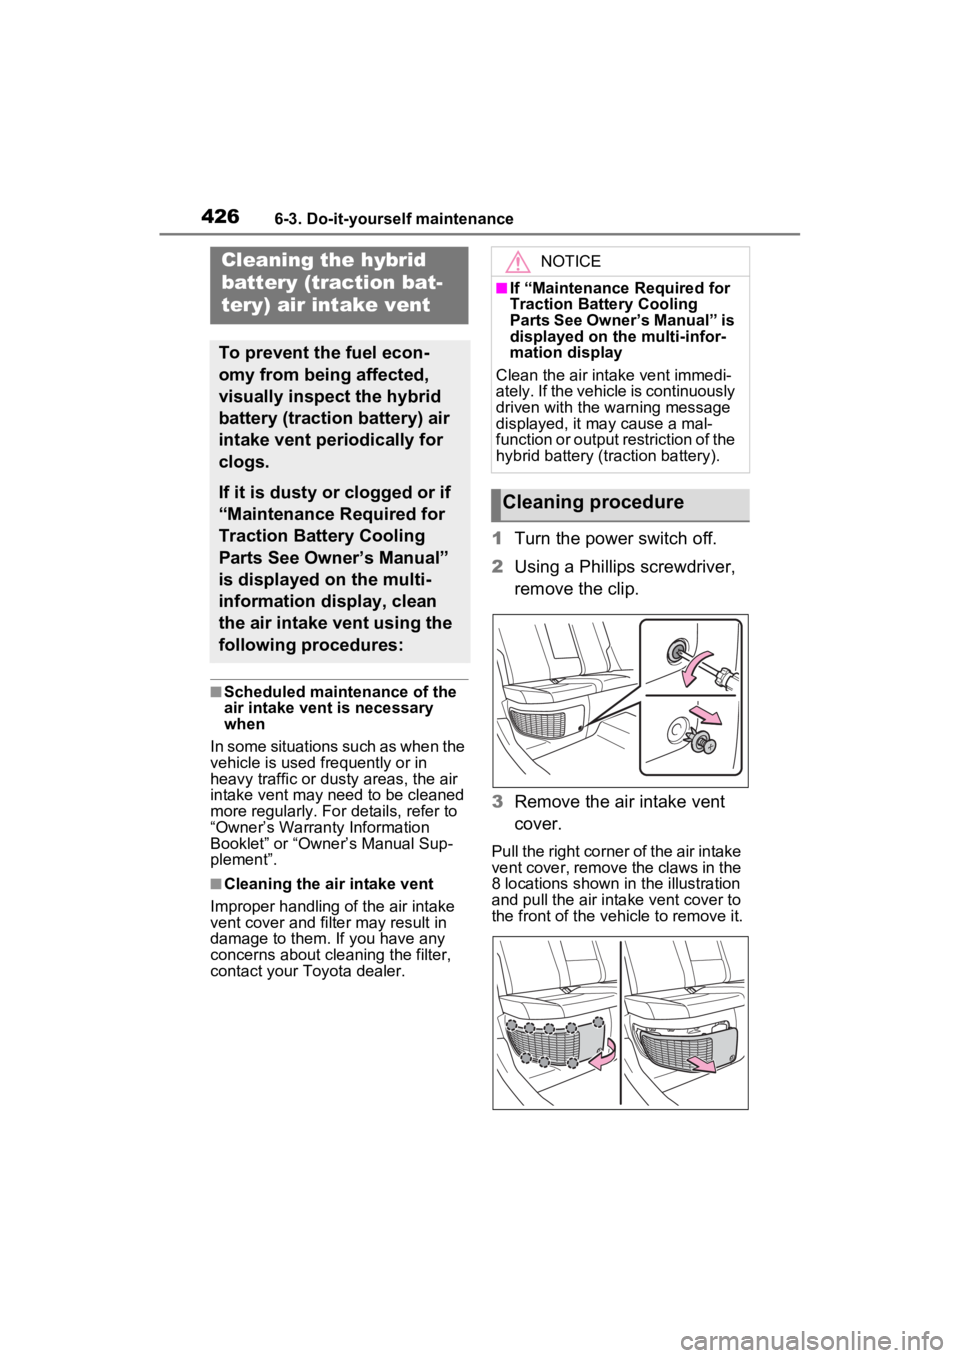
1 Turn the power switch off.
2 Using a Phillips screwdriver,
remove the clip.
3 Remove the air intake vent
cover.
Pull the right corner of the air intake
vent cover, remove the claws in the
8 locations shown in the illustration
and pull the air intake vent cover to
the front of the vehicle to remove it.
Cleaning the hybrid
battery (traction bat-
tery) air intake vent
To prevent the fuel econ-
omy from being affected,
visually inspect the hybrid
battery (traction battery) air
intake vent periodically for
clogs.
If it is dusty or clogged or if
“Maintenance Required for
Traction Battery Cooling
Parts See Owner’s Manual”
is displayed on the multi-
information display, clean
the air intake vent using the
following procedures:
NOTICE
■If “Maintenance Required for
Traction Battery Cooling
Parts See Owner’s Manual” is
displayed on the multi-infor-
mation display
Clean the air intake vent immedi-
ately. If the vehicle is continuously
driven with the warning message
displayed, it may cause a mal-
function or output restriction of the
hybrid battery (traction battery).
Cleaning procedure
Page 429 of 586
4276-3. Do-it-yourself maintenance
6
Maintenance and care
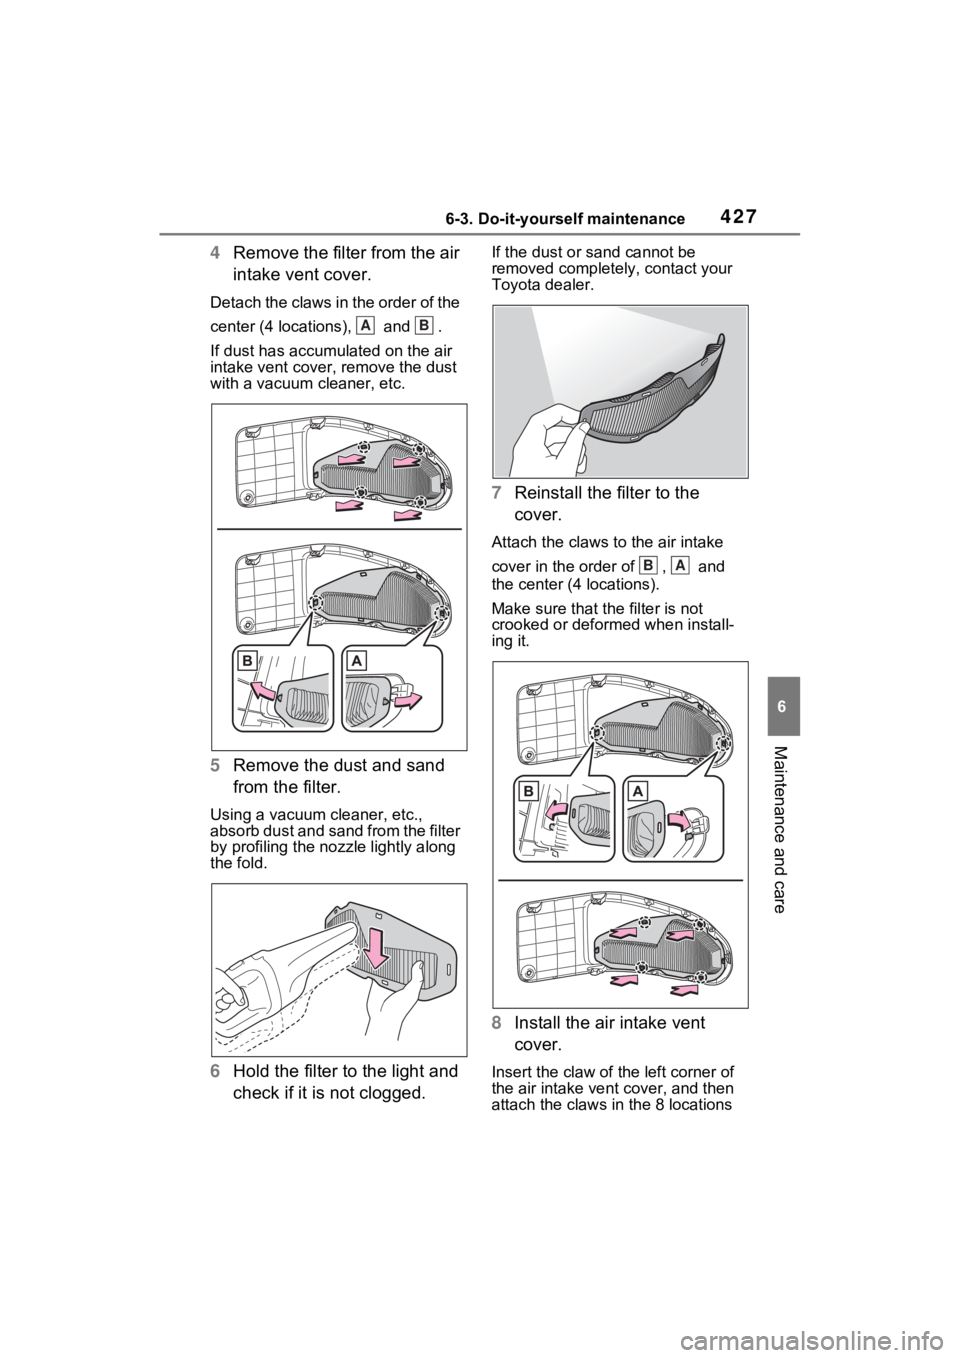
4Remove the filter from the air
intake vent cover.
Detach the claws in the order of the
center (4 locations), and .
If dust has accumulated on the air
intake vent cover, r emove the dust
with a vacuum cleaner, etc.
5 Remove the dust and sand
from the filter.
Using a vacuum cleaner, etc.,
absorb dust and sand from the filter
by profiling the nozz le lightly along
the fold.
6 Hold the filter to the light and
check if it is not clogged.
If the dust or sand cannot be
removed completely, contact your
Toyota dealer.
7Reinstall the filter to the
cover.
Attach the claws to the air intake
cover in the order of , and
the center (4 locations).
Make sure that the filter is not
crooked or deformed when install-
ing it.
8Install the air intake vent
cover.
Insert the claw of the left corner of
the air intake vent cover, and then
attach the claws in the 8 locations
AB
BA