2023 TOYOTA RAV4 HYBRID tires
[x] Cancel search: tiresPage 478 of 586
4767-2. Steps to take in an emergency
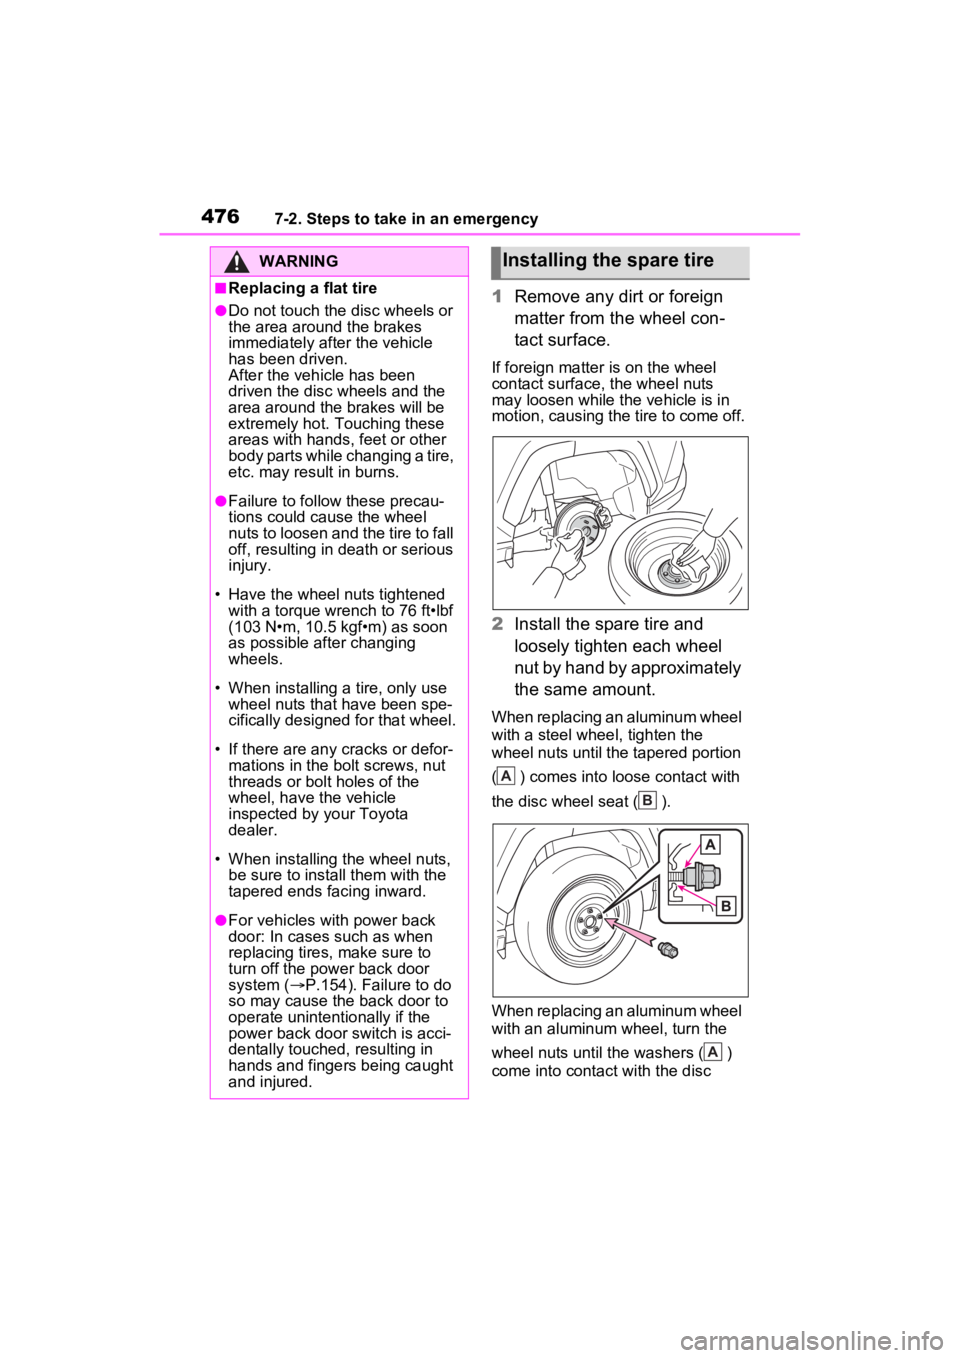
1Remove any dirt or foreign
matter from the wheel con-
tact surface.
If foreign matter is on the wheel
contact surface, the wheel nuts
may loosen while the vehicle is in
motion, causing the tire to come off.
2 Install the spare tire and
loosely tighten each wheel
nut by hand by approximately
the same amount.
When replacing an aluminum wheel
with a steel whee l, tighten the
wheel nuts until the tapered portion
( ) comes into loose contact with
the disc wheel seat ( ).
When replacing an aluminum wheel
with an aluminum wheel, turn the
wheel nuts until the washers ( )
come into contact with the disc
WARNING
■Replacing a flat tire
●Do not touch the disc wheels or
the area around the brakes
immediately after the vehicle
has been driven.
After the vehicle has been
driven the disc wheels and the
area around the brakes will be
extremely hot. Touching these
areas with hands , feet or other
body parts while changing a tire,
etc. may result in burns.
●Failure to follow these precau-
tions could cause the wheel
nuts to loosen and the tire to fall
off, resulting in death or serious
injury.
• Have the wheel nuts tightened with a torque wrench to 76 ft•lbf
(103 N•m, 10.5 kgf•m) as soon
as possible after changing
wheels.
• When installing a tire, only use wheel nuts that have been spe-
cifically designed for that wheel.
• If there are any cracks or defor- mations in the bolt screws, nut
threads or bolt holes of the
wheel, have the vehicle
inspected by your Toyota
dealer.
• When installing the wheel nuts,
be sure to install them with the
tapered ends facing inward.
●For vehicles with power back
door: In cases such as when
replacing tires, make sure to
turn off the power back door
system ( P.154). Failure to do
so may cause the back door to
operate unintentionally if the
power back door switch is acci-
dentally touched, resulting in
hands and fingers being caught
and injured.
Installing the spare tire
A
B
A
Page 479 of 586
4777-2. Steps to take in an emergency
7
When trouble arises
wheel ( ).
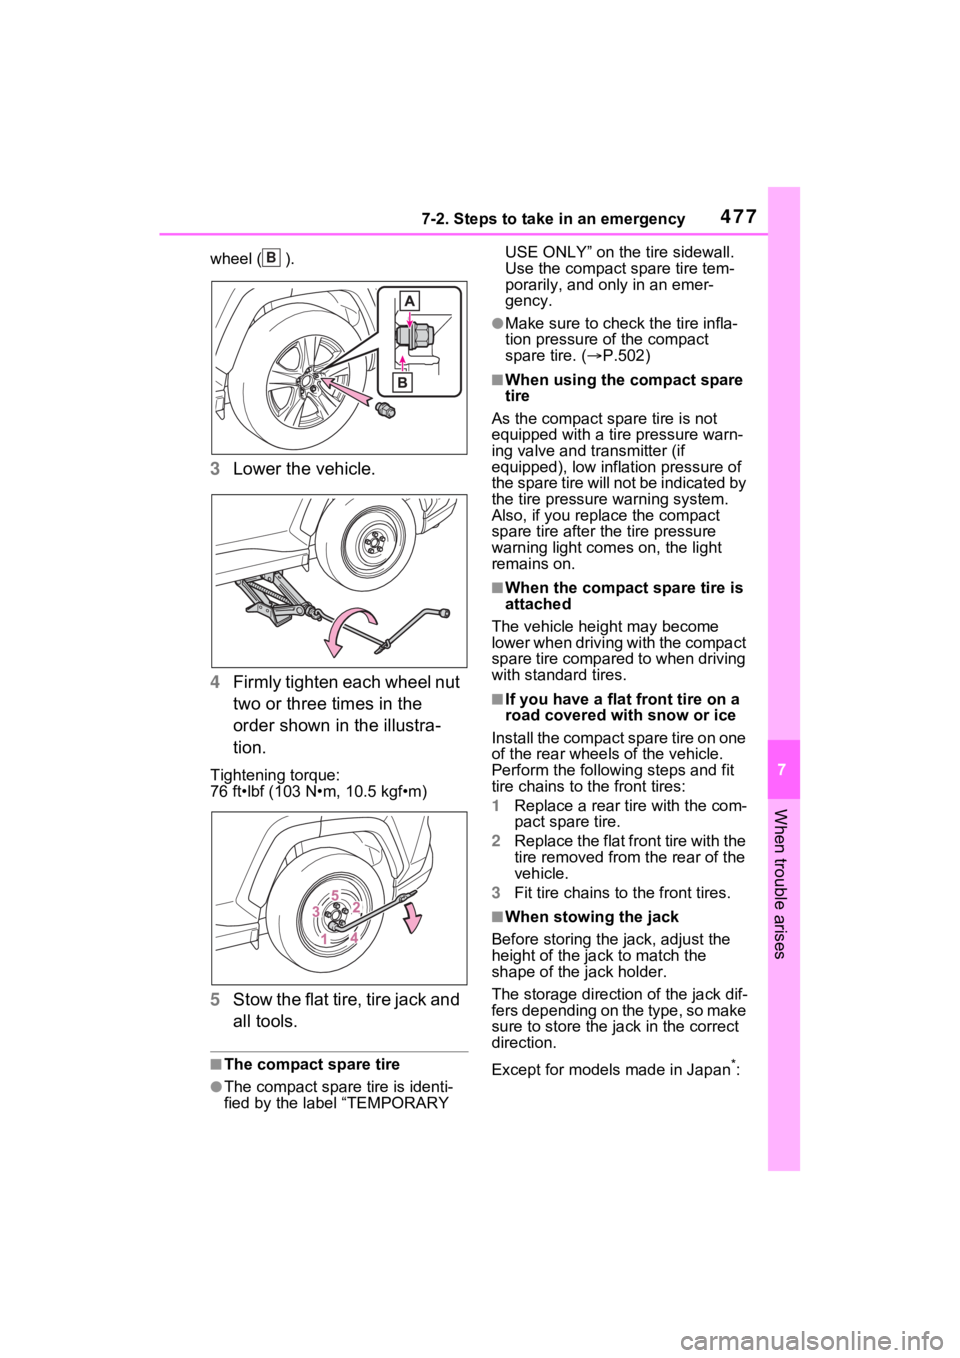
3Lower the vehicle.
4 Firmly tighten each wheel nut
two or three times in the
order shown in the illustra-
tion.
Tightening torque:
76 ft•lbf (103 N•m, 10.5 kgf•m)
5Stow the flat tire, tire jack and
all tools.
■The compact spare tire
●The compact spare tire is identi-
fied by the label “TEMPORARY USE ONLY” on the tire sidewall.
Use the compact spare tire tem-
porarily, and only in an emer-
gency.
●Make sure to check the tire infla-
tion pressure of the compact
spare tire. (
P.502)
■When using the compact spare
tire
As the compact spare tire is not
equipped with a tire pressure warn-
ing valve and transmitter (if
equipped), low inflation pressure of
the spare tire will not be indicated by
the tire pressure warning system.
Also, if you replace the compact
spare tire after the tire pressure
warning light com es on, the light
remains on.
■When the compact spare tire is
attached
The vehicle height may become
lower when driving with the compact
spare tire compared to when driving
with standard tires.
■If you have a flat front tire on a
road covered with snow or ice
Install the compact spare tire on one
of the rear wheels of the vehicle.
Perform the following steps and fit
tire chains to the front tires:
1 Replace a rear tire with the com-
pact spare tire.
2 Replace the flat front tire with the
tire removed from the rear of the
vehicle.
3 Fit tire chains to the front tires.
■When stowing the jack
Before storing the jack, adjust the
height of the ja ck to match the
shape of the jack holder.
The storage direction of the jack dif-
fers depending on the type, so make
sure to store the ja ck in the correct
direction.
Except for models made in Japan
*:
B
Page 481 of 586
4797-2. Steps to take in an emergency
7
When trouble arises
WARNING
■Speed limit when using the
compact spare tire
Do not drive at speeds in excess
of 50 mph (80 km/h) when a com-
pact spare tire is installed on the
vehicle.
The compact spare tire is not
designed for driving at high
speeds. Failure to observe this
precaution may lead to an acci-
dent causing death or serious
injury.
■After using the tools and jack
Before driving, make sure all the
tools and jack are securely in
place in their storage location to
reduce the possibility of personal
injury during a co llision or sudden
braking.
NOTICE
■Be careful when driving over
bumps with the compact
spare tire installed on the
vehicle
The vehicle height may become
lower when driving with the com-
pact spare tire compared to when
driving with standard tires. Be
careful when driving over uneven
road surfaces.
■Driving with tire chains and
the compact spare tire
Do not fit tire chains to the com-
pact spare tire.
Tire chains may damage the vehi-
cle body and adversely affect driv-
ing performance.
■When replacing the tires
(vehicles with tire pressure
warning system)
When removing or fitting the
wheels, tires or th e tire pressure
warning valve and transmitter,
contact your Toyota dealer as the
tire pressure warning valve and
transmitter may be damaged if not
handled correctly.
Page 495 of 586
4937-2. Steps to take in an emergency
7
When trouble arises
1Stop the hybrid system. Set
the parking brake and shift
the shift lever to P.
2 Remove the mud, snow or
sand from around the stuck
tire.
3 Place wood, stones or some
other material to help provide
traction under the tires.
4 Restart the hybrid system
5 Shift the shift lever to D or R
and release the parking
brake. Then, while exercising
caution, depress the acceler-
ator pedal.
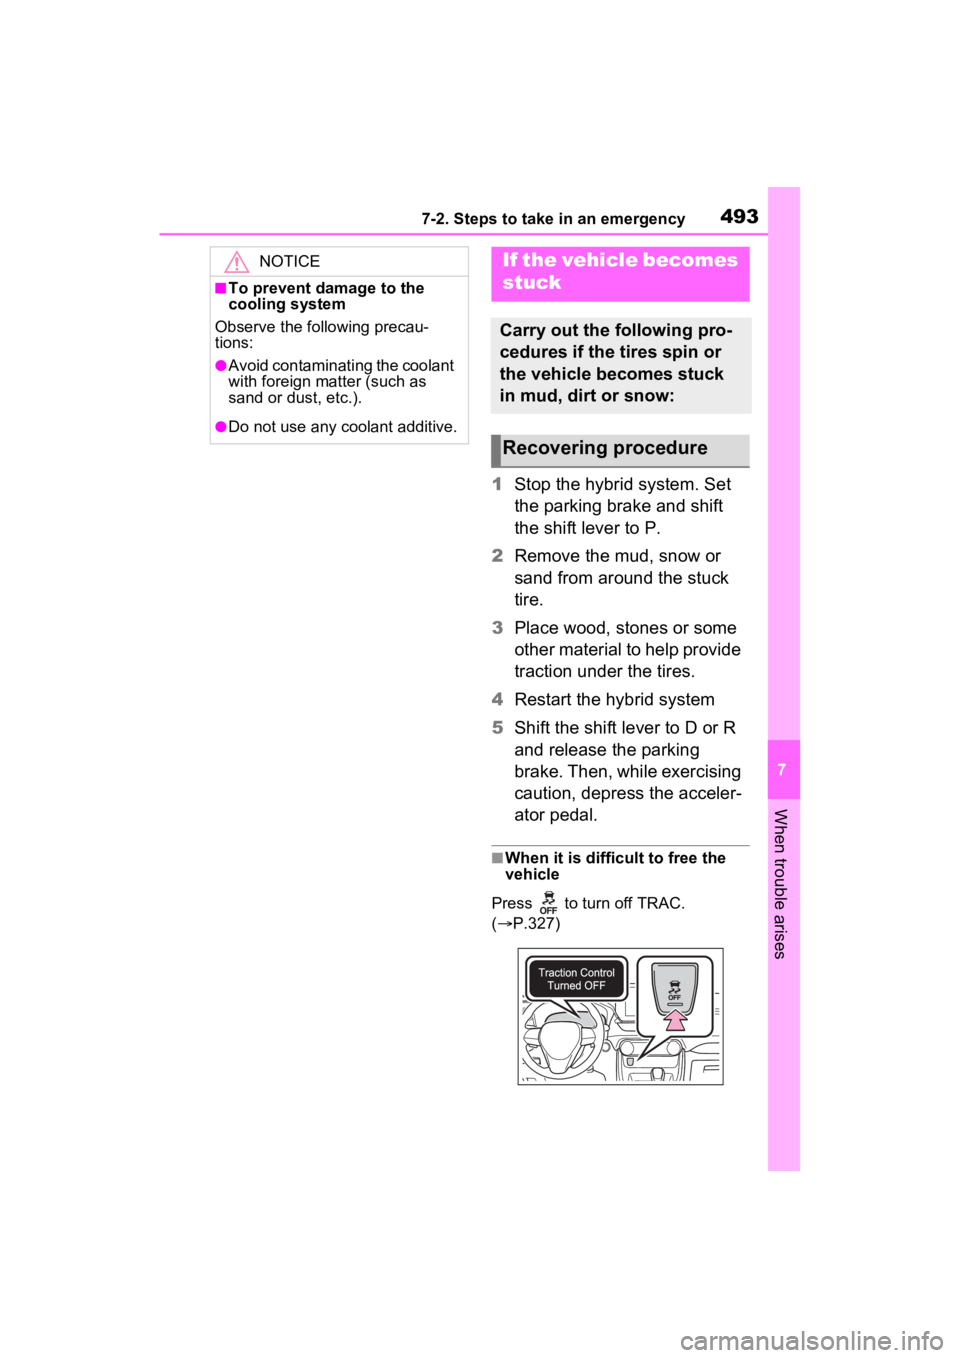
■When it is difficult to free the
vehicle
Press to turn off TRAC.
( P.327)
NOTICE
■To prevent damage to the
cooling system
Observe the following precau-
tions:
●Avoid contaminating the coolant
with foreign matter (such as
sand or dust, etc.).
●Do not use any coolant additive.
If the vehicle becomes
stuck
Carry out the following pro-
cedures if the tires spin or
the vehicle becomes stuck
in mud, dirt or snow:
Recovering procedure
Page 504 of 586
5028-1. Specifications
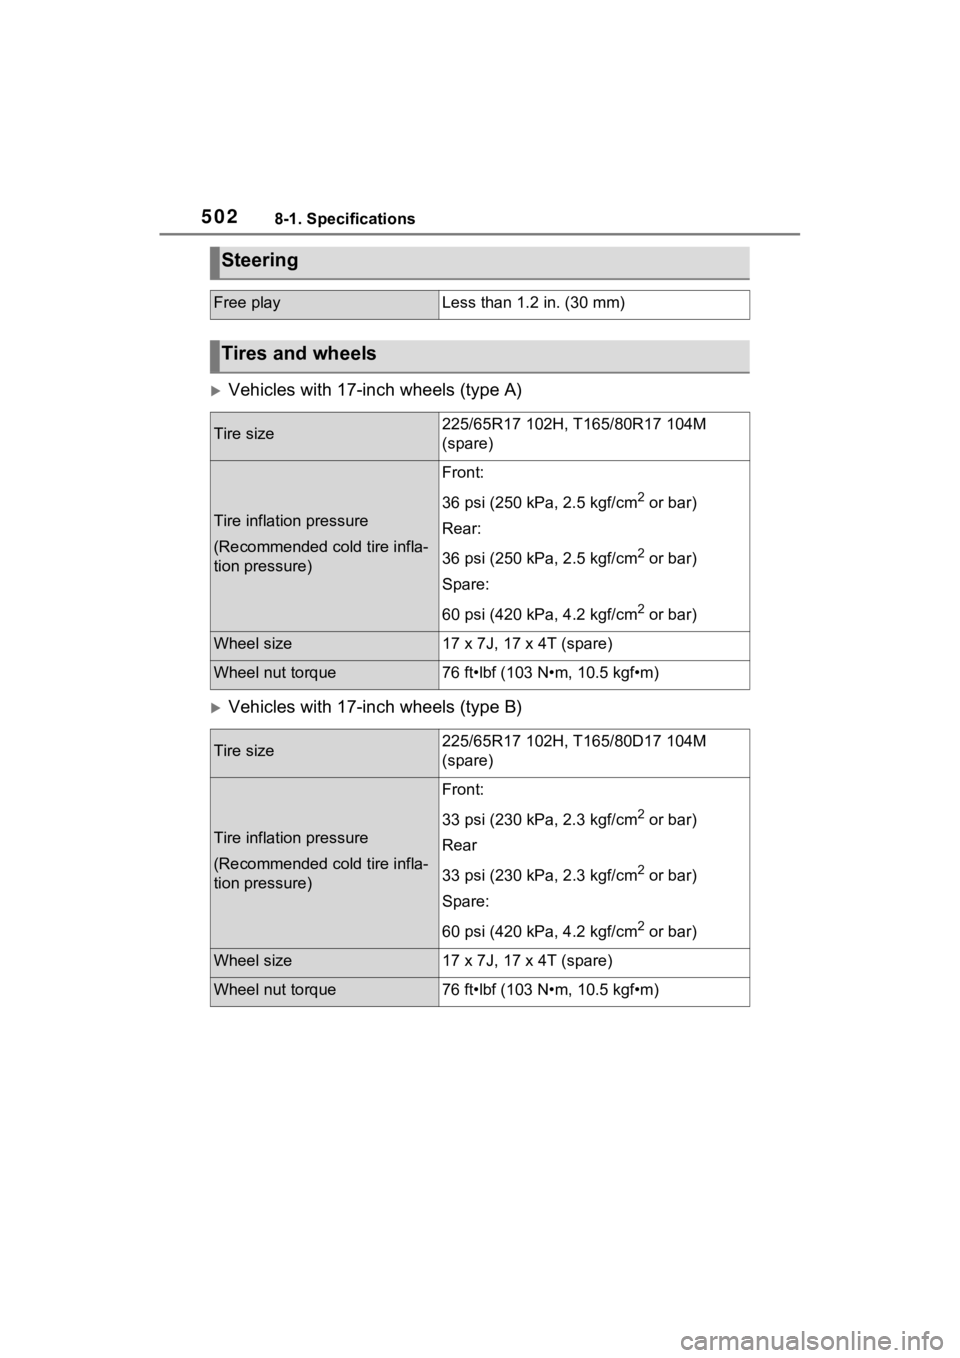
Vehicles with 17-inch wheels (type A)
Vehicles with 17-inch wheels (type B)
Steering
Free playLess than 1.2 in. (30 mm)
Tires and wheels
Tire size225/65R17 102H, T165/80R17 104M
(spare)
Tire inflation pressure
(Recommended cold tire infla-
tion pressure)
Front:
36 psi (250 kPa, 2.5 kgf/cm
2 or bar)
Rear:
36 psi (250 kPa, 2.5 kgf/cm
2 or bar)
Spare:
60 psi (420 kPa, 4.2 kgf/cm
2 or bar)
Wheel size17 x 7J, 17 x 4T (spare)
Wheel nut torque76 ft•lbf (103 N•m, 10.5 kgf•m)
Tire size225/65R17 102H, T165/80D17 104M
(spare)
Tire inflation pressure
(Recommended cold tire infla-
tion pressure)
Front:
33 psi (230 kPa, 2.3 kgf/cm
2 or bar)
Rear
33 psi (230 kPa, 2.3 kgf/cm
2 or bar)
Spare:
60 psi (420 kPa, 4.2 kgf/cm
2 or bar)
Wheel size17 x 7J, 17 x 4T (spare)
Wheel nut torque76 ft•lbf (103 N•m, 10.5 kgf•m)
Page 510 of 586
5088-1. Specifications
Radial tires or bias-ply tires
A radial tire has “RADIAL” on the sidewall. A tire not marked “RADIAL” is a
bias-ply tire.
TUBELESS or TUBE TYPE
A tubeless tire d oes not have a tube and air is directly put in to the tire. A
tube type tire has a tube inside t he tire and the tube maintains the air pres-
sure.
Load limit at maximum cold tire inflation pressure (P.511)
Maximum cold tire inflation pressure ( P.502)
This means the pressure to w hich a tire may be inflated.
Uniform tire quality grading
For details, see “Uniform Tire Quality Grading” that follows.
Summer tires or all season tires ( P.410)
An all season tire has “M+S” on the sidewal l. A tire not marked “M+S” is a
summer tire.
“TEMPORARY USE ONLY”
A compact spare tire is identifi ed by the phrase “TEMPORARY USE ONLY”
molded on its sidewall. This tire is designed for temporary emergency use
only.
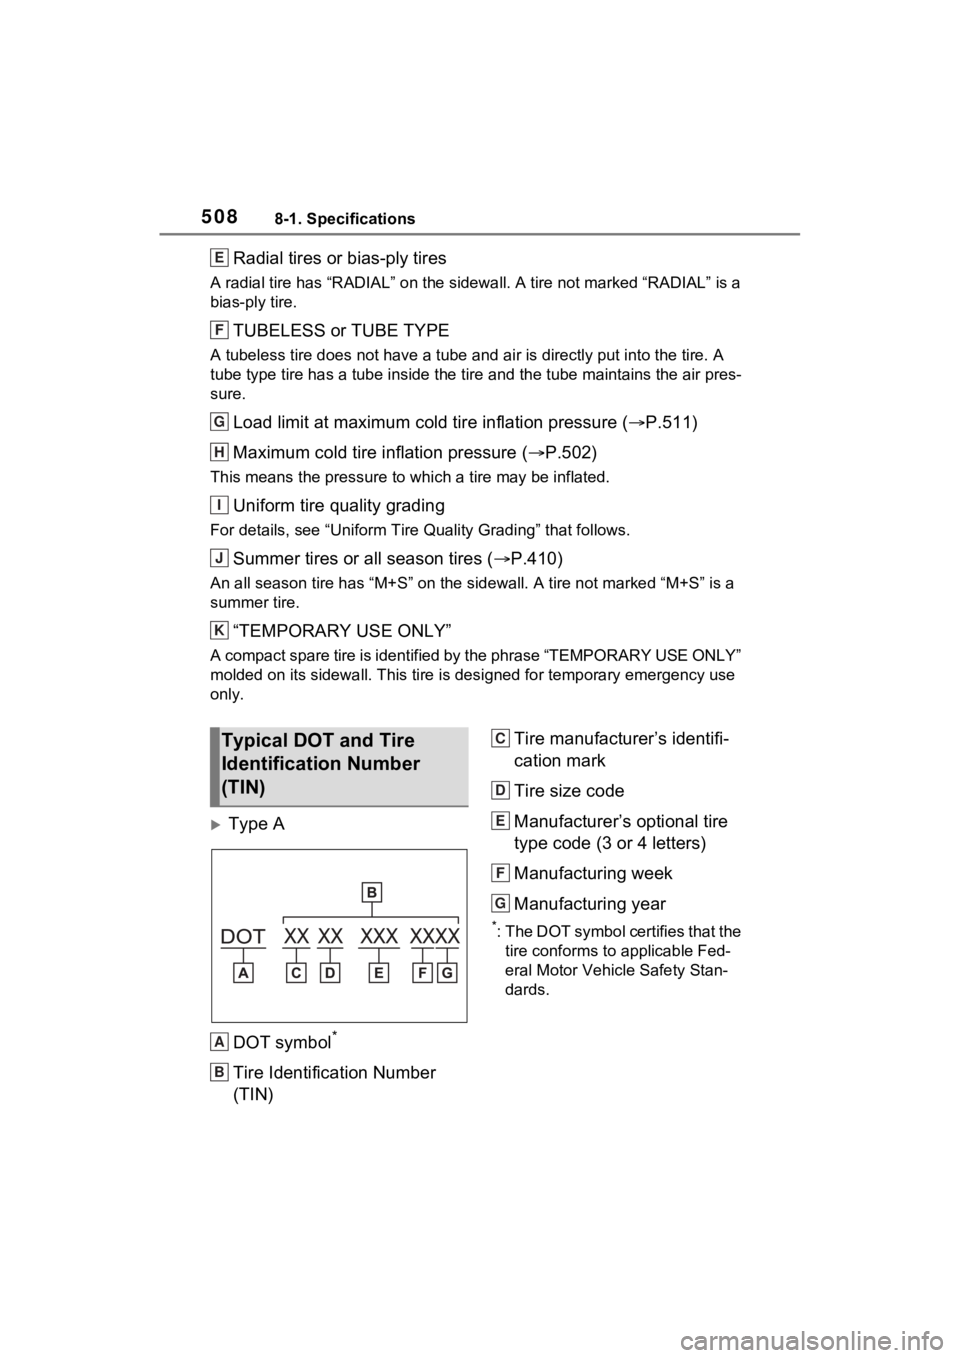
Type A
DOT symbol
*
Tire Identification Number
(TIN) Tire manufacturer’s identifi-
cation mark
Tire size code
Manufacturer’s optional tire
type code (3 or 4 letters)
Manufacturing week
Manufacturing year
*: The DOT symbol certifies that the
tire conforms to applicable Fed-
eral Motor Vehicle Safety Stan-
dards.
E
F
G
H
I
J
K
Typical DOT and Tire
Identification Number
(TIN)
A
B
C
D
E
F
G
Page 512 of 586
5108-1. Specifications
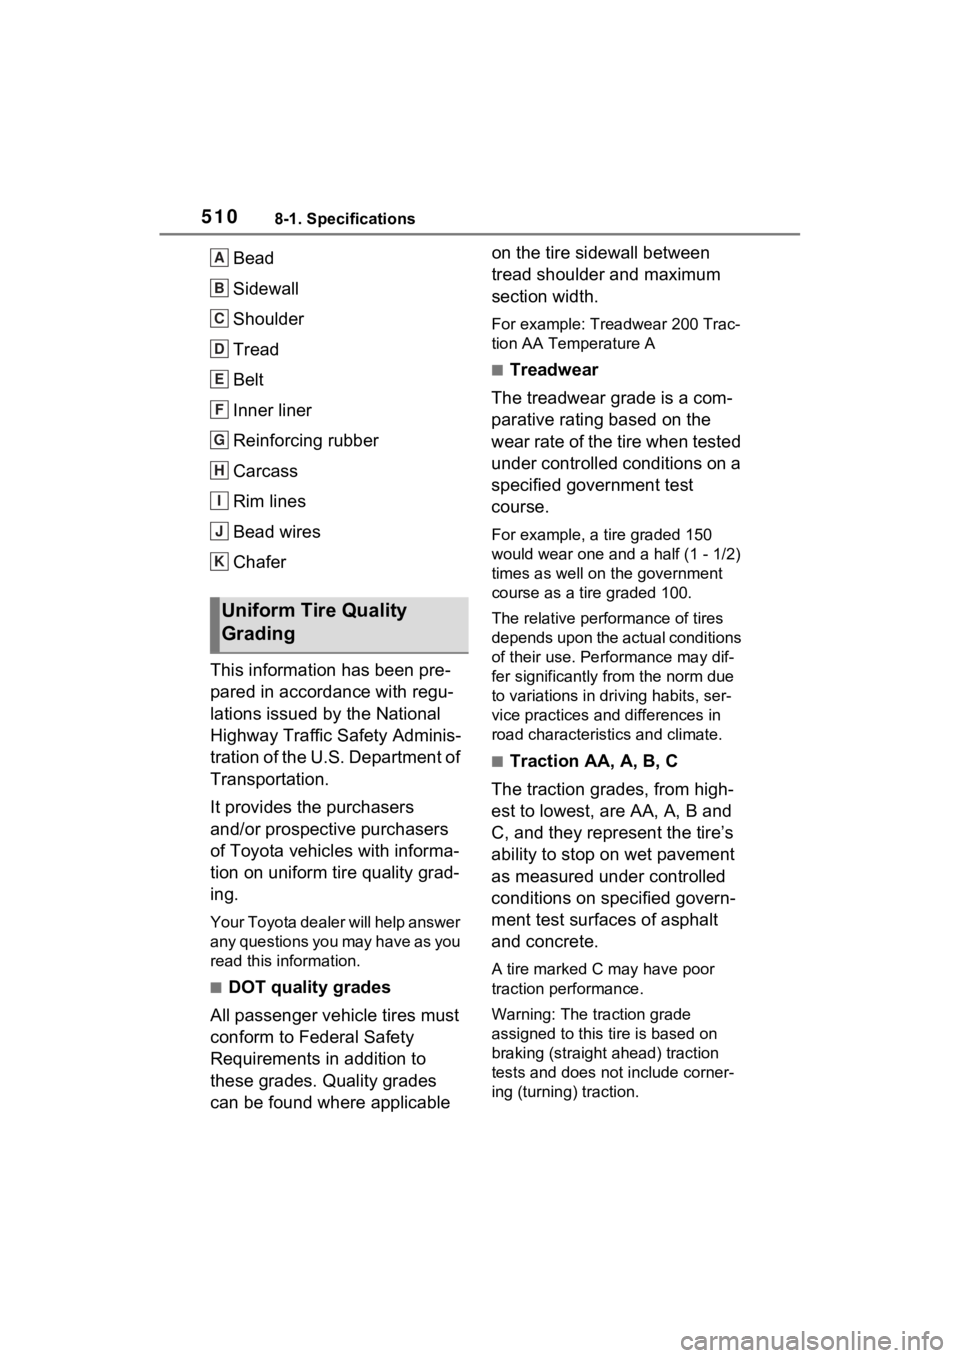
Bead
Sidewall
Shoulder
Tread
Belt
Inner liner
Reinforcing rubber
Carcass
Rim lines
Bead wires
Chafer
This information has been pre-
pared in accordance with regu-
lations issued by the National
Highway Traffic Safety Adminis-
tration of the U.S. Department of
Transportation.
It provides the purchasers
and/or prospective purchasers
of Toyota vehicles with informa-
tion on uniform tire quality grad-
ing.
Your Toyota dealer will help answer
any questions you may have as you
read this information.
■DOT quality grades
All passenger vehicle tires must
conform to Federal Safety
Requirements in addition to
these grades. Quality grades
can be found where applicable on the tire sidewall between
tread shoulder and maximum
section width.
For example: Treadwear 200 Trac-
tion AA Temperature A
■Treadwear
The treadwear grade is a com-
parative rating based on the
wear rate of the tire when tested
under controlled conditions on a
specified government test
course.
For example, a tire graded 150
would wear one and a half (1 - 1/2)
times as well on the government
course as a tire graded 100.
The relative performance of tires
depends upon the ac tual conditions
of their use. Performance may dif-
fer significantly from the norm due
to variations in dri ving habits, ser-
vice practices and differences in
road characteristics and climate.
■Traction AA, A, B, C
The traction grades, from high-
est to lowest, are AA, A, B and
C, and they represent the tire’s
ability to stop on wet pavement
as measured under controlled
conditions on specified govern-
ment test surfaces of asphalt
and concrete.
A tire marked C may have poor
traction performance.
Warning: The traction grade
assigned to this tire is based on
braking (straight ahead) traction
tests and does not include corner-
ing (turning) traction.
Uniform Tire Quality
Grading
A
B
C
D
E
F
G
H
I
J
K
Page 513 of 586
5118-1. Specifications
8
Vehicle specifications
■Temperature A, B, C
The temperature grades are A
(the highest), B, and C, repre-
senting the tire’s resistance to
the generation of heat and its
ability to dissipate heat when
tested under controlled condi-
tions on a specified indoor labo-
ratory test wheel.
Sustained high temperature can
cause the material of the tire to
degenerate and reduce tire life, and
excessive temperature can lead to
sudden tire failure.
Grade C corresponds to a level of performance which all passenger
car tires must meet under the Fed-
eral Motor Vehicle Safety Standard
No. 109.
Grades B and A represent higher
levels of performance on the labo-
ratory test wheel than the minimum
required by law.
Warning: The temperature grades
of a tire assume tha
t it is properly
inflated and not overloaded.
Excessive speed, underinflation, or
excessive loading, either sepa-
rately or in combination, can cause
heat buildup and possible tire fail-
ure.
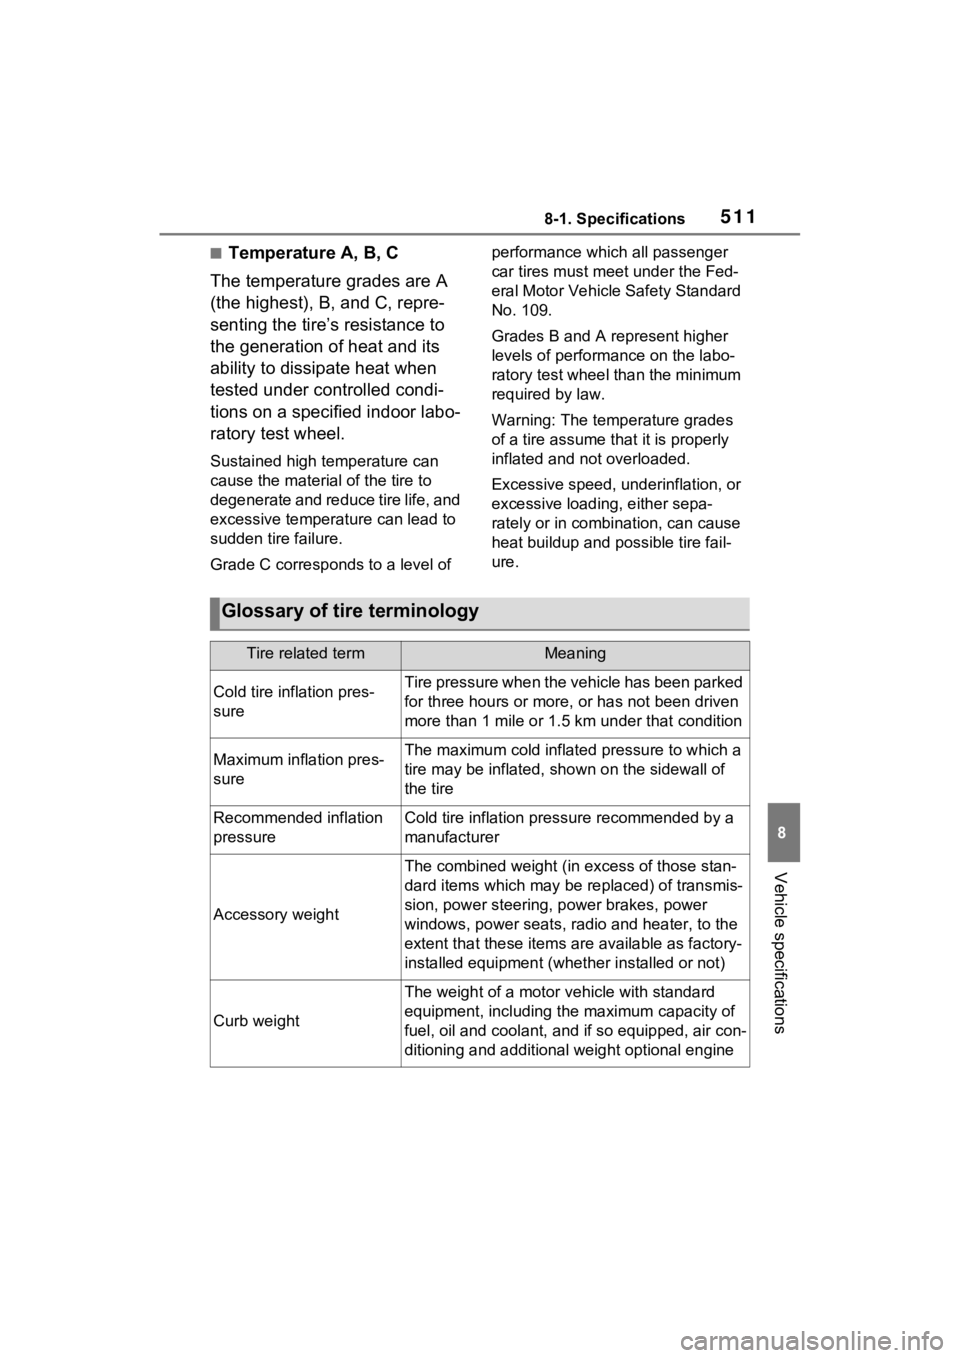
Glossary of tire terminology
Tire related termMeaning
Cold tire inflation pres-
sureTire pressure when the vehicle has been parked
for three hours or more, or has not been driven
more than 1 mile or 1.5 km under that condition
Maximum inflation pres-
sureThe maximum cold inflated pressure to which a
tire may be inflated, shown on the sidewall of
the tire
Recommended inflation
pressureCold tire inflation pressure recommended by a
manufacturer
Accessory weight
The combined weight (in excess of those stan-
dard items which may be replaced) of transmis-
sion, power steering, power brakes, power
windows, power seats, radio and heater, to the
extent that these items are available as factory-
installed equipment (whether installed or not)
Curb weight
The weight of a motor vehicle with standard
equipment, including th e maximum capacity of
fuel, oil and coolant, and if so equipped, air con-
ditioning and additional weight optional engine