2023 TOYOTA RAV4 HYBRID change time
[x] Cancel search: change timePage 353 of 586
3515-1. Using the air conditioning system and defogger
5
Interior features
Turns the seat heaters and ven-
tilators on/off
The level indicators come on
during operation.
Each time the switch is pressed,
the operation condition changes as
follows.
Hi (3 segments lit) Mid (2 seg-
ments lit) Lo (1 segment lit)
Off
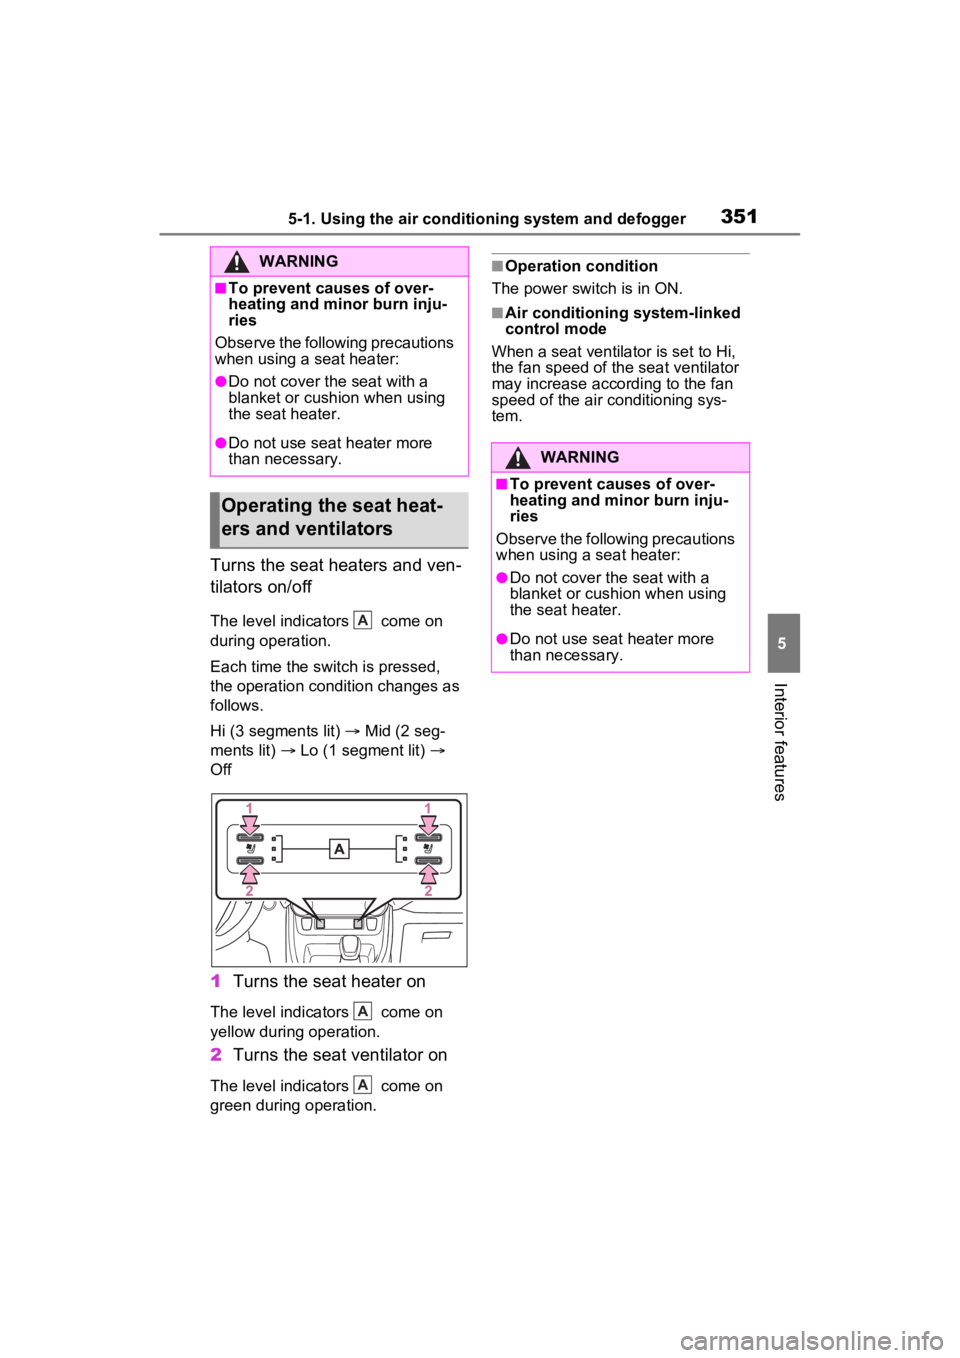
1 Turns the seat heater on
The level indicators come on
yellow during operation.
2Turns the seat ventilator on
The level indicators come on
green during operation.
■Operation condition
The power switch is in ON.
■Air conditioning system-linked
control mode
When a seat ventilator is set to Hi,
the fan speed of the seat ventilator
may increase according to the fan
speed of the air conditioning sys-
tem.
WARNING
■To prevent causes of over-
heating and minor burn inju-
ries
Observe the following precautions
when using a seat heater:
●Do not cover the seat with a
blanket or cushion when using
the seat heater.
●Do not use seat heater more
than necessary.
Operating the seat heat-
ers and ventilators
A
A
A
WARNING
■To prevent causes of over-
heating and minor burn inju-
ries
Observe the following precautions
when using a seat heater:
●Do not cover the seat with a
blanket or cushion when using
the seat heater.
●Do not use seat heater more
than necessary.
Page 355 of 586
3535-2. Using the interior lights
5
Interior features
turn on automatically.
The interior lights will turn off auto-
matically after approximately 20
minutes.
The interior lights can be turned off
manually. However, in order to help
prevent further collisions, it is rec-
ommended that they be left on until
safety can be ensured.
(The interior lights may not turn on
automatically depending on the
force of the impact and conditions of
the collision.)
■Customization
Setting (e.g. the time elapsed before
the lights turn off) can be changed.
(Customizable features: P.530)
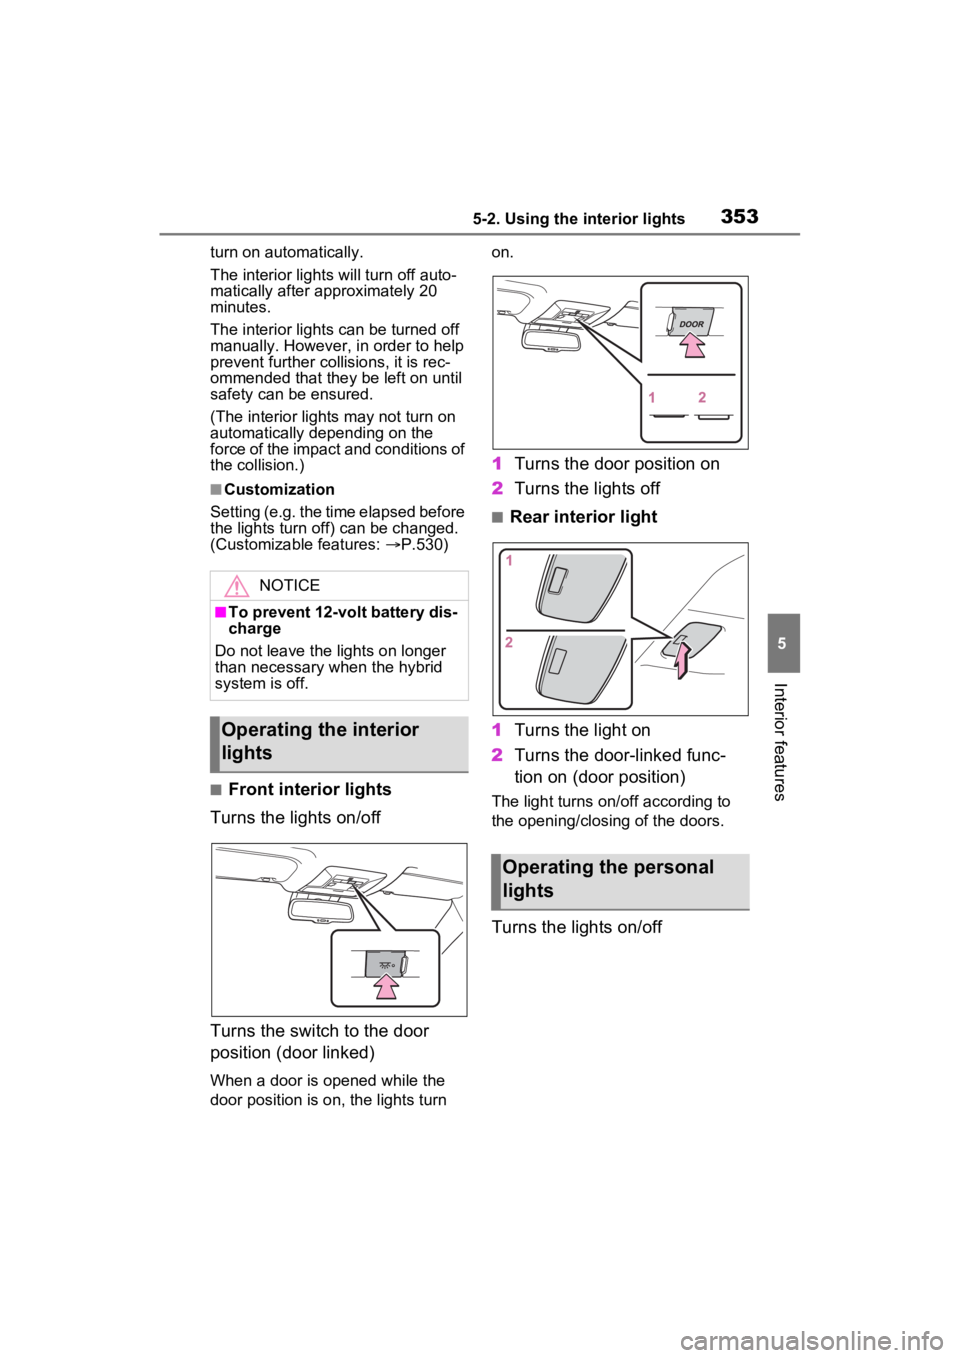
■Front interior lights
Turns the lights on/off
Turns the switch to the door
position (door linked)
When a door is opened while the
door position is on, the lights turn on.
1
Turns the door position on
2 Turns the lights off
■Rear interior light
1 Turns the light on
2 Turns the door-linked func-
tion on (door position)
The light turns on/off according to
the opening/closing of the doors.
Turns the lights on/off
NOTICE
■To prevent 12-volt battery dis-
charge
Do not leave the lights on longer
than necessary when the hybrid
system is off.
Operating the interior
lights
Operating the personal
lights
Page 373 of 586

3715-4. Using the other interior features
5
Interior features
cover and accessories not able to
handle Qi are attached to the porta-
ble device. Depending on the type
of cover (including the certain genu-
ine manufacture p arts) and acces-
sory, it may not be possible to
charge. When charging is not per-
formed even with the portable
device placed on the charge area,
remove the cover and accessories.
■While charging, noise enters
the AM radio
●Turn off the wireless charger and
confirm that the noise has
decreased. If the noise
decreases, continuously pushing
the power supply switch of the
wireless charger for 2 seconds,
the frequency of the charger can
be changed and the noise can be
reduced. Also, on that occasion,
the operation indicator light will
flash orange 2 times.
●iPhone’s use a particular fre-
quency for rapid charging.
Depending on the iOS version,
rapid charging may not be per-
formed while switching frequen-
cies.
■Important points of the wireless
charger
●If the electronic key cannot be
detected within the vehicle inte-
rior, charging cannot be done.
When the door is opened and
closed, charging may be tempo-
rarily suspended.
●When charging, the wireless
charging device and portable
device will get warmer, however
this is not a malfunction.
When a portable device gets
warm while charging, charging
may stop due to the protection
function on the portable device
side. In this case, when the tem-
perature of the portable device
drops significantly, charge again.
The fan may start operating to lower
the temperature inside the wireless
charger, however this is not a mal- function.
■Operation sounds
A buzzing noise may be heard when
pressing the power supply switch to
turn the power supply on, when
turning the power switch to ACC or
ON while the wireless charger
power supply is on, or when detect-
ing a portable device. However, this
is not a malfunction.
■If the smartphone OS has been
updated
If the smartphone OS has been
updated to a newer version, its
charging specifications may have
changed significant ly. For details,
check the information on the manu-
facturer’s website.
■Trademark information
iPhone is a trademark of Apple Inc.,
registered in the U.S. and other
countries.
WARNING
■Caution while driving
When charging a portable device,
for safety reasons, the driver
should not operate the main part
of the portable device while driv-
ing.
■Caution while in motion
Do not charge lightweight devices
such as wireless headphones
while in motion. These devices
are very light and may be ejected
from the charging tray, which may
lead to unforeseen accidents.
■Caution regarding interfer-
ence with electronic devices
People with implantable cardiac
pacemakers, cardiac resynchroni-
zation therapy-pacemakers or
implantable cardio verters, as well
as any other electrical medical
device, should consult their physi-
cian about the usage of the wire-
less charger.
Page 415 of 586
4136-3. Do-it-yourself maintenance
6
Maintenance and care
operate properly.
• If non-genuine Toyota wheels are used.
• A tire has been replaced with a tire that is not an OE (Original
Equipment) tire.
• A tire has been replaced with a tire that is not of the specified size.
• Tire chains, etc. are equipped.
• An auxiliary-supported run-flat tire
is equipped.
• If a window tint that affects the
radio wave signals is installed.
• If there is a lot of snow or ice on the vehicle, particularly around the
wheels or wheel housings.
• If the tire inflation pressure is extremely higher than the speci-
fied level.
• If wheels without tire pressure warning valves a nd transmitters
are used.
• If the ID code on the tire pressure warning valves and transmitters is
not registered in the tire pressure
warning computer.
●Performance may be affected in
the following situations.
• Near a TV tower, electric power
plant, gas station , radio station,
large display, airpo rt or other facil-
ity that generates strong radio
waves or electrical noise
• When carrying a portable radio, cellular phone, cordless phone or
other wireless communication
device
If tire position information is not cor-
rectly displayed due to the radio
wave conditions, the display may be
corrected by driving and changing
the radio wave conditions.
●When the vehicle is parked, the
time taken for the warning to start
or go off could be extended.
●When tire inflation pressure
declines rapidly for example when
a tire has burst, the warning may
not function.
■Warning performance of the tire
pressure warning system
The warning of the tire pressure
warning system w ill change in
accordance with the conditions
under which it was initialized. For
this reason, the system may give a
warning even if th e tire pressure
does not reach a low enough level,
or if the pressure is higher than the
pressure that was adjusted to when
the system was initialized.
When replacing tires or wheels,
tire pressure warning valves and
transmitters must also be
installed.
When new tire pressure warning
valves and transmitters are
installed, new ID codes must be
registered in the tire pressure
warning computer and the tire
pressure warning system must
be initialized. ( P.417)
■When replacing the tires and
wheels
If the ID code of the tire pressure
warning valve and tr ansmitter is not
registered, the tire pressure warning
system will not work properly. After
driving for about 20 minutes, the tire
pressure warning light blinks for 1
minute and stays on to indicate a
system malfunction.
Installing tire pressure
warning valves and trans-
mitters (if equipped)
Page 420 of 586
4186-3. Do-it-yourself maintenance
4Press or of the meter
control switches and select
“TPWS”, and then press .
5 Press or of the meter
control switches and select
“Change Wheel”. Then press
and hold until the tire
pressure warning light starts
slowly blinking 3 times.
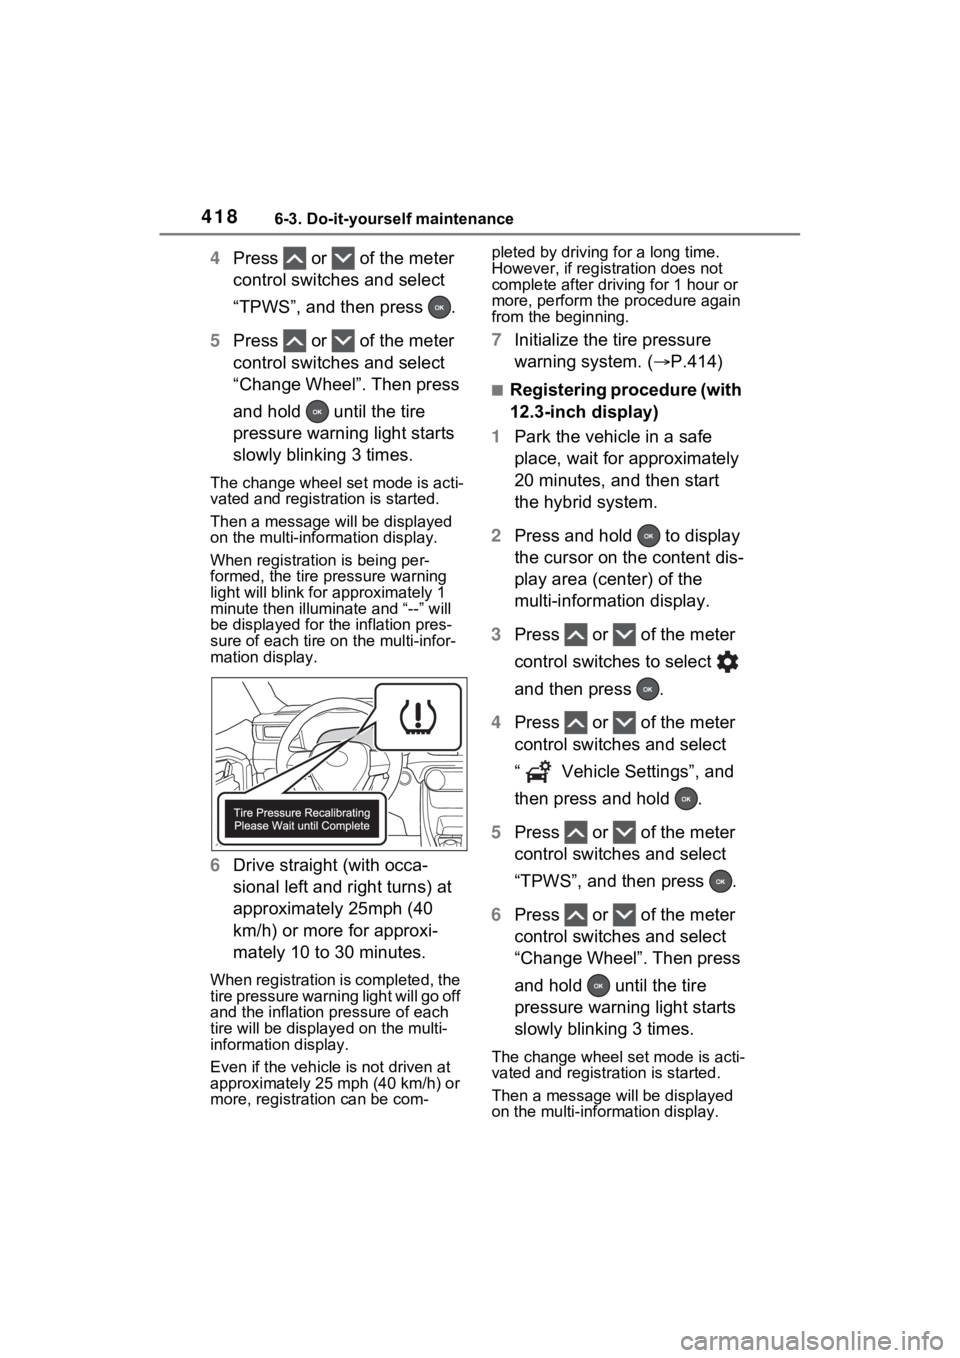
The change wheel set mode is acti-
vated and registration is started.
Then a message w ill be displayed
on the multi-info rmation display.
When registration is being per-
formed, the tire pressure warning
light will blink for approximately 1
minute then illumi nate and “--” will
be displayed for the inflation pres-
sure of each tire on the multi-infor-
mation display.
6 Drive straight (with occa-
sional left and right turns) at
approximately 25mph (40
km/h) or more for approxi-
mately 10 to 30 minutes.
When registration is completed, the
tire pressure warning light will go off
and the inflation pressure of each
tire will be displayed on the multi-
information display.
Even if the vehicle is not driven at
approximately 25 mph (40 km/h) or
more, registration can be com- pleted by driving for a long time.
However, if registr
ation does not
complete after driving for 1 hour or
more, perform the p rocedure again
from the beginning.
7 Initialize the tire pressure
warning system. ( P.414)
■Registering procedure (with
12.3-inch display)
1 Park the vehicle in a safe
place, wait for approximately
20 minutes, and then start
the hybrid system.
2 Press and hold to display
the cursor on the content dis-
play area (center) of the
multi-information display.
3 Press or of the meter
control switches to select
and then press .
4 Press or of the meter
control switches and select
“ Vehicle Settings”, and
then press and hold .
5 Press or of the meter
control switches and select
“TPWS”, and then press .
6 Press or of the meter
control switches and select
“Change Wheel”. Then press
and hold until the tire
pressure warning light starts
slowly blinking 3 times.
The change wheel set mode is acti-
vated and registra tion is started.
Then a message will be displayed
on the multi-information display.
Page 486 of 586
4847-2. Steps to take in an emergency
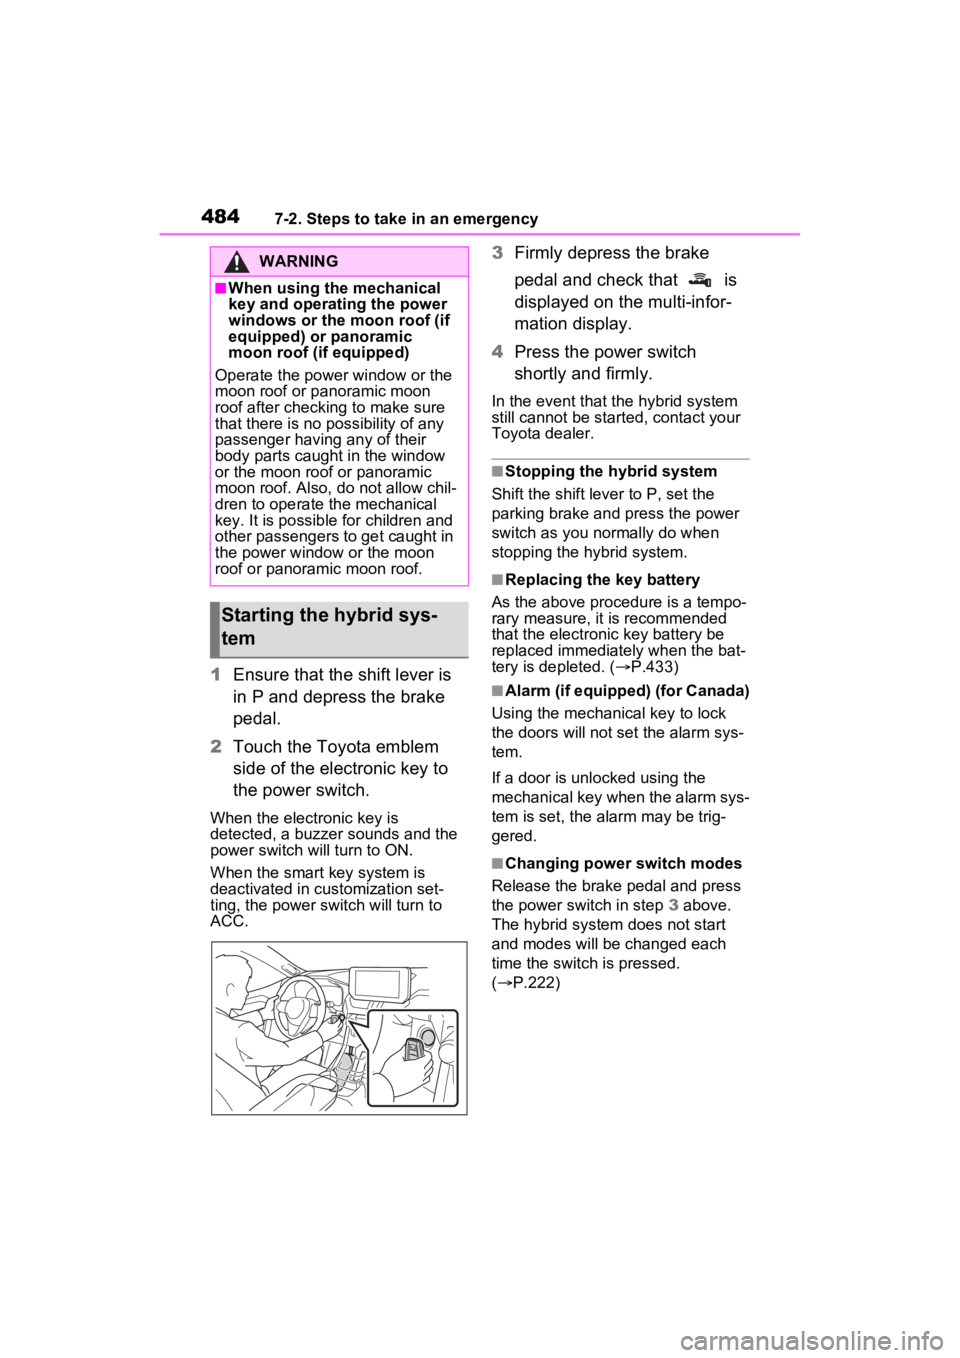
1Ensure that the shift lever is
in P and depress the brake
pedal.
2 Touch the Toyota emblem
side of the electronic key to
the power switch.
When the electronic key is
detected, a buzzer sounds and the
power switch will turn to ON.
When the smart key system is
deactivated in customization set-
ting, the power switch will turn to
ACC.
3Firmly depress the brake
pedal and check that is
displayed on the multi-infor-
mation display.
4 Press the power switch
shortly and firmly.
In the event that t he hybrid system
still cannot be started, contact your
Toyota dealer.
■Stopping the hybrid system
Shift the shift lever to P, set the
parking brake and press the power
switch as you normally do when
stopping the hybrid system.
■Replacing the key battery
As the above proce dure is a tempo-
rary measure, it is recommended
that the electronic key battery be
replaced immediately when the bat-
tery is depleted. ( P.433)
■Alarm (if equipped) (for Canada)
Using the mechanical key to lock
the doors will not set the alarm sys-
tem.
If a door is unl ocked using the
mechanical key when the alarm sys-
tem is set, the alarm may be trig-
gered.
■Changing power switch modes
Release the brake pedal and press
the power switch in step 3 above.
The hybrid system does not start
and modes will be changed each
time the switch is pressed.
( P.222)
WARNING
■When using the mechanical
key and operating the power
windows or the moon roof (if
equipped) or panoramic
moon roof (if equipped)
Operate the power window or the
moon roof or panoramic moon
roof after checking to make sure
that there is no possibility of any
passenger having any of their
body parts caught in the window
or the moon roof or panoramic
moon roof. Also, do not allow chil-
dren to operate the mechanical
key. It is possible for children and
other passengers to get caught in
the power window or the moon
roof or panoramic moon roof.
Starting the hybrid sys-
tem
Page 519 of 586

5178-2. Customization
8
Vehicle specifications
8-2.Customization
■Changing using the Multi-
media Display
1 select on the main menu.
2 Select “Vehicle customize”
on the sub menu.
3 Select the item to change the
settings of from the list.
Various setting can be changed.
Refer to the list o f settings that can
be changed for details.
For functions that can be turned
on/off, select (ON)/
(OFF).
The settings, such as the volume
and sensor sensitivity can be
changed by dragging the round
icon on the display.
■Changing using the multi-
information display (with 7-
inch display)
1 Press or of the meter
control switches and select
. 2
Press or of the meter
control switches, select the
item.
3 To switch the function on and
off, press to switch to the
desired setting.
4 To perform detailed setting of
functions that support
detailed settings, press and
hold and display the set-
ting screen.
The method of pe rforming detailed
setting differs for each screen.
Please refer to the advice sentence
displayed on the screen.
To go back to the p revious screen
or exit the customize mode, press
.
■Changing using the multi-
information display (with
12.3-inch display)
1 Press and hold to display
the cursor on the content dis-
play area (center) of the
multi-information display.
2 Press or of the meter
control switches to select
and press .
3 Press or of the meter
control switches, select the
item.
4 To switch the function on and
off, press to switch to the
desired setting.
5 To perform detailed setting of
functions that support
Customizable features
Your vehicle includes a vari-
ety of electronic features
that can be personalized to
suit your preferences. The
settings of these features
can be changed using the
multi-information display,
navigation/multimedia sys-
tem, or at your Toyota
dealer.
Customizing vehicle fea-
tures
Page 520 of 586
5188-2. Customization
detailed settings, press and
hold and display the set-
ting screen.
The method of performing detailed
setting differs for each screen.
Please refer to the advice sentence
displayed on the screen.
To go back to the previous screen
or exit the customize mode, press
.
■When customizing using the
navigation/multimedia system
or multi-information display
Stop the vehicle i n a safe place,
apply the parking brake, and shift
the shift lever to P. Also, to prevent
12-volt battery discharge, leave the
hybrid system operating while cus-
tomizing the features.
Some function settings are changed simultaneously with other fu nc-
tions being customized. Contact y our Toyota dealer for further
details.
Vehicles with navigation system or multimedia system: Settings
that can be changed using the navigation system or multimedia s ys-
tem
Settings that can be changed using the multi-information displa y
Settings that can be changed by your Toyota dealer
Definition of symbols: O = Available, – =Not available
■Predictive efficient drive*1 ( P.73)
*1: Vehicles with navigation system*2
*2
: This function can on ly be used in the mainland U.S.A. It cannot be used
in other states and territorie s, including Alaska and Hawaii.
WARNING
■During customization
As the hybrid system needs to be
operating during customization,
ensure that the vehicle is parked
in a place with adequate ventila-
tion. In a closed area such as a
garage, exhaust gases including
harmful carbon monoxide (CO)
may collect and enter the vehicle.
This may lead to death or a seri-
ous health hazard.
NOTICE
■During customization
To prevent 12-vo lt battery dis-
charge, ensure that the hybrid
system is operating while custom-
izing features.
Customizable Features
FunctionDefault settingCustomized
setting
Predictive efficient driveOnOffO––
A
B
C
ABC