2023 TOYOTA RAV4 HYBRID rear view mirror
[x] Cancel search: rear view mirrorPage 295 of 586

2934-5. Using the driving support systems
4
Driving
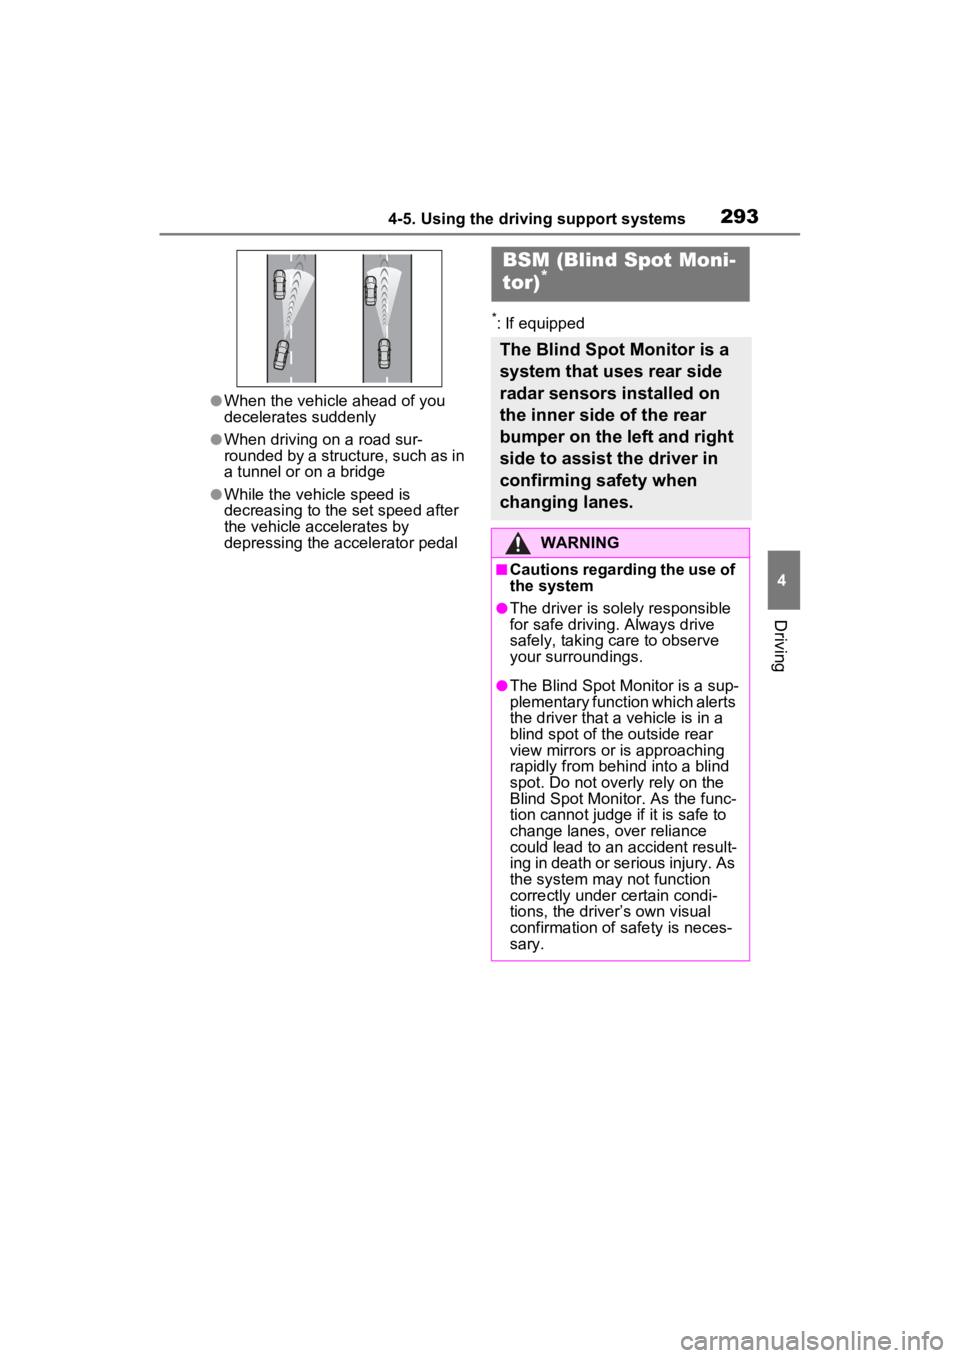
●When the vehicle ahead of you
decelerates suddenly
●When driving on a road sur-
rounded by a structure, such as in
a tunnel or on a bridge
●While the vehicle speed is
decreasing to the set speed after
the vehicle accelerates by
depressing the accelerator pedal
*: If equipped
BSM (Blind Spot Moni-
tor)*
The Blind Spot Monitor is a
system that uses rear side
radar sensors installed on
the inner side of the rear
bumper on the left and right
side to assist the driver in
confirming safety when
changing lanes.
WARNING
■Cautions regarding the use of
the system
●The driver is solely responsible
for safe driving. Always drive
safely, taking care to observe
your surroundings.
●The Blind Spot Monitor is a sup-
plementary function which alerts
the driver that a vehicle is in a
blind spot of the outside rear
view mirrors or is approaching
rapidly from behind into a blind
spot. Do not overly rely on the
Blind Spot Monitor. As the func-
tion cannot judge if it is safe to
change lanes, over reliance
could lead to an accident result-
ing in death or se rious injury. As
the system may not function
correctly under certain condi-
tions, the driver’s own visual
confirmation of safety is neces-
sary.
Page 296 of 586

2944-5. Using the driving support systems
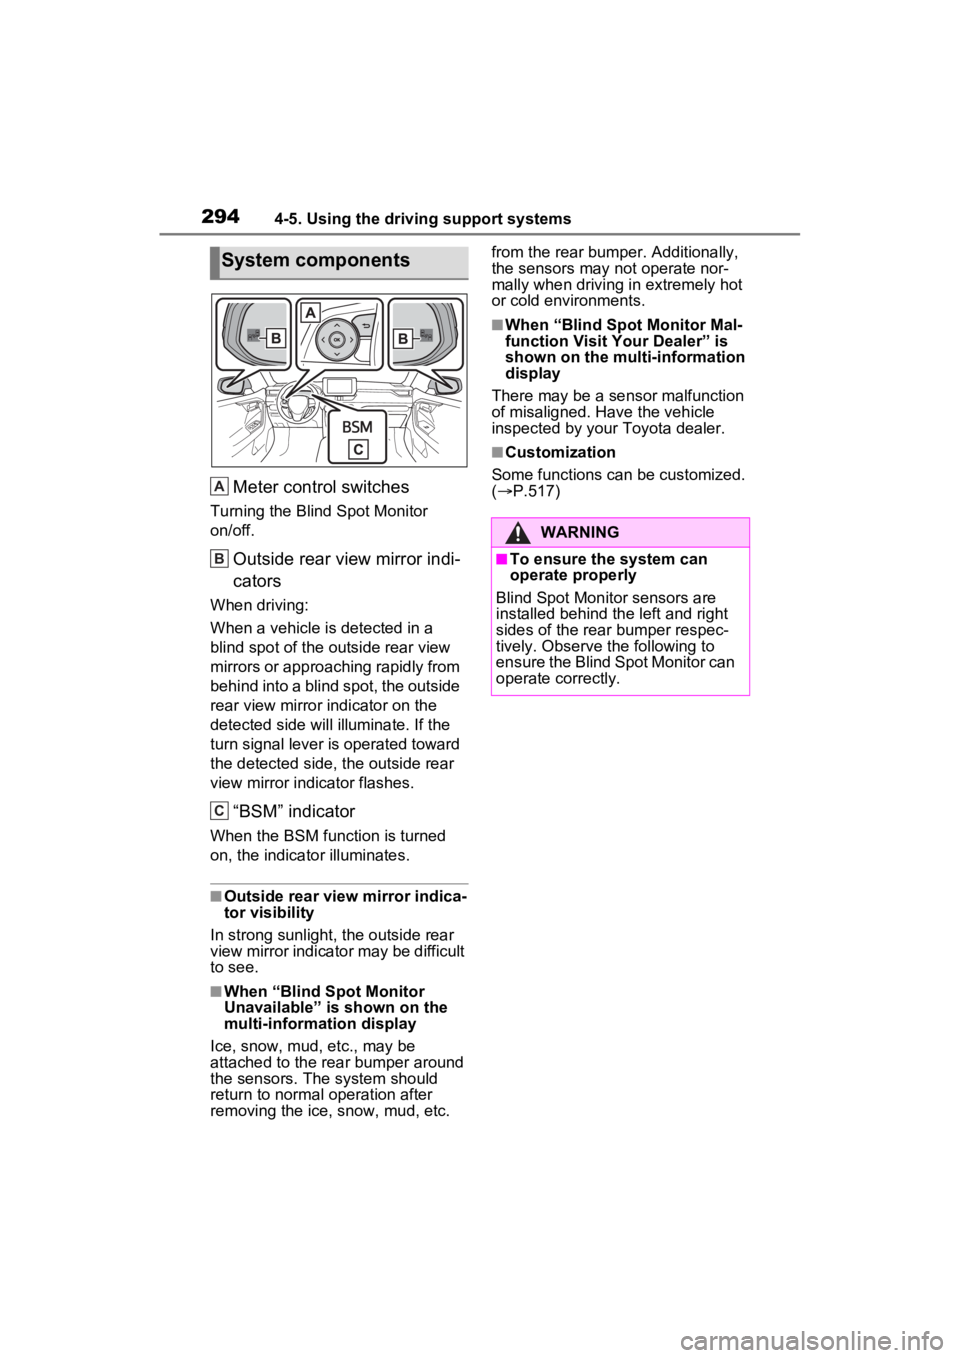
Meter control switches
Turning the Blind Spot Monitor
on/off.
Outside rear view mirror indi-
cators
When driving:
When a vehicle is detected in a
blind spot of the outside rear view
mirrors or approaching rapidly from
behind into a blind spot, the outside
rear view mirror indicator on the
detected side will illuminate. If the
turn signal lever is operated toward
the detected side, the outside rear
view mirror indicator flashes.
“BSM” indicator
When the BSM function is turned
on, the indicator illuminates.
■Outside rear view mirror indica-
tor visibility
In strong sunlight, the outside rear
view mirror indicato r may be difficult
to see.
■When “Blind Spot Monitor
Unavailable” is shown on the
multi-information display
Ice, snow, mud, etc., may be
attached to the rear bumper around
the sensors. The system should
return to normal operation after
removing the ice, snow, mud, etc. from the rear bumper. Additionally,
the sensors may not operate nor-
mally when driving in extremely hot
or cold environments.
■When “Blind Spot Monitor Mal-
function Visit Your Dealer” is
shown on the multi-information
display
There may be a sensor malfunction
of misaligned. Have the vehicle
inspected by your Toyota dealer.
■Customization
Some functions can be customized.
( P.517)
System components
A
B
C
�:�$�5�1�,�1�*
■To ensure the system can
operate properly
Blind Spot Monitor sensors are
installed behind the left and right
sides of the rear bumper respec-
tively. Observe the following to
ensure the Blind Spot Monitor can
operate correctly.
Page 298 of 586

2964-5. Using the driving support systems
■Objects that can be detected while driving
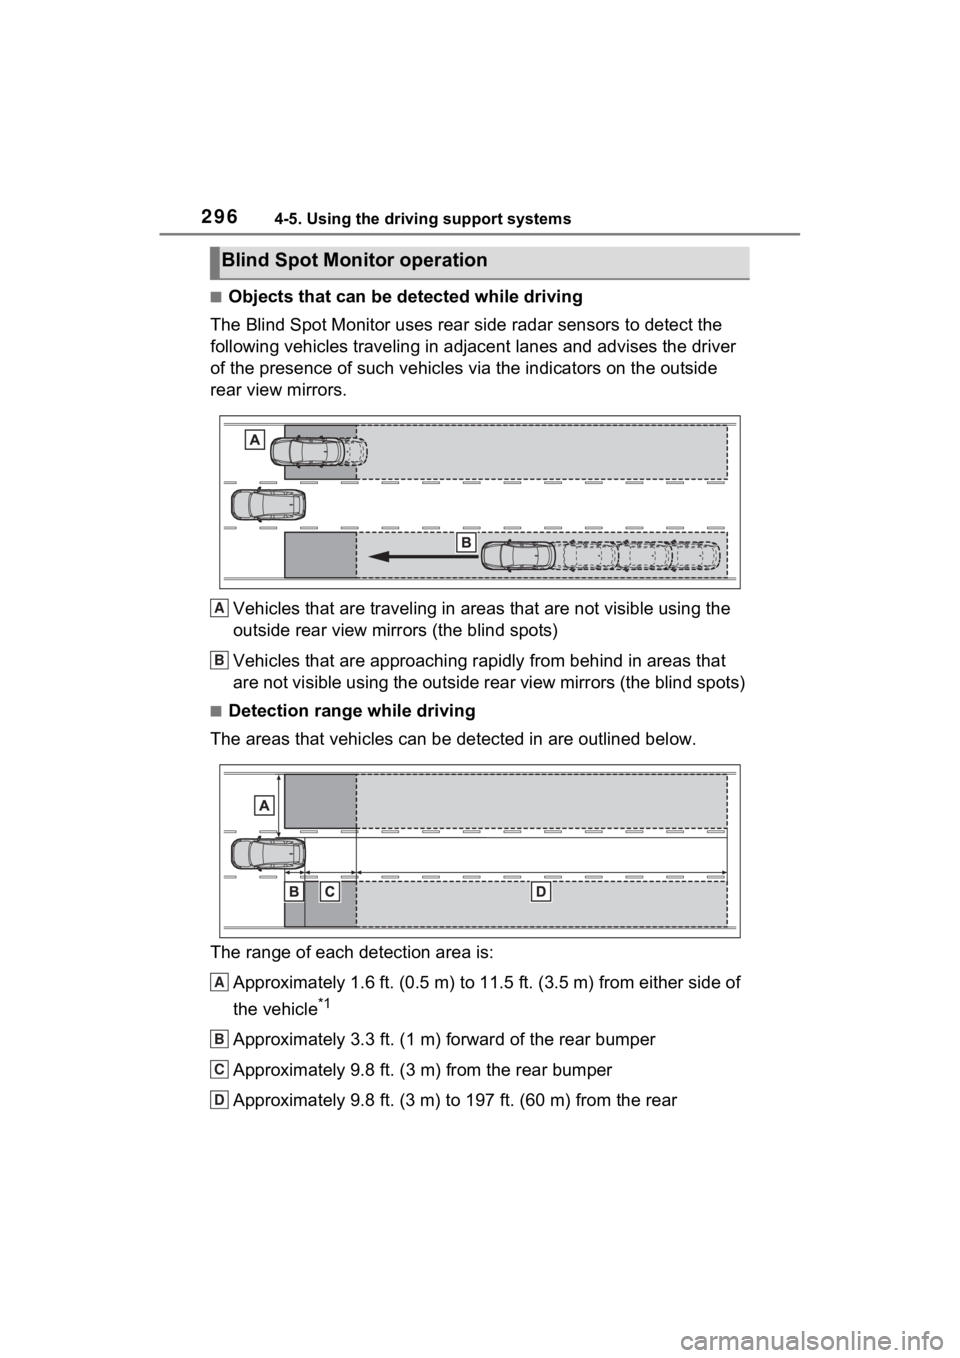
The Blind Spot Monitor uses rear side radar sensors to detect the
following vehicles traveling in adjacent lanes and advises the driver
of the presence of such vehicles via the indicators on the outside
rear view mirrors.
Vehicles that are traveling in areas that are not visible using the
outside rear view mirrors (the blind spots)
Vehicles that are approaching r apidly from behind in areas that
are not visible using the outside rear view mirrors (the blind spots)
■Detection range while driving
The areas that vehicles can be detected in are outlined below.
The range of each detection area is:
Approximately 1.6 ft. (0.5 m) to 11.5 ft. (3.5 m) from either s ide of
the vehicle
*1
Approximately 3.3 ft. (1 m) forward of the rear bumper
Approximately 9.8 ft. (3 m) from the rear bumper
Approximately 9.8 ft. (3 m) to 197 ft. (60 m) from the rear
Blind Spot Monitor operation
A
B
A
B
C
D
Page 299 of 586

2974-5. Using the driving support systems
4
Driving
bumper*2
*1: The area between the side of the vehicle and 1.6 ft. (0.5 m) from the side
of the vehicle cannot be detected.
*2: The greater the difference in speed between your vehicle and t he
detected vehicle is, the farthe r away the vehicle will be detec ted, causing
the outside r ear view mirror indicato r to illuminate or flash.
■The Blind Spot Monitor is oper-
ational when
The Blind Spot Monitor is opera-
tional when all of the following con-
ditions are met:
●The power switch is in ON.
●The Blind Spot Monitor is on.
●The shift lever is in a position
other than R.
●The vehicle speed is approxi-
mately 7 mph (10 km/h) or more
(while driving).
■The Blind Spot Monitor will
detect a veh icle when
The Blind Spot Mon itor will detect a
vehicle present in the detection area
in the followin g situations:
●A vehicle in an adjacent lane over-
takes your vehicle.
●You overtake a vehicle in an adja-
cent lane slowly.
●Another vehicle enters the detec-
tion area when it changes lanes.
■Situations in which the Blind
Spot Monitor cannot detect
vehicles (while driving)
The Blind Spot Monitor cannot
detect the following vehicles and
other objects (while driving):
●Small motorcycles, bicycles,
pedestrians, etc.*
●Vehicles traveling in the opposite
direction
●Guardrails, walls, signs, parked
vehicles and similar stationary
objects
*
●Following vehicles that are in the same lane
*
●Vehicles traveling 2 lanes away
from your vehicle*
●Vehicles which are being over-
taken rapidly by your vehicle*
*
: Depending on the conditions, detection of a v ehicle and/or
object may occur.
■Conditions under which the
system may not function cor-
rectly
●In the following situations, vehi-
cles may not be detected correctly
(while driving):
• When the sensor is misaligned
due to a strong impact to the sen-
sor or its surrounding area
• When mud, snow, ice, a sticker,
etc., is covering the sensor or sur-
rounding area on the rear bumper
• When driving on a road surface
that is wet with standing water
during bad weather, such as
heavy rain, snow, or fog
• When multiple vehicles are approaching with only a small gap
between each vehicle
• When the distance between your vehicle and a following vehicle is
short
• When there is a significant differ- ence in speed between your vehi-
cle and the vehicle that enters the
detection area
• When the difference in speed between your vehicle and another
vehicle is changing
• When a vehicle enters a detection area traveling at about the same
speed as your vehicle
• As your vehicle starts from a stop,
Page 309 of 586

3074-5. Using the driving support systems
4
Driving
*: If equipped
Meter control switches
Turning the RCTA function on/off.
When the RCTA function is dis-
abled, the RCTA OFF indicator illu-
minates.
Outside rear view mirror indi-
cators
If a vehicle is detected as
approaching from the left or right
behind the vehicle, both outside
rear view mirror indicators will blink
and a buzzer will sound.
Multimedia display
If a vehicle approaching from the
right or left at the rear of the vehicle
is detected, the RCTA icon
( P.308) for the detected side will
be displayed on the Multimedia dis-
play. This illustration shows an
example of a vehicle approaching
from both sides of the vehicle.
The RCTA can be enabled/dis-
abled on of the multi-infor-
mation display. ( P.517)
When the RCTA function is dis-
RCTA (Rear Cross
Traffic Alert) function*
The RCTA function uses the
BSM rear side radar sensors
installed behind the rear
bumper. This function is
intended to assist the driver
in checking areas that are
not easily visible when
backing up.
WARNING
■Cautions regarding the use of
the system
The driver is solely responsible for
safe driving. Always drive safely,
taking care to o bserve your sur-
roundings.
The RCTA function is only a sup-
plementary function which alerts
the driver tha t a vehicle is
approaching from the right or left
at the rear of the vehicle.
As the RCTA function may not
function correctly under certain
conditions, the driver’s own visual
confirmation of safety is neces-
sary.
Over reliance on this function may
lead to an accident resulting
death or serious injury.
System components
Turning the RCTA func-
tion on/off
A
B
C
Page 310 of 586

3084-5. Using the driving support systems
abled, the RCTA OFF indicator
(P.90) illuminates. (Each time
the power switch is turned to
OFF then changed to ON, the
RCTA function will be enabled
automatically.)
■Outside rear view mirror indica-
tor visibility
In strong sunlight, the outside rear
view mirror indicato r may be difficult
to see.
■Hearing the RCTA buzzer
The RCTA buzzer may be difficult to
hear over loud noises, such as if the
audio system volume is high.
■When “Rear Cross Traffic Alert
Unavailable” is shown on the
multi-information display
Ice, snow, mud, etc., may be
attached to the rear bumper around
the sensors. ( P.294) Removing
the ice, snow, mud, etc., from the
attached to the rear bumper around
the sensors to normal. Additionally,
the function may not function nor-
mally when used in extremely hot or
cold environments.
■When “Rear Cross Traffic Alert
Malfunction Visit Your Dealer”
is shown on the multi-informa-
tion display
There may be a sensor malfunction
or misaligned. Have the vehicle
inspected at a Toyota dealer.
■Rear side radar sensors
P.294
■Operation of the RCTA
function
The RCTA function uses rear
side radar sensors to detect
vehicles approaching from the right or left at the rear of the
vehicle and alerts the driver of
the presence of such vehicles
by flashing the outside rear view
mirror indicators and sounding a
buzzer.
Approaching vehicles
Detection areas of approach-
ing vehicles
■RCTA icon display
When a vehicle approaching
from the right or left at the rear
of the vehicle is detected, the
following will be displayed on
the Multimedia display.
• Example (Panoramic view monitor) (if equipped): Vehi-
cles are approaching from
both sides of the vehicle
RCTA function
A
B
Page 337 of 586

3354-6. Driving tips
4
Driving
Perform the following according
to the driving conditions:
Do not try to forcibly open a
window or move a wiper that
is frozen. Pour warm water
over the frozen area to melt
the ice. Wipe away the water
immediately to prevent it from
freezing.
To ensure proper operation of
the climate control system
fan, remove any snow that
has accumulated on the air
inlet vents in front of the wind-
shield.
Check for and remove any
excess ice or snow that may
have accumulated on the
exterior lights, outside rear
view mirrors, windows, vehi-
cle’s roof, chassis, around the
tires or on the brakes.
Remove any snow or mud
from the bottom of your shoes
before getting in the vehicle.
Accelerate the vehicle slowly,
keep a safe distance between
you and the vehicle ahead, and
drive at a reduced speed suit-
able to road conditions.
Turn automatic mode of the parking brake off. Otherwise,
the parking brake may freeze
and not be able to be
released automatically.
Also, avoid using the following as
the parking brake may operate
automatically, even if automatic
mode is off.
• Brake hold system
Park the vehicle and shift the
shift lever to P without setting
the parking brake. The park-
ing brake may freeze up, pre-
venting it from being released.
If the vehicle is parked without
setting the parking brake,
make sure to block the
wheels. Failure to do so may
be dangerous because it may
cause the vehicle to move
unexpectedly, possibly lead-
ing to an accident.
When the parking brake is in
automatic mode, release the
parking brake after shifting
the shift lever to P. ( P.232)
If the vehicle is parked without
setting the parking brake,
confirm that the shift lever
cannot be moved out of P.
If the vehicle is left parked
with the brakes damp in cold
temperatures, there is a pos-
sibility of the brakes freezing.
Before driving the vehicle
When driving the vehicle
When parking the vehicle
Page 344 of 586

3425-1. Using the air conditioning system and defogger
5-1.Using the air conditioning system and defogger
Automatic mode switch
Left-hand side temperature control knob
Right-hand side temperature control knob
“SYNC” switch
“OFF” switch
Windshield defogger switch
Rear window and outside rear view mirror defoggers switch
Eco air conditioning mode switch
Fan speed decrease switch
Fan speed increase switch
Airflow mode control switch
Outside/recirculated air mode switch
Front seat concentrated airflow mode (S-FLOW) switch
“A/C” switch
■Adjusting the temperature
setting
Turn driver’s side temperature
control dial clockwise to increases the temperature and
turn the dial counterclockwise to
decreases the temperature.
The air conditioning system
Automatic air co
nditioning system
Air outlets and fan speed are automatically adjusted accord-
ing to the temperature setting.
Air conditioning controls
A
B
C
D
E
F
G
H
I
J
K
L
M
N