2023 TOYOTA RAV4 HYBRID warning
[x] Cancel search: warningPage 422 of 586
4206-3. Do-it-yourself maintenance
be possible. Normally, registra-
tion completes within approxi-
mately 30 minutes.
If ID code registration is not com-
plete after driving for approxi-
mately 30 minutes, continue
driving for a while.
• Vehicle is not parked for approxi- mately 20 minutes or more before
driving
• Vehicle is not driven at approxi- mately 25 mph ( 40 km/h) or more
• Vehicle is driven on unpaved roads
• Vehicle is driven near other vehi-
cles and system cannot recog-
nize tire pressure warning valve
and transmitters of your vehicle
over those of other vehicles
• Wheel with tire p ressure warning
valve and transmitter installed is
inside or near the vehicle
If registration does not complete
after driving for 1 hour or more, per-
form the ID code registration proce-
dure again from the beginning.
●If the vehicle is reversed during
registration, the data up to that
point is reset, so perform the reg-
istration procedure again from the
beginning.
●In the following situations, ID code
registration will not be started or
was not completed properly and
the system will no t operate prop-
erly. Perform the ID code registra-
tion procedure again.
• If, when attempting to start ID code registration, the tire pressure
warning light does not blink slowly
3 times.
• If, when the vehicle has been driven for about 20 minutes after
performing ID co de registration,
the tire pressur e warning light
blinks for approxi mately 1 minute
and then illu minates.
If the ID codes cannot be registered
even when performing the above
procedure, contact your Toyota
dealer.
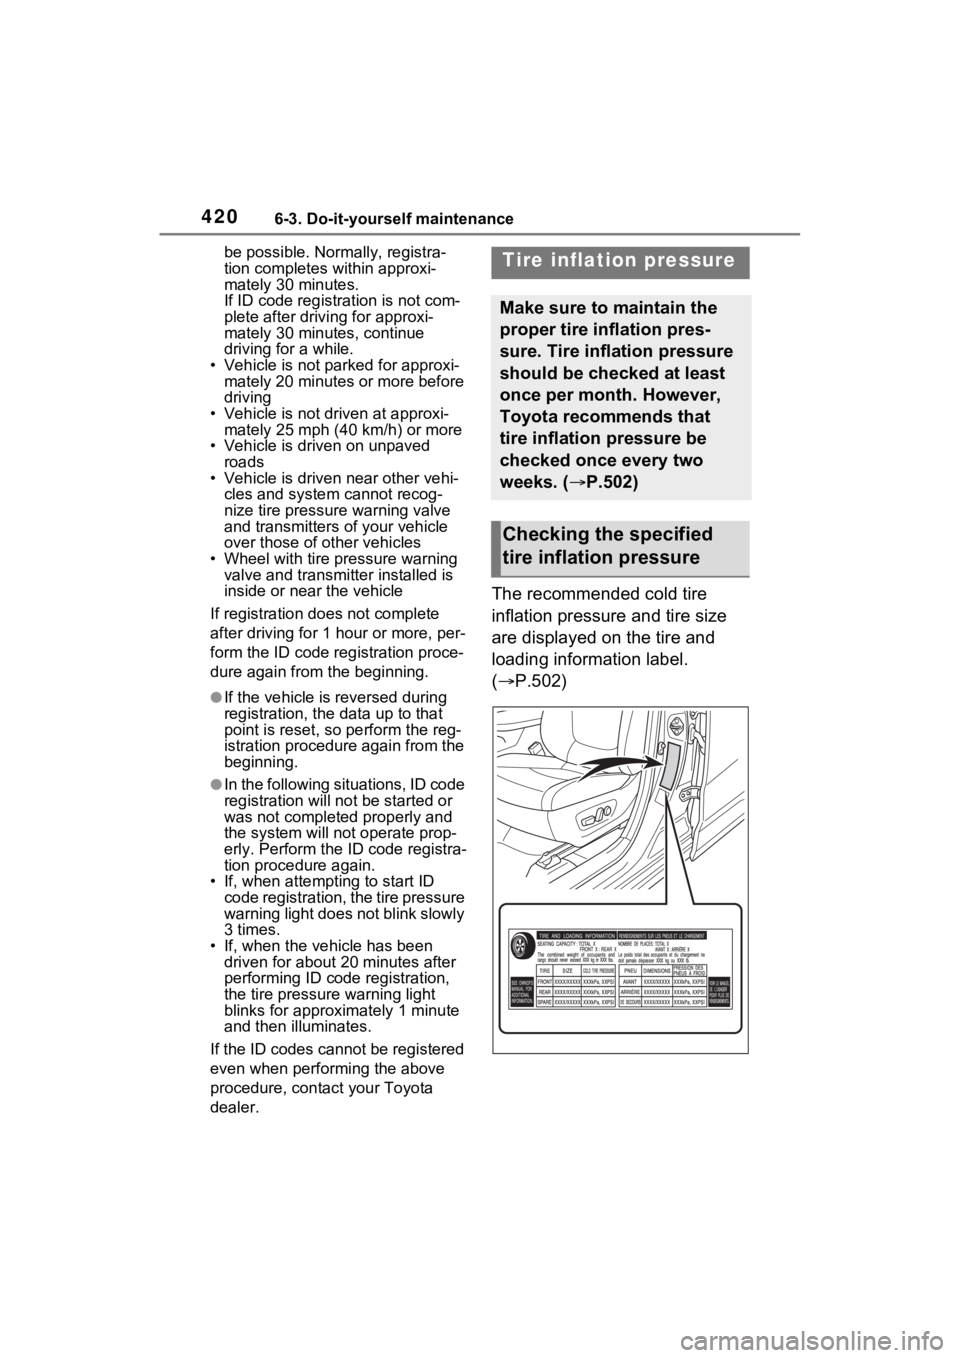
The recommended cold tire
inflation pressure and tire size
are displayed on the tire and
loading information label.
( P.502)
Tire inflation pressure
Make sure to maintain the
proper tire inflation pres-
sure. Tire inflation pressure
should be checked at least
once per month. However,
Toyota recommends that
tire inflation pressure be
checked once every two
weeks. ( P.502)
Checking the specified
tire inflation pressure
Page 424 of 586
4226-3. Do-it-yourself maintenance
When replacing wheels, care
should be taken to ensure that
they are equivalent to those
removed in load capacity, diam-
eter, rim width and inset
*.
Replacement wheels are avail-
able at your Toyota dealer.
*: Conventionally referred to as off- set.
Toyota does not recommend
using the following:
Wheels of different sizes or
types
Used wheels
Bent wheels that have been
straightened
■When replacing wheels (vehi-
cles with tire p ressure warning
system)
The wheels of your vehicle are
equipped with tire pressure warning
valves and transmitters that allow
the tire pressure warning system to
provide advance warning in the
event of a loss in tire inflation pres-
sure. Whenever wheels are
replaced, tire pressure warning
valves and transmitters must be
installed. ( P.412, 423)
WARNING
■Proper inflation is critical to
save tire performance
Keep your tires properly inflated.
If the tires are not properly
inflated, the following conditions
may occur which could lead to an
accident resulting in death or seri-
ous injury:
●Excessive wear
●Uneven wear
●Poor handling
●Possibility of blowouts resulting
from overheated tires
●Air leaking from between tire
and wheel
●Wheel deformation and/or tire
damage
●Greater possibility of tire dam-
age while driving (due to road
hazards, expansion joints,
sharp edges in the road, etc.)
NOTICE
■When inspecting and adjust-
ing tire inflation pressure
Be sure to put the tire valve caps
back on.
If a valve cap is not installed, dirt
or moisture may get into the valve
and cause an air leak, resulting in
decreased tire inflation pressure.
Wheels
If a wheel is bent, cracked or
heavily corroded, it should
be replaced. Otherwise, the
tire may separate from the
wheel or cause a loss of
handling control.
Wheel selection
Page 425 of 586
4236-3. Do-it-yourself maintenance
6
Maintenance and careUse only Toyota wheel nuts
and wrenches designed for
use with your aluminum
wheels.
When rotating, repairing or
changing your tires, check
that the wheel nuts are still
tight after driving 1000 miles
(1600 km).
Be careful not to damage the
aluminum wheels when using
tire chains.
Use only Toyota genuine bal-
ance weights or equivalent
and a plastic or rubber ham-
mer when balancing your
wheels.
WARNING
■When replacing wheels
●Do not use wheels that are a dif-
ferent size from those recom-
mended in the Owner’s Manual,
as this may result in a loss of
handling control.
●Never use an inner tube in a
leaking wheel which is designed
for a tubeless tire. Doing so may
result in an accident, causing
death or serious injury.
■When installing the wheel
nuts
Never use oil or grease on the
wheel bolts or wheel nuts. Oil and
grease may cause the wheel nuts
to be excessively tightened, lead-
ing to bolt or disc wheel damage.
In addition, the oil or grease can
cause the wheel nuts to loosen
and the wheel may fall off, caus-
ing an accident and resulting in
death or serious injury. Remove
any oil or grease from the wheel
bolts or wheel nuts.
■Use of defective wheels pro-
hibited
Do not use cracked or deformed
wheels.
Doing so could cause the tire to
leak air during driving, possibly
causing an accident.
NOTICE
■Replacing tire pressure warn-
ing valves and transmitters
(vehicles with tire pressure
warning system)
●Because tire repair or replace-
ment may affect the tire pres-
sure warning valves and
transmitters, make sure to have
tires serviced by your Toyota
dealer or other qualified service
shop. In additio n, make sure to
purchase your tire pressure
warning valves and transmit-
ters at your To yota dealer.
●Ensure that only genuine
Toyota wheels are used on your
vehicle.
Tire pressure warning valves
and transmitters may not work
properly with non-genuine
wheels.
Aluminum wheel precau-
tions
Page 428 of 586
4266-3. Do-it-yourself maintenance
■Scheduled maintenance of the
air intake vent is necessary
when
In some situations such as when the
vehicle is used frequently or in
heavy traffic or dusty areas, the air
intake vent may need to be cleaned
more regularly. For details, refer to
“Owner’s Warranty Information
Booklet” or “Owner’s Manual Sup-
plement”.
■Cleaning the air intake vent
Improper handling of the air intake
vent cover and filter may result in
damage to them. If you have any
concerns about cleaning the filter,
contact your Toyota dealer.
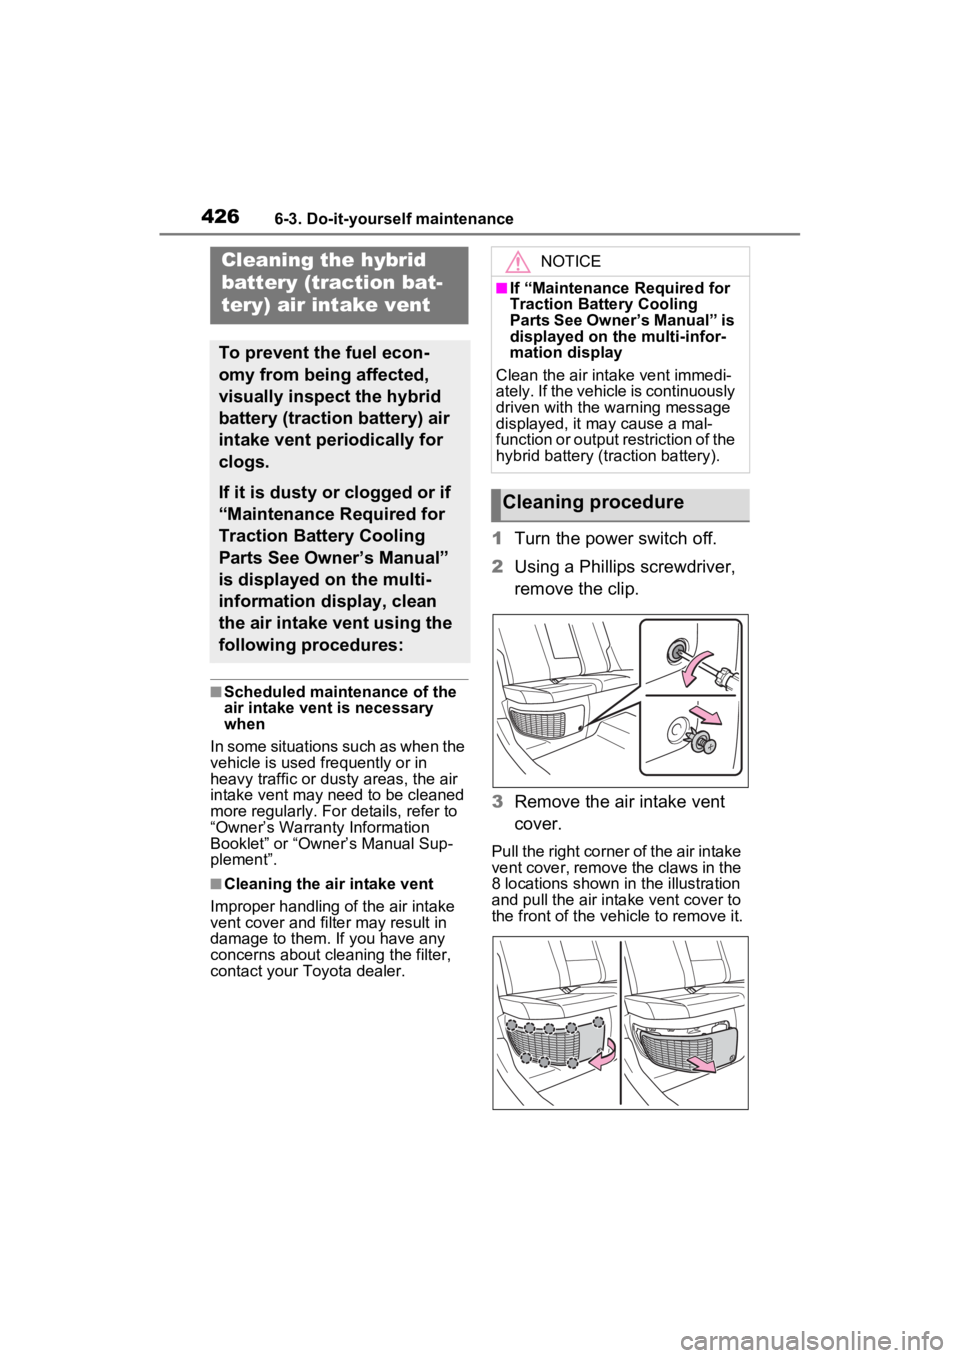
1 Turn the power switch off.
2 Using a Phillips screwdriver,
remove the clip.
3 Remove the air intake vent
cover.
Pull the right corner of the air intake
vent cover, remove the claws in the
8 locations shown in the illustration
and pull the air intake vent cover to
the front of the vehicle to remove it.
Cleaning the hybrid
battery (traction bat-
tery) air intake vent
To prevent the fuel econ-
omy from being affected,
visually inspect the hybrid
battery (traction battery) air
intake vent periodically for
clogs.
If it is dusty or clogged or if
“Maintenance Required for
Traction Battery Cooling
Parts See Owner’s Manual”
is displayed on the multi-
information display, clean
the air intake vent using the
following procedures:
NOTICE
■If “Maintenance Required for
Traction Battery Cooling
Parts See Owner’s Manual” is
displayed on the multi-infor-
mation display
Clean the air intake vent immedi-
ately. If the vehicle is continuously
driven with the warning message
displayed, it may cause a mal-
function or output restriction of the
hybrid battery (traction battery).
Cleaning procedure
Page 430 of 586

4286-3. Do-it-yourself maintenance
shown in the illustration.
9Install the clip.
If “Maintenance Required for
Traction Battery Cooling Parts
See Owner’s Manual” was
displayed on the multi-infor-
mation display
10 Start the hybrid system and
check that the warning mes-
sage is no longer displayed.
It may be necessary to drive the
vehicle for approximately 20 min-
utes before the warning message is
displayed again then disappears.
If the warning message does not
disappear after some time, have
the vehicle insp ected by your
Toyota dealer.
■If the dust or sand on the filter
cannot be removed
It is recommended to use a vacuum
cleaner with plastic brushes.
WARNING
■When cleaning the air intake
vent
●Do not use water or other liq-
uids to clean the air intake vent.
If water is applied to the hybrid
battery (traction battery) or
other components, a malfunc-
tion or fire may occur.
●Do not touch the service plug
located near the air intake vent.
( P.76)
●Before cleaning the air intake
vent, make sure to turn the
power switch off to stop the
hybrid system.
●Do not put a han d or leg in the
air intake vent. If it is caught in a
cooling fan, or if it touches a
high voltage part that results in
an electric shock, death or seri-
ous injuries may result.
NOTICE
■When cleaning the air intake
vent
Do not use an ai r blow gun, etc.
Dust may be blown out, possibly
causing a malfunction or output
restriction of the hybrid battery
(traction battery).
■To prevent damage to the
vehicle
Observe the following precau-
tions:
Page 437 of 586
4356-3. Do-it-yourself maintenance
6
Maintenance and care
WARNING
■Battery precautions
Observe the following precau-
tions. Failure to do so may result
in death or serious injury.
●Do not swallow the battery.
Doing so may cause chemical
burns.
●A coin battery or button battery
is used in the electronic key. If a
battery is swallowed, it may
cause severe chemical burns in
as little as 2 hours and may
result in death or serious injury.
●Keep away new and removed
batteries from children.
●If the cover cannot be firmly
closed, stop using the electronic
key and stow the key in the
place where children cannot
reach, and then contact your
Toyota dealer.
●If you accidentally swallow a
battery or put a b attery into a
part of your body, get emer-
gency medical attention imme-
diately.
■To prevent battery explosion
or leakage of flammable liq-
uid or gas
●Replace the battery with a new
battery of the same type. If a
wrong type of battery is used, it
may explode.
●Do not expose batteries to
extremely low pressure due to
high altitude or extremely high
temperatures.
●Do not burn, bre ak or cut a bat-
tery.
NOTICE
■For normal operation after
replacing the battery
Observe the following precautions
to prevent accidents:
●Always work with dry hands.
Moisture may cause the battery
to rust.
●Do not touch or move any other
component inside the remote
control.
●Do not bend either of the battery
terminals.
Page 440 of 586

4386-3. Do-it-yourself maintenance
*: Vehicles with LED projector
headlights
Adjustment bolt A
Adjustment bolt B
Make sure the vehicle has a
full tank of gasoline and the
area around the headlight is
not deformed.
Park the vehicle on level
ground.
Make sure the tire inflation
pressure is at the specified
level.
Have someone sit in the
driver’s seat.
Bounce the vehicle several
times.
WARNING
■To prevent system break-
downs and vehicle fire
Observe the following precau-
tions.
Failure to do so may cause dam-
age to the vehicle, and possibly a
fire or injury.
●Never use a fuse of a higher
amperage rating than that indi-
cated, or use any other object in
place of a fuse.
●Always use a genuine Toyota
fuse or equivalent.
Never replace a fuse with a
wire, even as a temporary fix.
●Do not modify the fuses or fuse
boxes.
NOTICE
■Before replacing fuses
Have the cause of electrical over-
load determined and repaired by
your Toyota dealer as soon as
possible.
■To prevent damage to the
engine compartment fuse box
cover
When opening the fuse box, com-
pletely release the claw locks
before lifting up the cover. Other-
wise, the claws may be damaged.
Headlight aim*
Vertical movement adjust-
ing bolts
Before checking the head-
light aim
A
B
Page 447 of 586
4456-3. Do-it-yourself maintenance
6
Maintenance and care
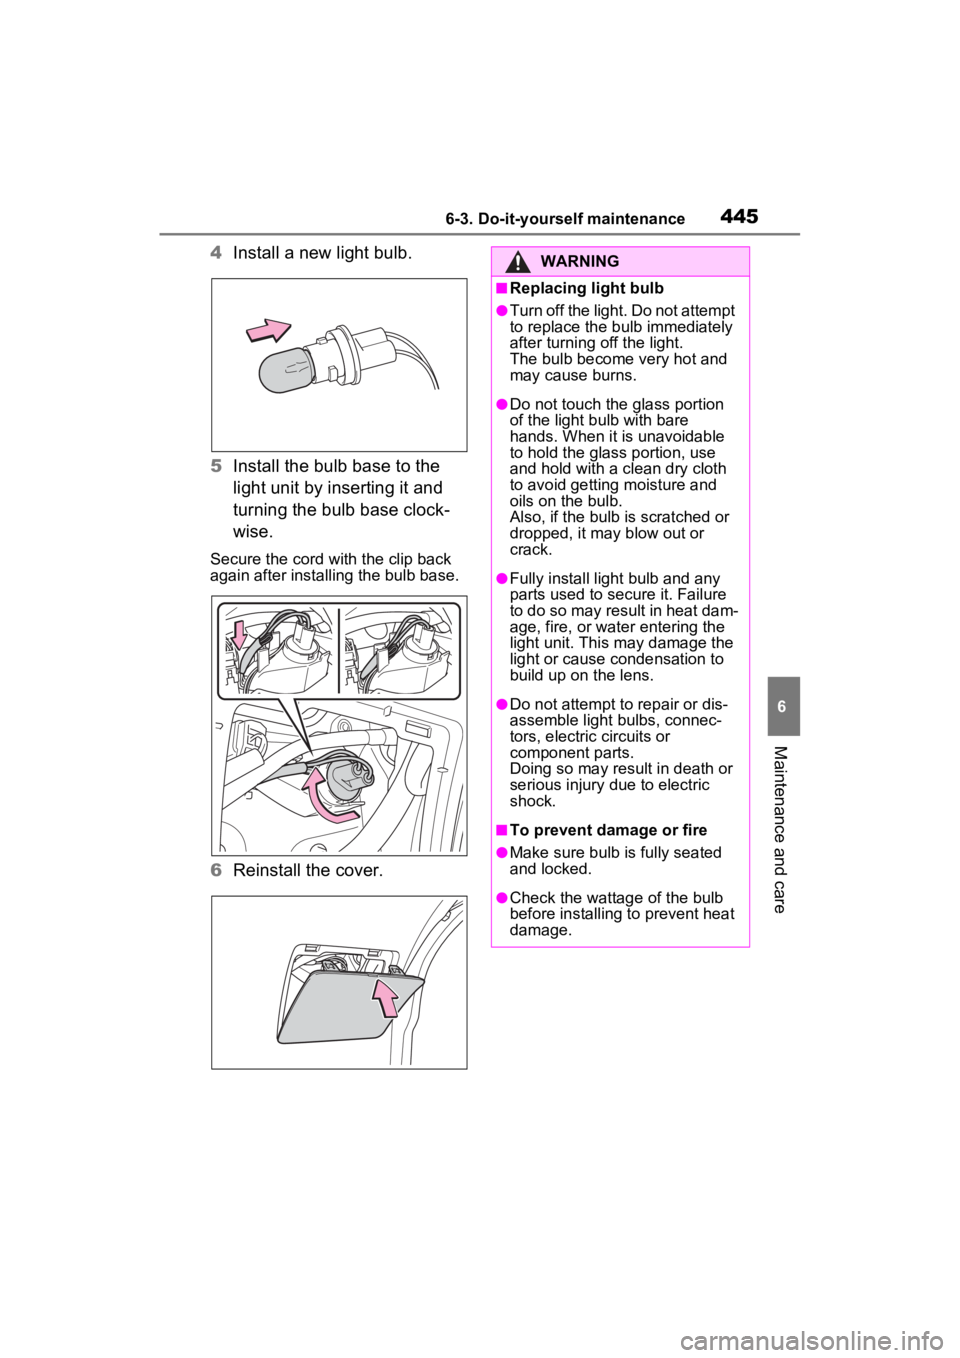
4Install a new light bulb.
5 Install the bulb base to the
light unit by inserting it and
turning the bulb base clock-
wise.
Secure the cord wit h the clip back
again after installing the bulb base.
6 Reinstall the cover.
WARNING
■Replacing light bulb
●Turn off the light. Do not attempt
to replace the bu lb immediately
after turning off the light.
The bulb become very hot and
may cause burns.
●Do not touch the glass portion
of the light bulb with bare
hands. When it is unavoidable
to hold the glass portion, use
and hold with a clean dry cloth
to avoid getting moisture and
oils on the bulb.
Also, if the bulb is scratched or
dropped, it may blow out or
crack.
●Fully install light bulb and any
parts used to secure it. Failure
to do so may result in heat dam-
age, fire, or water entering the
light unit. This may damage the
light or cause condensation to
build up on the lens.
●Do not attempt to repair or dis-
assemble light bulbs, connec-
tors, electric circuits or
component parts.
Doing so may result in death or
serious injury due to electric
shock.
■To prevent damage or fire
●Make sure bulb is fully seated
and locked.
●Check the wattage of the bulb
before installing to prevent heat
damage.