Page 337 of 516
3356-3. Do-it-yourself maintenance
RAIZE_OM_General_BZ358E
Maintenance and care
6
WARNING
⬛Proper inflation is critical to save tire performance
Keep your tires properly inflated.
If the tires are not properly inflated, the following conditions may occur which
could lead to an accident resulting in death or serious injury:
⚫Excessive wear
⚫Uneven wear
⚫Poor handling
⚫Possibility of blowouts resulting from overheated tires
⚫Air leaking from between tire and wheel
⚫Wheel deformation and/or tire damage
⚫Greater possibility of tire damage while driving (due to road hazards, expan-
sion joints, sharp edges in the road, etc.)
NOTICE
⬛After inspecting and adjusting the tire pressure
Be sure to put the tire valve caps back on securely.
If a valve cap is not installed, dirt or moisture may get into the valve and cause
an air leak, resulting in decreased tire inflation pressure.
RAIZE_OM_General_BZ358E.book 335 ページ 2022年5月17日 火曜日 午後1時59分
Page 343 of 516
3416-3. Do-it-yourself maintenance
RAIZE_OM_General_BZ358E
Maintenance and care
6
⬛Replacing the windshield wiper rubbers
a Pull the wiper rubber, remove
the stopper by pressing the claw
of the wiper blade, and pull out
the wiper rubber
b Remove the 2 metal plates from
the old wiper rubber and attach
them to the new wiper rubber
Pay attention to the orientation of the
notch and upward curve of the metal
plate.
cIn attachment, insert it into the
wiper blade from the side with-
out the wiper rubber stopper
Insert the wiper rubber to the blade in
the arrow direction.
dCarefully secure the wiper rubber stopper with the claw of the wiper
blade
KBTC621003
Claw
KBTC621004
KBTC621010
RAIZE_OM_General_BZ358E.book 341 ページ 2022年5月17日 火曜日 午後1時59分
Page 344 of 516
3426-3. Do-it-yourself maintenance
RAIZE_OM_General_BZ358E
Rear wiper
⬛Removing and attaching the rear wiper blades
a Raise the wiper arm and remove
the wiper blade
aRotate the wiper blade until
the claw fitting comes off
b Remove the wiper blade from
the wiper arm
b To attach the windshield wiper blade, do it in the reverse steps of the
procedure a
When returning the raised wiper arm, return it slowly while holding it with hands.
After attaching the wiper blade, make sure that the joint is securely locked.
⬛Replacing the rear wiper rubbers
a Pull out the wiper rubber from
the wiper blade’s stopper and
remove it all the way
b Remove the 2 metal plates from
the old wiper rubber and attach
them to the new wiper rubber
Pay attention to the orientation of the
upward curve of the metal plate.
2
1
KBRO621005
KBRO621006
KBRO621007
RAIZE_OM_General_BZ358E.book 342 ページ 2022年5月17日 火曜日 午後1時59分
Page 347 of 516

3456-3. Do-it-yourself maintenance
RAIZE_OM_General_BZ358E
Maintenance and care
6
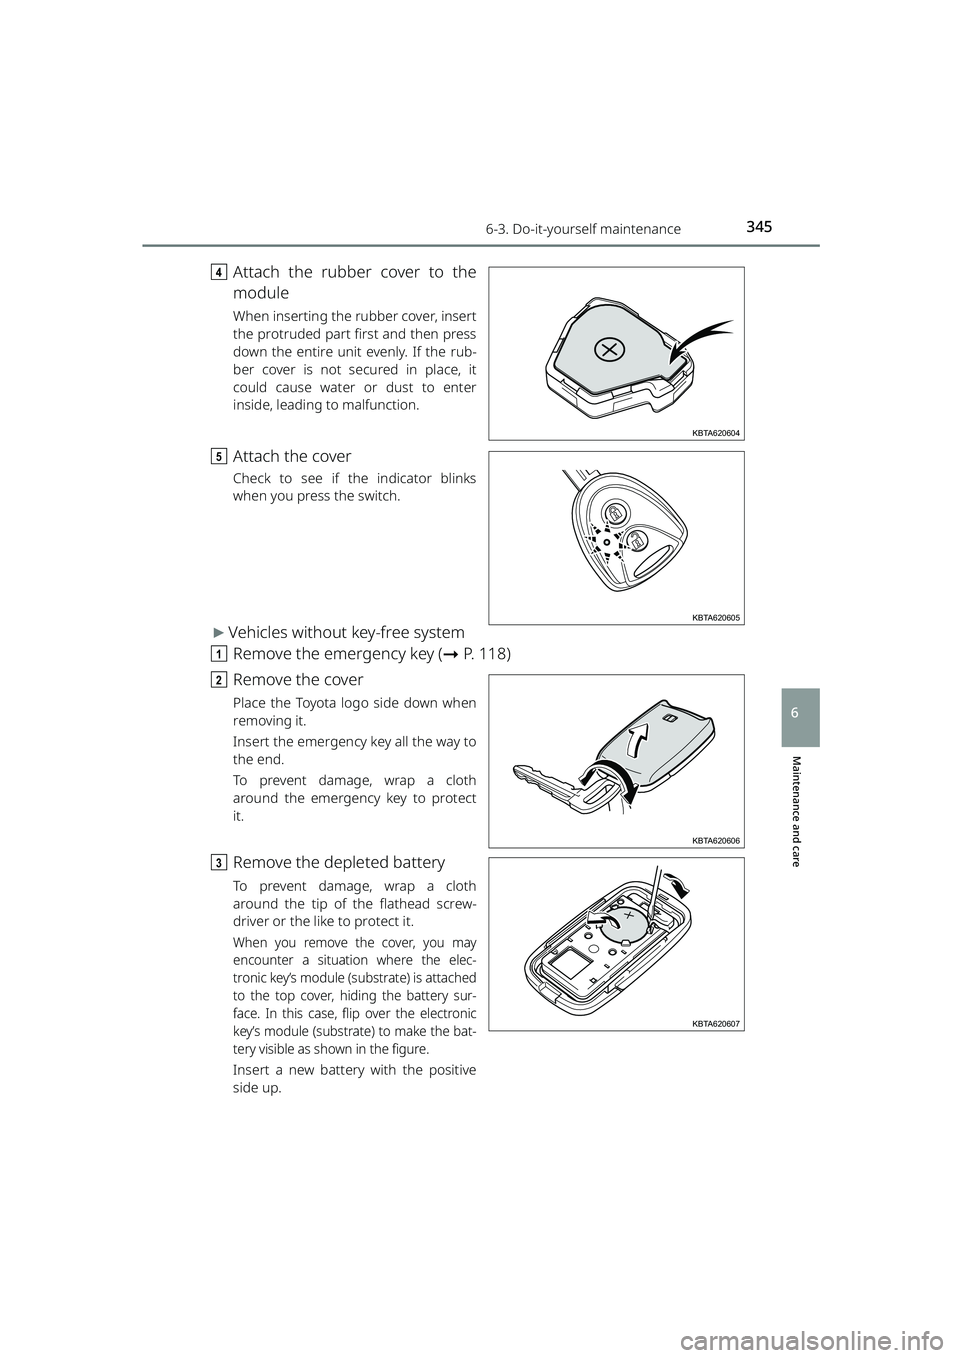
dAttach the rubber cover to the
module
When inserting the rubber cover, insert
the protruded part first and then press
down the entire unit evenly. If the rub-
ber cover is not secured in place, it
could cause water or dust to enter
inside, leading to malfunction.
eAttach the cover
Check to see if the indicator blinks
when you press the switch.
▶Vehicles without key-free system
a Remove the emergency key ( ➞P. 118)
b Remove the cover
Place the Toyota logo side down when
removing it.
Insert the emergency key all the way to
the end.
To prevent damage, wrap a cloth
around the emergency key to protect
it.
cRemove the depleted battery
To prevent damage, wrap a cloth
around the tip of the flathead screw-
driver or the like to protect it.
When you remove the cover, you may
encounter a situation where the elec-
tronic key’s module (s ubstrate) is attached
to the top cover, hiding the battery sur-
face. In this case, flip over the electronic
key’s module (substrate) to make the bat-
tery visible as shown in the figure.
Insert a new battery with the positive
side up.
KBTA620604
KBTA620605
KBTA620606
KBTA620607
RAIZE_OM_General_BZ358E.book 345 ページ 2022年5月17日 火曜日 午後1時59分
Page 357 of 516
3556-3. Do-it-yourself maintenance
RAIZE_OM_General_BZ358E
Maintenance and care
6
cReplace and attach the light bulb
Align the light bulb’s claws (3 locations)
to the mounted area, insert it and
secure it in place.
aLow beam (outside)
b High beam (inside)
d Attach the socket
After attaching the socket, turn on the
headlights and make sure there is no
light leaking out.
12
KBRO620818N
KBRO620819N
RAIZE_OM_General_BZ358E.book 355 ページ 2022年5月17日 火曜日 午後1時59分
Page 361 of 516
3596-3. Do-it-yourself maintenance
RAIZE_OM_General_BZ358E
Maintenance and care
6
eReplace and attach the light bulb
Align the light bulb’s claws (3 locations)
to the mounted area, insert it and
secure it in place.
fAttach the connector
After attaching the connector, turn on
the front fog lights and make sure
there is no light leaking out.
gRestore the fender liner to the
original position and attach the
clips (3 pcs)
KBRO620829N
KBRO620830N
KBRO620831N
RAIZE_OM_General_BZ358E.book 359 ページ 2022年5月17日 火曜日 午後1時59分
Page 365 of 516

3636-3. Do-it-yourself maintenance
RAIZE_OM_General_BZ358E✽
: If equipped
Maintenance and care
6
⬛Other light bulbs
If any other light bulbs go out, replace them at your Toyota dealer.
⚫Headlight high beam/low beam (vehicles with LED headlights)
⚫Daytime running lights✽
⚫Front position lights (vehicles with LED headlights)
⚫Front turn signal/emergency flashe rs (vehicles with LED headlights)
⚫Side turn signal lights/emergency flashers
⚫Stop lights/tail lights
⚫High mounted stoplight
⚫Rear fog light✽
⬛LED lights
Each unit of LED headlights,
✽ daytime running lights✽, and high mounted stop-
light are made of several LEDs. If any one of the LEDs do not light up, replace it
at your Toyota dealer.
⬛When replacing the front fog lights✽
Remove the retaining clips of the fender liner and replace the light bulb. After
replacement, be sure to hold the fender liner with the clips and secure it in
place.
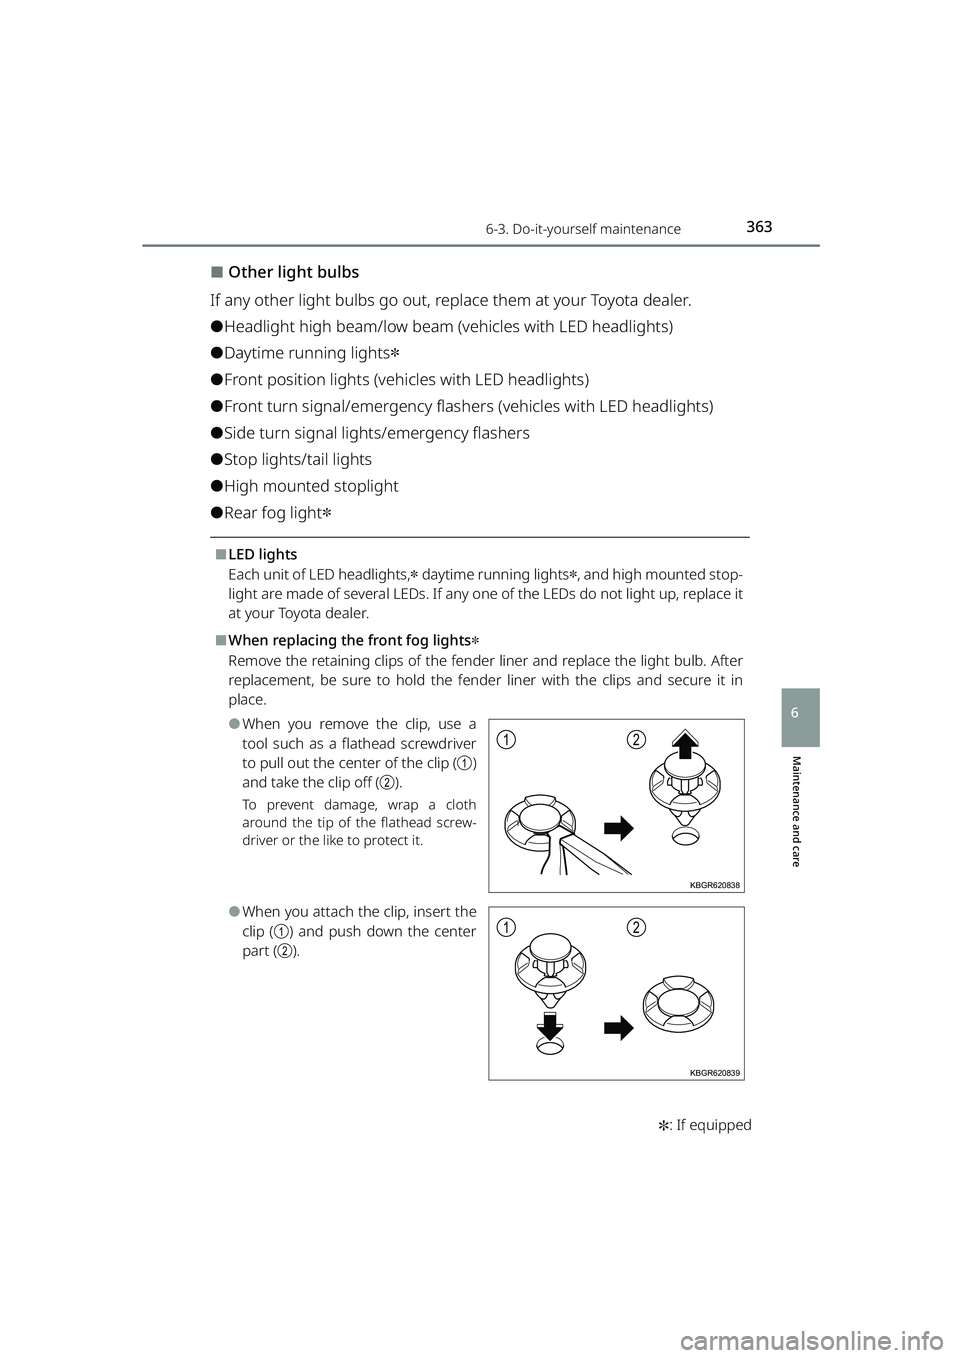
⚫When you remove the clip, use a
tool such as a flathead screwdriver
to pull out the center of the clip ( a)
and take the clip off ( b).
To prevent damage, wrap a cloth
around the tip of the flathead screw-
driver or the like to protect it.
⚫When you attach the clip, insert the
clip ( a) and push down the center
part ( b).
12
KBGR620838
12
KBGR620839
RAIZE_OM_General_BZ358E.book 363 ページ 2022年5月17日 火曜日 午後1時59分
Page 366 of 516

3646-3. Do-it-yourself maintenance
RAIZE_OM_General_BZ358E
⬛Water droplets and condensation in the lens
Temporary condensation build-up on the inside of the lens does not indicate a
malfunction. However, contact your Toyota dealer in the following situations:
⚫Large drops of water have built up on the inside of the lens
⚫Water has built up inside the light
⬛When replacing light bulbs
➞P. 3 5 2
WARNING
⬛When replacing light bulbs
⚫Turn off the lights. Do not attempt to replace the bulb immediately after
turning off the lights. The bulbs be come very hot and may cause burns.
There is also a danger of electric shock.
⚫Do not touch the glass portion of the light bulb with bare hands.
When it is unavoidable to hold the gl ass portion, use and hold with a clean
dry cloth to avoid getting moisture and oils on the bulb.
Also, if the bulb is scratched or dropped, it may blow out or crack.
⚫Fully install light bulbs and any parts us ed to secure them. Failure to do so
may result in heat damage, fire, or water entering the headlight unit. This
may damage the headlights or cause condensation to build up on the lens.
⚫Do not repair or disassemble light bulbs, sockets, electrical circuits, or com-
ponents.
Electric shock may result in death or serious injury.
⬛To prevent vehicle damage or fire
⚫Make sure bulbs are securely in stalled in the correct position.
⚫Check the wattage of the bulb before installing to prevent heat damage.
RAIZE_OM_General_BZ358E.book 364 ページ 2022年5月17日 火曜日 午後1時59分