2023 TOYOTA HIGHLANDER ECU
[x] Cancel search: ECUPage 418 of 552
4186-3. Do-it-yourself maintenance
vehicle.
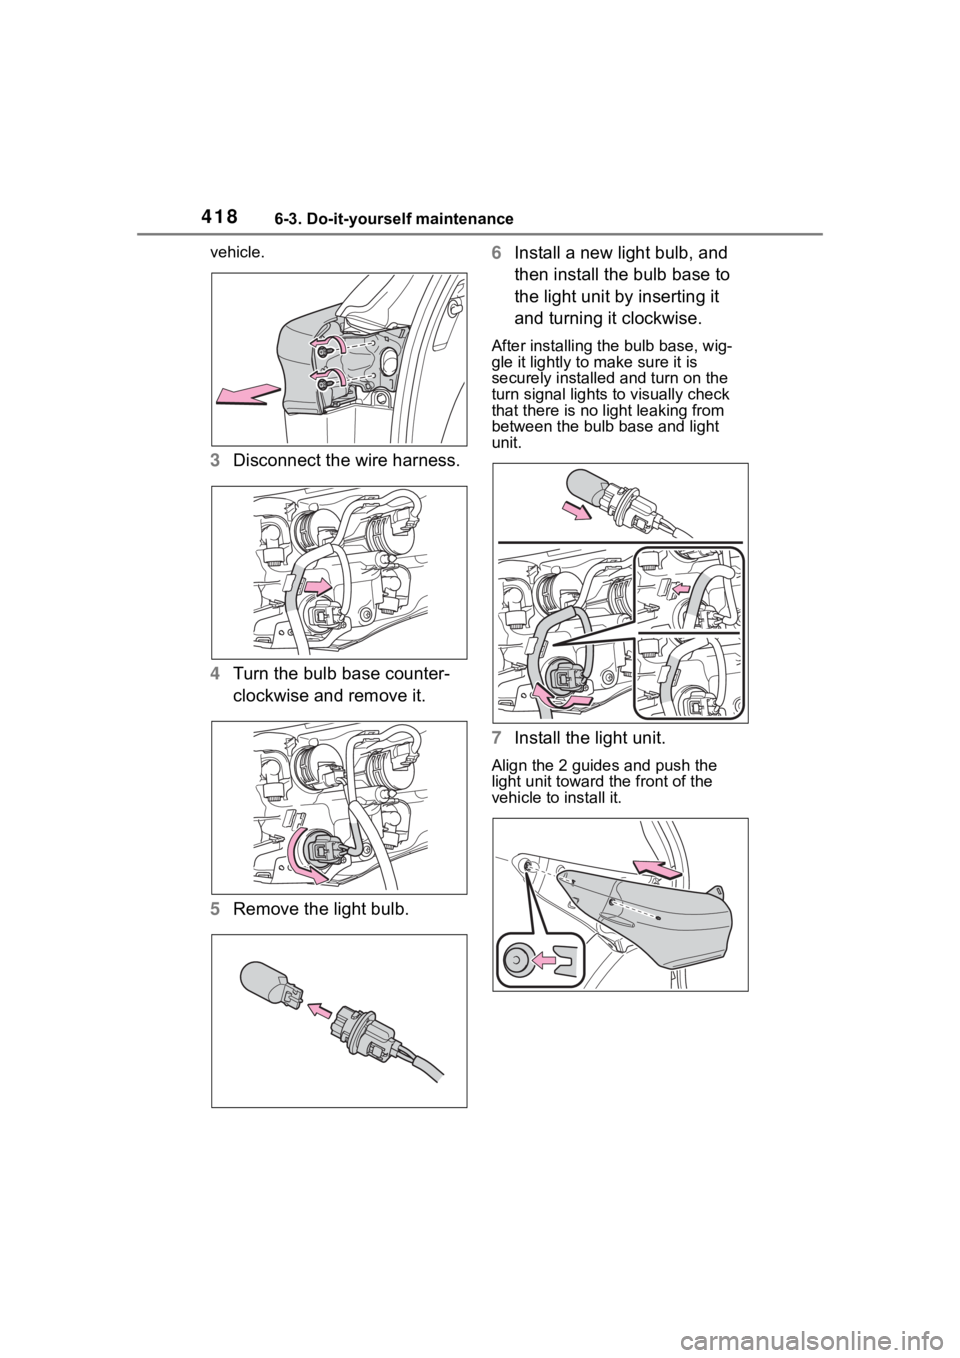
3Disconnect the wire harness.
4 Turn the bulb base counter-
clockwise and remove it.
5 Remove the light bulb. 6
Install a new light bulb, and
then install the bulb base to
the light unit by inserting it
and turning it clockwise.
After installing the bulb base, wig-
gle it lightly to make sure it is
securely installed and turn on the
turn signal lights to visually check
that there is no light leaking from
between the bulb base and light
unit.
7Install the light unit.
Align the 2 guides and push the
light unit toward the front of the
vehicle to install it.
Page 419 of 552
4196-3. Do-it-yourself maintenance
6
Maintenance and care
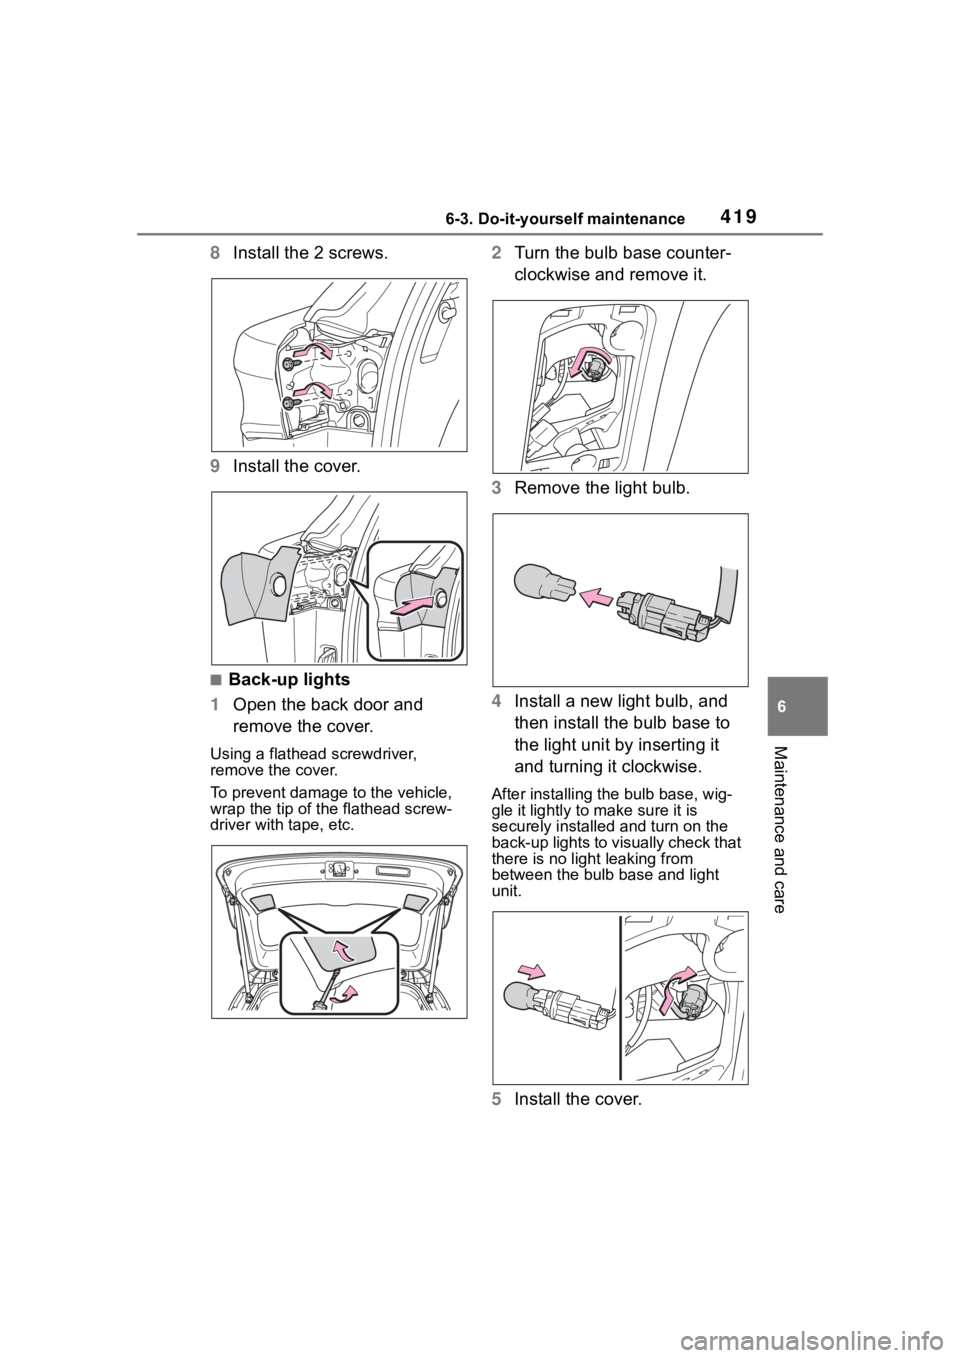
8Install the 2 screws.
9 Install the cover.
■Back-up lights
1 Open the back door and
remove the cover.
Using a flathead screwdriver,
remove the cover.
To prevent damage to the vehicle,
wrap the tip of the flathead screw-
driver with tape, etc.
2Turn the bulb base counter-
clockwise and remove it.
3 Remove the light bulb.
4 Install a new light bulb, and
then install the bulb base to
the light unit by inserting it
and turning it clockwise.
After installing the bulb base, wig-
gle it lightly to make sure it is
securely installed and turn on the
back-up lights to visually check that
there is no light leaking from
between the bulb base and light
unit.
5Install the cover.
Page 422 of 552
4226-3. Do-it-yourself maintenance
WARNING
●Do not touch the glass portion
of the light bulb with bare
hands. When it is unavoidable
to hold the glass portion, use
and hold with a clean dry cloth
to avoid getting moisture and
oils on the bulb. Also, if the bulb
is scratched or dropped, it may
blow out or crack.
●Fully install light bulbs and any
parts used to secure them. Fail-
ure to do so may result in heat
damage, fire, or water entering
the light unit. This may damage
the lights or cause condensa-
tion to build up on the lens.
●Do not attempt t o repair or dis-
assemble light bulbs, connec-
tors, electric circuits or
component parts.
Doing so may result in death or
serious injury due to electric
shock.
■To prevent damage or fire
●Make sure bulbs are fully
seated and locked.
●Check the wattage of the bulb
before installing to prevent heat
damage.
Page 424 of 552
4247-1. Essential information
7-1.Essential information
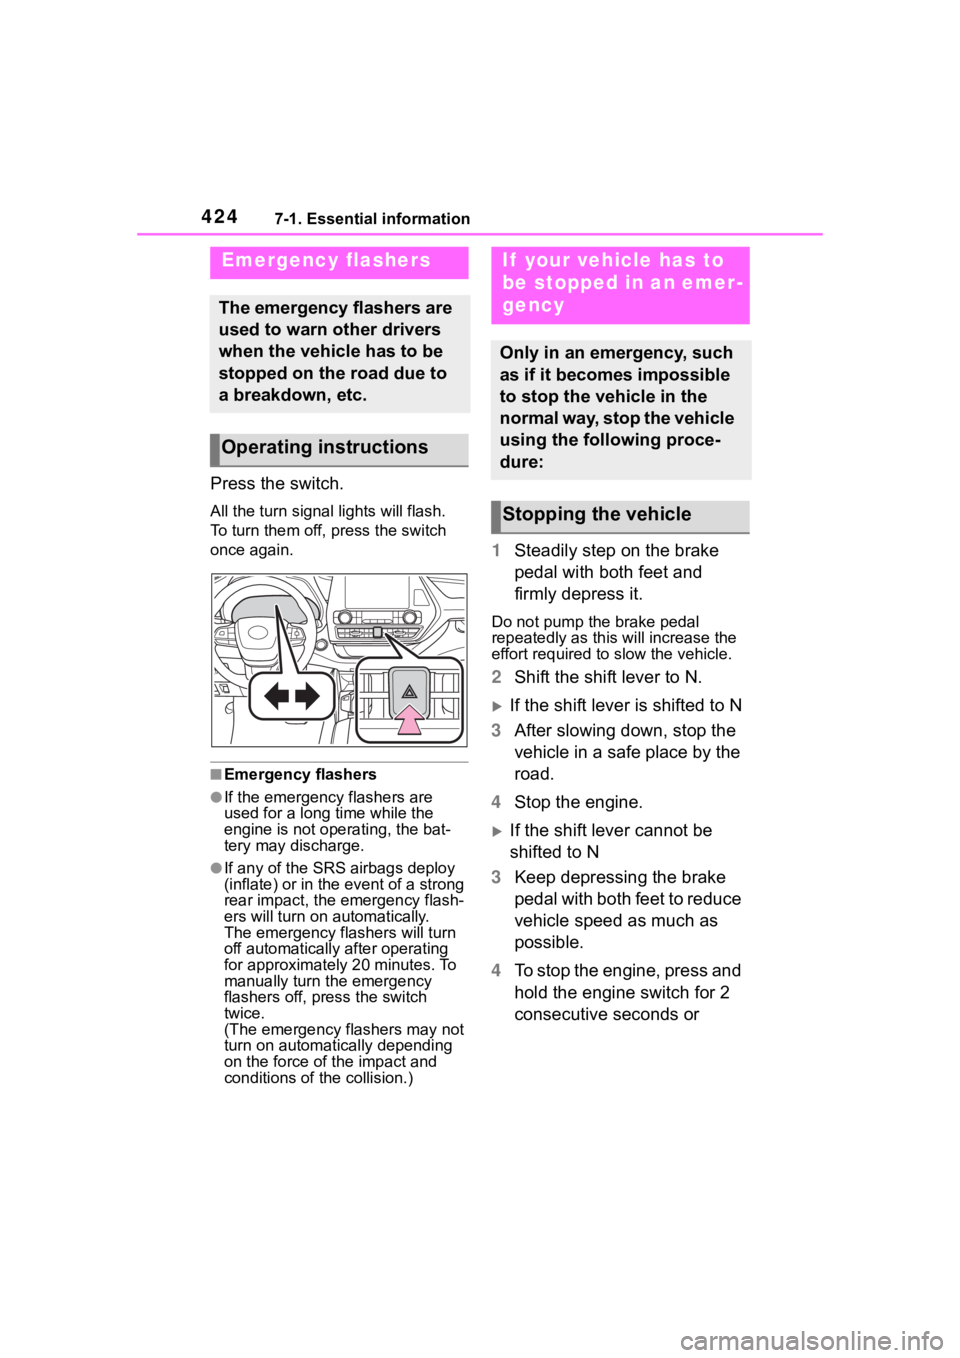
Press the switch.
All the turn signal lights will flash.
To turn them off, press the switch
once again.
■Emergency flashers
●If the emergency flashers are
used for a long time while the
engine is not operating, the bat-
tery may discharge.
●If any of the SRS airbags deploy
(inflate) or in the event of a strong
rear impact, the emergency flash-
ers will turn on automatically.
The emergency flashers will turn
off automatically after operating
for approximately 20 minutes. To
manually turn t he emergency
flashers off, press the switch
twice.
(The emergency flashers may not
turn on automatically depending
on the force of the impact and
conditions of the collision.)
1 Steadily step on the brake
pedal with both feet and
firmly depress it.
Do not pump the brake pedal
repeatedly as this will increase the
effort required to slow the vehicle.
2Shift the shift lever to N.
If the shift lever is shifted to N
3 After slowing down, stop the
vehicle in a safe place by the
road.
4 Stop the engine.
If the shift lever cannot be
shifted to N
3 Keep depressing the brake
pedal with both feet to reduce
vehicle speed as much as
possible.
4 To stop the engine, press and
hold the engine switch for 2
consecutive seconds or
Emergency flashers
The emergency flashers are
used to warn other drivers
when the vehicle has to be
stopped on the road due to
a breakdown, etc.
Operating instructions
If your vehicle has to
be stopped in an emer-
gency
Only in an emergency, such
as if it becomes impossible
to stop the vehicle in the
normal way, stop the vehicle
using the following proce-
dure:
Stopping the vehicle
Page 429 of 552
4297-2. Steps to take in an emergency
7
When trouble arises
truck for the tire strapping
method.
In order to suppress vehicle
movement during transporta-
tion, set the parking brake and
turn the engine switch off.
Fluid leaks under the vehicle
(Water dripping from the air
conditioning after use is nor-
mal.)
Flat-looking tires or uneven
tire wear
Engine coolant temperature
gauge needle continually
points higher than normal
Changes in exhaust sound
Excessive tire squeal when
cornering
Strange noises related to the
suspension system
Pinging or other noises
related to the engine
Engine missing, stumbling or
running roughly
Appreciable loss of power
Vehicle pulls heavily to one
NOTICE
■To prevent damage to the
vehicle during emergency
towing
Do not secure cables or chains to
the suspension components.
If you think something
is wrong
If you notice any of the fol-
lowing symptoms, your
vehicle probably needs
adjustment or repair. Con-
tact your Toyota dealer as
soon as possible.
Visible symptoms
Audible symptoms
Operational symptoms
Page 439 of 552

4397-2. Steps to take in an emergency
7
When trouble arises
ger detection sensor may cause
the warning light to flash and the
warning buzzer to sound even if a
passenger is not sitting in the
seat.
●If a cushion is placed on the seat,
the sensor may not detect a pas-
senger, and the warning light may
not operate properly.
■SRS warning light
This warning light system monitors
the airbag sensor assembly, front
impact sensors, side impact sensors
(front), side impact sensors (front
door), side impact sensors (rear),
driver’s seat position sensor,
driver’s seat belt buckle switch, front
passenger occupant classification
system (ECU and sensors), “PASS
AIR BAG ON” indicator light, “PASS
AIR BAG OFF” indicator light, front
passenger’s seat belt buckle switch,
driver’s seat belt pretensioner, front
passenger’s seat be lt pretensioner
and force limiter, airbags, intercon-
necting wiring and power sources.
( P.34)
■If the malfunction indicator
lamp comes on while driving
First check the following:
●Is the fuel t ank empty?
If it is, fill the f uel tank immediately.
●Is the fuel tank cap loose?
If it is, tighten it securely.
The light will go o ff after several
driving trips.
If the light does not go off even after
several trips, contact your Toyota
dealer as soon as possible.
■Electric power steering system
warning light (warning buzzer)
When the battery charge becomes
insufficient or the voltage temporar-
ily drops, the electric power steering
system warning light may come on
and the warning buzzer may sound.
■When the tire pressure warning
light comes on
Inspect the tires to check if a tire is
punctured.
If a tire is punctured: P. 4 4 6
If none of the tires are punctured:
Turn the engine switch off then turn
it to ON. Check if the tire pressure
warning light com es on or blinks.
If the tire pressure warning light
blinks for 1 minute then stays on
There may be a malfunction in the
tire pressure warning system. Have
the vehicle inspected by your Toyota
dealer immediately.
If the tire pressur e warning light
comes on
1 After the temperature of the tires
has lowered sufficiently, check
the inflation pressure of each tire
and adjust them to the specified
level.
2 If the warning light does not turn
off even after several minutes
have elapsed, check that the
inflation pressure of each tire is
at the specified level and perform
initialization. ( P.399)
If the warning light d oes not turn off
several minutes af ter the initializa-
tion has been performed, have the
vehicle inspected by your Toyota
dealer immediately.
■The tire pressure warning light
may come on due to natural
causes
The tire pressure warning light may
come on due to natural causes such
as natural air leaks and tire inflation
pressure changes caused by tem-
perature. In this ca se, adjusting the
tire inflation pressure will turn off the
warning ligh t (after a few minutes).
■When a tire is replaced with a
spare tire
Vehicles with a co mpact spare tire:
The compact spare tire is not
equipped with a tire pressure warn-
ing valve and tran smitter. If a tire
Page 458 of 552

4587-2. Steps to take in an emergency
WARNING
■When using the compact
spare tire (vehicles with a
compact spare tire)
●Remember that the compact
spare tire provided is specifi-
cally designed for use with your
vehicle. Do not use your com-
pact spare tire on another vehi-
cle.
●Do not use more than one com-
pact spare tire simultaneously.
●Replace the compact spare tire
with a standard tire as soon as
possible.
●Avoid sudden acceleration,
abrupt steering, sudden brak-
ing and shifting operations that
cause sudden engine braking.
■When the compact spare tire
is attached (vehicles with a
compact spare tire)
The vehicle speed may not be
correctly detecte d, and the follow-
ing systems may not operate cor-
rectly:
• ABS & Brake assist
• VSC
• TRAC
• EPS
• Dynamic radar cruise control with full-speed range
• PCS (Pre-Collision System)
• LTA (Lane Tracing Assist)
• Automatic High Beam
• AFS (Adaptive Front-lighting System) (if equipped)
• Tire pressure warning system
• Intuitive parking assist (if equipped)
• PKSB (Parking Support Brake) (if equipped)
• Toyota parking assist monitor (if equipped)
• Panoramic view monitor (if equipped)
• BSM (Blind Spot Monitor) (if equipped)
• RCTA (if equipped)
• Navigation system (if equipped)
Also, not only c an the following
system not be utilized fully, but it
may even negatively affect the
drive-train components:
• AWD system (AWD models)
■Speed limit when using the
compact spare tire (vehicles
with a compact spare tire)
Do not drive at speeds in excess
of 50 mph (80 km /h) when a com-
pact spare tire is installed on the
vehicle.
The compact spare tire is not
designed for driving at high
speeds. Failure to observe this
precaution may lead to an acci-
dent causing death or serious
injury.
■After using the tools and jack
Before driving, ma ke sure all the
tools and jack are securely in
place in their storage location to
reduce the possibility of personal
injury during a collision or sudden
braking.
Page 459 of 552
4597-2. Steps to take in an emergency
7
When trouble arises
NOTICE
■Be careful when driving over
bumps with the compact
spare tire installed on the
vehicle (vehicles with a com-
pact spare tire)
The vehicle becomes lower when
driving with the compact spare tire
compared to when driving with
standard tires. Be careful when
driving over uneven road sur-
faces.
■Driving with tire chains and
the compact spare tire (vehi-
cles with a compact spare
tire)
Do not fit tire chains to the com-
pact spare tire. Tire chains may
damage the vehicle body and
adversely affect driving perfor-
mance.
■When replacing the tires
When removing or fitting the
wheels, tires or the tire pressure
warning valve and transmitter,
contact your Toyota dealer as the
tire pressure warning valve and
transmitter may be damaged if not
handled correctly.
■When stowing the flat tire
●Ensure that there is no object
caught between the tire and the
vehicle underbody.
●Securely tighten the spare tire
clamp bolt to hold the spare
wheel carrier by the hook.
●Stow the flat tire in the spare tire
location. Failure to do so may
cause damage to the spare tire
carrier. Proper storage reduces
the possibility of injury in a colli-
sion or during sudden braking.
●Have the flat tire repaired and
the spare tire replaced with it as
soon as possible.
■Proper storage of the spare
tire
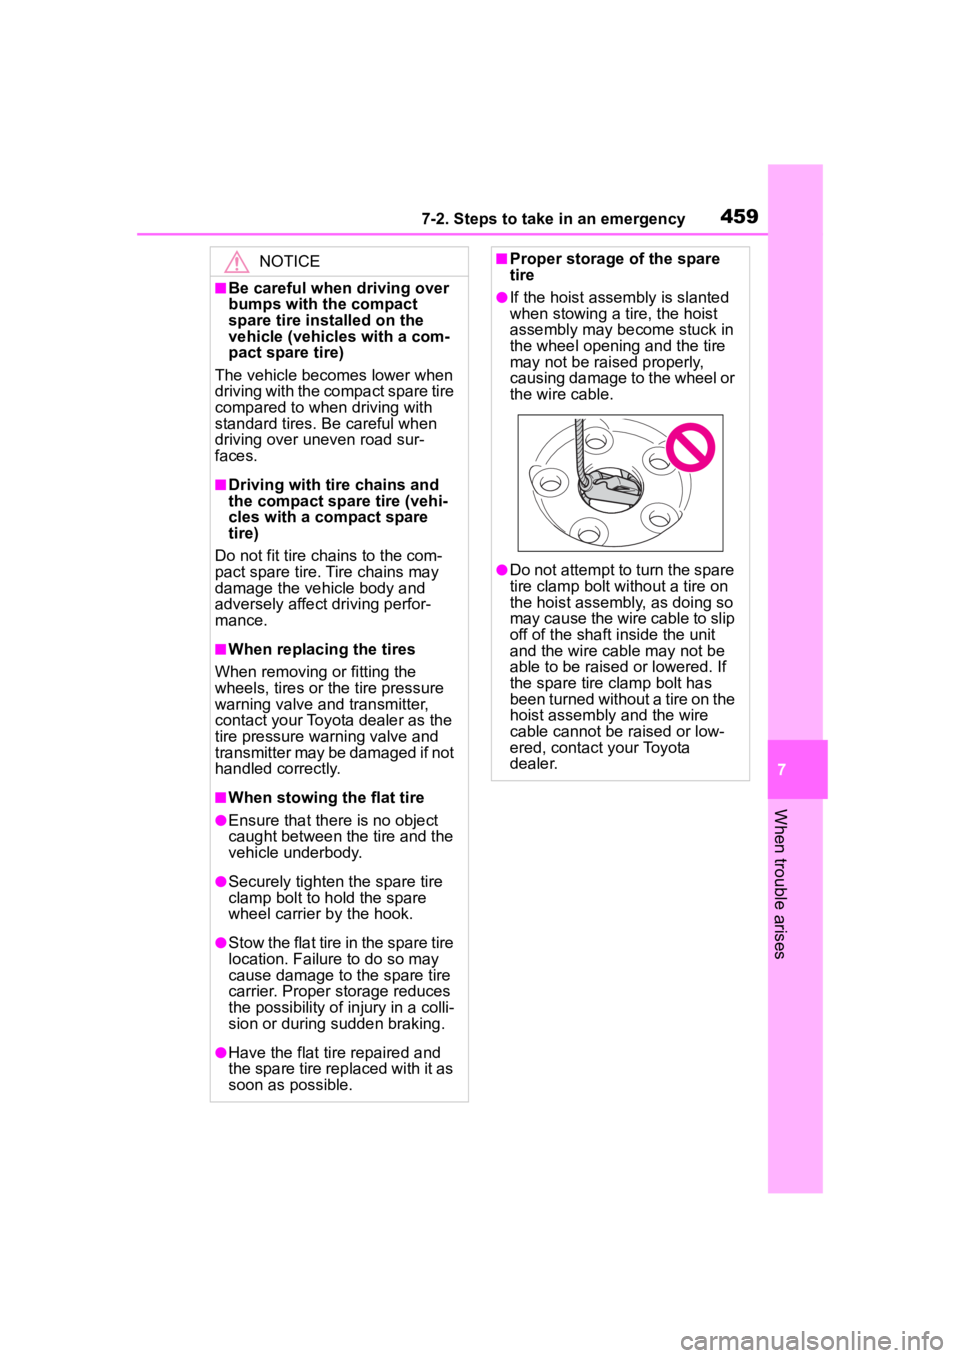
●If the hoist assembly is slanted
when stowing a tire, the hoist
assembly may become stuck in
the wheel opening and the tire
may not be raised properly,
causing damage to the wheel or
the wire cable.
●Do not attempt to turn the spare
tire clamp bolt without a tire on
the hoist assembly, as doing so
may cause the wire cable to slip
off of the shaft inside the unit
and the wire cable may not be
able to be raised or lowered. If
the spare tire clamp bolt has
been turned without a tire on the
hoist assembly and the wire
cable cannot be raised or low-
ered, contact your Toyota
dealer.