2023 TOYOTA HIGHLANDER stop start
[x] Cancel search: stop startPage 193 of 552

1934-1. Before driving
4
Driving
This function is activated when the
rated current of any of the following
trailer light circuit components is
exceeded:
●Tail lights: maximum 4.5 A
●Stop/turn signal light (right): maxi-
mum 7.8 A
●Stop/turn signal light (left): maxi-
mum 4.5 A
■When the auto current cut func-
tion is activated
If a trailer light d oes not come on
due to the activation of the auto cur-
rent cut function , the light system
will need to be reset.
Follow the reset procedure shown
below.
●If a tail light doe s not come on,
turn off the headlight switch.
●If the right-side stop/turn signal
light does not com e on, put the
turn signal in the off position or
remove foot from t he brake pedal.
●If the left-side stop/turn signal light
does not come on, put the turn
signal in the off position or remove
foot from the brake pedal.
If the emergency flashers do not
operate, press the emergency
flasher switch to turn them off.
After the light syst em is reset, oper-
ate the light switches again to see if
the lights operate normally.
If the lights do not operate normally,
have the vehicle inspected by your
Toyota dealer.
Your vehicle will handle differ-
ently when towing a trailer. Help
to avoid an accident, death or
serious injury, keep the following
in mind when towing:
Speed limits for towing a
trailer vary by state or prov-
ince. Do not exceed the
posted towing speed limit.
Toyota recommends that the
vehicle-trailer speed limit is 65
mph (104 km/h) on a flat,
straight, dry road. Do not
exceed this limit, the posted
towing speed limit or the
speed limit for your trailer as
set forth in your trailer owner’s
manual, whichever is lowest.
Instability of the towing vehi-
cle-trailer combination (trailer
sway) increases as speed
increases. Exceeding speed
limits may cause loss of con-
trol.
Before starting out, check the
trailer lights, tires and the
vehicle-trailer connections.
Recheck after driving a short
distance.
Practice turning, stopping and
reversing with the trailer
attached in an area away
from traffic until you become
accustomed to the feel of the
vehicle-trailer combination.
Reversing with a trailer
attached is difficult and
NOTICE
■Do not directly splice trailer
lights
Do not directly splice trailer lights.
Directly splicing trailer lights may
damage your vehicle’s electrical
system and cause a malfunction.
Trailer towing tips
Page 194 of 552

1944-1. Before driving
requires practice. Grip the
bottom of the steering wheel
and move your hand to the
left to move the trailer to the
left. Move your hand to the
right to move the trailer to
right. (This is generally oppo-
site to reversing without a
trailer attached.) Avoid sharp
or prolonged turning. Have
someone guide you when
reversing to reduce the risk of
an accident.
As stopping distance is
increased when towing a
trailer, vehicle-to vehicle dis-
tance should be increased.
For each 10 mph (16 km/h) of
speed, allow at least one
vehicle and trailer length.
Avoid sudden braking as you
may skid, resulting in the
trailer jackknifing and a loss of
vehicle control. This is espe-
cially true on wet or slippery
surfaces.
Avoid jerky starts or sudden
acceleration.
Avoid jerky steering and
sharp turns, and slow down
before making turn.
Note that when making a turn,
the trailer wheels will be
closer than the vehicle wheels
to the inside of the turn. Com-
pensate by making a wider
than normal turning radius.
Slow down before making a turn, in cross winds, on wet or
slippery surfaces, etc.
Increasing vehicle speed can
destabilize the trailer.
Take care when passing other
vehicles. Passing requires
considerable distance. After
passing a vehicle, do not for-
get the length of your trailer,
and be sure you have plenty
of room before changing
lanes.
To maintain engine braking
efficiency and charging sys-
tem performance when using
engine braking, do not put the
transmission in D. If in the M
mode, the transmission shift
range position must be in 6 or
lower. ( P.201)
Instability happens more fre-
quently when descending
steep or long downhill grades.
Before descending, slow
down and downshift. Do not
make sudden downshifts
while descending steep or
long downhill grades.
Avoid holding the brake pedal
down too long or applying the
brakes too frequently. This
could cause the brakes to
overheat and result in
reduced braking efficiency.
Due to the added load of the
trailer, your vehicle’s engine
may overheat on hot days (at
temperatures over 85°F
[30°C]) when driving up a long
Page 195 of 552

1954-1. Before driving
4
Driving
or steep grade. If the engine
coolant temperature gauge
indicates overheating, imme-
diately turn off the air condi-
tioning (if in use), pull your
vehicle off the road and stop
in a safe spot. (P.469)
Always place wheel blocks
under both the vehicle’s and
the trailer’s wheels when
parking. Put the transmission
in P and apply the parking
brake. Avoid parking on a
slope, but if unavoidable, do
so only after performing the
following:
1 Apply the brakes and keep
them applied.
2 Have someone place wheel
blocks under both the vehi-
cle’s and trailer’s wheels.
3 When the wheel blocks are in
place, release the brakes
slowly until the blocks absorb
the load.
4 Shift into P and apply the
parking brake.
5 Turn off the engine.
When restarting after parking
on a slope:
1 With the transmission in P,
start the engine. Be sure to
keep the brake pedal
depressed.
2 Shift into a forward gear. If
reversing, shift into R. 3
If the parking brake is in man-
ual mode, release the park-
ing brake. ( P.205)
4 Release the brake pedal, and
slowly pull or back away from
the wheel blocks. Stop and
apply the brakes.
5 Have someone retrieve the
blocks.
Page 198 of 552

1984-2. Driving procedures
■Customization
If the smart key system has been
deactivated in a customized setting,
refer to P.463.
1 Stop the vehicle completely.
2 Set the parking brake
( P.205), and shift the shift
lever to P.
Check the parking brake indicator
is illuminated.
3 Press the engine switch.
The engine will stop, and the meter
display will be extinguished.
4Release the brake pedal and
check that “ACCESSORY” or
“IGNITION ON” is not shown
on the multi-information dis-
play.
■Automatic engine shut off fea-
ture
●The vehicle is equipped with a
feature that automatically shuts off
the engine when the shift lever is
in P with the engine running for an
extended period.
●The engine will automatically shut
off after approxima tely 1 hour if it
has been left running while the
shift lever is in P.
●The timer for the automatic engine
shut off feature will reset if the
brake pedal is depressed or if the
shift lever is in a position other
than P.
●After the vehicle is parked, if the
door is locked with the door lock
switch ( P.118) from the inside or
the mechanical k ey from the out-
side, the automatic engine shut off
feature will be disab led. The timer
for the automatic engine shut off
feature will be re-enabled if the
driver’s door is opened.
■When the engine is stopped
Even if the engine switch is turned
off, the cooling fan may continue to
operate for a short time.
WARNING
■When starting the engine
Always start the e ngine while sit-
ting in the driver’s seat. Do not
depress the accelerator pedal
while starting the engine under
any circumstances.
Doing so may cause an accident
resulting in death or serious injury.
NOTICE
■When starting the engine
●Do not race a cold engine.
●If the engine becomes difficult to
start or stalls frequently, have
your vehicle checked by your
Toyota dealer immediately.
■Symptoms indicating a mal-
function with the engine
switch
If the engine switch seems to be
operating somewh at differently
than usual, such as the switch
sticking slightly, there may be a
malfunction. Contact your Toyota
dealer immediately.
Stopping the engine
Page 199 of 552

1994-2. Driving procedures
4
Driving
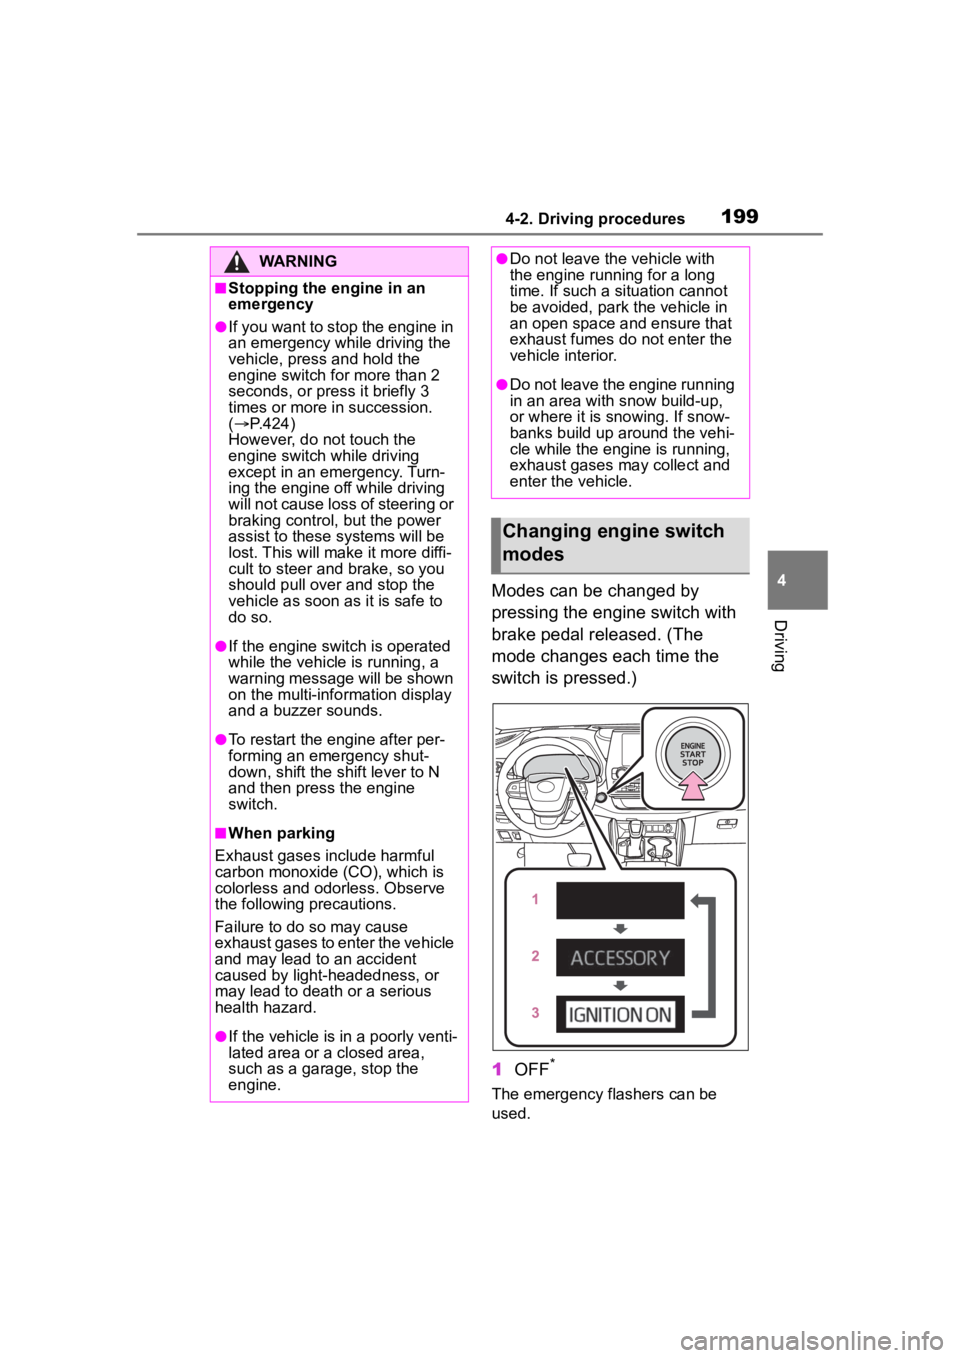
Modes can be changed by
pressing the engine switch with
brake pedal released. (The
mode changes each time the
switch is pressed.)
1OFF
*
The emergency flashers can be
used.
WARNING
■Stopping the engine in an
emergency
●If you want to stop the engine in
an emergency while driving the
vehicle, press and hold the
engine switch for more than 2
seconds, or press it briefly 3
times or more in succession.
( P.424)
However, do not touch the
engine switch while driving
except in an emergency. Turn-
ing the engine off while driving
will not cause loss of steering or
braking control, but the power
assist to these systems will be
lost. This will make it more diffi-
cult to steer and brake, so you
should pull over and stop the
vehicle as soon as it is safe to
do so.
●If the engine switch is operated
while the vehicle is running, a
warning message will be shown
on the multi-info rmation display
and a buzzer sounds.
●To restart the engine after per-
forming an emergency shut-
down, shift the shift lever to N
and then press the engine
switch.
■When parking
Exhaust gases include harmful
carbon monoxide (CO), which is
colorless and odorless. Observe
the following precautions.
Failure to do so may cause
exhaust gases to enter the vehicle
and may lead to an accident
caused by light-headedness, or
may lead to death or a serious
health hazard.
●If the vehicle is in a poorly venti-
lated area or a closed area,
such as a garage, stop the
engine.
●Do not leave the vehicle with
the engine running for a long
time. If such a situation cannot
be avoided, park the vehicle in
an open space and ensure that
exhaust fumes do not enter the
vehicle interior.
●Do not leave the engine running
in an area with snow build-up,
or where it is snowing. If snow-
banks build up around the vehi-
cle while the engine is running,
exhaust gases may collect and
enter the vehicle.
Changing engine switch
modes
Page 202 of 552

2024-2. Driving procedures
: While the engine switch is in
ON and the brake pedal
depressed
*, shift the shift lever
while pushing the shift release
button on the shift knob.
: Shift the shift lever while
pushing the shift release button
on the shift knob.
: Shift the shift lever normally.
When shifting the shift lever
between P and D, make sure that
the vehicle is completely stopped.
*: For the vehicle to be able to be
shifted from P, the brake pedal
must be depresse d before the
shift release button is pushed. If
the shift release button is pushed
first, the shift lock will not be
released.
■Shift lock system
The shift lock system is a system to
prevent accidental operation of the
shift lever in starting.
The shift lever can be shifted from P
only when the engine switch is in ON and the brake pedal is being
depressed.
■If the shift lever cannot be
shifted from P
First, check whether the brake pedal
is being depressed.
If the shift lever cannot be shifted
with your foot on the brake pedal,
there may be a p roblem with the
shift lock system. Have the vehicle
inspected by your Toyota dealer
immediately.
The following steps may be used as
an emergency measure to ensure
that the shift lev er can be shifted.
Releasing the shift lock:
1 Turn the engine switch to ON
and check that the parking brake
is set. ( P.199, 205)
2 Turn the engine switch to off.
3 Depress the brake pedal.
4 Pry the cover up with a flathead
screwdriver or equivalent tool.
To prevent damag e to the cover,
cover the tip of the screwdriver with
a rag.
5 Press and hold the shift lock
override button.
The shift lever can be shifted while
both buttons are pressed.
Shifting the shift lever
Page 208 of 552

2084-2. Driving procedures
Turns the brake hold system on
The brake hold standby indicator
(green) comes on. While the
system is holding the brake, the
brake hold operated indicator (yel-
low) comes on.
■Brake hold system operating
conditions
The brake hold system cannot be
turned on in the following condi-
tions:
●The driver’s doo r is not closed.
●The driver is not wearing the seat
belt.
●The parking brake is engaged.
If any of the cond itions above are
detected when the brake hold sys-
tem is enabled, the system will turn
off and the brake hold standby indi-
cator light will go off. In addition, if
any of the conditions are detected
while the system is holding the
brake, a warning buzzer will sound
and a message will be shown on the
multi-information display. The park-
ing brake will then be set automati-
cally.
■Brake hold function
●If the brake pedal is left released
for a period of about 3 minutes
after the system has started hold-
ing the brake, the parking brake
will be set automatically. In this
case, a warning buzzer sounds
and a message is shown on the
multi-information display.
●To turn the system off while the
system is holding the brake, firmly
depress the brake pedal and
press the button again.
●The brake hold function may not
hold the vehicle when the vehicle
is on a steep incline. In this situa-
tion, it may be ne cessary for the
driver to apply the brakes. A warn-
ing buzzer will sound and the
multi-information display will
inform the driver of this situation. If
a warning message is shown on
the multi-information display, read
the message and follow the
instructions.
■When the parking brake is set
automatically while the system
is holding the brakes
Perform any of the following opera-
tions to release the parking brake.
●Depress the accelerator pedal.
(The parking brake will not be
released automatically if the seat
belt is not fastened.)
●Operate the parkin g brake switch
with the brake pedal depressed.
Make sure that the parking brake
Brake Hold
The brake hold system
keeps the brake applied
when the shift lever is in D,
M or N with the system on
and the brake pedal has
been depressed to stop the
vehicle. The system
releases the brake when the
accelerator pedal is
depressed with the shift
lever in D or M to allow
smooth start off.
Enabling the system
Page 252 of 552

2524-5. Using the driving support systems
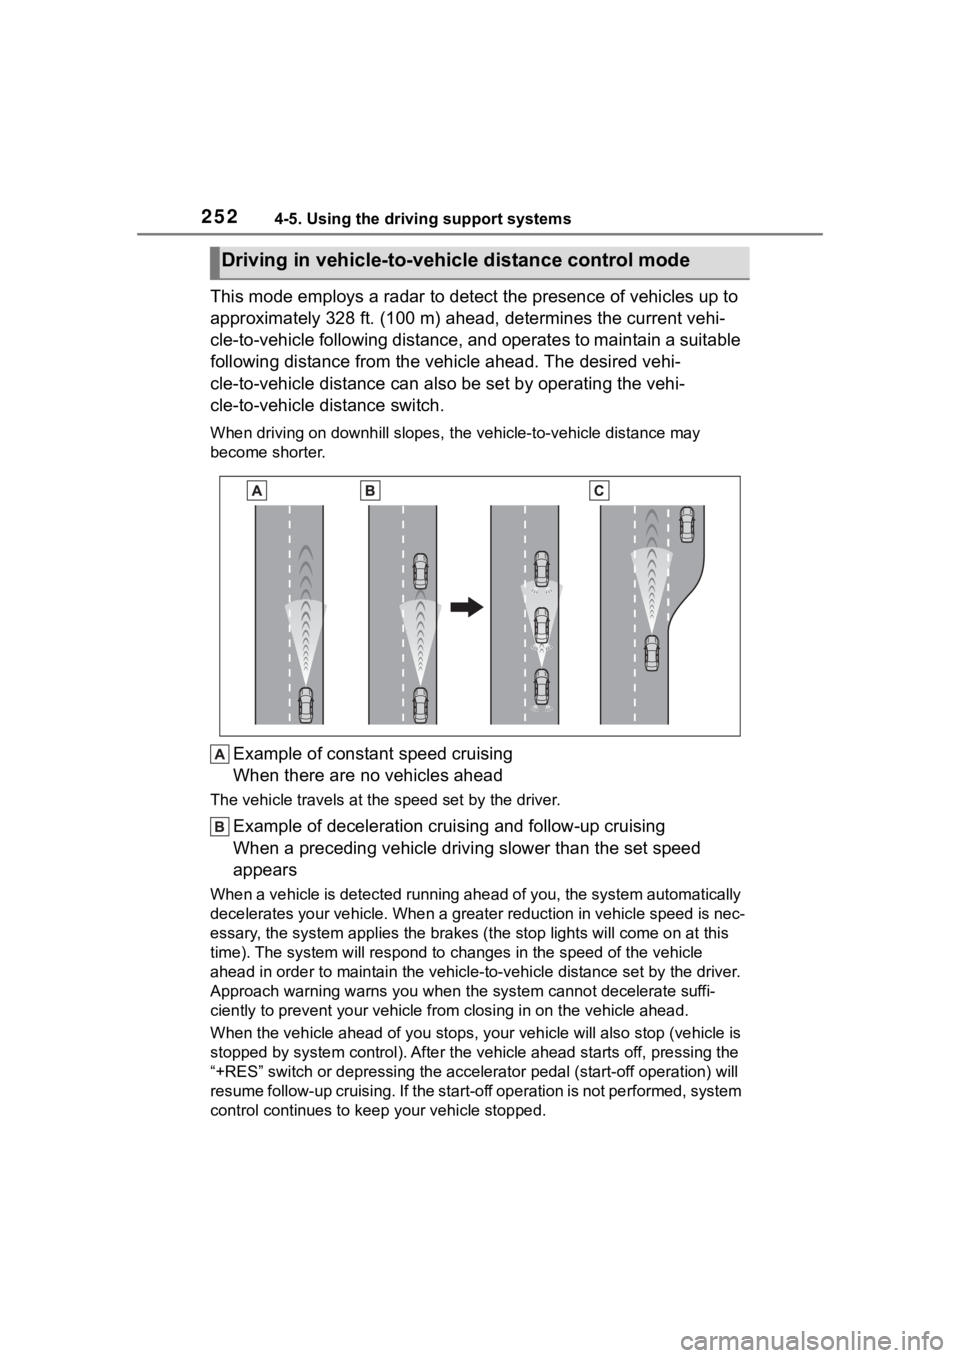
This mode employs a radar to detect the presence of vehicles up to
approximately 328 ft. (100 m) ahead, determines the current vehi-
cle-to-vehicle following distance, and operates to maintain a s uitable
following distance from the vehicle ahead. The desired vehi-
cle-to-vehicle distance can also be set by operating the vehi-
cle-to-vehicle distance switch.
When driving on downhill slopes, t he vehicle-to-vehicle distance may
become shorter.
Example of constant speed cruising
When there are no vehicles ahead
The vehicle travels at the speed set by the driver.
Example of deceleration crui sing and follow-up cruising
When a preceding vehicle driving slower than the set speed
appears
When a vehicle is detected runni ng ahead of you, the system automatically
decelerates your vehicle. When a greater reduction in vehicle s peed is nec-
essary, the system applies the brakes (the stop lights will come on at this
time). The system will respond to changes in the speed of the vehicle
ahead in order to maintain the vehicle-to-vehicle distance set by the driver.
Approach warning warns you when the system cannot decelerate suffi-
ciently to prevent your vehicle from closing in on the vehicle ahead.
When the vehicle ahead of you st ops, your vehicle will also stop (vehicle is
stopped by system control). Afte r the vehicle ahead starts off, pressing the
“+RES” switch or depressing the accelerator pedal (start-off operation) will
resume follow-up cruising. If the start-off operation is not pe rformed, system
control continues to keep your vehicle stopped.
Driving in vehicle-to-vehicle distance control mode