2023 TOYOTA COROLLA trunk
[x] Cancel search: trunkPage 124 of 468
1243-2. Opening, closing and locking the doors
●Do not leave the electronic key
inside the trunk.
The key confinement prevention
function may not operate, depend-
ing on the location of the key (the
inside edge of the trunk), condi-
tions (inside a met al bag, close to
metallic objects) and the radio
waves in the surrounding area.
( P.119)
■If the smart key system does
not operate properly
●Locking and unlocking the doors:
P. 3 8 2
●Starting the engine: P.382
■Customization
Some functions can be customized.
( P.412)
■If the smart key system has
been deactivated in a custom-
ized setting
●Locking and unlocking the doors:
Use the wireless remote control or
mechanical key. ( P.111, 382)
●Starting the engine and changing
engine switch modes: P. 3 8 2
●Stopping the engine: P. 1 5 7
WARNING
■Caution regarding interfer-
ence with electronic devices
●People with implantable car-
diac pacemakers, cardiac
resynchronization ther-
apy-pacemakers or implantable
cardioverter defib rillators should
keep away from the smart key
system antennas. ( P.120)
The radio waves may affect the
operation of such devices. If
necessary, the entry function
can be disabled. Ask your Toy-
ota dealer for details, such as
the frequency of radio waves
and timing of the emitted radio
waves. Then, consult your doc-
tor to see if you should disable
the entry function.
●Users of any electrical medical
device other than implantable
cardiac pacemakers, cardiac
resynchronization ther-
apy-pacemakers or implantable
cardioverter defibrillators should
consult the manufacturer of the
device for information about its
operation under the influence of
radio waves.
Radio waves could have unex-
pected effects on the operation
of such medical devices.
Ask your Toyota dealer for details
on disabling the entry function.
Page 127 of 468
1273-3. Adjusting the seats
3
Before driving
WARNING
●Do not allow anyone to sit on a
folded seatback or in the trunk
while driving.
●Do not allow child ren to enter
the trunk.
●Be careful not to get your hand
caught when folding the rear
seatbacks.
●Adjust the position of the front
seats before folding down the
rear seatbacks so that the front
seats do not interfere with the
rear seatbacks when folding
down the rear seatbacks.
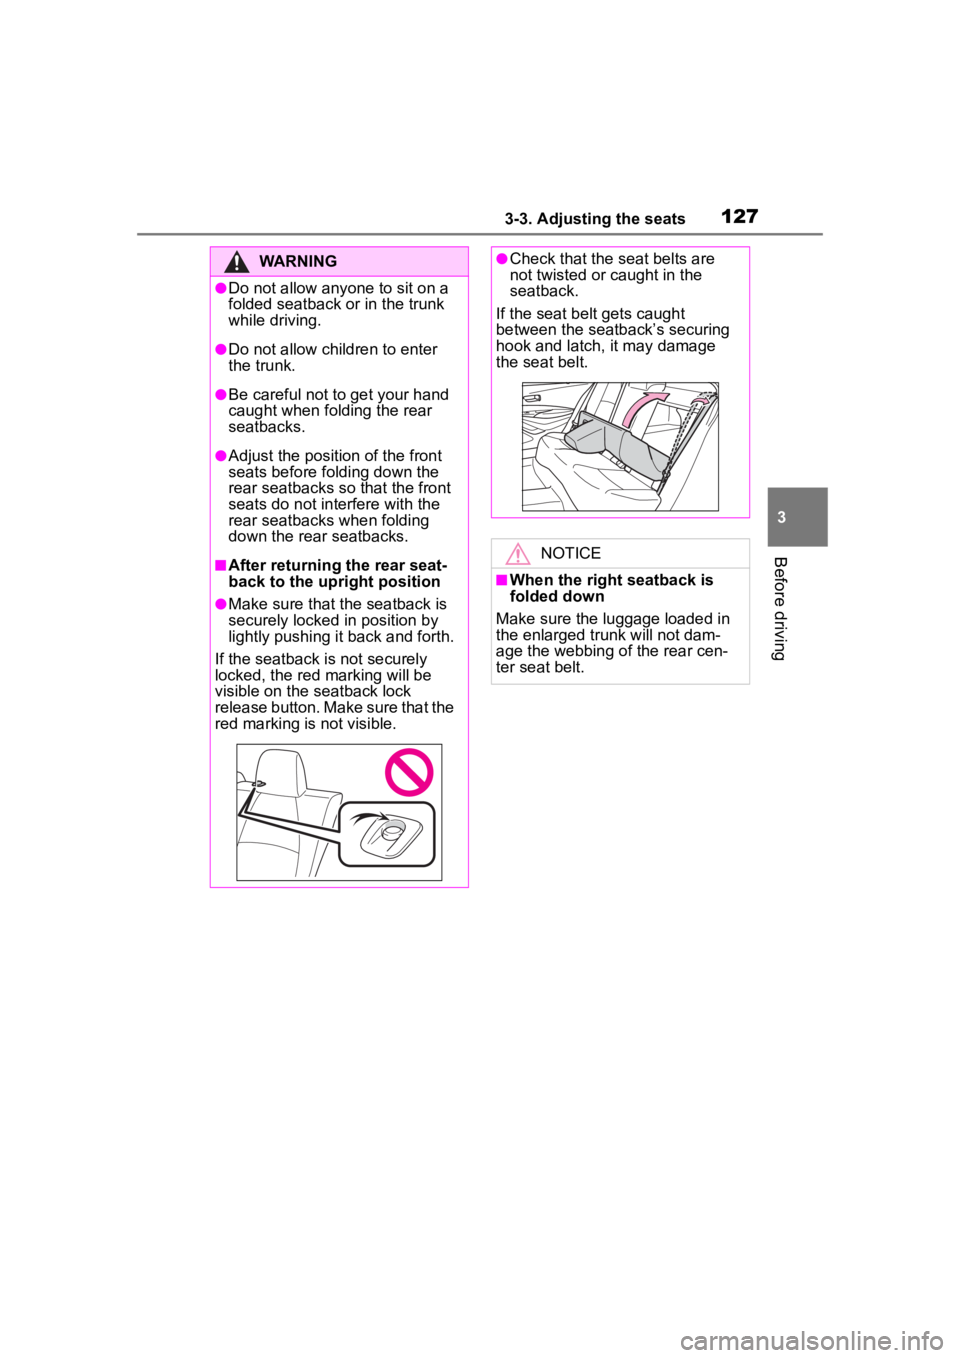
■After returning the rear seat-
back to the upright position
●Make sure that the seatback is
securely locked in position by
lightly pushing it back and forth.
If the seatback is not securely
locked, the red marking will be
visible on the seatback lock
release button. Make sure that the
red marking is not visible.
●Check that the seat belts are
not twisted or caught in the
seatback.
If the seat belt gets caught
between the seatback’s securing
hook and latch, it may damage
the seat belt.
NOTICE
■When the right seatback is
folded down
Make sure the luggage loaded in
the enlarged trunk will not dam-
age the webbing of the rear cen-
ter seat belt.
Page 151 of 468
1514-1. Before driving
4
Driving
WARNING
■Things that must not be car-
ried in the trunk
The following things may cause a
fire if loaded in the trunk:
●Receptacles co ntaining gaso-
line
●Aerosol cans
■Storage precautions
Observe the following precau-
tions.
Failure to do so m ay prevent the
pedals from being depressed
properly, may block the driver’s
vision, or may result in items hit-
ting the driver or passengers, pos-
sibly causing an accident.
●Stow cargo and luggage in the
trunk whenever possible.
●To prevent cargo and luggage
from sliding forward during
braking, do not stack anything in
the enlarged trunk. Keep cargo
and luggage low, as close to the
floor as possible.
●When you fold down the rear
seats, long items should not be
placed directly behind the front
seats.
●Do not place cargo or luggage
in or on the following locations.
• At the feet of the driver
• On the front passenger or rear seats (when stacking items)
• On the package tray
• On the instrument panel
• On the dashboard
●Secure all items in the occupant
compartment.
●Never allow anyon e to ride in
the enlarged trunk. It is not
designed for passengers. They
should ride in their seats with
their seat belts properly fas-
tened.
■Capacity and distribution
●Do not exceed the maximum
axle weight rating or the total
vehicle weight rating.
●Even if the total load of occu-
pant’s weight and the cargo
load is less than the total load
capacity, do not apply the load
unevenly. Improper loading may
cause deterioration of steering
or braking control which may
cause death or serious injury.
Page 246 of 468

2464-5. Using the driving support systems
(the time which operation is possi-
ble may be extended if a door is
opened and closed)
●Safe exit assist is on
●The vehicle is stopped.
●The shift lever is in a position
other than R.
■The Safe exit assist will detect a
vehicle when
The Safe exit assist will detect a
vehicle present in the detection area
in the followin g situations:
●When the vehicle is stopped and a
vehicle or bicycle, which is travel-
ing parallel to the vehicle, is
approaching within the area that a
door opens
■Conditions under which the
system will not detect a vehicle
●Safe exit assist does not detect
the following objects, vehicles,
and bicycles:
• Vehicles or bicycles which are
approaching slowly
*
• Vehicles or bicycles which are determined to have a low possibil-
ity of colliding with a door when
opened
*
• Vehicles or bicycles which are
approaching from directly behind*
• Vehicles or bicycles which are approaching from the front*
• Guardrails, walls , signs, parked
vehicles, and other stationary
objects
*
• Pedestrians, animals, etc.*
*
: Depending on the conditions, detection of a vehicle and/or
object may occur.
●In situations such as the following,
safe exit assist will not operate:
• When 3 minutes or more have elapsed since the engine off (the
time which operation is possible
may be extended if a door is
opened and closed)
• When your vehicle is not com- pletely stopped
■Conditions under which the
system may not function cor-
rectly
●The Safe exit assist may not
detect vehicles corr ectly in the fol-
lowing situations:
• When the sensor is misaligned due to a strong impact to the sen-
sor or its surrounding area
• When mud, snow, ice, a sticker, etc. is covering the sensor or sur-
rounding area on the rear bumper
• When the vehicle is stopped on a
wet road surface, such as in a
puddle, while in inclement
weather, such as heavy rain,
snow, fog, etc.
• When a vehicle or bicycle approaches from behind a nearby
parked vehicle
• When an approaching vehicle or bicycle suddenly changes direc-
tion
• Immediately after a vehicle or bicycle starts moving
• When the trunk is open
• When a bicycle carrier, ramp, or
other accessory is installed to the
back of the vehicle
• When a parked vehicle, wall, sign, person or other stationary object
is behind the vehicle
• When the vehicle is stopped at an angle to the road
• When a vehicle is traveling near
an approaching vehicle or bicycle
• When an approaching vehicle or bicycle is traveling along a station-
ary object, such a wall or sign
• When a vehicle or bicycle is approaching at high speed
• When towing with the vehicle
• When stopped on a steep slope
• When stopped on a curve or at the exit of a curve
●Instances of the Safe exit assist
unnecessarily detecting a vehicle
and/or object may increase in the
following situations:
• When the sensor is misaligned
due to a strong impact to the sen-
sor or its surrounding area
• When a vehicle or bicycle
Page 247 of 468
2474-5. Using the driving support systems
4
Driving
approaches from behind your
vehicle at an angle
• When the vehicle is stopped at an
angle to the road
• When a vehicle or bicycle approaches from behind a parked
vehicle at an angle
• When a parked vehicle, wall, sign, person or other stationary object
is behind the vehicle
• When an approaching vehicle or bicycle suddenly changes direc-
tion
• When an approaching vehicle or bicycle is traveling along a station-
ary object, such a wall or sign
• When the trunk is open
• When a bicycle carrier, ramp, or other accessory is installed to the
back of the vehicle
• When a vehicle or bicycle is
approaching at high speed
• When towing with the vehicle
• When stopped on a steep slope
• When stopped on a curve or at the exit of a curve
*: If equipped
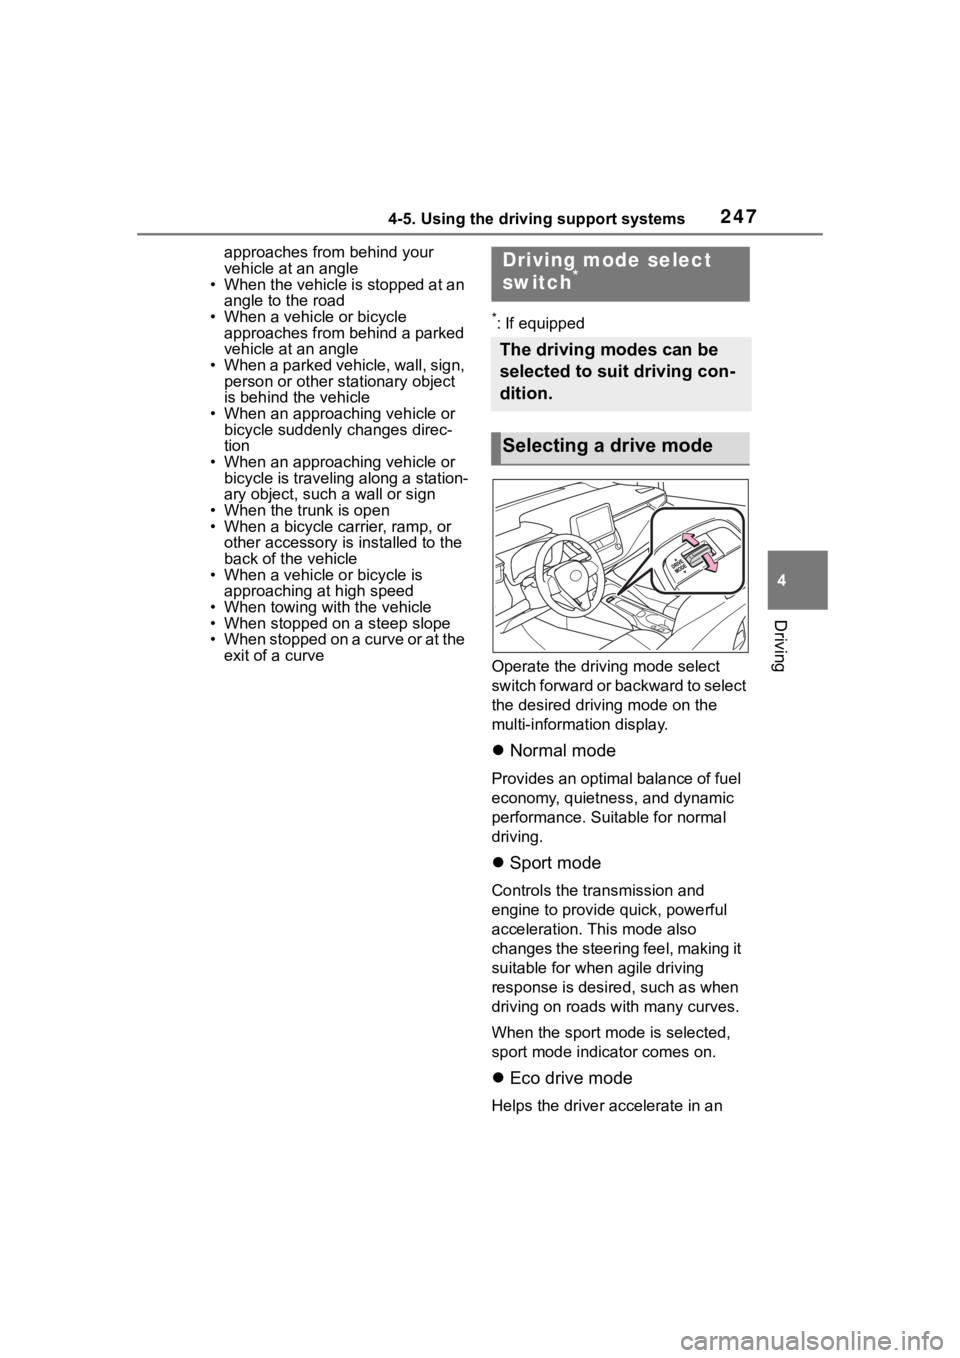
Operate the driv ing mode select
switch forward or backward to select
the desired driving mode on the
multi-information display.
Normal mode
Provides an optimal balance of fuel
economy, quietness, and dynamic
performance. Suitable for normal
driving.
Sport mode
Controls the transmission and
engine to provide quick, powerful
acceleration. This mode also
changes the steering feel, making it
suitable for when agile driving
response is desire d, such as when
driving on roads w ith many curves.
When the sport mode is selected,
sport mode indicator comes on.
Eco drive mode
Helps the driver accelerate in an
Driving mode select
switch*
The driving modes can be
selected to suit driving con-
dition.
Selecting a drive mode
Page 297 of 468

2976-2. Maintenance
6
Maintenance and care
Brakes
• The vehicle should not pull to
one side when
the brakes are
applied.
• The brakes should work
effectively.
• The brake pedal should not feel
spongy.
• The brake pedal should not get
too close to the
floor when the
brakes are
applied.
Head
restraints
Do the head
restraints move
smoothly and lock
securely?
Indica-
tors/buzzersDo the indicators
and buzzers func-
tion properly?
LightsDo all the lights
come on?
Parking brake
• Does the park-ing brake oper-
ate normally?
• When parked on a slope and the
parking brake is
on, is the vehicle
securely
stopped?
ItemsCheck points
Seat belts
• Do the seat belts operate
smoothly?
• The seat belts should not be
damaged.
Seats
Do the seat con-
trols operate prop-
erly?
Steering wheel
• Does the steer-ing wheel rotate
smoothly?
• Does the steer- ing wheel have
the correct
amount of free
play?
• There should not be any strange
sounds coming
from the steer-
ing wheel.
Vehicle exterior
ItemsCheck points
Doors/trunkDo the doors/trunk
operate smoothly?
Engine hood
Does the engine
hood lock system
work properly?
Fluid leaks
There should not
be any signs of
fluid leakage after
the vehicle has
been parked.
ItemsCheck points
Page 342 of 468
3426-3. Do-it-yourself maintenance
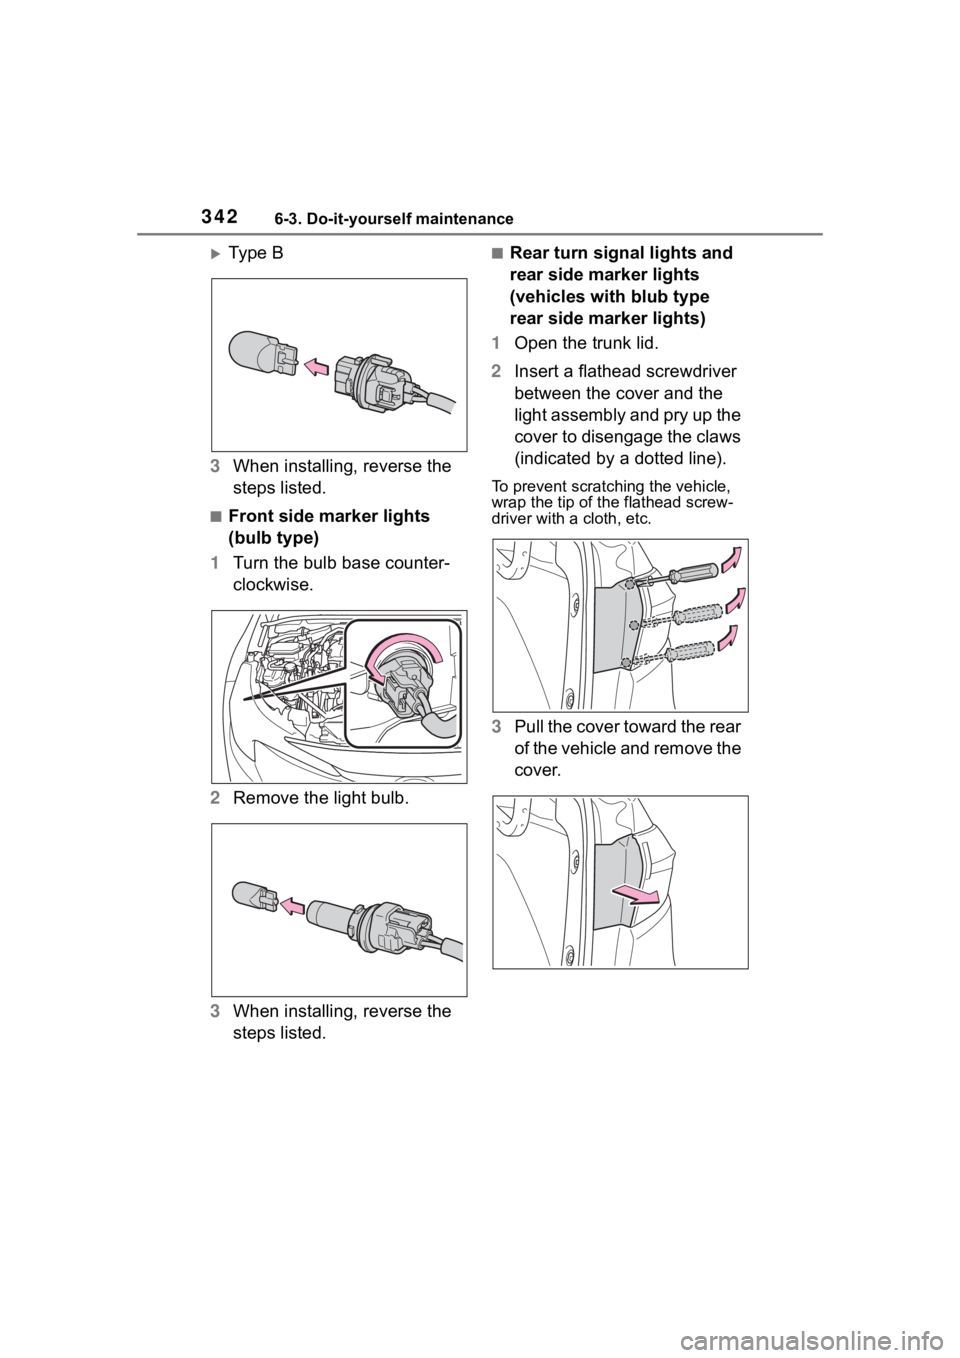
Ty p e B
3 When installing, reverse the
steps listed.
■Front side marker lights
(bulb type)
1 Turn the bulb base counter-
clockwise.
2 Remove the light bulb.
3 When installing, reverse the
steps listed.
■Rear turn signal lights and
rear side marker lights
(vehicles with blub type
rear side marker lights)
1 Open the trunk lid.
2 Insert a flathead screwdriver
between the cover and the
light assembly and pry up the
cover to disengage the claws
(indicated by a dotted line).
To prevent scratching the vehicle,
wrap the tip of th e flathead screw-
driver with a cloth, etc.
3Pull the cover toward the rear
of the vehicle and remove the
cover.
Page 343 of 468
3436-3. Do-it-yourself maintenance
6
Maintenance and care
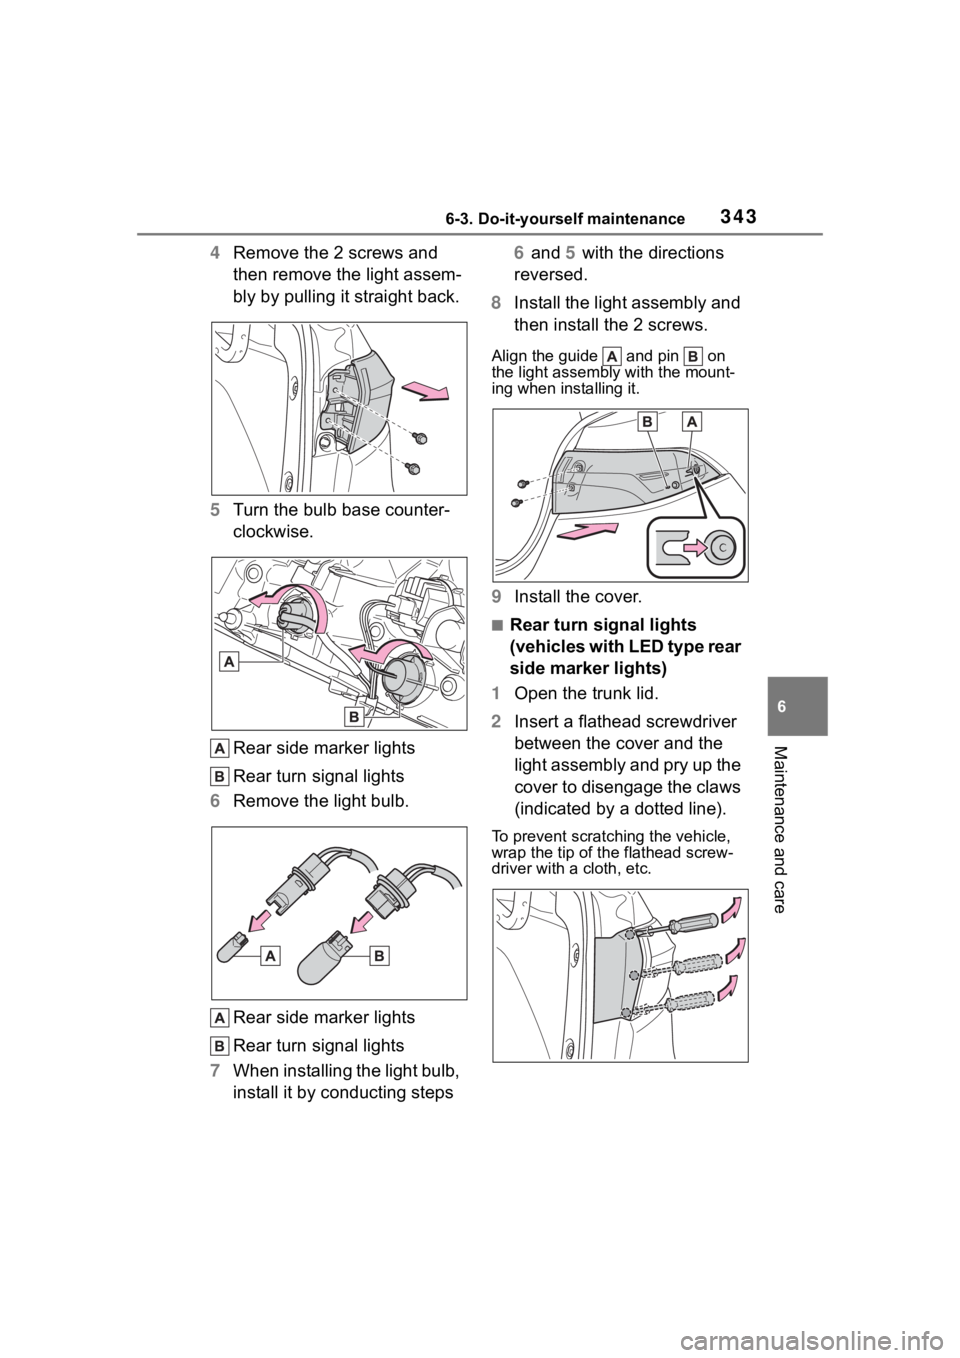
4Remove the 2 screws and
then remove the light assem-
bly by pulling it straight back.
5 Turn the bulb base counter-
clockwise.
Rear side marker lights
Rear turn signal lights
6 Remove the light bulb.
Rear side marker lights
Rear turn signal lights
7 When installing the light bulb,
install it by conducting steps 6 and 5 with the directions
reversed.
8 Install the light assembly and
then install the 2 screws.
Align the guide and pin on
the light assembl y with the mount-
ing when installing it.
9 Install the cover.
■Rear turn signal lights
(vehicles with LED type rear
side marker lights)
1 Open the trunk lid.
2 Insert a flathead screwdriver
between the cover and the
light assembly and pry up the
cover to disengage the claws
(indicated by a dotted line).
To prevent scratching the vehicle,
wrap the tip of th e flathead screw-
driver with a cloth, etc.