2023 TOYOTA COROLLA ECO mode
[x] Cancel search: ECO modePage 163 of 468
1634-2. Driving procedures
4
Driving
dealer.
■When driving with dynamic
radar cruise control with
full-speed range activated
Even when switching the driving
mode to sport mode with the intent
of enabling engine braking, engine
braking will not occur because
dynamic radar cruise control will not
be canceled. ( P.247)
■Restraining sudden start
(Drive-Start Control)
P. 1 4 9
■G AI-SHIFT
G AI-SHIFT automatically selects a
suitable gear for sporty driving
according to driver’s input and driv-
ing conditions. G AI-SHIFT operates
automatically when th e shift lever is
in D and sport mode is selected for
the driving mode. (Selecting normal
mode or shifting the shift lever to the
M position cancels this function.)
■After recharging/reconnecting
the battery
P. 3 8 5
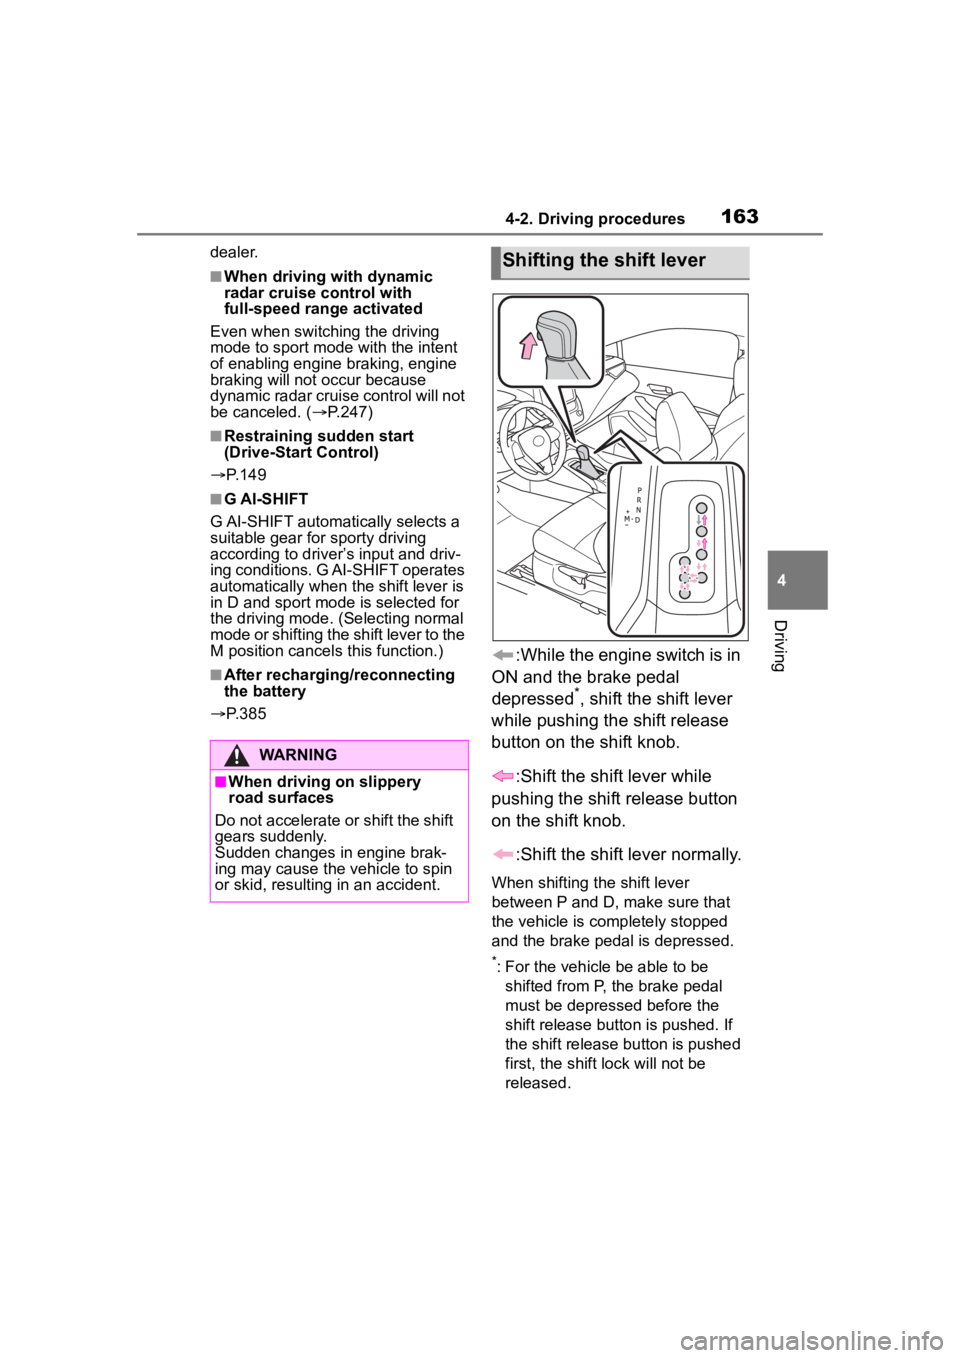
:While the engine switch is in
ON and the brake pedal
depressed
*, shift the shift lever
while pushing the shift release
button on the shift knob.
:Shift the shift lever while
pushing the shift release button
on the shift knob.
:Shift the shift lever normally.
When shifting the shift lever
between P and D, make sure that
the vehicle is completely stopped
and the brake pedal is depressed.
*: For the vehicle be able to be shifted from P, the brake pedal
must be depressed before the
shift release button is pushed. If
the shift release button is pushed
first, the shift lock will not be
released.
WARNING
■When driving on slippery
road surfaces
Do not accelerate o r shift the shift
gears suddenly.
Sudden changes in engine brak-
ing may cause the vehicle to spin
or skid, resulting in an accident.
Shifting the shift lever
Page 170 of 468

1704-2. Driving procedures
position/mode, the parking brake
indicator light will turn on and stay
on as described below:
ON: Comes on until the parking
brake is released.
Not in ON: Stays on for approxi-
mately 15 seconds.
●When the engine switch is turned
off with the parking brake set, the
parking brake indicator light will
stay on for about 15 seconds. This
does not indicate a malfunction.
■When the parking brake switch
malfunctions
Automatic mode (automatic brake
setting and releas ing) will be turned
on automatically.
■Parking the vehicle
P. 1 4 3
■Parking brake engaged warning
buzzer
A buzzer will sound if the vehicle is
driven with the parking brake
engaged. “Parking Brake ON” is dis-
played on the multi-information dis-
play (with the vehicle reaching a
speed of 3 mph [5 km/h]).
■If the brake system warning
light comes on
P. 3 5 6
■Usage in winter time
P. 2 5 3
WARNING
■When parking the vehicle
Do not leave a child in the vehicle
alone. The parking brake may be
released unintentionally by a child
and there is the danger of the
vehicle moving that may lead to
an accident resulting in death or
serious injury.
■Parking brake switch
Do not set any objects near the
parking brake switch.
Objects may inte rfere with the
switch and may lead the parking
brake to unexpectedly operate.
■Parking brake automatic lock
function
Never use the automatic parking
brake engagement function in
place of normal parking brake
operation. This function is
designed to reduce the risk of a
collision due to the driver forget-
ting to engage the parking brake.
Over-reliance on this function to
park the vehicle safely may lead
to an accident resulting in death
or serious injury.
NOTICE
■When parking the vehicle
Before you leave the vehicle, shift
the shift lever to P, set the parking
brake and make s ure that the
vehicle does not move.
■When the system malfunc-
tions
Stop the vehicle in a safe place
and check the warning messages.
■When the vehicle battery is
discharged
The parking brake system cannot
be activated. ( P.383)
■When the parking brake can-
not be released due to a mal-
function
Driving the vehicle with the park-
ing brake set will lead to brake
components overheating, which
may affect braking performance
and increase brake wear.
Have the vehicle inspected by
your Toyota dealer immediately if
this occurs.
Page 225 of 468

2254-5. Using the driving support systems
4
Driving
■Accelerating after setting the
vehicle speed
As with normal dri ving, acceleration
can be performed by depressing the
accelerator pedal. After accelerat-
ing, the vehicle will return to the set
vehicle speed. However, while in
vehicle-to-vehicle distance control
mode, the vehicle speed may
decrease to below the set vehicle
speed in order to maintain the dis-
tance from the preceding vehicle.
■When the vehicle is stopped by
system control during follow-up
cruising
●When the “+RES” switch is
pressed while the vehicle is
stopped by system control, if the
preceding vehicle starts off within
approximately 3 seconds, fol-
low-up cruising will resume.
●If the preceding vehicle starts off
within approximately 3 seconds of
the vehicle being stopped by sys-
tem control, follo w-up cruising will
resume.
■Automatic cancellation of vehi-
cle-to-vehicle d istance control
mode
In the following situations, vehi-
cle-to-vehicle dista nce control mode
will be canceled automatically:
●When the brake control or output
restriction control of a driving sup-
port system operates
(For example: Pre-Collision Sys-
tem, drive-start control)
●When the parking brake has been
operated
●When the vehicle is stopped by
system control on a steep incline
●When any of the following are
detected while the vehicle is
stopped by system control:
• The driver’s seat belt is unfas- tened
• The driver’s door is opened
• Approximately 3 minutes have elapsed since the vehicle was
stopped The parking brake
may be actived
automatically.
●Situations in which some or all of
the functions of the system cannot
operate: P. 1 8 9
■Dynamic radar cruise control
system warning messages and
buzzers
For safe use: P. 1 8 4
■Preceding vehicles that the sen-
sor may not detect correctly
In the following situations, depend-
ing on the conditions, if the system
cannot provide sufficient decelera-
tion or acceleration is necessary,
operate the brake pedal or accelera-
tor pedal.
As the sensor may not be able to
correctly detect th ese types of vehi-
cles, the approach warning
( P.226) may not operate.
●When a vehicle cuts in front of
your vehicle or changes lanes
away from your vehicle extremely
slowly or quickly
●When changing lanes
●When a preceding vehicle is driv-
ing at a low speed
●When a vehicle is stopped in the
same lane as the vehicle
●When a motorcycle is traveling in
the same lane as the vehicle
■Conditions under which the
system may not operate cor-
rectly
In the following situations, operate
the brake pedal (or accelerator
pedal, depending on the situation)
as necessary.
As the sensor may not be able to
correctly detect a vehicle, the sys-
tem may not operate properly.
●When a preceding vehicle brakes
suddenly
●When changing lanes at low
speeds, such as in a traffic jam
Page 247 of 468
2474-5. Using the driving support systems
4
Driving
approaches from behind your
vehicle at an angle
• When the vehicle is stopped at an
angle to the road
• When a vehicle or bicycle approaches from behind a parked
vehicle at an angle
• When a parked vehicle, wall, sign, person or other stationary object
is behind the vehicle
• When an approaching vehicle or bicycle suddenly changes direc-
tion
• When an approaching vehicle or bicycle is traveling along a station-
ary object, such a wall or sign
• When the trunk is open
• When a bicycle carrier, ramp, or other accessory is installed to the
back of the vehicle
• When a vehicle or bicycle is
approaching at high speed
• When towing with the vehicle
• When stopped on a steep slope
• When stopped on a curve or at the exit of a curve
*: If equipped
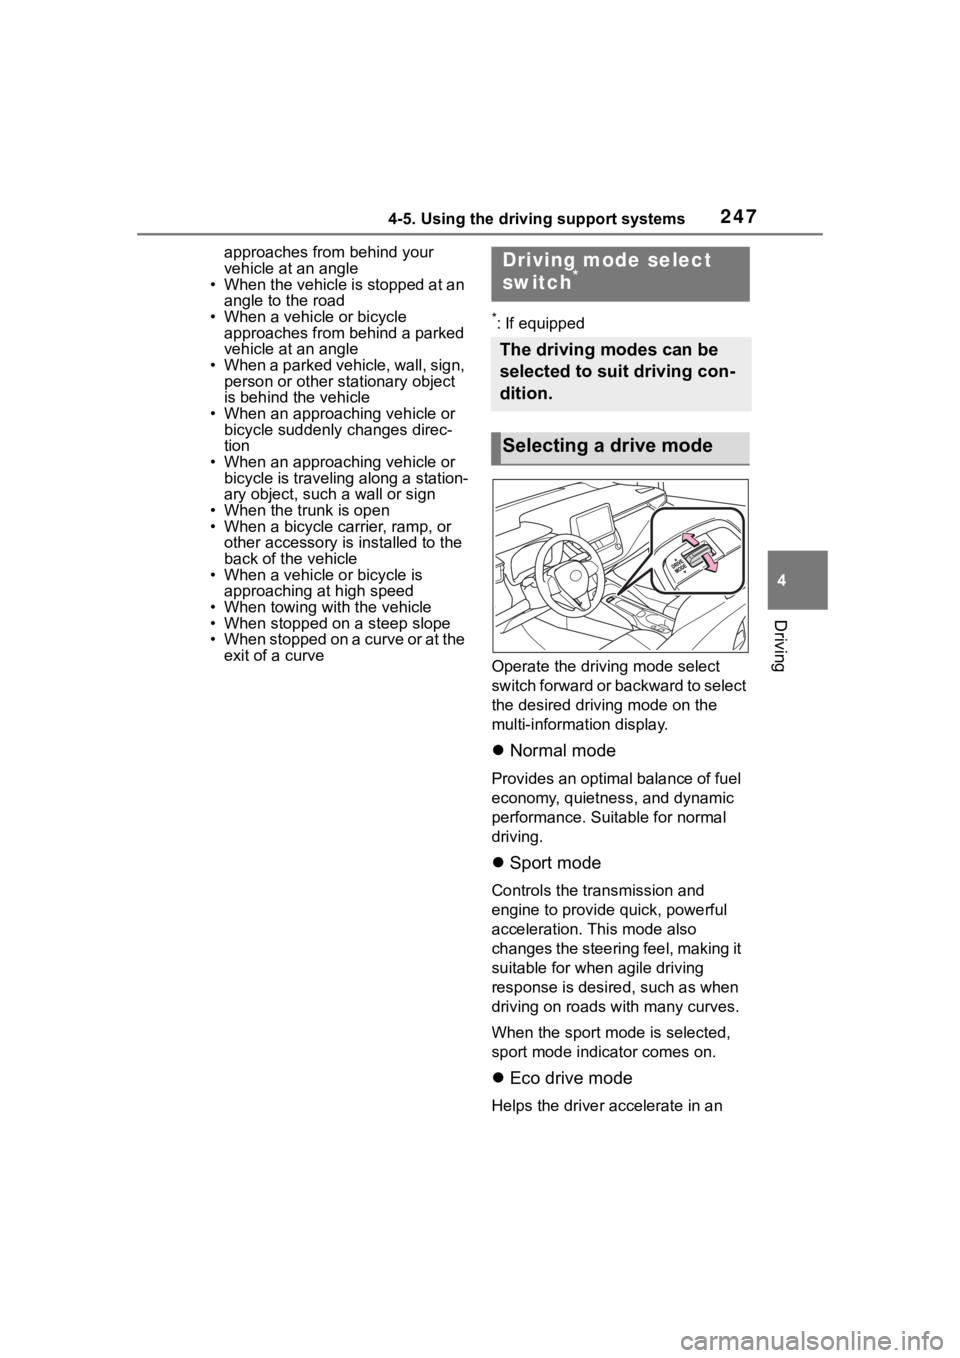
Operate the driv ing mode select
switch forward or backward to select
the desired driving mode on the
multi-information display.
Normal mode
Provides an optimal balance of fuel
economy, quietness, and dynamic
performance. Suitable for normal
driving.
Sport mode
Controls the transmission and
engine to provide quick, powerful
acceleration. This mode also
changes the steering feel, making it
suitable for when agile driving
response is desire d, such as when
driving on roads w ith many curves.
When the sport mode is selected,
sport mode indicator comes on.
Eco drive mode
Helps the driver accelerate in an
Driving mode select
switch*
The driving modes can be
selected to suit driving con-
dition.
Selecting a drive mode
Page 248 of 468
2484-5. Using the driving support systems
eco-friendly manner and improve
fuel economy through moderate
throttle characteristics and by con-
trolling the operation of the air con-
ditioning system (heating/cooling).
When the eco mode is selected,
eco drive mode indicator comes on.
■Operation of the air condition-
ing system in Eco drive mode
Eco drive mode c ontrols the heat-
ing/cooling operations and fan
speed of the air conditioning system
to enhance fuel efficiency. To
improve air conditioning perfor-
mance, perform t he following opera-
tions:
●Turn off eco air conditioning mode
( P.265)
●Adjust the fan speed ( P.264)
●Turn off Eco drive mode
■Automatic deactivation of sport
mode
If the engine switch is turned off
after driving in sport mode, the drive
mode will be chang ed to normal
mode.
■ABS (Anti-lock Brake Sys-
tem)
Helps to prevent wheel lock
when the brakes are applied
suddenly, or if the brakes are
applied while driving on a slip-
pery road surface
■Brake assist
Generates an increased level of
braking force after the brake
pedal is depressed when the
system detects a panic stop sit-
uation
■VSC (Vehicle Stability Con-
trol)
Helps the driver to control skid-
ding when swerving suddenly or
turning on slippery road sur-
faces.
Driving assist systems
To keep driving safety and
performance, the following
systems operate automati-
cally in response to various
driving situations. Be
aware, however, that these
systems are supplementary
and should not be relied
upon too heavily when oper-
ating the vehicle.
Summary of the driving
assist systems
Page 260 of 468

2605-1. Using the air conditioning system and defogger
switch.
■Defogging the rear window
and outside rear view mir-
rors
Vehicles without outside rear
view mirror defoggers
A defogger is used to defog the
rear window.
Press the rear window defogger
switch.
The defogger will automatically turn
off after a while.
When the rear window defogger
switch is on, the indicator illumi-
nates on the rear window defogger
switch.
Vehicles with outside rear
view mirror defoggers
Defoggers are used to defog the
rear window, and to remove
raindrops, dew and frost from
the outside rear view mirrors.
Press the rear window and out-
side rear view mirror defoggers
switch.
The defoggers will automatically
turn off after a while.
When the rear window and outside
rear view mirror defoggers switch is
on, the indicator illuminates on the
rear window and ou tside rear view
mirror defoggers switch.
■Fogging up of the windows
●The windows will easily fog up
when the humidity in the vehicle is
high. Turning “A/C” switch is on
will dehumidify the air from the
outlets and defog the windshield
effectively.
●If you turn “A/C” s witch is off, the
windows may fog up more easily.
●The windows may fog up if the
recirculated air mode is used.
■When driving on dusty roads
Close all windows. If dust thrown up
by the vehicle is still drawn into the
vehicle after closing the windows, it
is recommended that the air intake
mode be set to outside air mode and
the fan speed to a ny setting except
off.
■Outside/recirculated air mode
Setting to the recir culated air mode
temporarily is recommended in pre-
venting dirty air from entering the
vehicle interior and helping to cool
the vehicle when the outside air
temperature is high.
■When the outside temperature
falls to nearly 32°F (0°C)
The dehumidification function may
not operate even when “A/C” switch
is pressed.
■Ventilation and air conditioning
odors
●To let fresh air in, set the air condi-
tioning system to the outside air
mode.
●During use, various odors from
inside and outside the vehicle may
enter into and accumulate in the
air conditioning system. This may
then cause odor to be emitted
from the vents.
●It is recommended that the air
conditioning system be set to out-
side air mode prior to turning the
vehicle off.
●When parking, the system auto-
matically switches to outside air
mode to encourage better air cir-
culation throughout the vehicle,
helping to reduce odors that occur
when starting the vehicle.
■Air conditioning filter
P.331
Page 261 of 468
2615-1. Using the air conditioning system and defogger
5
Interior features
■Air conditioning system refrig-
erant
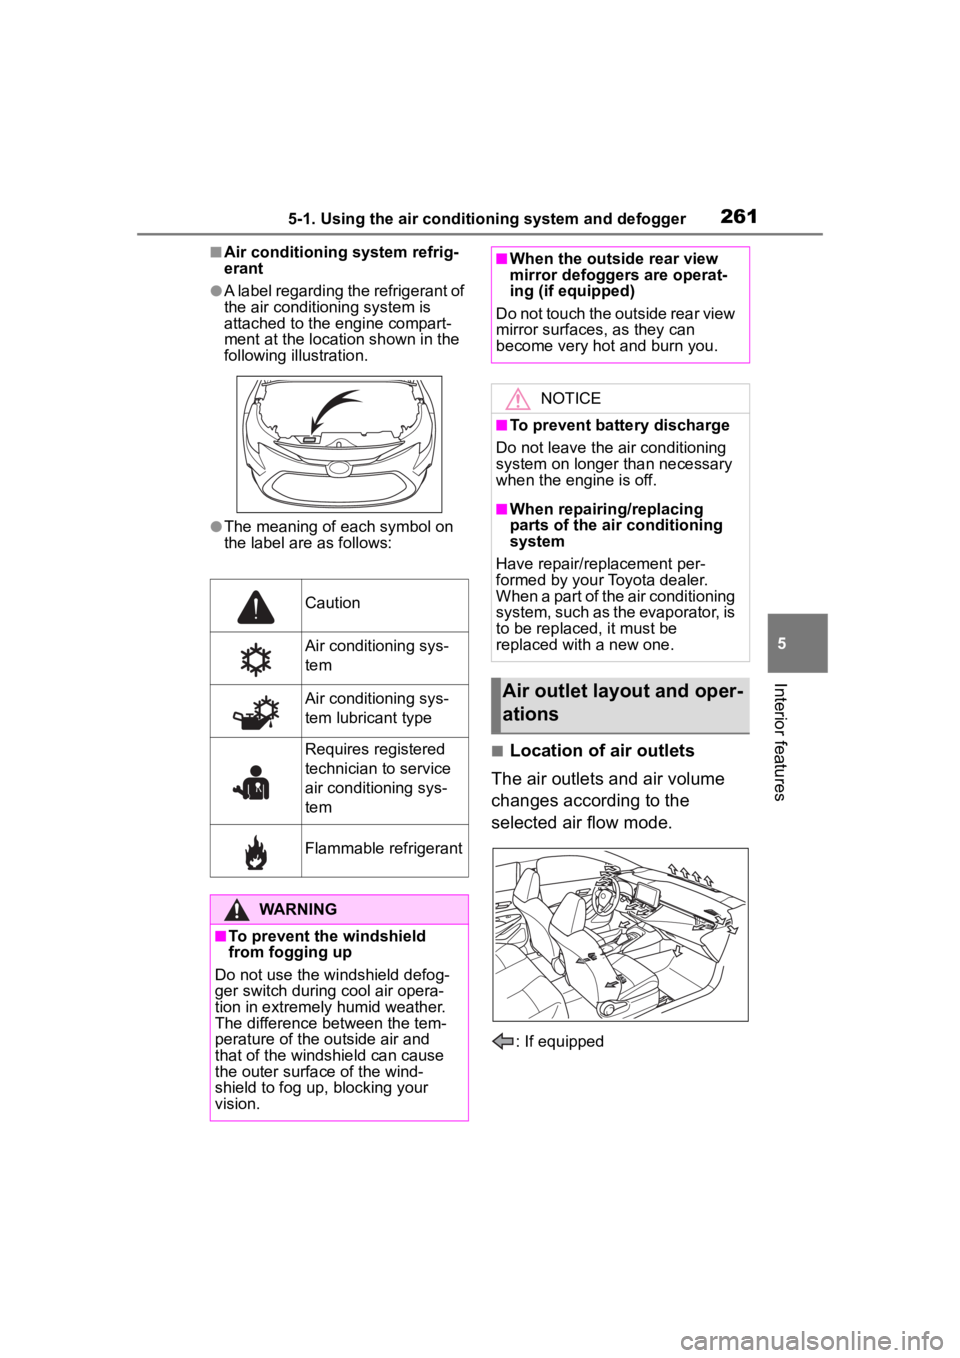
●A label regarding the refrigerant of
the air conditioning system is
attached to the engine compart-
ment at the location shown in the
following illustration.
●The meaning of each symbol on
the label are as follows:
■Location of air outlets
The air outlets and air volume
changes according to the
selected air flow mode.
: If equipped
Caution
Air conditioning sys-
tem
Air conditioning sys-
tem lubricant type
Requires registered
technician to service
air conditioning sys-
tem
Flammable refrigerant
WARNING
■To prevent the windshield
from fogging up
Do not use the windshield defog-
ger switch during cool air opera-
tion in extremely humid weather.
The difference between the tem-
perature of the outside air and
that of the windshield can cause
the outer surface of the wind-
shield to fog up, blocking your
vision.
■When the outside rear view
mirror defoggers are operat-
ing (if equipped)
Do not touch the outside rear view
mirror surfaces, as they can
become very hot and burn you.
NOTICE
■To prevent battery discharge
Do not leave the air conditioning
system on longer than necessary
when the engine is off.
■When repairing/replacing
parts of the air conditioning
system
Have repair/replacement per-
formed by your Toyota dealer.
When a part of the air conditioning
system, such as the evaporator, is
to be replaced, it must be
replaced with a new one.
Air outlet layout and oper-
ations
Page 263 of 468
2635-1. Using the air conditioning system and defogger
5
Interior features
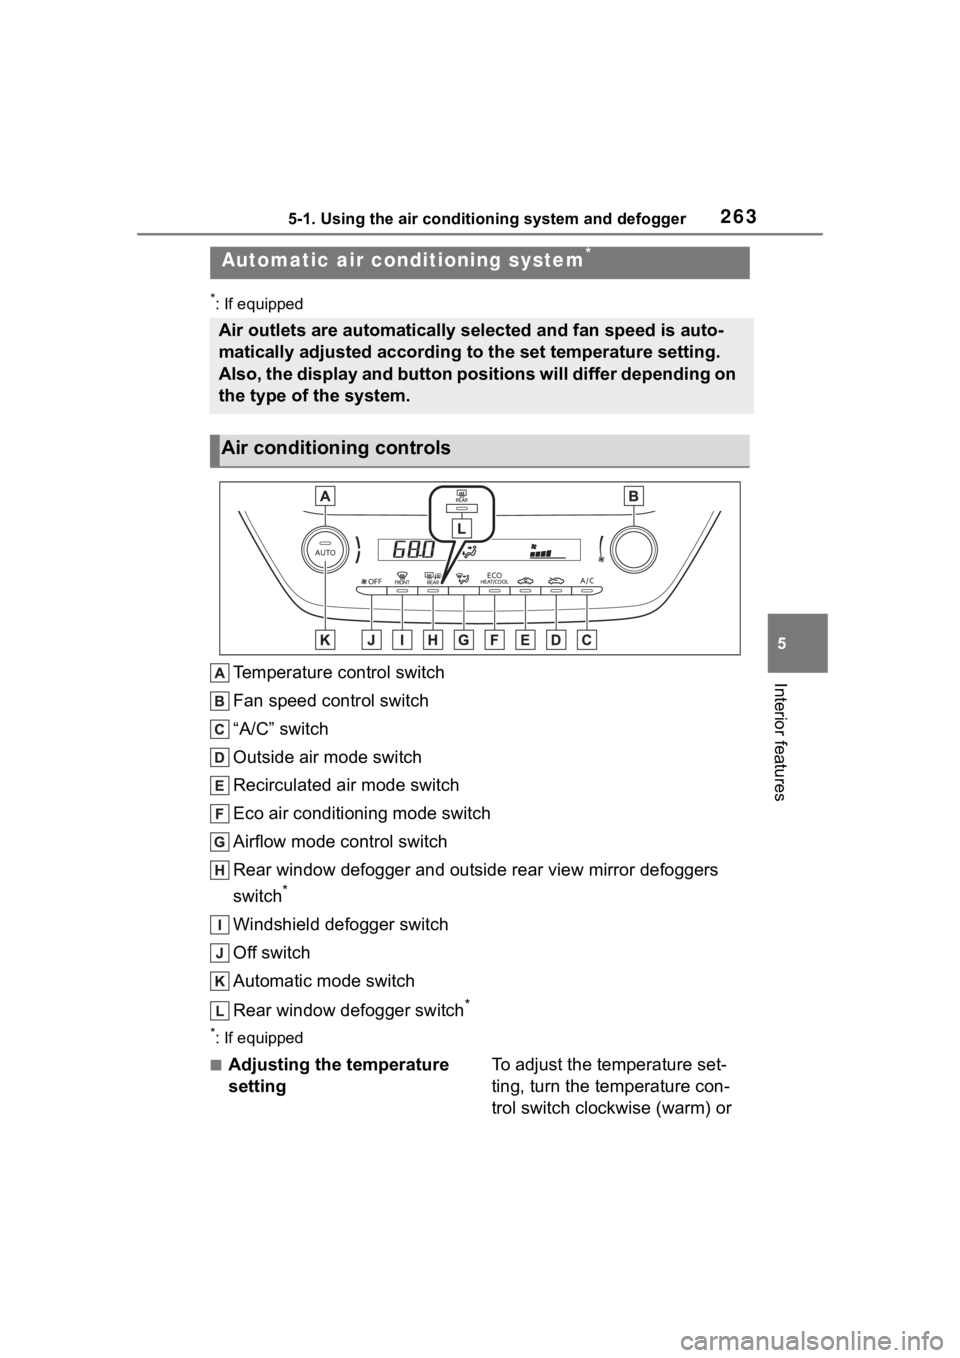
*: If equipped
Temperature control switch
Fan speed control switch
“A/C” switch
Outside air mode switch
Recirculated air mode switch
Eco air conditioning mode switch
Airflow mode control switch
Rear window defogger and outside rear view mirror defoggers
switch
*
Windshield defogger switch
Off switch
Automatic mode switch
Rear window defogger switch
*
*: If equipped
■Adjusting the temperature
settingTo adjust the temperature set-
ting, turn the temperature con-
trol switch clockwise (warm) or
Automatic air conditioning system*
Air outlets are automatically selected and fan speed is auto-
matically adjusted according to the set temperature setting.
Also, the display and button positions will differ depending on
the type of the system.
Air conditioning controls