2023 TOYOTA COROLLA change time
[x] Cancel search: change timePage 101 of 468
1012-1. Instrument cluster
2
Vehicle status information and indicators
Driving Indicator Light.
Fuel economy display
Select to change the average fuel
consumption display to any of the
following: trip average/total aver-
age/tank average. ( P. 9 8 )
Select to display/not display the
audio system linked display.
Select to change the displayed con-
tent of the following:
• Drive information type
Select to change the drive informa-
tion type display between trip infor-
mation/total information.
• Drive information items
Select to set the first and second
items of the drive information dis-
play to any of the following: aver-
age vehicle
speed/distance/elapsed time.
Pop-up display
Select to enable/disable pop-up
displays for each relevant system.
Multi-information display off
Select to turn the m ulti-information
display off.
To turn the multi-in formation display
on again, press any of the following
meter control switches
//// /.
Default setting
Select to reset the meter display
settings to the default setting.
■Vehicle functions and set-
tings that can be changed
P.412
■Suspension of the settings dis-
play
●Some settings cannot be changed
while driving. When changing set-
tings, park the vehicle in a safe
place.
●If a warning message is displayed,
operation of the settings display
will be suspended.
WARNING
■Cautions during setting up
the display
If the engine is running when
changing the dis play settings,
ensure that the vehicle is parked
in a place with adequate ventila-
tion. In a closed area such as a
garage, exhaust gases including
harmful carbon monoxide (CO)
may collect and enter the vehicle.
This may lead to death or a seri-
ous health hazard.
NOTICE
■During setting up the display
To prevent batte ry discharge,
ensure that the engine is running
while setting up the display fea-
tures.
Page 112 of 468
1123-2. Opening, closing and locking the doors
again within 3 seconds unlocks the
other doors.
Press and hold to open the win-
dows
*1and moon roof.*1, 2
*1
:This setting mu st be customized
at your Toyota dealer.
*2: If equipped
■Key
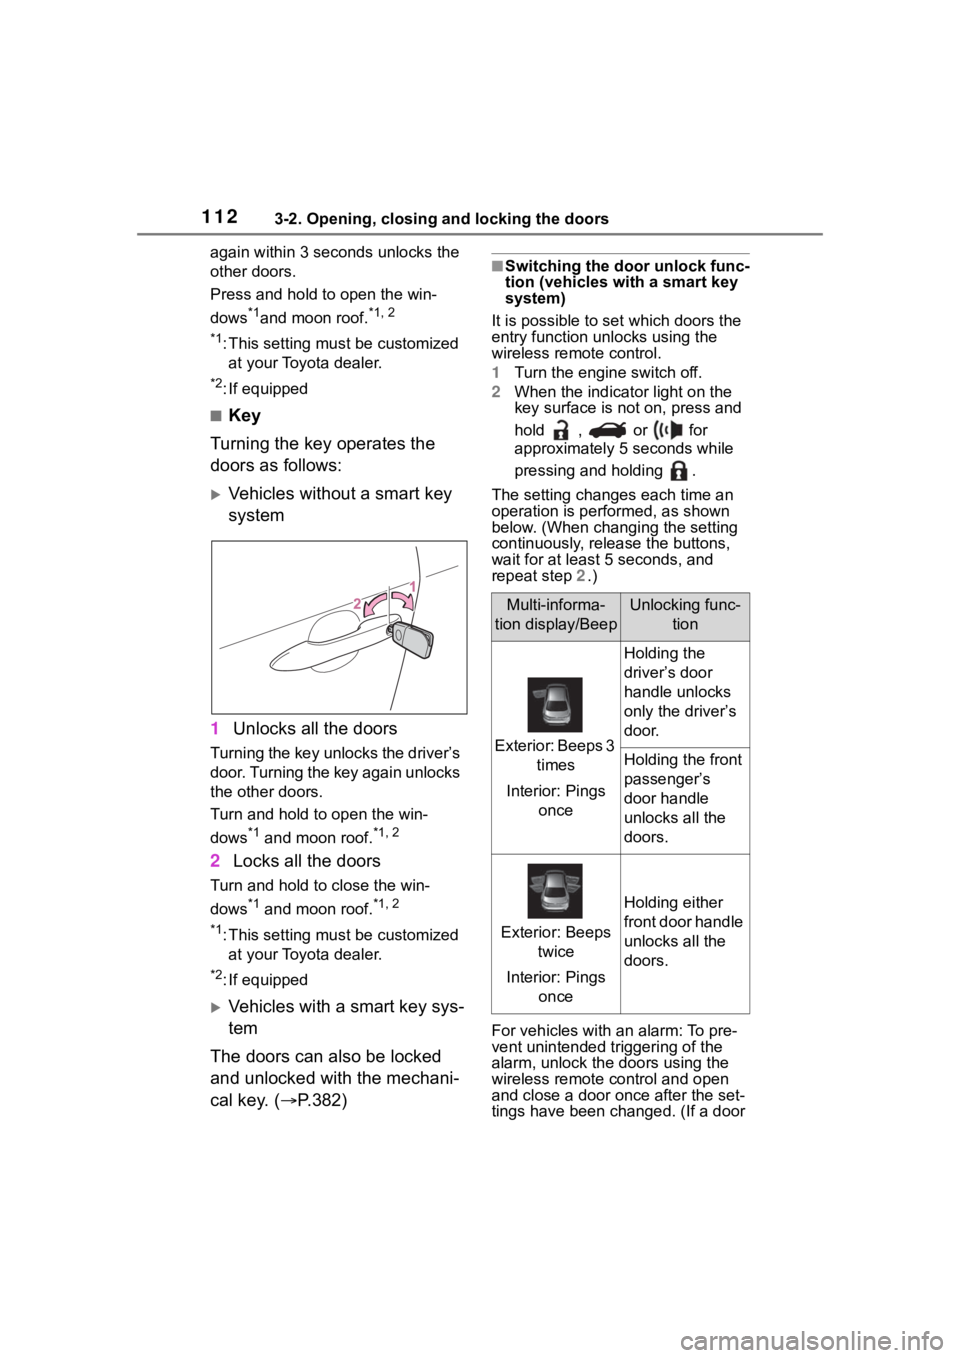
Turning the key operates the
doors as follows:
Vehicles without a smart key
system
1 Unlocks all the doors
Turning the key unlocks the driver’s
door. Turning the key again unlocks
the other doors.
Turn and hold to open the win-
dows
*1 and moon roof.*1, 2
2Locks all the doors
Turn and hold to close the win-
dows
*1 and moon roof.*1, 2
*1
:This setting mu st be customized
at your Toyota dealer.
*2: If equipped
Vehicles with a smart key sys-
tem
The doors can also be locked
and unlocked with the mechani-
cal key. ( P.382)
■Switching the door unlock func-
tion (vehicles with a smart key
system)
It is possible to set which doors the
entry function unlocks using the
wireless remote control.
1 Turn the engine switch off.
2 When the indicator light on the
key surface is not on, press and
hold , or for
approximately 5 seconds while
pressing and holding .
The setting changes each time an
operation is per formed, as shown
below. (When changing the setting
continuously, release the buttons,
wait for at least 5 seconds, and
repeat step 2 .)
For vehicles with an alarm: To pre-
vent unintended triggering of the
alarm, unlock the doors using the
wireless remote control and open
and close a door once after the set-
tings have been ch anged. (If a door
Multi-informa-
tion display/BeepUnlocking func- tion
Exterior: Beeps 3 times
Interior: Pings once
Holding the
driver’s door
handle unlocks
only the driver’s
door.
Holding the front
passenger’s
door handle
unlocks all the
doors.
Exterior: Beeps twice
Interior: Pings once
Holding either
front door handle
unlocks all the
doors.
Page 155 of 468
1554-2. Driving procedures
4
Driving
3ON ( “ON” position)
All electrical com ponents can be
used.
4 START ( “START” position)
For starting the engine.
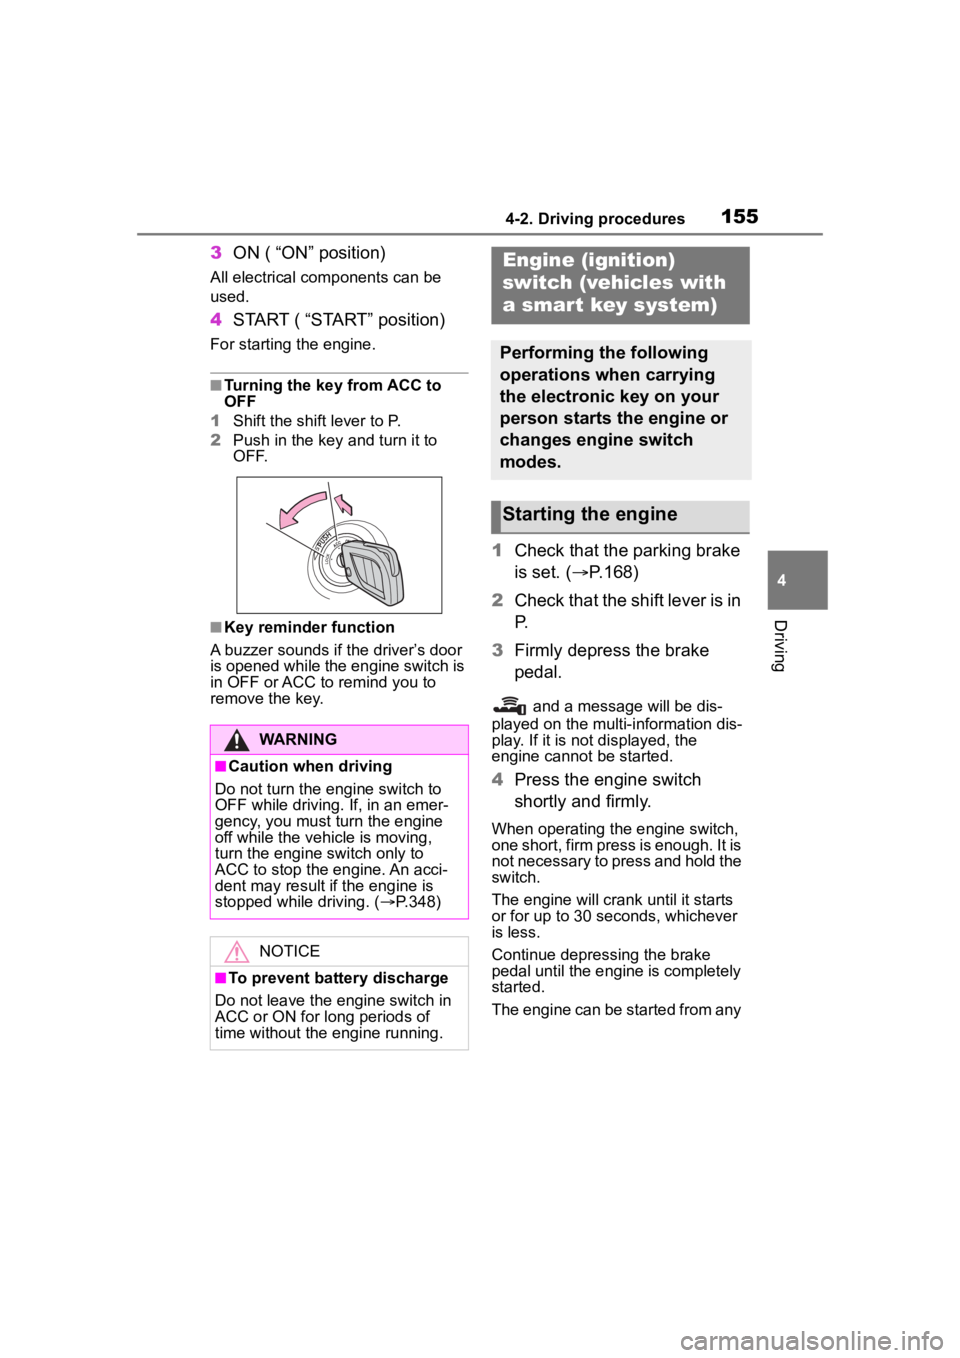
■Turning the key from ACC to
OFF
1 Shift the shift lever to P.
2 Push in the key and turn it to
OFF.
■Key reminder function
A buzzer sounds if the driver’s door
is opened while the engine switch is
in OFF or ACC to r emind you to
remove the key.
1 Check that the parking brake
is set. ( P.168)
2 Check that the shift lever is in
P.
3 Firmly depress the brake
pedal.
and a message will be dis-
played on the multi-information dis-
play. If it is not displayed, the
engine cannot be started.
4 Press the engine switch
shortly and firmly.
When operating the engine switch,
one short, firm press is enough. It is
not necessary to press and hold the
switch.
The engine will crank until it starts
or for up to 30 seconds, whichever
is less.
Continue depressing the brake
pedal until the engine is completely
started.
The engine can be started from any
WARNING
■Caution when driving
Do not turn the engine switch to
OFF while driving. If, in an emer-
gency, you must turn the engine
off while the vehicle is moving,
turn the engine switch only to
ACC to stop the engine. An acci-
dent may result i f the engine is
stopped while driving. ( P.348)
NOTICE
■To prevent battery discharge
Do not leave the engine switch in
ACC or ON for long periods of
time without the engine running.
Engine (ignition)
switch (vehicles with
a smar t key system)
Performing the following
operations when carrying
the electronic key on your
person starts the engine or
changes engine switch
modes.
Starting the engine
Page 158 of 468
1584-2. Driving procedures
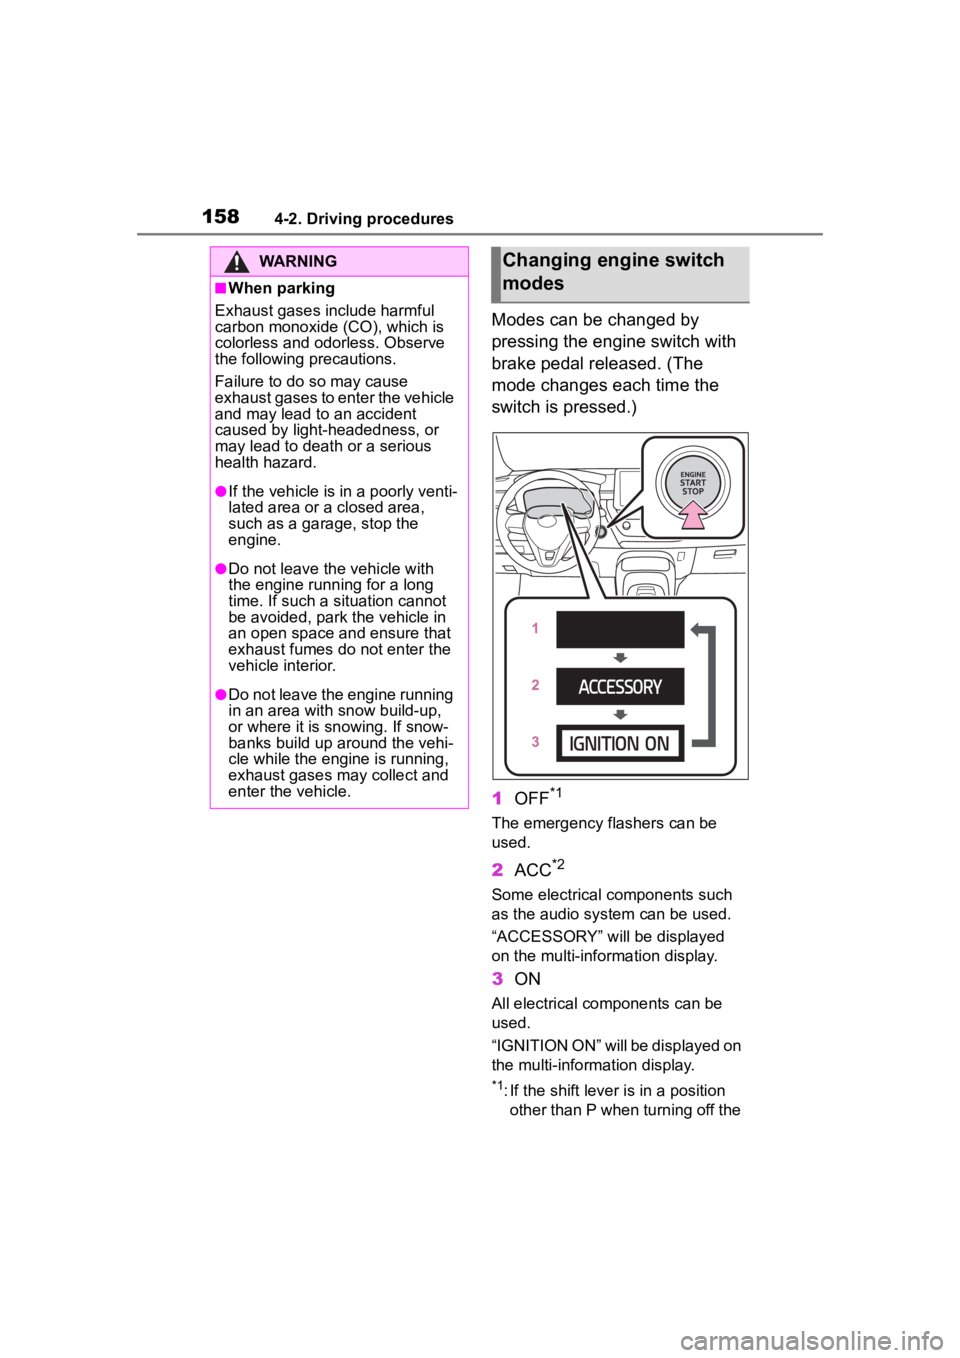
Modes can be changed by
pressing the engine switch with
brake pedal released. (The
mode changes each time the
switch is pressed.)
1OFF
*1
The emergency flashers can be
used.
2ACC*2
Some electrical components such
as the audio sys tem can be used.
“ACCESSORY” will be displayed
on the multi-information display.
3 ON
All electrical components can be
used.
“IGNITION ON” will be displayed on
the multi-information display.
*1: If the shift lever is in a position
other than P when turning off the
WARNING
■When parking
Exhaust gases include harmful
carbon monoxide (CO), which is
colorless and odorless. Observe
the following precautions.
Failure to do so may cause
exhaust gases to enter the vehicle
and may lead to an accident
caused by light-headedness, or
may lead to death or a serious
health hazard.
●If the vehicle is in a poorly venti-
lated area or a closed area,
such as a garage, stop the
engine.
●Do not leave the vehicle with
the engine running for a long
time. If such a situation cannot
be avoided, park the vehicle in
an open space and ensure that
exhaust fumes do not enter the
vehicle interior.
●Do not leave the engine running
in an area with snow build-up,
or where it is snowing. If snow-
banks build up around the vehi-
cle while the engine is running,
exhaust gases may collect and
enter the vehicle.
Changing engine switch
modes
Page 165 of 468
1654-2. Driving procedures
4
Driving
range higher than the current
range.
Changing the shift range allows
restriction of the highest gear,
preventing unnecessary upshift-
ing and enabling the level of
engine braking force to be
selected.
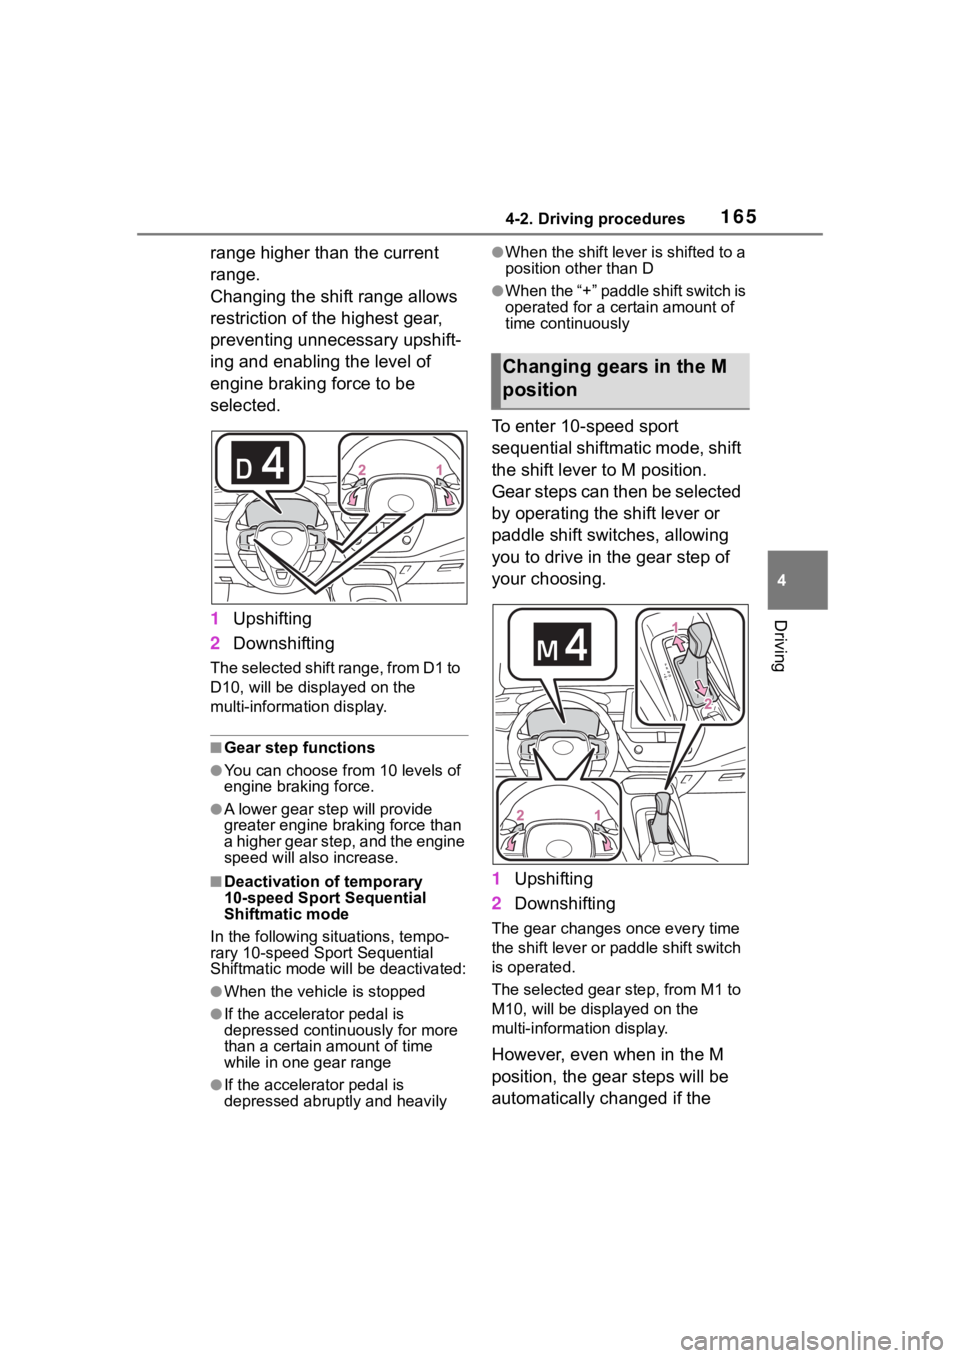
1Upshifting
2 Downshifting
The selected shift range, from D1 to
D10, will be dis played on the
multi-information display.
■Gear step functions
●You can choose from 10 levels of
engine braking force.
●A lower gear s tep will provide
greater engine braking force than
a higher gear step, and the engine
speed will also increase.
■Deactivation of temporary
10-speed Sport Sequential
Shiftmatic mode
In the following situations, tempo-
rary 10-speed Sport Sequential
Shiftmatic mode will be deactivated:
●When the vehicle is stopped
●If the accelerator pedal is
depressed continuously for more
than a certain amount of time
while in one gear range
●If the accelerator pedal is
depressed abruptly and heavily
●When the shift lever is shifted to a
position other than D
●W h en th e “+ ” p ad dle sh ift sw itch is
operated for a certain amount of
time continuously
To enter 10-speed sport
sequential shiftmatic mode, shift
the shift lever to M position.
Gear steps can then be selected
by operating the shift lever or
paddle shift switches, allowing
you to drive in the gear step of
your choosing.
1Upshifting
2 Downshifting
The gear changes once every time
the shift lever or paddle shift switch
is operated.
The selected gear step, from M1 to
M10, will be dis played on the
multi-information display.
However, even when in the M
position, the gear steps will be
automatically changed if the
Changing gears in the M
position
Page 167 of 468

1674-2. Driving procedures
4
Driving
1Right turn
2 Lane change to the right
(move the lever partway and
release it)
The right hand signals will flash 3
times.
3Lane change to the left
(move the lever partway and
release it)
The left hand signals will flash 3
times.
4Left turn
■Turn signals can be operated
when
The engine switch is in ON.
■If the indicator flashes faster
than usual
Check that a light bulb in the front or
rear turn signal lights has not burned out.
Tur n signal lever
Operating instructions
Page 177 of 468

1774-3. Operating the lights and wipers
4
Driving
roundings. This may cause the
low beams to remain on or the
high beams to flash or dazzle
pedestrians or vehicles ahead. In
such a case, it is necessary to
manually change between the
high beams and low beams.
• When there are lights similar to headlights or tail li ghts in the sur-
rounding area
• When headlights or tail lights of vehicles ahead are turned off,
dirty, changing color, or not aimed
properly
• When the headlights are repeat-
edly changing between the high
beams and low beams.
• When use of the high beams is
inappropriate or when the high
beams may be flashing or daz-
zling pedestrians or other drivers.
• When the vehicle is used in an area in which vehicles travel on
the opposite side of the road of
the country for wh ich the vehicle
was designed, for example using
a vehicle designed for right-hand
traffic in a left-hand traffic area, or
vice versa
• When it is necessary to disable
the system: P. 1 8 4
• Situations in which the sensors may not operate properly: P. 1 8 8
■Temporarily reducing front
camera sensitivity (for the
U.S.A.)
The sensitivity o f the front camera
can be temporarily reduced.
1 Turn the engine switch off with
the following conditions met.
• The headlight switch is in the
or position.
• The headlight switch lever is in the low beam position.
• The automatic High Beam switch is on.
2 Press the engine switch to ON.
3 Within 60 seconds after perform-
ing step 2, push the headlight
switch lever to the high beam
position then pull it to the original position quickly 10 times, then
leave the lever in its original posi-
tion.
■Changing to the high
beams
Push the lever forward.
The Automatic High Beam indicator
will turn off and the high beam indi-
cator will turn on.
Pull the lever to its original position
to enable the Automatic High Beam
system again.
■Changing to the low beams
Press the Automatic High Beam
switch.
The Automatic High Beam indicator
will turn off.
Press the switch to enable the
Automatic High Beam system
again.
Turning the high beams
on/off manually
Page 201 of 468

2014-5. Using the driving support systems
4
Driving
The pre-collision setting can
be changed on the customize
settings. ( P.412)
When the pre-collision warn-
ing timing is changed, the
emergency steering assist
(excluding the active steering
function) timing will also be
changed.
When "Later" is selected, the
emergency steering assist
(excluding the active steering
function) will not operate in
most cases.
When the dynamic radar
cruise control is operating, the
pre-collision warning will
operate at the “Earlier” timing,
regardless of the user setting.
When driving on a road with
clear lane lines with the
dynamic radar cruise control
operating, lane lines and pre-
ceding and surrounding vehi-
cles are detected using the
front camera and radar sen-
sor, and the steering wheel is
operated to maintain the vehi-
cle’s lane position.
Use the this function only on high-
ways and expressways.
If the dynamic radar cruise control
is not operating, the function will not
operate.
In situations where the lane lines
are difficult to see or are not visible,
such as when in a traffic jam, sup-
port will be provided using the path
of preceding and surrounding vehi-
cles.
If the system determines that the
steering wheel has not been oper-
ated for a certain amount of time or
the steering wheel is not being
firmly gripped, the driver will be
alerted via a display and this func-
tion will be temporarily canceled.
If the steering wheel is firmly
gripped, the func tion will begin
operating again.
LTA (Lane Tracing
Assist)
LTA functions